All posts by Baljit S.

A Plugin Update Broke Your WooCommerce Checkout? The Safe Update Playbook

It’s Monday morning. Weekend sales look oddly quiet. You try a test purchase and the checkout spins forever, or shows a blank error, or the Place order button does nothing at all.

You check the plugin list. Three plugins auto-updated on Friday night.

This is one of the most common and most expensive things that happens to WooCommerce stores, and it’s rarely discussed honestly. The update itself usually takes a few minutes to fix. The real cost is the hours or days between the break and someone noticing. During that time your ads keep running, your emails keep sending people to a dead checkout, and every visitor who tries to buy leaves.

This guide covers two things: how to recover quickly when an update has already broken checkout, and how to update in a way that makes it almost impossible to lose a weekend again.

Why updates break checkout in particular

Checkout is the most fragile page on a WooCommerce store because it’s where everything meets:

  • your theme (templates, scripts, styles)
  • WooCommerce itself (classic shortcode or block-based checkout)
  • the payment gateway plugin and its JavaScript
  • shipping, tax, coupon and fee plugins that change totals
  • checkout field editors, address validators and upsell plugins
  • caching and optimization plugins that combine, defer or delay scripts
  • security plugins and CAPTCHAs that intercept requests

An update to any one of them can break the interaction with another. A few patterns cause most incidents:

  1. JavaScript errors. One plugin’s updated script throws an error, and everything after it stops running, including the payment form.
  2. Optimization plugins delaying or combining a gateway’s script so the card field never loads.
  3. Template overrides. Your theme overrides a WooCommerce template that changed, leaving the checkout using an outdated version.
  4. Block vs classic mismatches. An extension supports one checkout type but not the other.
  5. PHP fatal errors on the checkout or the Store API endpoint after a PHP or plugin version jump.
  6. Payment gateway changes that require new settings, new webhooks or reconnection.

What merchants report

Browse r/woocommerce or the WordPress.org support forums and the same stories repeat:

  • “Checkout spinner never stops after update.” Usually a JavaScript error in one plugin stopping the payment script.
  • “Card field disappeared.” Frequently an optimization plugin delaying or combining the gateway’s script.
  • “Customers can pay but no order is created.” A fatal error after payment, or a webhook endpoint broken by a security plugin update.
  • “Block checkout broke but the classic shortcode works.” An extension that doesn’t yet support the Store API that block checkout relies on.
  • “It only fails for logged-in customers” (or only on mobile, or only for one payment method). That’s the hardest kind to spot, because the owner’s own quick test passes.

The common thread is that the store owner discovered the problem from customers or from falling sales, not from any tool. That’s the gap worth closing.

The silent part

Here’s why these incidents last so long. When checkout breaks, almost nothing looks broken:

  • The home page loads, so your uptime monitor stays green.
  • Product pages load, so casual checks look fine.
  • Traffic continues, so analytics looks normal at a glance.
  • No orders means no failed orders, so WooCommerce shows nothing unusual. It just shows… less.

The only signal is an absence: fewer orders than usual. Absences are hard for humans to notice, especially at weekends.

Already broken? Recover in this order

1. Confirm and capture the error (5 minutes)

  • Try checkout in a private window as a guest and as a logged-in customer.
  • Open your browser’s developer tools Console tab and note any red errors, especially ones naming a plugin.
  • Check WooCommerce → Status → Logs for fatal errors since the update.
  • Note which plugins, theme or WooCommerce version changed, and when (your host’s logs or the plugin list will show recent updates).

2. Restore sales first, diagnose second

Your priority is taking money again, not finding the perfect fix.

  • If you know which update caused it, roll that plugin back to the previous version (many hosts keep backups; some plugins offer rollback; you can also reinstall a previous version from the plugin’s WordPress.org page under Advanced View).
  • If you don’t know, restore the most recent pre-update backup of files and database if no orders have arrived since, or roll back the updated plugins one at a time.
  • If an optimization plugin is involved, exclude checkout and cart pages from script delay/combine features, or temporarily disable it.

3. Confirm with a real purchase

Place a real order with a real card (then refund it), or use a 100% coupon if your gateway supports zero-value orders. Confirm the order arrives as Processing, the confirmation email arrives, and the gateway shows the payment.

4. Measure the damage

Compare orders per day with the same days in previous weeks to estimate lost sales. Check for orders that did come through during the outage but are incomplete: stuck on Pending payment, missing emails, or duplicated by frustrated customers who tried several times. (See WooCommerce order stuck on pending payment.)

5. Tell affected customers

If abandoned-cart emails captured anyone, a short “sorry, our checkout had a problem, it’s fixed now” with a small discount often recovers a surprising number of sales.

What a silent outage really costs
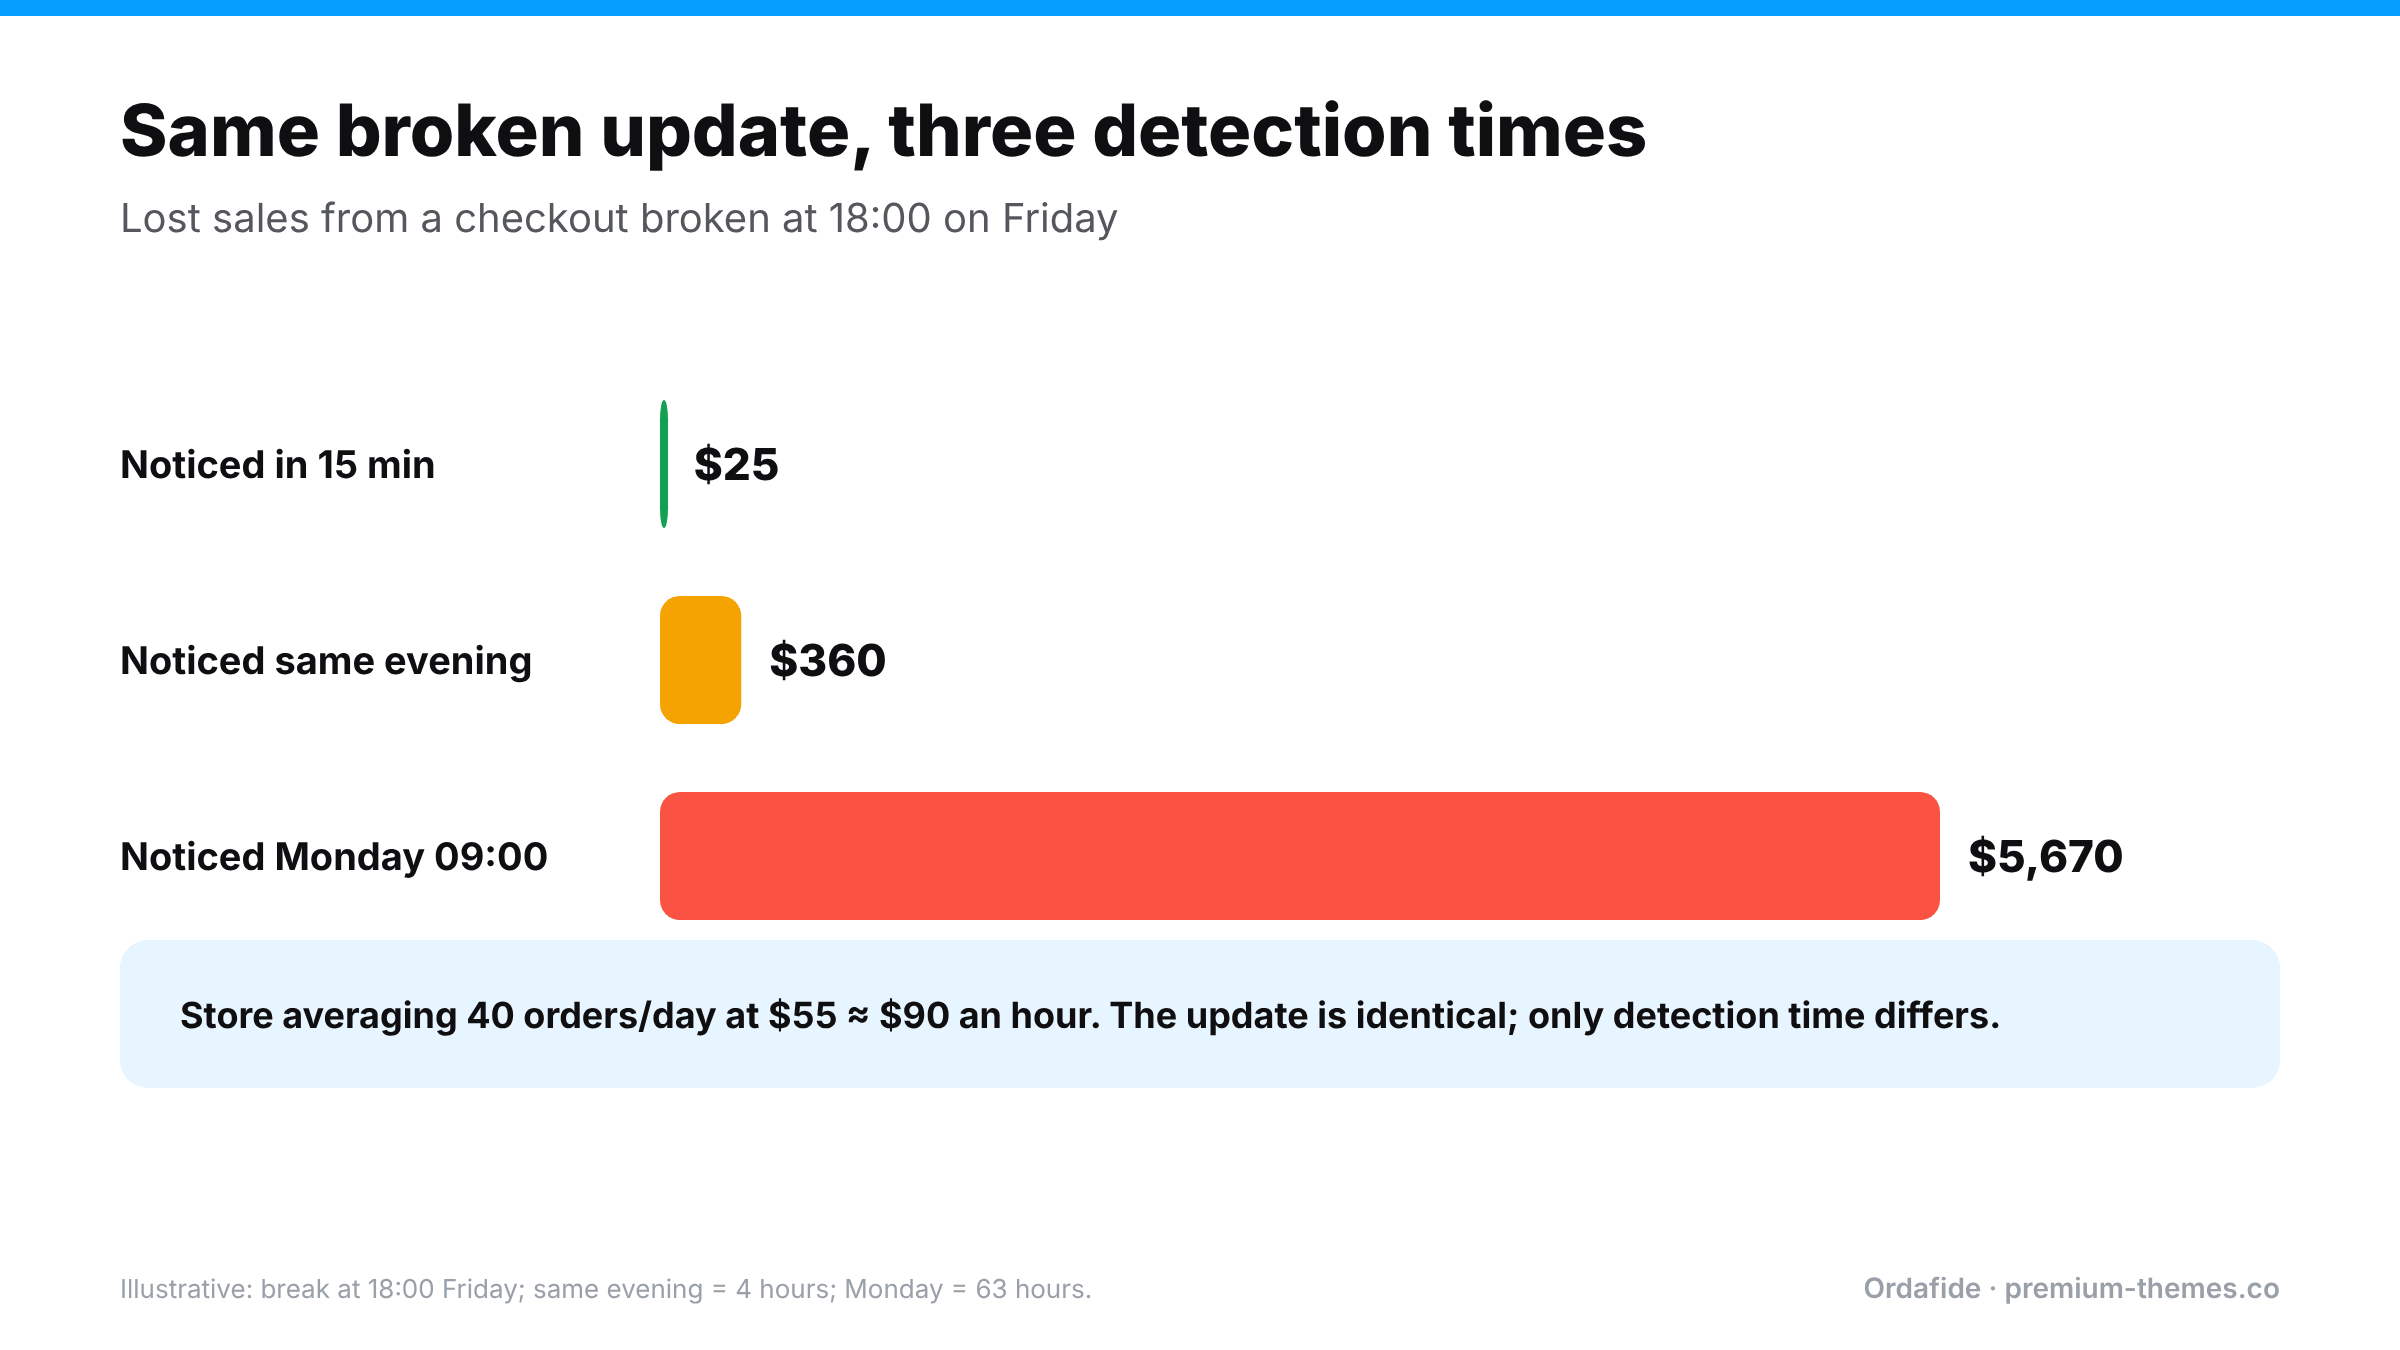
Bar chart of lost sales for the same broken checkout: about $25 if noticed in 15 minutes, $360 if noticed the same evening, and about $5,670 if noticed Monday morning after 63 hours, for a store making about $90 an hour.

It’s worth putting a number on this, because it changes how seriously teams treat updates.

Suppose your store averages 40 orders a day at $55 each: about $2,200 a day, or roughly $90 an hour. A plugin auto-updates at 18:00 on Friday and breaks the payment form. Nobody checks until 09:00 Monday. That’s 63 hours. At normal weekend volume you’ve lost something like $5,000–$6,000 in sales, plus the ad spend that sent people to a dead checkout, plus the customers who tried, failed, and won’t come back.

The same break noticed in 15 minutes costs about $25.

The update was identical in both cases. The only difference was detection time. That’s why the playbook below spends as much effort on noticing as on preventing.

A five-step test purchase script

Write this down and keep it where whoever updates the store can find it. Adapt the products and methods to your store.

  1. Product page: open your best-selling product in a private window. Choose a variation if it has one. Click Add to cart. Confirm the cart count changes.
  2. Cart: open the cart. Apply a coupon you keep for testing. Confirm the total updates and shipping options load for a typical address.
  3. Checkout: go to checkout. Confirm the payment form (card field, PayPal button, wallets) appears without console errors.
  4. Pay: complete payment with your normal method (refund afterwards), or with your test coupon set to 100% if your gateway supports zero-value orders.
  5. After: confirm the order is Processing, the customer email arrives, the admin email arrives, and the gateway shows the payment.

If you sell to logged-in customers or use several payment methods, repeat steps 3–5 for the most-used variations. The whole thing takes five minutes, and it’s the cheapest insurance a store can buy.

The safe update playbook
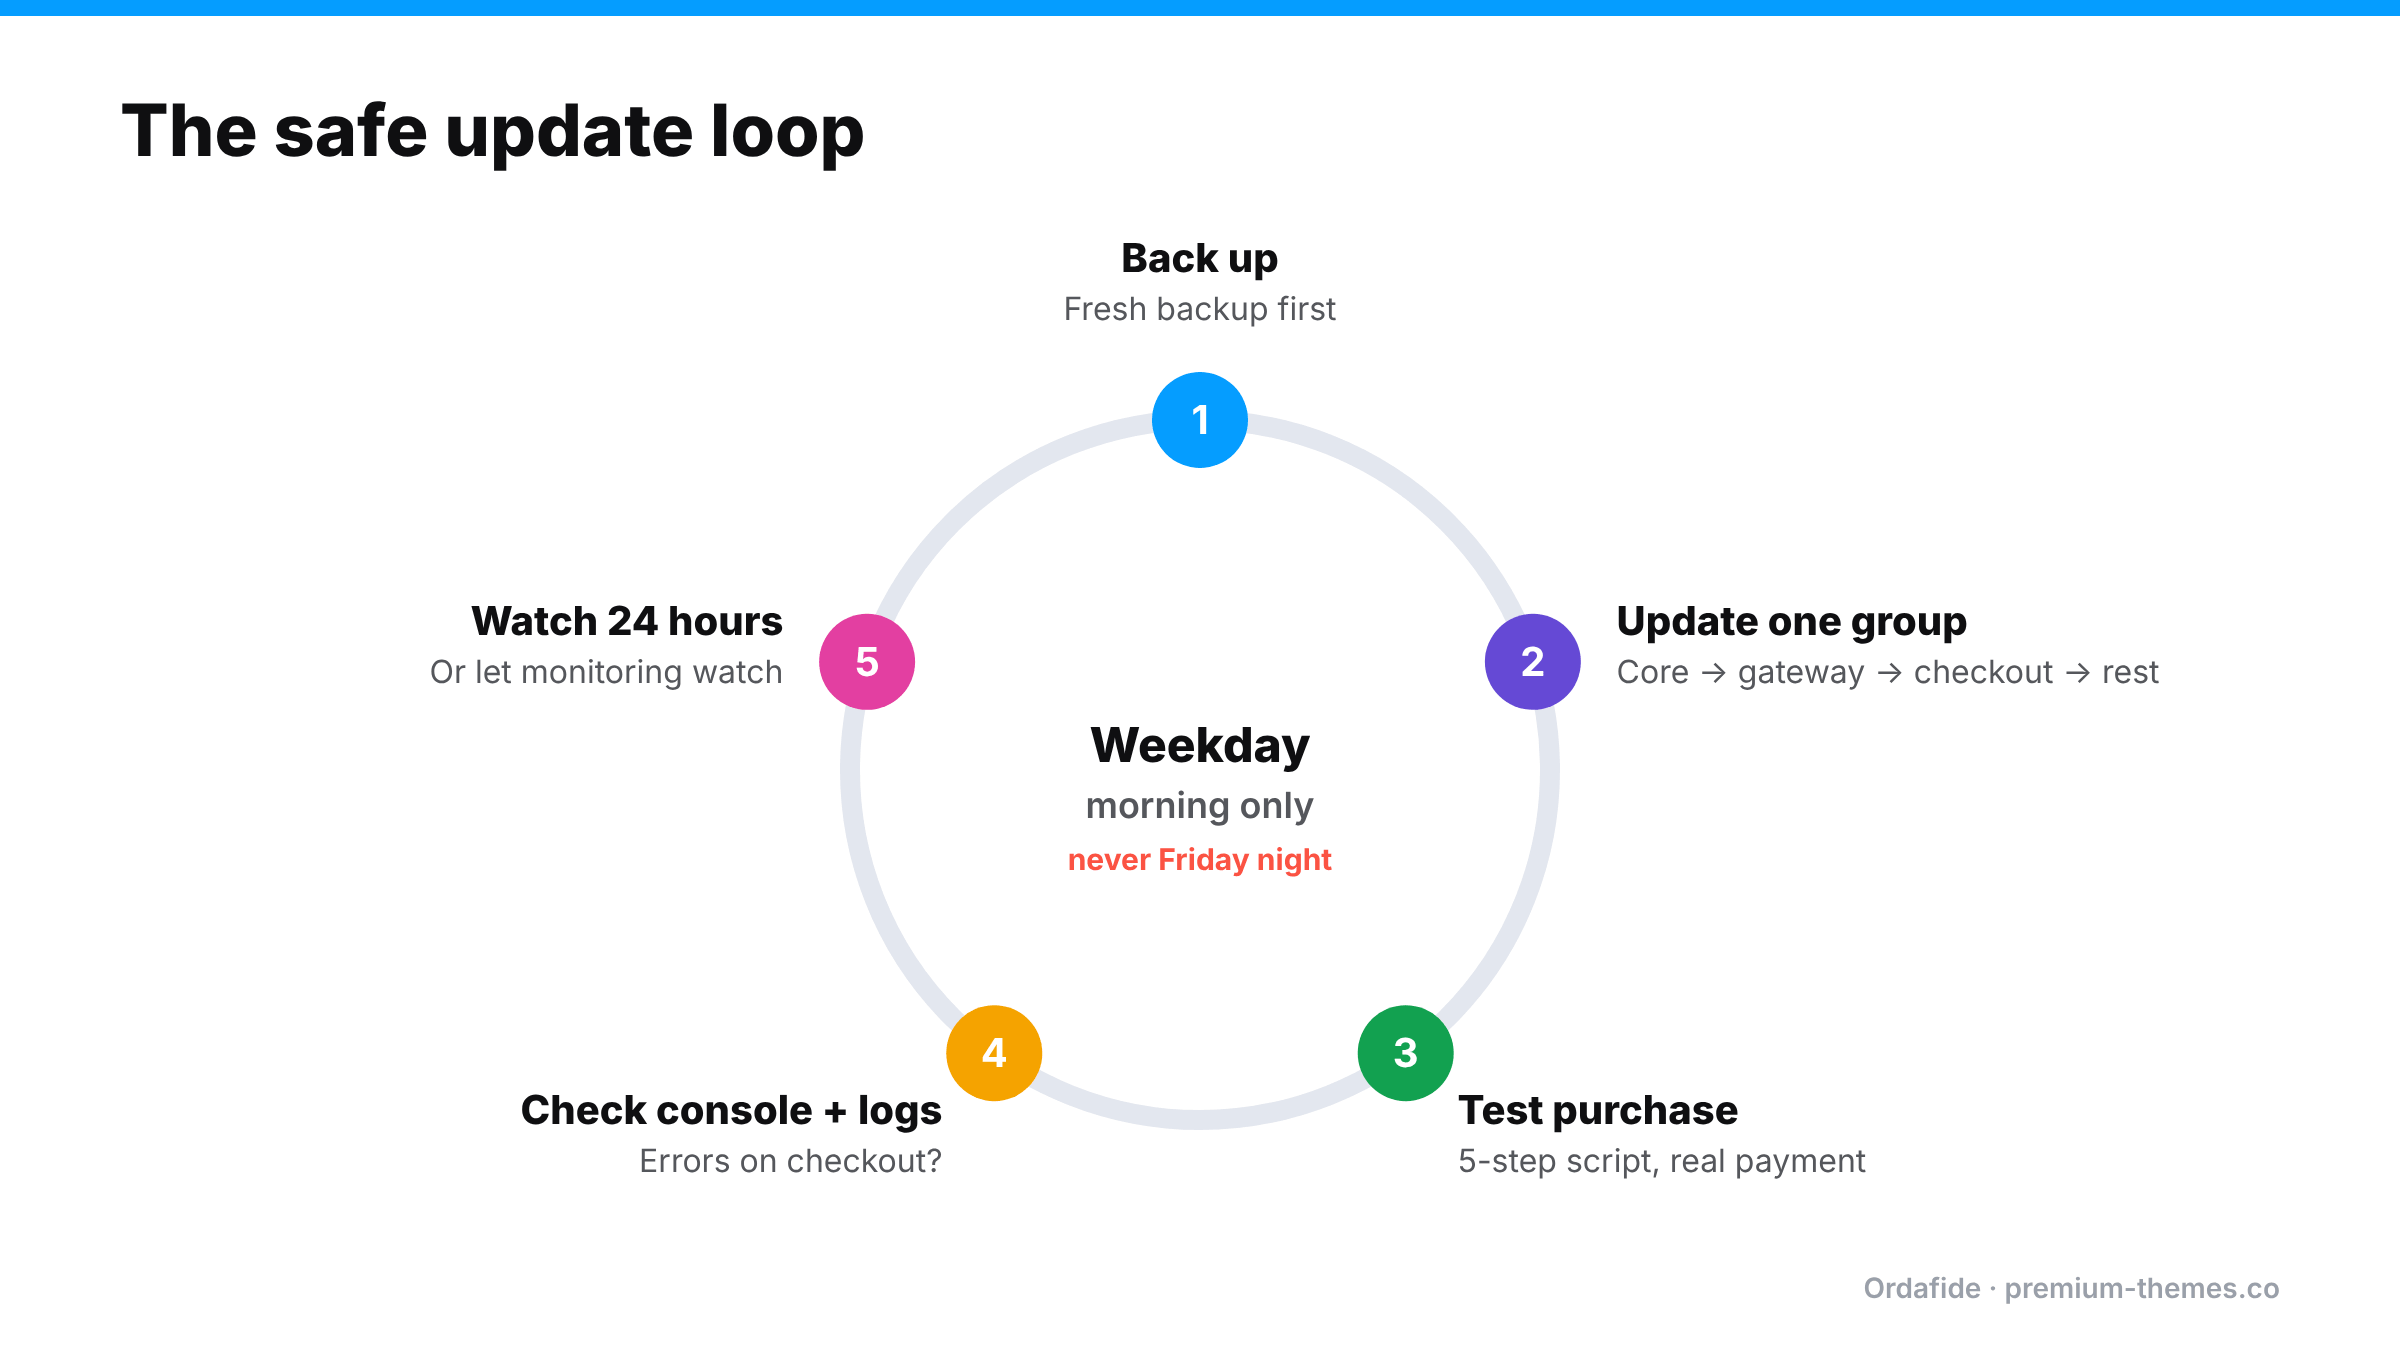
Cycle of five steps repeated for each group of updates: back up, update one group (core, gateway, checkout plugins, the rest), run a test purchase, check the browser console and logs, and watch for 24 hours. Weekday mornings only, never Friday night.

The goal isn’t to stop updating. Outdated plugins are a security risk and accumulate bugs. The goal is to find breakage in minutes, on your schedule, not days later by accident.

Rule 1: Don’t let checkout-critical plugins auto-update unattended

Auto-updates are great for low-risk plugins. For WooCommerce itself, your theme, payment gateways, and anything that touches cart or checkout, update manually, on a weekday morning, when someone can test immediately. Never on Friday afternoon.

Rule 2: Stage first when you can

If your host offers one-click staging, update there first and run through the purchase flow. Use test payment keys on staging, never live ones.

Rule 3: Update one group at a time

Update WooCommerce core, then test. Then the gateway, then test. Then everything else. If something breaks, you know exactly which change caused it.

Rule 4: Back up immediately before updating

A fresh backup turns a disaster into a five-minute restore.

Rule 5: Run the same test purchase after every update

Write down a five-step test: add product → cart → checkout → pay → confirm order and email. Run it every time. Takes three minutes.

Rule 6: Watch the next 24 hours

Some breaks only affect certain browsers, payment methods, products or customer types. Keep an eye on orders and errors for a day after significant updates.

Rule 7: Have monitoring that notices for you

Rules 1–6 depend on people remembering. The last line of defence should be automatic: something that checks checkout on a schedule and notices when orders stop.

Automating the “notice” part with Ordafide Pro

Ordafide Pro is built for exactly the failure in this article: the store is up, but it has stopped taking money.

  • Synthetic checkout monitoring runs every 15 minutes, checking your shop, product, cart and checkout pages and the Store API used by block checkout, with response-time tracking. An optional deep mode adds a test product to a cart. It never places an order, so your data stays clean. A finding is raised only after two consecutive failures, so a single blip doesn’t wake anyone.
  • Order volume anomaly detection compares each hour’s orders with comparable past hours using median-based statistics and flags drops. That’s the absence-of-orders signal humans miss, and it catches breaks that a page check can’t see, such as a payment method failing silently for some customers.
  • Alerts go to Slack, SMS, email or a signed webhook (Discord, Teams, PagerDuty and others), with severity routing and throttling.
  • A signed heartbeat endpoint lets an external monitor confirm Ordafide’s own checks are still running, so you’d know if a broken update took the monitoring down too.

The free Ordafide plugin covers the aftermath. After any update, a scan finds the orders that slipped through badly: stuck payments, paid-but-cancelled orders, duplicate charges from frustrated customers retrying, order totals that no longer add up (common when a coupon, tax or fee plugin misbehaves), and paid customers who never got a confirmation email. It also reports the health of the background job queue, which some updates quietly break.

Your update-day checklist

Before

  • [ ] It’s a weekday morning, and someone is available for a few hours
  • [ ] Fresh backup taken
  • [ ] Changelogs skimmed for WooCommerce, gateway and checkout plugins
  • [ ] Staging updated and tested first (if available)

During

  • [ ] Update in groups: core → gateway → checkout-related → the rest
  • [ ] Test purchase after each group
  • [ ] Browser console checked for errors on checkout

After

  • [ ] Real or zero-value order placed, email received, gateway checked
  • [ ] Ordafide scan run for stuck, duplicate or mis-totalled orders
  • [ ] Orders watched for 24 hours (or monitoring/alerts confirmed active)

WooCommerce Card Testing Attack: How to Spot It, Stop It and Clean Up Afterwards

You open WooCommerce in the morning and the orders list is unrecognizable. Hundreds of new orders arrived overnight, almost all of them Failed. They’re for the cheapest product you sell. The names look random, the email addresses are nonsense, and the billing addresses don’t match anything.

Then your payment gateway emails you about unusual activity.

This is a card testing attack, and it’s one of the most common complaints in WooCommerce communities. Threads with titles like “Spam orders, at my wits’ end” turn up regularly on r/woocommerce and the WordPress.org forums. It’s unsettling, but it’s well understood, and there’s a clear playbook for stopping it.

What card testing is (and why your store was chosen)

Criminals buy stolen card numbers in bulk. Many of those cards are already cancelled or blocked. Before they use or resell them, they need to know which ones still work. The cheapest way to find out is to attempt small purchases on real stores and see which payments go through.

Your store wasn’t chosen because of anything you sell. It was chosen because it:

  • has a cheap product (a low-value charge attracts less attention),
  • has a checkout that can be scripted (no CAPTCHA, no rate limiting),
  • uses a major gateway whose responses are easy to interpret.

WooCommerce’s developer blog has noted that attackers have targeted the WooCommerce Store API directly: the REST endpoints behind the block-based cart and checkout. This works even on stores that don’t use the Checkout block, because the endpoints exist on every modern WooCommerce install. Bots skip your checkout page entirely and talk straight to the API.

Why it matters even though the orders “failed”

It’s tempting to think failed orders are harmless. They aren’t:

  • Gateway fees. Some gateways charge per authorization attempt or for fraud screening, even when the payment fails.
  • Account risk. A flood of declines looks bad to your gateway. Stripe and others may restrict or review your account, and in serious cases pause payouts.
  • Disputes later. Some test charges succeed. When real cardholders spot them, they dispute them, and you pay a dispute fee (Stripe charges $15 per dispute in the US, win or lose) on top of refunding.
  • Polluted data. Hundreds of junk orders distort your reports, analytics and stock reservations.
  • Emails. Depending on your settings, failed-order emails can flood your admin inbox.
  • Server load. Thousands of checkout requests can slow the site for real customers.

Recognizing the signature

Illustrative bar chart of orders per hour over a day: normal low volume, then a huge overnight spike between 1 and 7 a.m., mostly failed orders with a few successful. Signature: sudden spike, mostly failed, cheapest product, random names and guest checkouts.

Card testing has a very recognizable pattern:

Signal What you’ll see
Volume A sudden spike, often overnight, far above your normal hourly order count
Status Mostly Failed, with a few Processing (the cards that worked)
Products The cheapest item, or a single low-priced product over and over
Customer details Random or mismatched names, emails and addresses; often guest checkouts
Payment notes Declines with reasons like card declined, incorrect CVC, insufficient funds
Origin Many different IPs, or bursts from data-centre ranges
Timing Requests seconds apart, at hours your real customers don’t shop

If you see most of the first four, assume it’s card testing and act now. You can confirm the details later.

What an attack looks like hour by hour

Attacks vary, but a typical overnight incident on a small store runs something like this:

  • 01:40: The first few orders arrive for a $3 product. Two fail with card declined, one succeeds. Nobody notices: it’s the middle of the night, and three orders is unremarkable.
  • 02:00–03:00: The bot speeds up once it’s confirmed the checkout can be scripted. Dozens of attempts an hour, mostly failures, from rotating IP addresses.
  • 03:00–07:00: Hundreds of attempts. The admin email inbox fills with failed-order notifications. Your gateway’s risk systems start to notice.
  • 07:30: You wake up to the inbox, the orders list, and perhaps an email from your gateway.

Every hour between 01:40 and 07:30 was another batch of stolen cards validated on your store, another set of potential disputes, and another notch against your account’s risk profile. Shortening that window is the single biggest thing you can do to reduce the damage.

Common mistakes when responding

  • Deleting the orders before refunding the successful ones. You lose the easiest list of charges to refund. Export first, refund, then clean up.
  • Refunding in the gateway dashboard only. It works for the money, but WooCommerce still shows paid orders, which distorts reports and can leave orders in Processing to be shipped. Refund from the WooCommerce order where you can.
  • Blocking by country or IP only. Attackers rotate IPs and use proxies in your own country. Use it as a supplement, not a fix.
  • Turning off the gateway entirely. It stops the attack, but it also stops real customers. CAPTCHA and rate limiting usually let you stay open.
  • Assuming it’s over because it stopped. Attackers often pause and return. Keep defences on.

Stop it: the immediate response (first hour)

Five defence layers: detect fast with order volume spike alerts; gateway fraud rules; Store API rate limiting (off by default); a CAPTCHA that covers the Store API and block checkout; and a web application firewall at the edge. No single layer is enough.

1. Put friction in front of checkout

Turn on a CAPTCHA that protects the checkout and the Store API. This matters. WooCommerce’s developer team found that some CAPTCHA plugins didn’t protect the Checkout block or Store API, so bots skipped them entirely, and worked with several plugin authors to patch them. Make sure your CAPTCHA plugin is up to date and explicitly supports block checkout and the Store API.

2. Enable Store API rate limiting

WooCommerce includes rate limiting for the Store API, but it’s off by default. Developers can enable and configure it with the `woocommerce_store_api_rate_limit_options` filter. WooCommerce 9.6 added stricter rules for the place-order endpoint that can be configured from the admin, and 9.8 added a filter for using a custom fingerprint rather than IP address. If your store sits behind a proxy or CDN, enable proxy mode so you don’t rate-limit all your real customers as one IP.

3. Tighten your gateway’s fraud rules

In Stripe, review Radar rules: block payments where the CVC or postcode check fails, and consider blocking or reviewing high-risk payments. Other gateways have equivalent risk settings. Tell your gateway’s support team you’re under attack. They see this daily.

4. Block obvious sources at the edge

If your host or CDN offers a WAF, add rules or challenges for the checkout and Store API paths, and block data-centre ranges if the attack comes from them.

5. Temporarily hide the target

If the attack hammers one cheap product, temporarily raise its price, set it to private, or require login for checkout until defences are in place.

Clean up afterwards

  1. Refund any successful test charges. Find the few Processing orders that match the attack pattern, verify them against the gateway, and refund them through the WooCommerce order (so both systems record it). Proactively refunding is cheaper than fighting the disputes that will otherwise arrive.
  2. Restore stock. Check that cancelled or failed junk orders aren’t still holding stock.
  3. Delete or trash the junk orders once refunded, so they stop polluting reports. Export a list first for your records.
  4. Check customer accounts. If the attack created accounts, remove them.
  5. Tell your gateway what you’ve done. It helps your account standing.
  6. Review your email settings so a future attack doesn’t flood your inbox.

What to tell your payment gateway

Gateways deal with card testing constantly, and a clear, early message from you helps both your account standing and their response. Include:

  • When it started and whether it’s still going
  • Roughly how many attempts and how many succeeded
  • Which product was targeted and its price
  • What you’ve done: CAPTCHA enabled, rate limiting on, fraud rules tightened, successful charges refunded
  • A request for any account-level protections they can add while things settle

Keep a copy. If your account is later reviewed because of the spike in declines, a record showing you acted quickly and responsibly is useful.

It’s also worth asking whether your gateway offers built-in card-testing protection you haven’t switched on. Several gateways and payment plugins now include specific protections against bursts of low-value attempts, and they’re often off by default or tucked away in advanced settings.

Prevent the next one

  • Keep CAPTCHA and rate limiting on permanently. Attackers return to stores that worked once.
  • Keep WooCommerce updated. Store API protections have improved release by release.
  • Watch your order volume. The earlier you notice an attack, the fewer cards get tested on your store and the smaller the clean-up.
  • Set up alerts. An attack that starts at 2 a.m. shouldn’t run until 9 a.m.

That last point is the one most stores miss. Every defence above is something you turn on after you notice. The size of the damage depends almost entirely on how long the attack runs before someone sees it.

Seeing an attack within the hour, not the morning after

Ordafide Pro includes order volume anomaly detection. Every hour, it compares the current hour’s order count with comparable past hours, using median-based statistics so that genuinely busy periods like a sale don’t distort the baseline. It flags both spikes, the typical shape of a card testing burst, and drops, which usually mean checkout is broken. Findings resolve themselves when volume returns to normal.

Combined with Pro’s alerts (Slack, SMS via Twilio, email, or a signed webhook into Discord, Microsoft Teams or PagerDuty), with severity routing and throttling, an overnight spike becomes a message on your phone while the attack is still small.

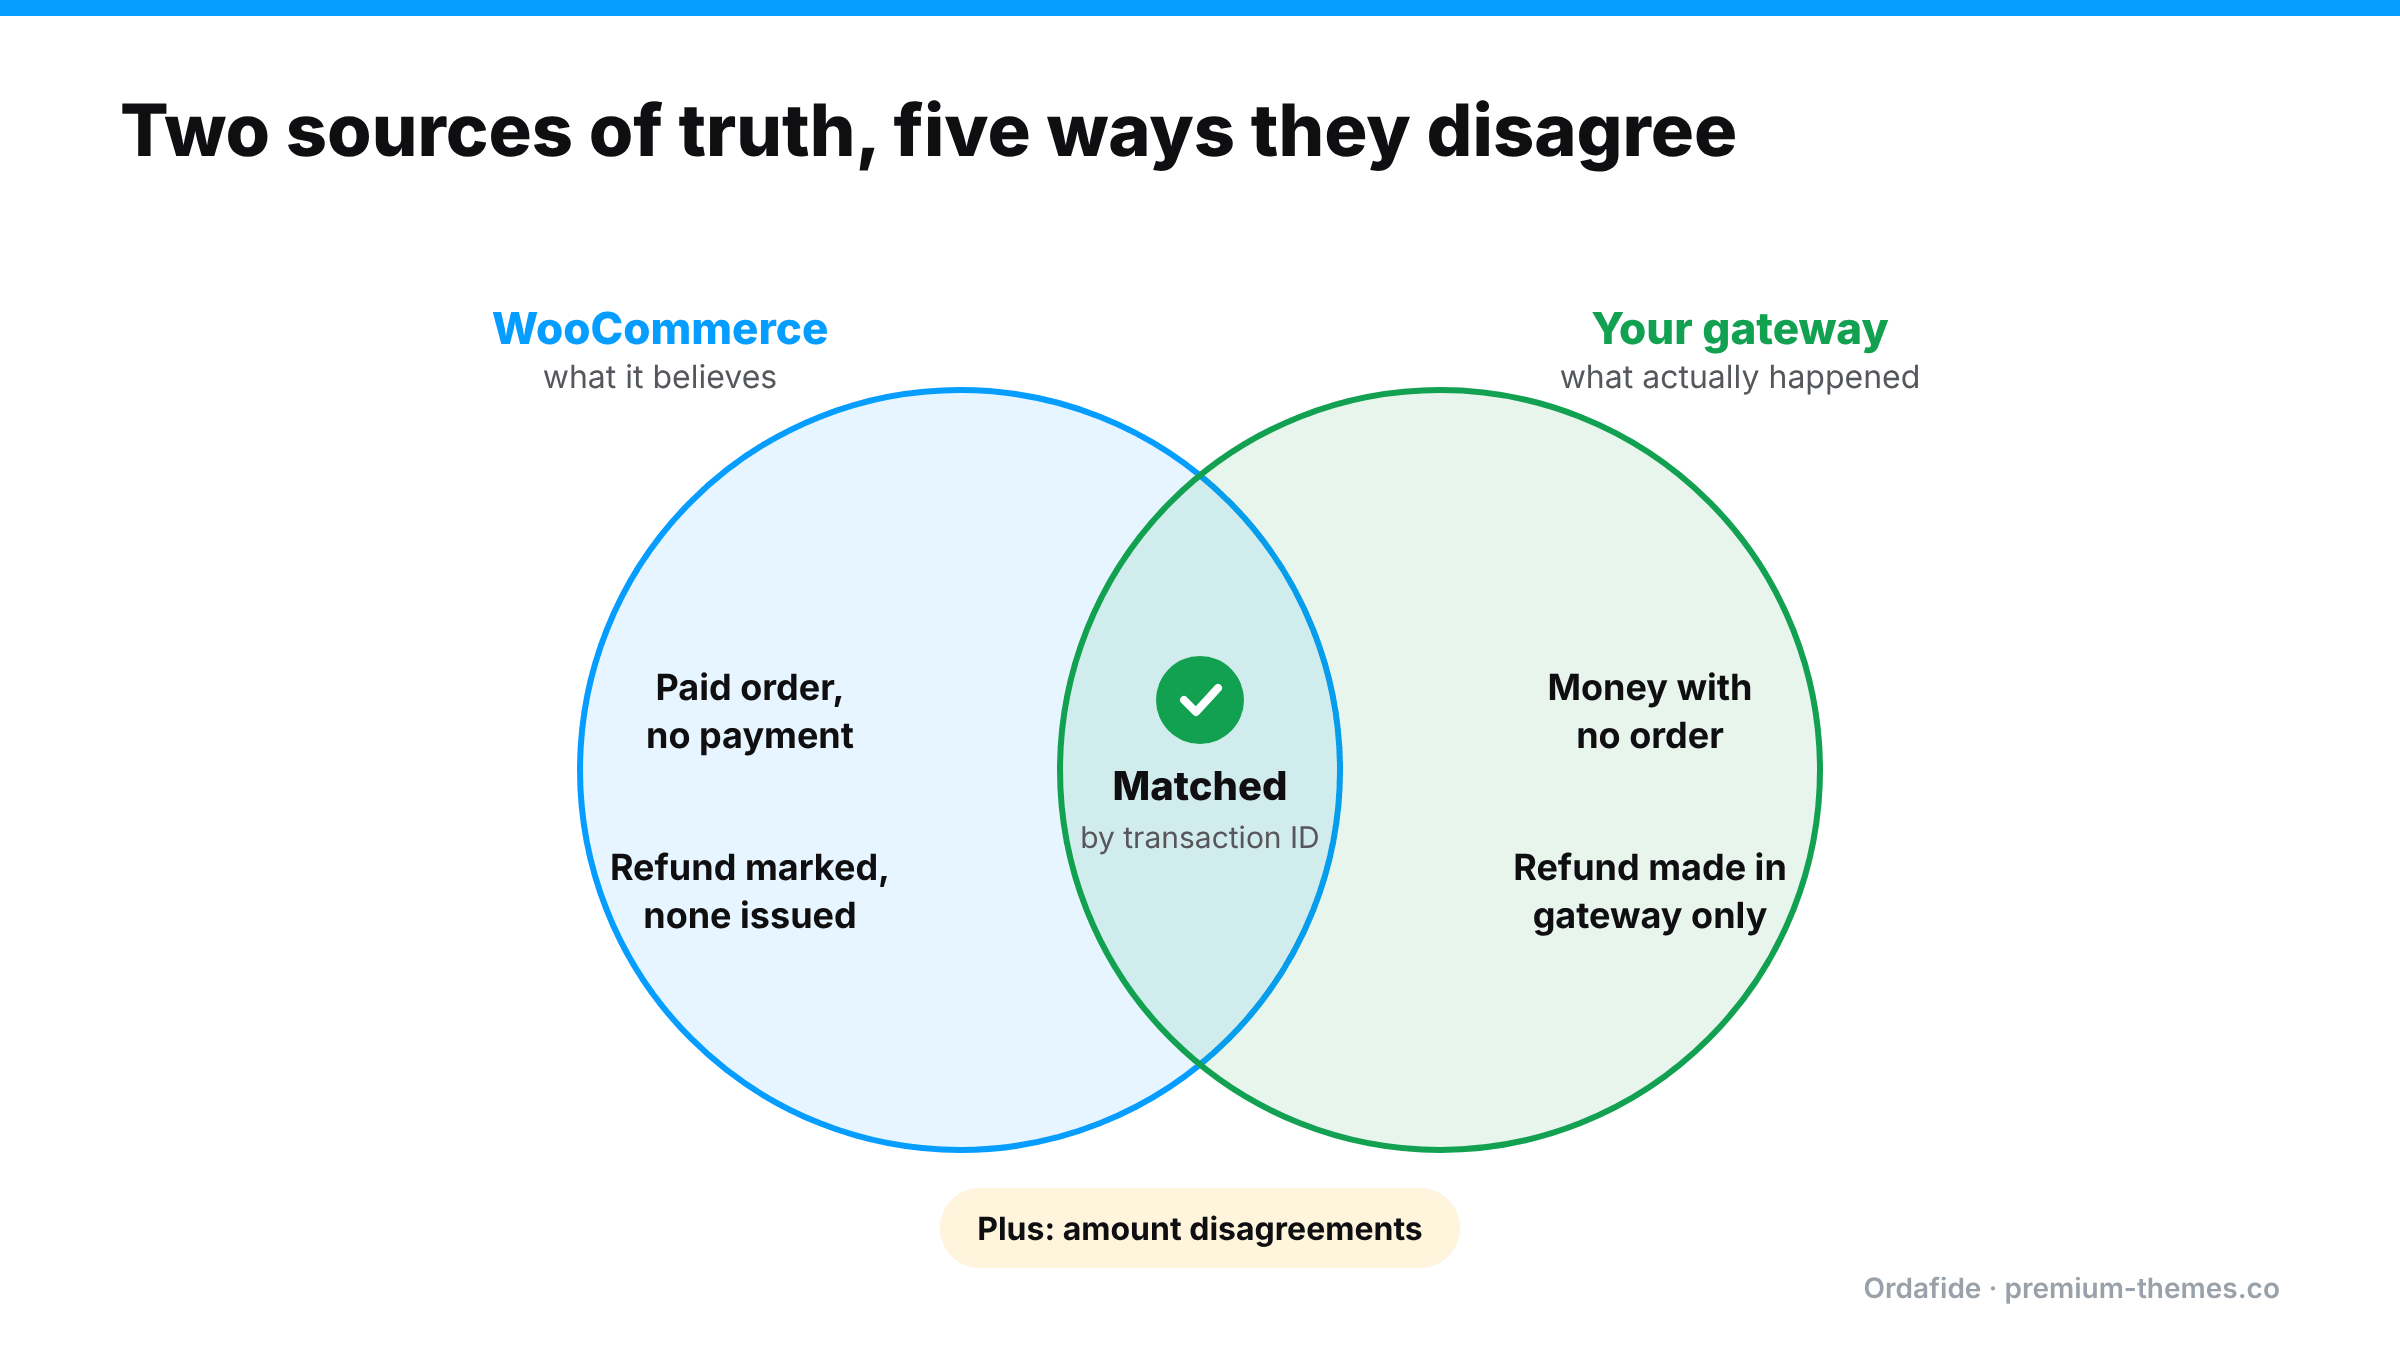
Pro’s read-only gateway reconciliation with Stripe, PayPal, Square, Mollie and Razorpay also helps afterwards. It shows any money with no order and any amount disagreements, so you can be sure you’ve found every successful test charge, including ones that never produced a clean WooCommerce order.

The free Ordafide plugin won’t detect an attack in progress (that needs volume monitoring), but its duplicate charge and refund mismatch checks help verify the clean-up: that refunds were recorded correctly, and that no refunded order is still sitting in Processing waiting to be shipped.

Ordafide is not a fraud-prevention firewall and doesn’t block requests. It’s the alarm that tells you to put the firewall up. Use it alongside CAPTCHA, rate limiting and your gateway’s fraud rules.

Card testing response checklist

Right now

  • [ ] CAPTCHA on checkout, confirmed to protect block checkout and the Store API
  • [ ] Store API rate limiting enabled (proxy mode on if behind a CDN)
  • [ ] Gateway fraud rules tightened; gateway support informed
  • [ ] WAF challenge on checkout/Store API paths

Within 24 hours

  • [ ] Successful test charges identified and refunded through WooCommerce
  • [ ] Stock checked and restored
  • [ ] Junk orders exported, then removed
  • [ ] Junk customer accounts removed

Permanently

  • [ ] WooCommerce, gateway and CAPTCHA plugins kept updated
  • [ ] Order volume monitored with alerts for spikes

WooCommerce Orders Stuck On Hold: Authorized vs Captured Payments Explained

On hold is the most misunderstood order status in WooCommerce.

Some store owners see it and assume the payment failed. Others assume the money is safely in the bank and ship the order. Both can be wrong. And because On hold orders don’t show up in the Processing queue that most teams work from, they’re easy to forget entirely, until a customer asks where their parcel is or an accountant asks where the money went.

At the centre of most On hold confusion is one concept that WooCommerce merchants rarely get explained properly: the difference between a payment being authorized and a payment being captured.

This guide explains what On hold actually means, the five reasons orders end up there, how to tell which one you’re dealing with, and how to stop orders (and money) falling through the gap.

What “On hold” really means

WooCommerce’s own documentation describes On hold as an order awaiting payment confirmation: stock has been reduced, but you need to confirm payment before fulfilling. It’s a waiting room, not a verdict.

Compare it with the neighbouring statuses:

Status What it means Should you ship?
Pending payment Order created, no payment received yet No
On hold Awaiting payment confirmation; stock reduced Not until you’ve confirmed payment
Processing Payment received; ready to fulfil Yes
Completed Fulfilled Already done
Failed Payment failed or was declined No

The danger is in that middle row. An On hold order looks like a real sale, because stock has gone down and the order has items, an address and a total, but the money may not be yours yet. Or ever.

Authorized vs captured: the five-minute explanation

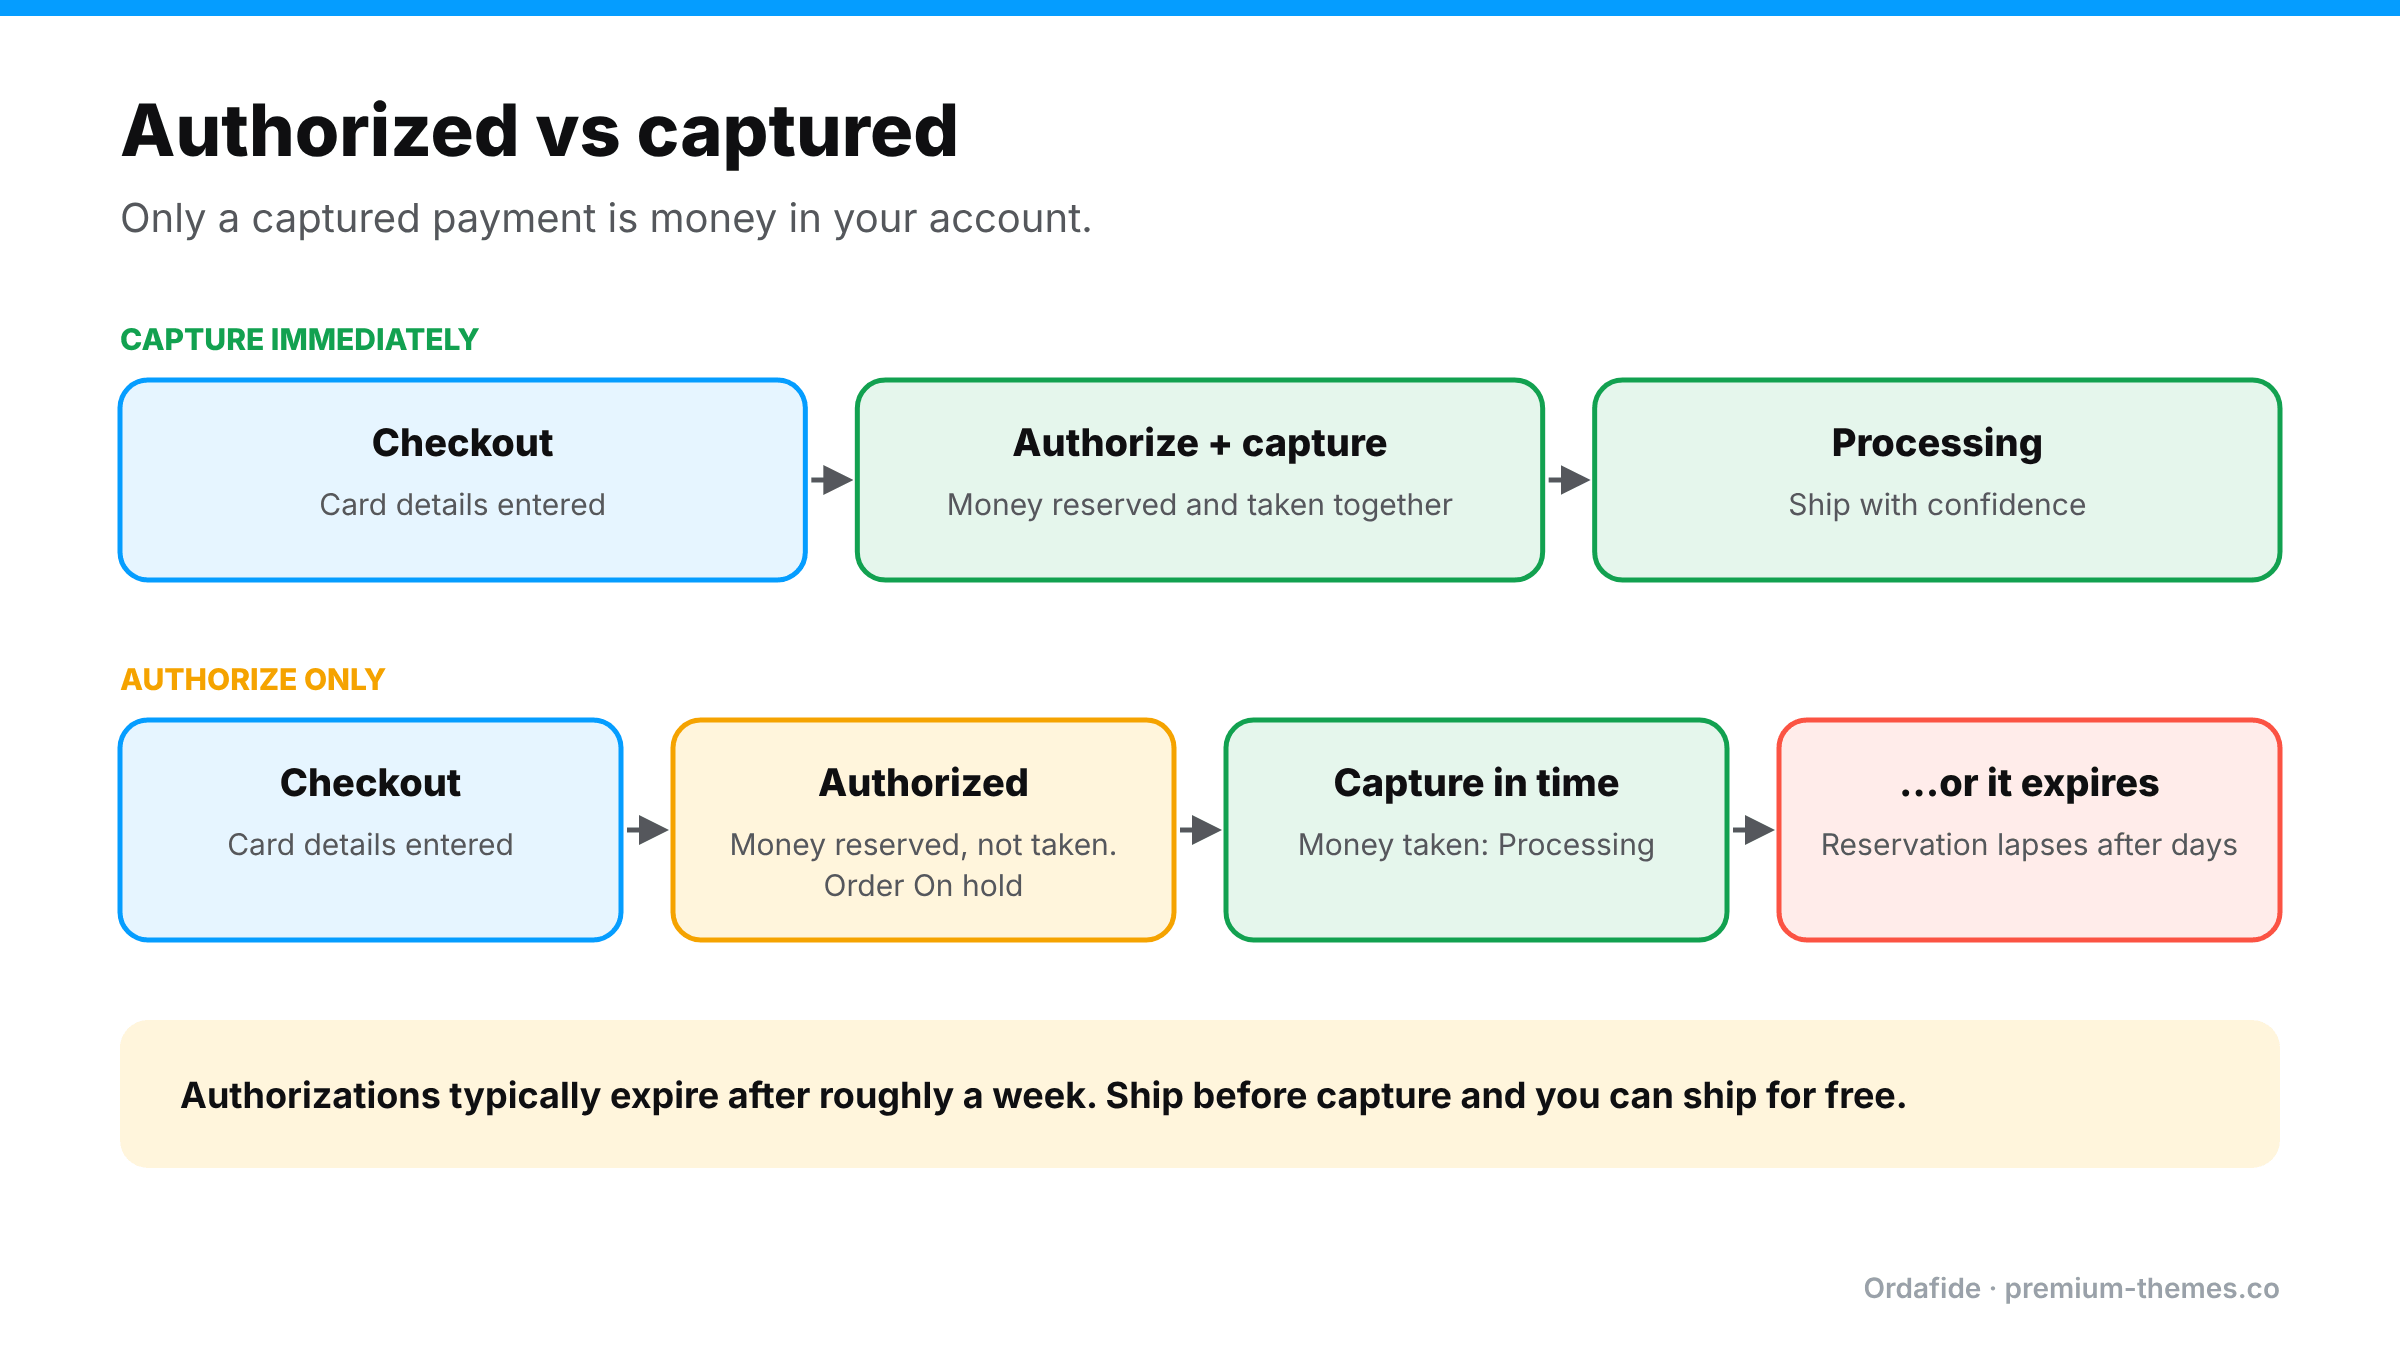
Two flows. Capture immediately: checkout, authorize and capture together, order goes to Processing. Authorize only: checkout, money reserved and order On hold, then either captured in time and moved to Processing, or the authorization expires after days. Shipping before capture risks shipping for free.

Card payments happen in two steps:

  1. Authorization. The customer’s bank confirms the card is valid and has enough funds, and reserves the amount. Nothing has moved. The customer sees a pending charge.
  2. Capture. You tell the gateway to actually take the reserved money. Now it moves toward your account.

Most stores capture immediately: both steps happen at checkout, and nobody thinks about it. But many gateways let you authorize only and capture later. That’s useful for made-to-order goods, pre-orders or stores that check stock before charging.

The catch: authorizations expire. Card networks typically hold an authorization for roughly a week (it varies by card type, network and gateway). If you don’t capture in time, the reservation lapses and the money is released back to the customer. You may already have shipped.

WooCommerce’s troubleshooting documentation calls this out directly: if your gateway only authorizes, funds aren’t transferred, and you need to either enable authorize-and-capture in the gateway settings or capture the charge manually.

The five reasons orders get stuck On hold

1. You chose authorize-only (and forgot to capture)

Many gateway plugins, including the WooCommerce Stripe and PayPal Payments plugins, offer a setting to capture charges immediately or only authorize them. With authorize-only, the order typically sits On hold until you capture, often by changing the order to Processing or Completed or using a capture action, depending on the plugin.

Symptom: order notes mention the charge was authorized rather than completed or captured.

2. An offline payment method

Direct bank transfer (BACS), cheque and cash on delivery orders go On hold by design. WooCommerce can’t know when the money arrives, so it waits for you.

Symptom: payment method is BACS or cheque. This is normal. The risk is only that nobody checks the bank.

3. A delayed-notification payment method

Some methods, such as SEPA Direct Debit and certain bank-based methods, take days to confirm. WooCommerce’s documentation notes these may sit On hold temporarily until the gateway confirms.

Symptom: payment method is SEPA or similar; order notes show the payment as initiated or processing.

4. The gateway’s confirmation didn’t match what the plugin expected

A WordPress.org support thread describes a store using PayPal Powered by Braintree where card payments were authorized and settled at Braintree but orders stayed On hold. The plugin checked for one specific settlement status, while Braintree sometimes reported a different, still-valid one for up to 24 hours. The money was fine. The store’s records weren’t.

Symptom: gateway dashboard shows the payment as settled or captured, but the order never moved.

5. A risk or review hold

Gateways and fraud tools can hold payments for review (PayPal “pending” reasons, fraud screening, unverified accounts). The order waits until the review finishes.

Symptom: order notes or the gateway show a review, pending reason or risk flag.

How to diagnose an On hold order in two minutes

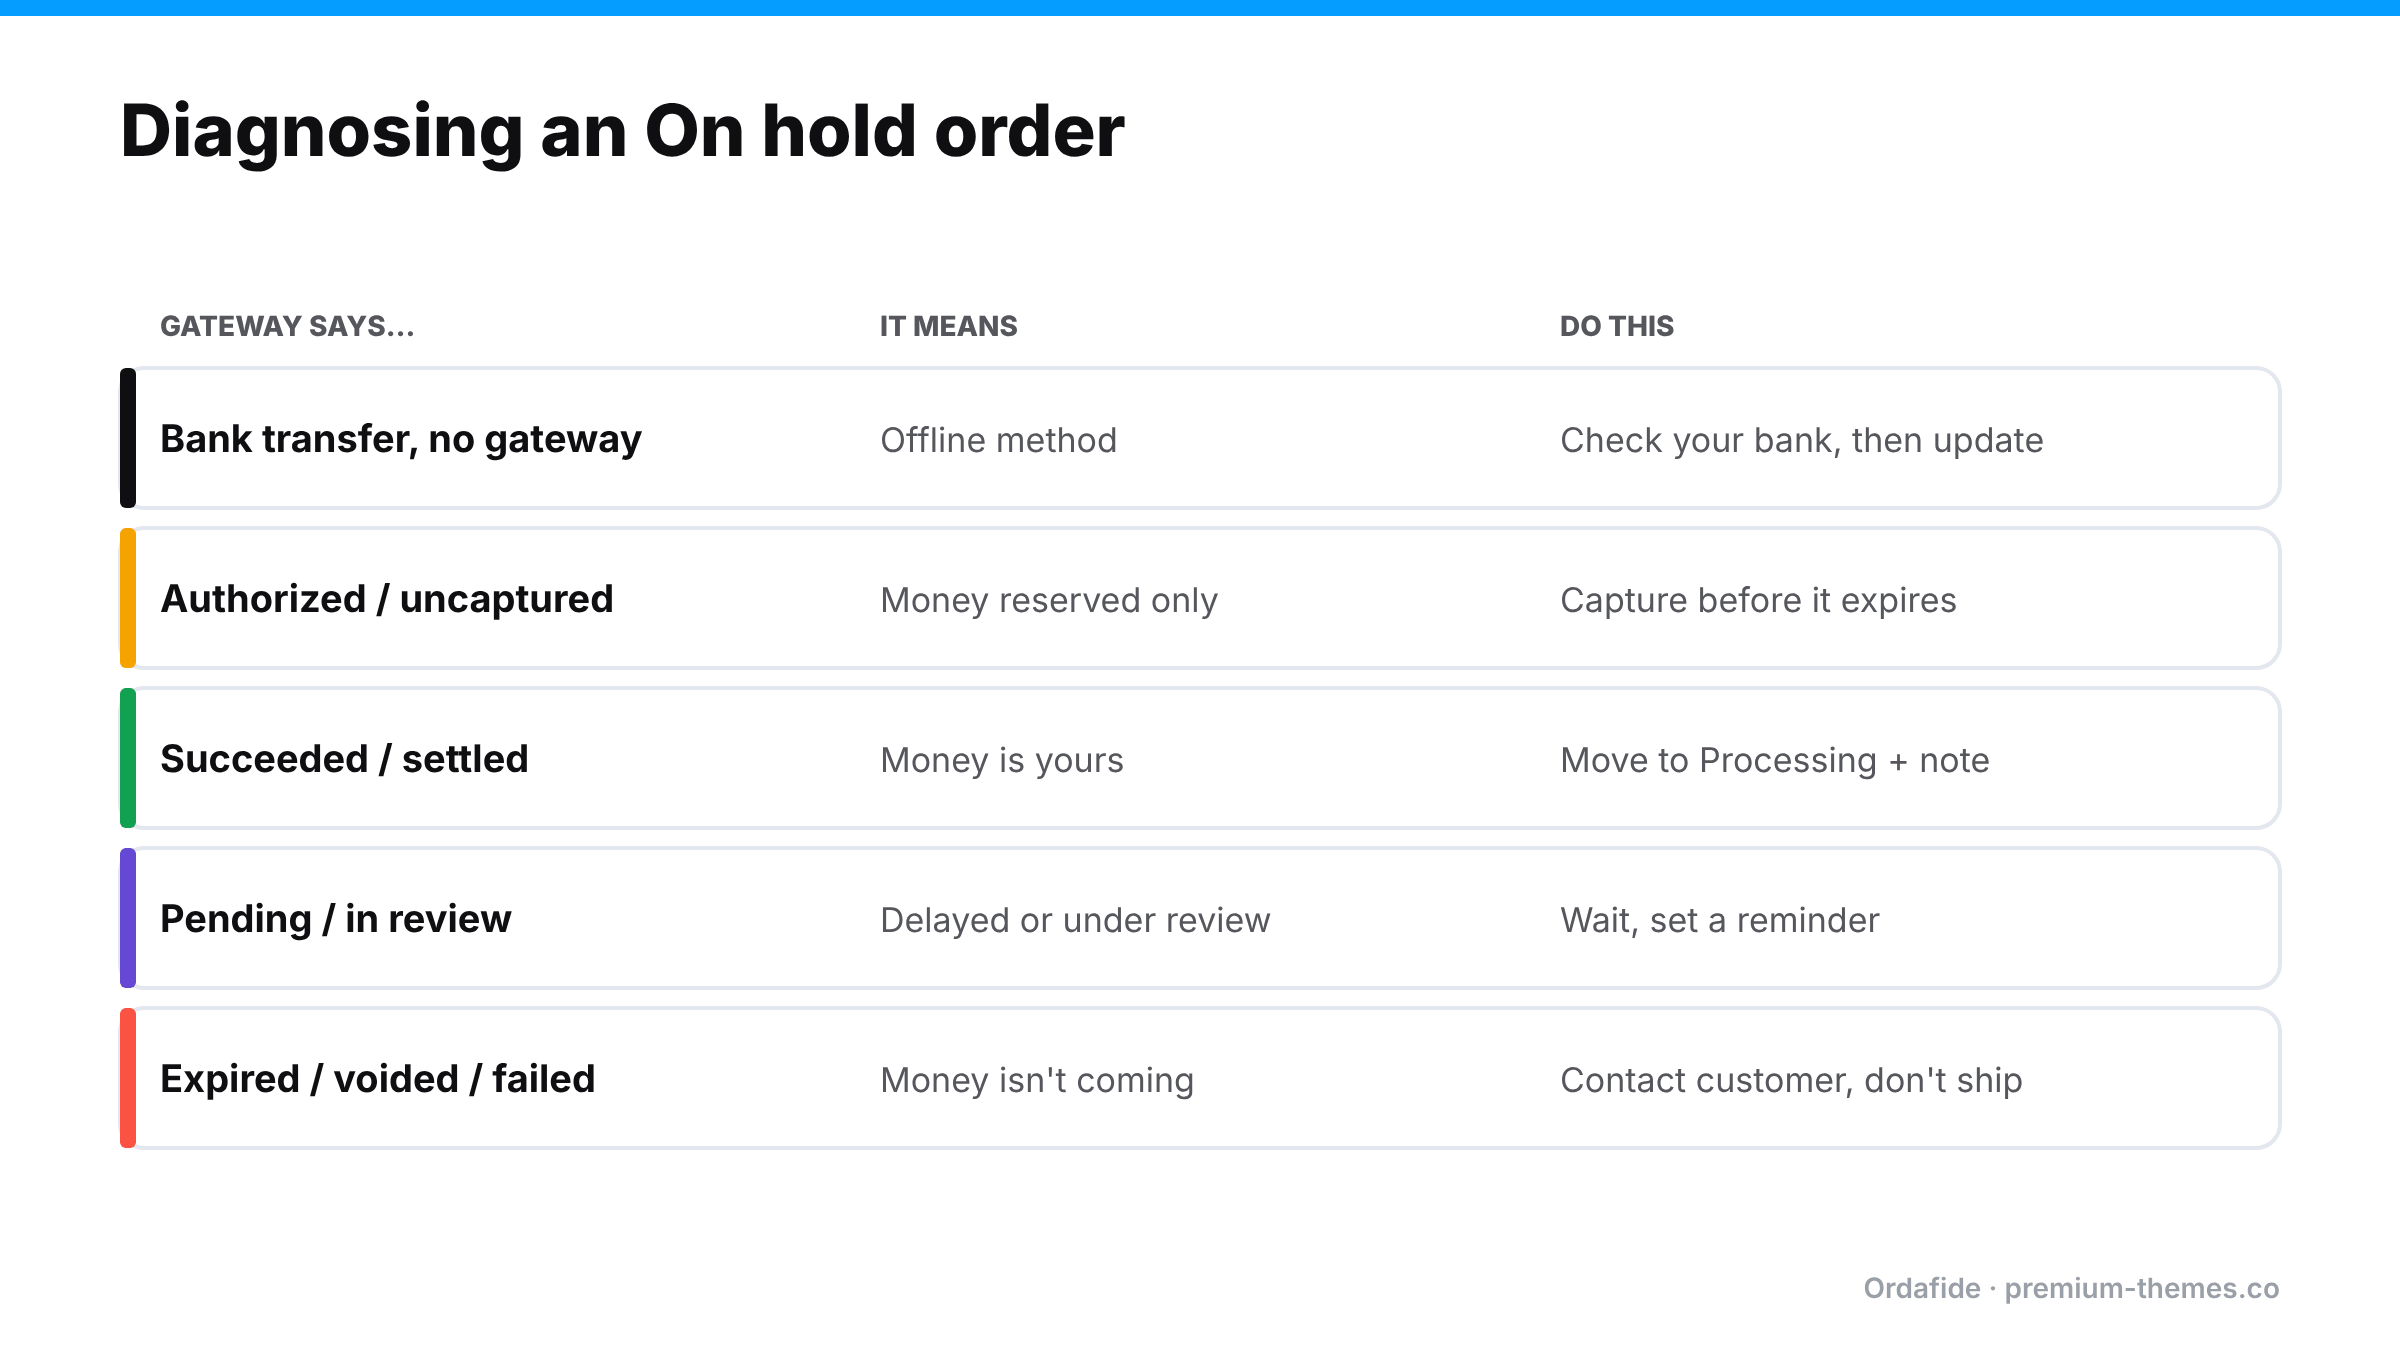
Table: bank transfer means check your bank then update; authorized or uncaptured means capture before it expires; succeeded or settled means move to Processing with a note; pending or in review means wait; expired, voided or failed means contact the customer and don't ship.

Open the order and work through this:

  1. 1. Check the payment method. BACS, cheque or COD? It’s case 2: check your bank and update manually.
  2. 2. Read the order notes. Look for the words authorized, captured, pending, review or a gateway status.
  3. 3. Find the transaction ID and open it in the gateway dashboard. What does the gateway say?
    • Authorized / uncaptured: case 1. Capture it (if you intend to fulfil) before the authorization expires.
    • Succeeded / captured / settled: case 4. Money’s in. Move the order to Processing and add a note.
    • Pending / in review: case 3 or 5. Wait, but set a reminder.
    • Expired / voided / failed: the money isn’t coming. Contact the customer before shipping anything.
  4. Check the order date. An authorization more than a few days old is at risk. Prioritize it.

The costly scenario: “paid” orders with no captured money

Here’s where it really hurts. Imagine your team moves On hold orders to Processing in bulk every morning to get them into the picking queue, perhaps because “On hold” orders always turn out fine.

If even one of those was an authorization that later expired or was never captured, you’ve shipped goods for free, and nothing in WooCommerce will ever tell you. The order says Processing, then Completed. It has a transaction ID. It looks perfect. Only the gateway knows no money was collected.

This is one of the cases where WooCommerce’s records and reality disagree silently. It’s also why “just check the order status” isn’t a reliable control.

A worked example: Monday morning’s On hold list

Here’s what a typical On hold list might look like on a small store after a weekend, and how to handle each one.

Order #4102: Direct bank transfer, $89, placed Saturday.
The customer chose bank transfer. You check the bank account: no payment yet. This is normal. Leave it On hold, and if nothing arrives within your stated payment window (say five days), send a reminder and then cancel to release the stock.

Order #4108: Card via Stripe, $240, placed Friday night, note says “authorized”.
Your Stripe plugin is set to authorize only, because you make items to order. Open the transaction in Stripe: it shows Uncaptured. If you’re starting production today, capture it now. Waiting until you ship next week risks the authorization expiring. If the item is out of stock and you won’t fulfil, cancel the authorization rather than letting it lapse, so the customer’s funds are released promptly.

Order #4111: PayPal, $56, placed Sunday, note says “pending: payment review”.
PayPal is reviewing the payment. Don’t ship. Check again later in the day. If PayPal completes it, the order should move forward on its own; if it doesn’t, compare the PayPal status and update by hand.

Order #4115: Card via another gateway, $132, placed Sunday, no useful note.
You open the gateway dashboard: the payment shows as settled. The money is yours. The plugin simply didn’t recognize the status it received. Move the order to Processing, add a note with the transaction ID, and check for a gateway plugin update.

Four orders, four different correct answers, and only one of them needed no action. That’s why On hold can’t be handled with a single rule like “promote everything each morning”.

Getting your capture settings right

Wherever your payment plugin’s settings live (usually WooCommerce → Settings → Payments → [gateway] → Manage), look for a setting along the lines of capture charge immediately, payment action: capture / authorize, or intent. Then:

– If you ship from stock: choose immediate capture. You don’t need authorize-only.
– If you make to order or sell pre-orders: authorize-only can make sense, but write down who captures, when, and what happens to authorizations older than a few days.
– If you’re not sure what’s configured: place a small real order and check the gateway. An uncaptured payment means you’re on authorize-only.

Changing this setting affects new orders only. Existing authorized orders still need capturing or cancelling individually.

Fixing On hold for good

Decide deliberately between immediate capture and authorize-only

Unless you have a real business reason to delay capture (made-to-order, stock verification, pre-orders), capture immediately. It removes an entire class of problems. If you do authorize-only, make capture part of a daily routine and make sure everyone knows authorizations expire.

Give On hold orders an owner

Add a daily check of the On hold filter in WooCommerce → Orders. Every order there should have an obvious reason (bank transfer awaiting payment, SEPA pending, authorized awaiting capture) and a next step.

Never bulk-promote On hold orders without checking the gateway

If you bulk-move orders to Processing, do it only after checking that each one’s payment is captured or confirmed. It’s tedious, which is exactly why it should be automated.

Keep gateway plugins current

Status-mapping issues like the Braintree example are typically fixed in plugin updates. Running old gateway plugins means running old bugs.

Reconcile against the gateway

The only way to catch “order says paid, gateway says no” is to compare the two. See how to reconcile WooCommerce orders with Stripe and PayPal.

How Ordafide helps

Ordafide Order Integrity for WooCommerce (free) scans your recent orders and raises plain-English findings sorted by money at risk. For the problems in this article it gives partial cover from your own database:

  • Its stuck payment and paid but cancelled checks flag orders where the gateway wrote a payment reference or WooCommerce recorded a confirmed payment date, but the status says otherwise, which helps when a valid payment never moved the order forward.
  • Its refund mismatch and order total checks catch other cases where an order’s status and its numbers disagree.

But an order that’s been promoted to Processing without the money ever being captured looks internally consistent. Only the gateway knows. That’s what Ordafide Pro adds: read-only reconciliation with Stripe, PayPal, Square, Mollie and Razorpay, which flags:

  • Paid orders with no payment: orders WooCommerce treats as paid where the gateway has no matching captured payment
  • Money with no order
  • Amount disagreements
  • Refunds missing in WooCommerce

With Pro’s alerts (Slack, SMS, email or signed webhook), a “shipped but never captured” order becomes a same-day notification rather than a hole your accountant finds next quarter. Ordafide never captures, refunds or voids anything itself; capturing stays a deliberate decision you make in the gateway or your payment plugin.

Daily On hold routine (5 minutes)

  1. Filter WooCommerce → Orders by On hold.
  2. For each BACS/cheque order: check the bank, then move to Processing or chase the customer.
  3. For each authorized order: capture if you’re ready to fulfil; flag anything older than a few days.
  4. For each delayed method order: leave it, but note how long it’s been waiting.
  5. For anything settled at the gateway but still On hold: move to Processing with a note, and look for a plugin update.
  6. Never mass-promote without checking.

Payment Received but No Order in WooCommerce? How to Find and Fix Orphaned Payments


Most WooCommerce payment problems at least leave a trace. An order sits on Pending payment, or shows up twice, or is cancelled when it shouldn’t be. You can see it, even if you don’t yet understand it.

This one leaves nothing.

A customer emails you a bank statement showing they paid. You search WooCommerce for their name, their email, the amount. Nothing. No order, no draft, no failed attempt. But when you open Stripe or PayPal, the payment is right there, marked Succeeded.

We call these orphaned payments: money that reached your gateway with no WooCommerce order attached. They’re rarer than stuck orders, but they’re among the most damaging failures a store can have. The customer has paid, nobody is going to ship anything, and nothing inside your store will ever tell you.

This guide explains how orphaned payments happen, how to find every one of them, how to resolve each case, and how to make sure you hear about the next one in hours instead of weeks.

The problem in one sentence

WooCommerce can only show you orders it created. An orphaned payment is, by definition, one it never created or never connected.

That’s why ordinary troubleshooting fails here. Every report, filter and search in WooCommerce looks at the orders table. If there’s no row, there’s nothing to find. The evidence only exists on the gateway’s side.

What merchants actually report

Searching the WordPress.org support forums and WooCommerce communities turns up the same story again and again:

  • – “Customer sent proof of payment, money is in my account, but there’s no order.” In one WordPress.org thread, a store using the Mercado Pago gateway found that two payments from the same customer had reached the gateway carrying the same WooCommerce order ID, so only one order was saved and the other payment was left without one.
  • – “Apple Pay approved but nothing happened.” An open issue in the official WooCommerce Stripe gateway’s GitHub repository describes Express Checkout (Apple Pay) sheets being approved while the order is left pending until it auto-cancels. Wallet flows add another handoff, and another place for it to break.
  • – “Orders are appearing as drafts with no customer details.” Block-based checkout creates a draft order while the shopper is on the checkout page. If something fails between the draft and the payment confirmation, you can end up with a payment and an incomplete or abandoned draft that never became a real order.

The common thread: the money moved, but the order record didn’t follow it.

The five ways an orphaned payment happens

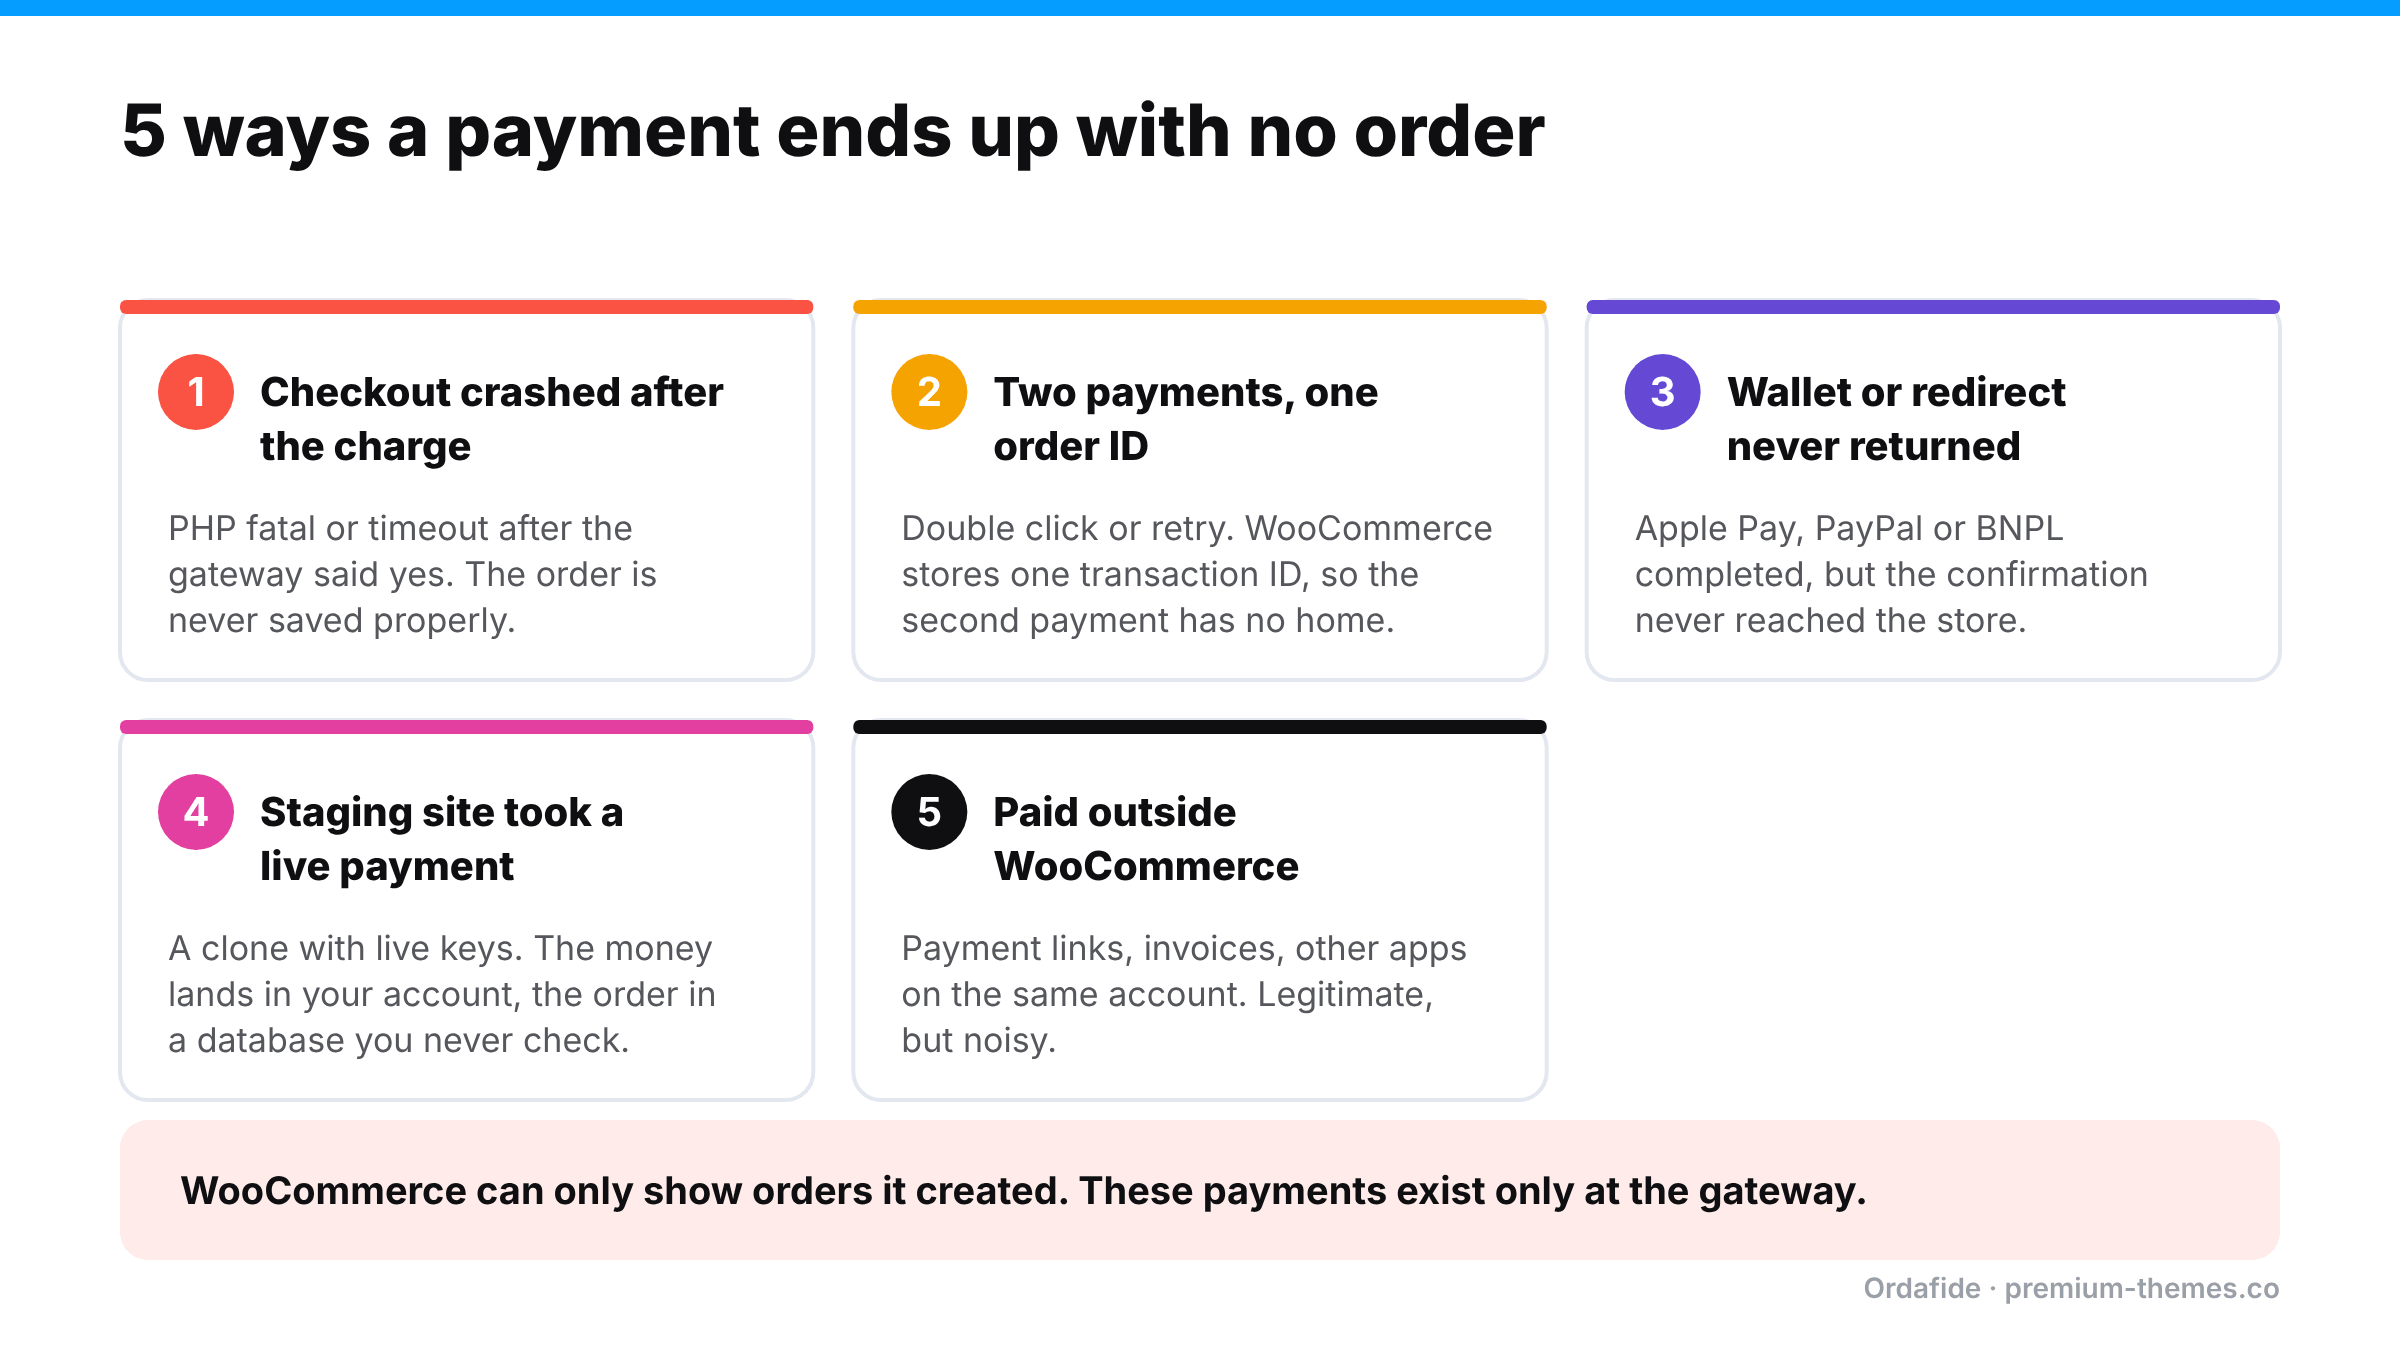
Five causes of orphaned payments in WooCommerce: checkout crashed after the charge, two payments on one order ID, wallet or redirect flow never returned, a staging site took a live payment, and payments taken outside WooCommerce. These exist only at the gateway.

1. The checkout crashed after the charge

The sequence inside checkout is: create or update the order, call the gateway, get a success response, then mark the order paid and redirect. If PHP hits a fatal error or `max_execution_time` after the gateway charged the card, the order may never be saved in a usable state. Slow checkouts (heavy plugins, external tax or shipping API calls, an overloaded server) make this more likely.

2. Two payments, one order ID

If a shopper pays twice (double click, a retry, a second tab), both payments can reference the same WooCommerce order. WooCommerce stores one transaction ID per order. The second payment is real money, but it has nowhere to live in your store.

3. A wallet or redirect flow that never came back

Apple Pay, Google Pay, PayPal, buy-now-pay-later and bank-redirect methods all involve the shopper leaving your page or a payment sheet appearing on top of it. If the return trip or the confirming webhook fails, the order can be left as a draft or auto-cancelled while the payment itself completes.

4. A staging or cloned site took the payment

This one surprises people. A staging copy of your store that still has live payment keys can take real payments from real customers (for example, if a search engine indexed it, or someone shared the wrong link). The payment lands in your live Stripe account. The order lands in the staging database, which you never look at.

The reverse also happens: a staging site registers its own webhook endpoint with your live gateway account, and events start going to the wrong place.

5. Payments taken outside WooCommerce

Payment links, invoices, manual charges in the gateway dashboard, or another app connected to the same Stripe or PayPal account all create gateway payments that WooCommerce never sees. These are usually legitimate, but they make reconciliation noisy. Unless you can tell them apart, a genuine orphan can hide among them.

How to find every orphaned payment (manual method)

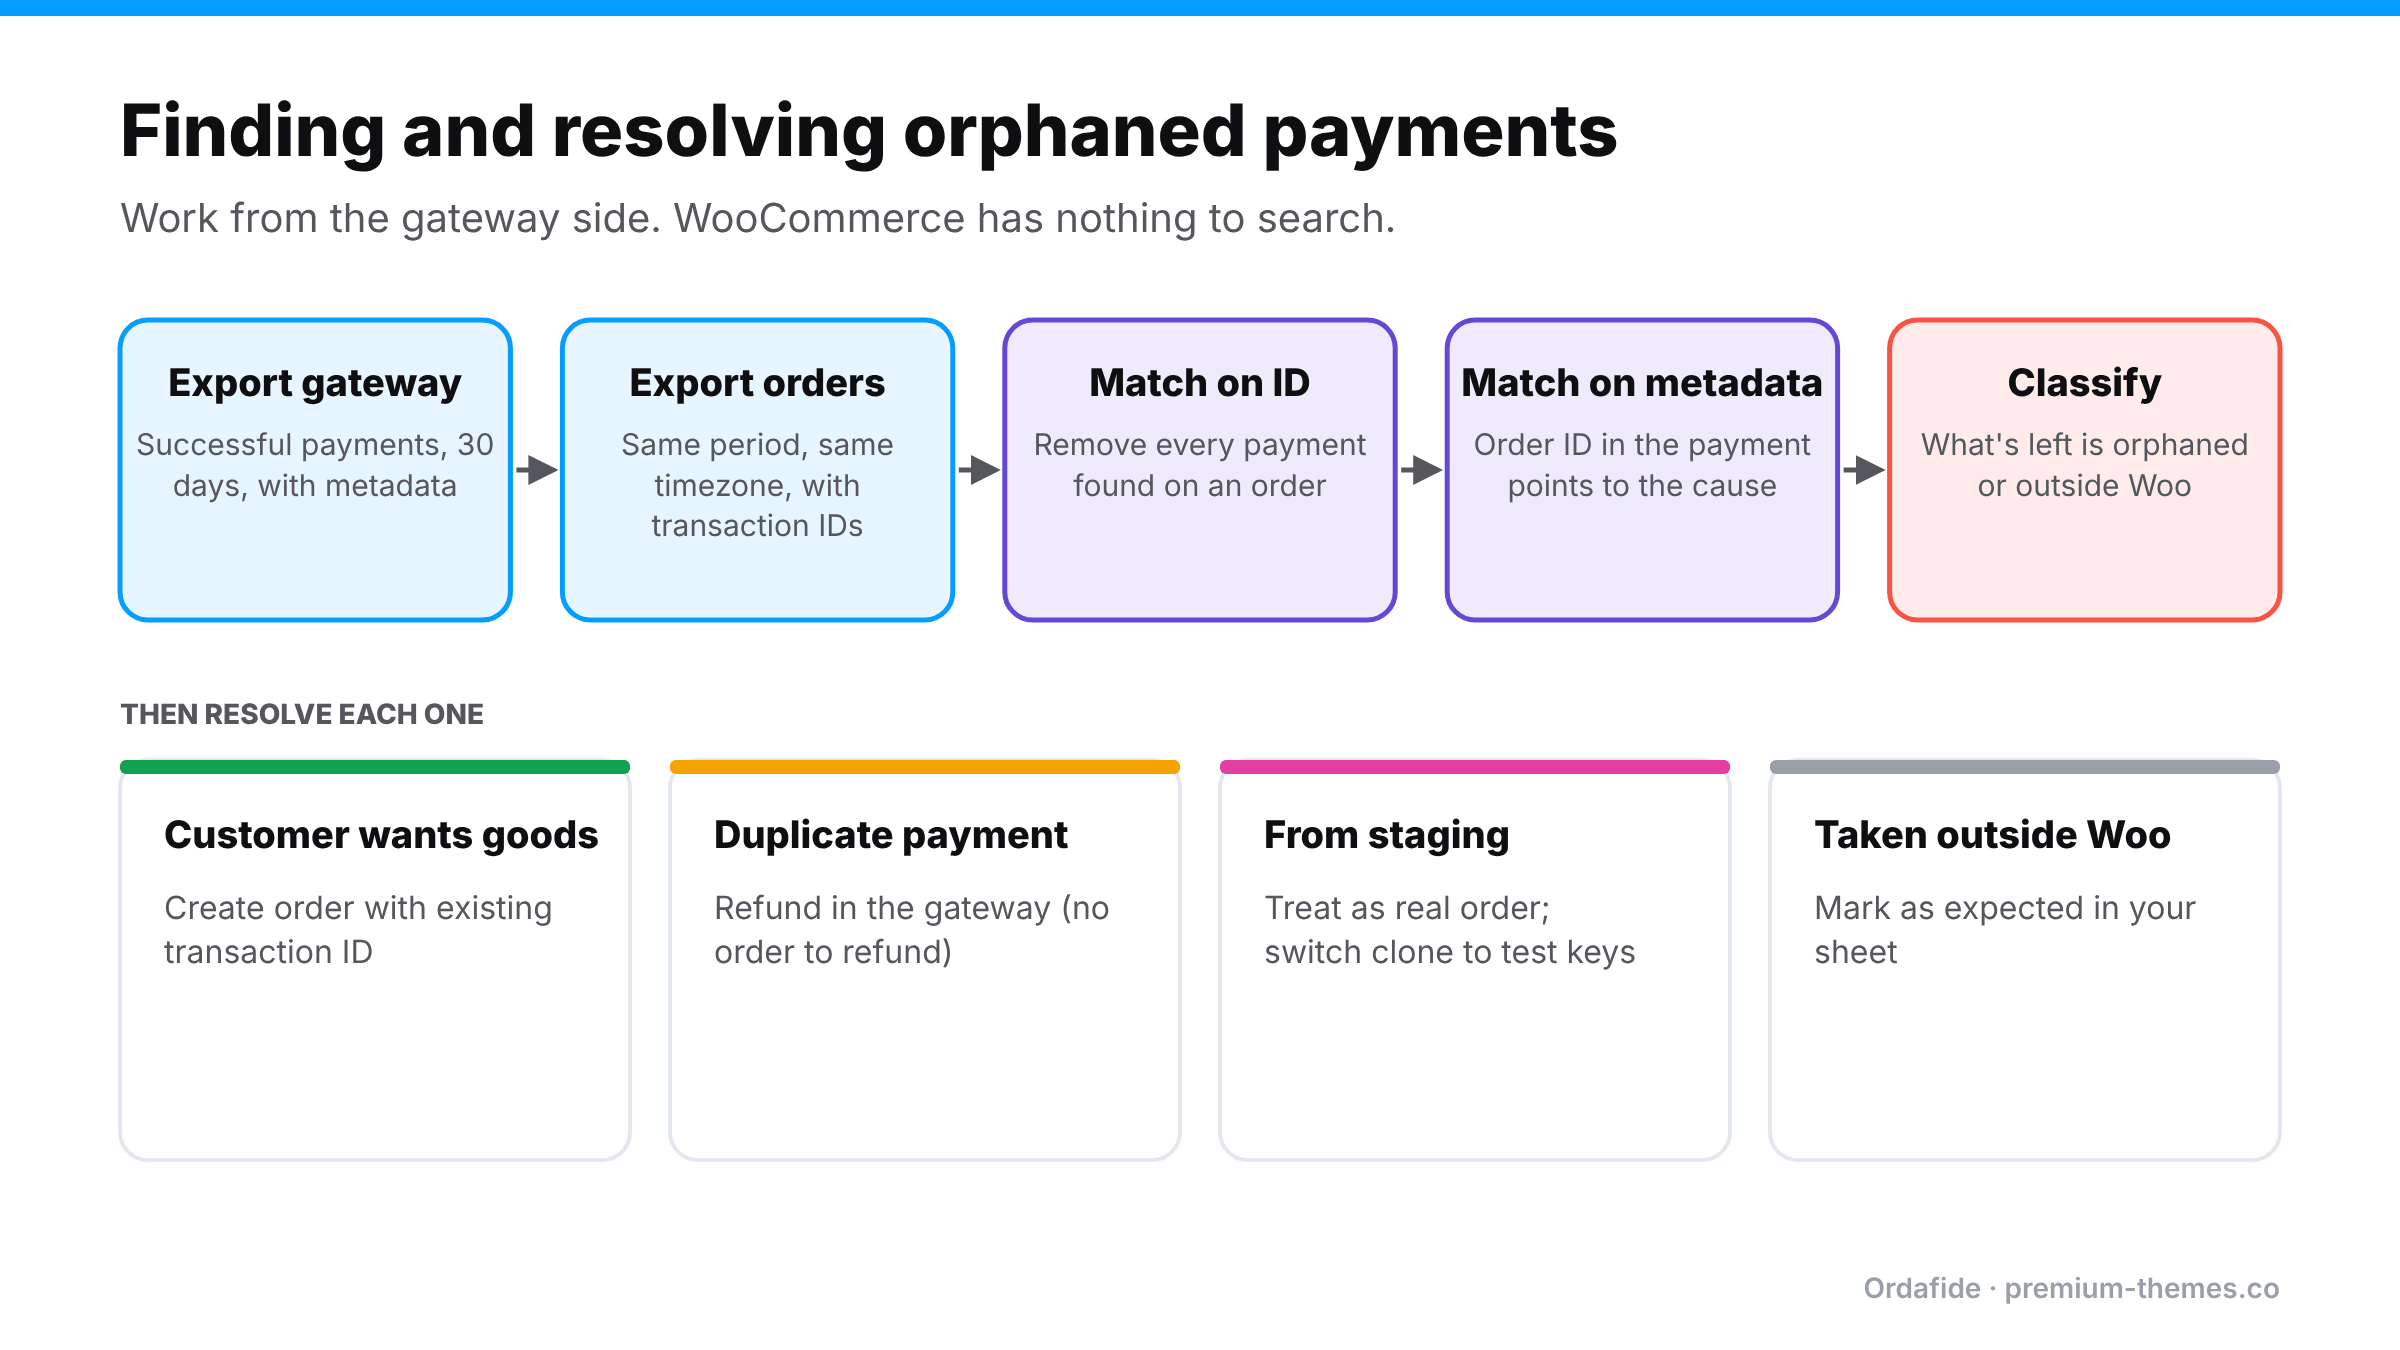
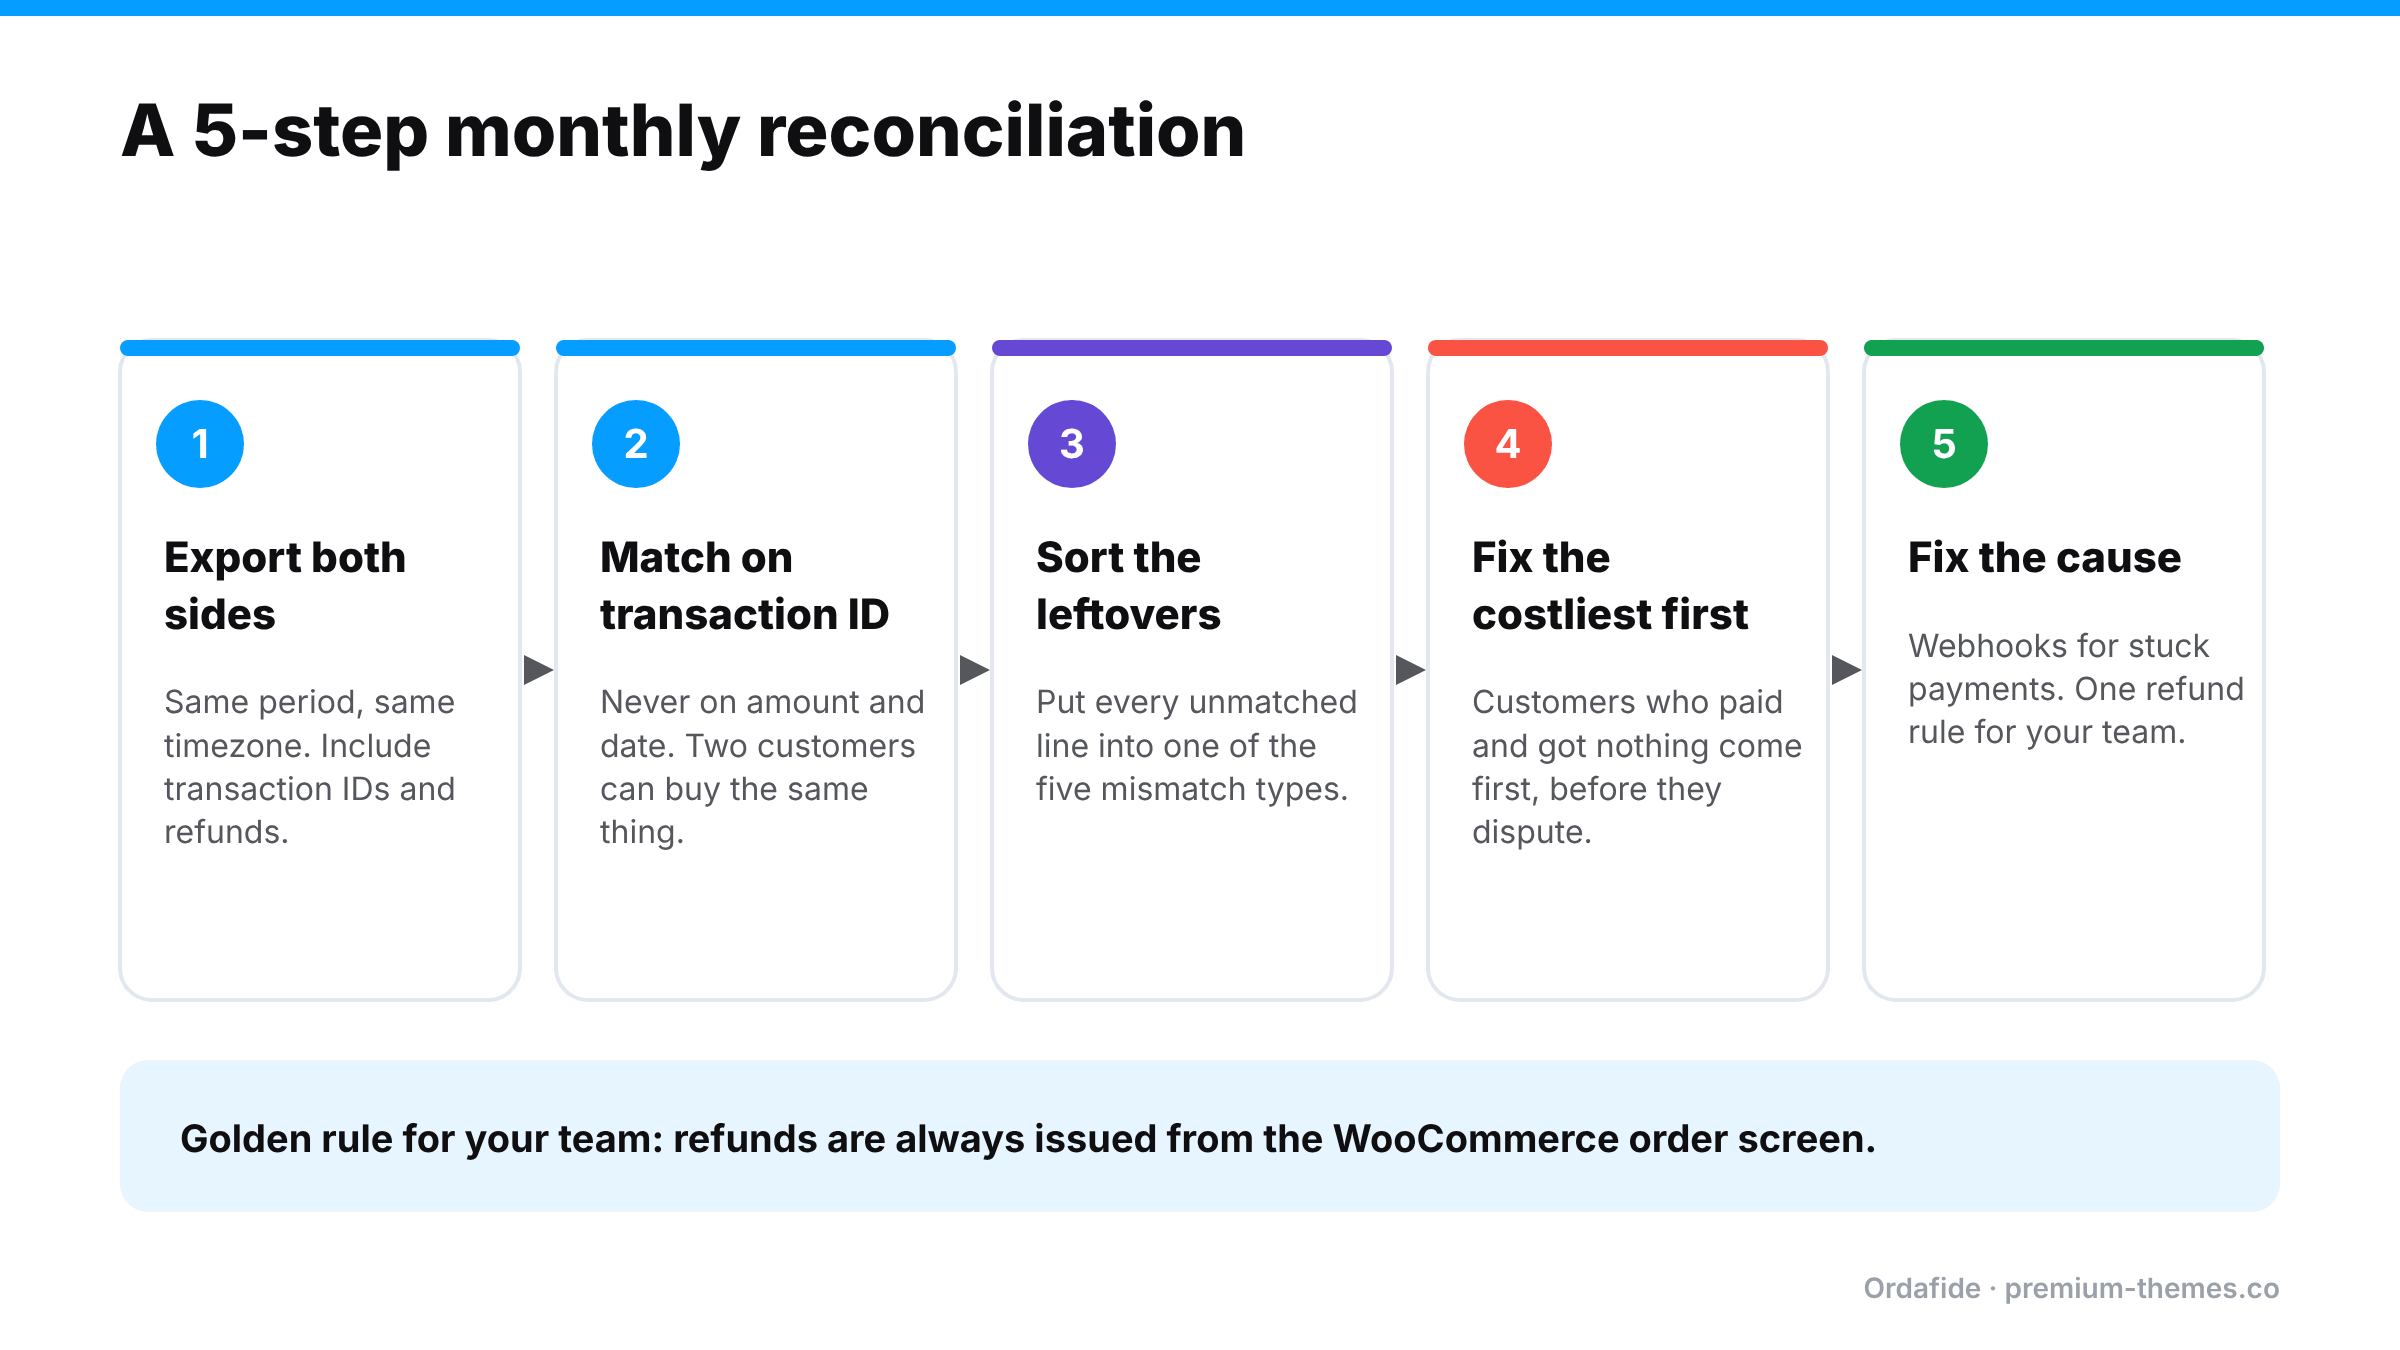
Process: export gateway payments, export WooCommerce orders, match on transaction ID, match leftovers on metadata, classify. Then resolve: create the order if the customer wants goods, refund duplicates in the gateway, treat staging payments as real orders and fix the clone, mark outside payments as expected.

You can’t search for something that doesn’t exist in WooCommerce, so you work from the gateway side.

Step 1: Export successful gateway payments for a period

From Stripe’s Payments list or PayPal’s activity reports, export successful payments for the last 30 days. Include the payment ID, amount, currency, customer email, created date and any metadata or description. The WooCommerce Stripe gateway normally writes the order ID and order number into the payment’s metadata or description, which is gold for matching.

Step 2: Export WooCommerce orders with transaction IDs

Export orders for the same period, including the transaction ID field, status, total and billing email. Make sure both exports use the same timezone.

Step 3: Match on transaction ID first

Every gateway payment whose ID appears on a WooCommerce order is accounted for. Remove those.

Step 4: Match the leftovers on metadata

For the remaining gateway payments, look at the order ID in the metadata. If it points to an existing order that has a different transaction ID, you’ve likely found two payments on one order (cause #2). If it points to an order ID that doesn’t exist in your live database, suspect a staging site (cause #4) or a crash before the order was saved (cause #1).

Step 5: Classify what’s left

Anything still unmatched is either a genuine orphan or a payment taken outside WooCommerce (cause #5). The description, payment link ID or invoice ID usually tells you which.

For a store doing a few hundred orders a month, this is an hour or two of spreadsheet work. It’s worth doing once even if you automate it later, because it shows you which causes affect your store.

Resolving each orphaned payment

Work from the most urgent: customers who paid and are waiting for something.

If the customer should receive goods:

  1. Contact them, confirm what they ordered (the gateway shows the amount, and sometimes line items in the description or metadata).
  2. Create the order manually in WooCommerce → Orders → Add order, add the items, set the customer, and set the status to Processing.
  3. Paste the gateway payment ID into the transaction ID field and add a private note explaining how you verified it. Don’t charge again.
  4. Check stock afterwards. A manually created order may need stock reduced by hand depending on how you add items.


If it’s a duplicate payment (the customer only wanted one order):

Refund it in the gateway. Since there’s no WooCommerce order to refund through, this is one of the few cases where refunding in the gateway dashboard is correct. Note it in the original order so your team knows.

If it came from a staging site:

Treat each one as a real order (as above), then fix the staging site immediately. Switch it to test keys, block it from search engines, put it behind a password, and remove any webhook endpoints it registered in your live gateway account.

If it was taken outside WooCommerce on purpose:

Mark it as expected in your reconciliation sheet so it stops showing up.

Fixing the cause

Cause Fix
Checkout crash after charge Check WooCommerce → Status → Logs for fatal errors at the payment time. Speed up checkout and remove slow external calls where possible. Raise PHP limits with your host if timeouts are frequent.
Two payments, one order See WooCommerce customer charged twice: slow checkouts, request replays and plugin retries.
Wallet / redirect flow failed Keep your gateway plugin updated, check its webhook delivery log, and test each wallet on real devices after updates.
Staging site with live keys Test keys on every non-production copy, always. Add it to your launch and clone checklist.
Payments outside WooCommerce Use a separate account, or consistent descriptions/metadata, so they’re easy to exclude.

Why this needs automation, not vigilance

Orphaned payments have three properties that make manual detection unreliable:

  1. They’re rare, so nobody builds a habit of checking for them.
  2. They’re invisible from WooCommerce, so the screens you look at every day can’t show them.
  3. They’re expensive when missed: a customer who paid and received nothing is the textbook case for a “product not received” chargeback, which costs you the sale, the goods if you ship late, and a dispute fee.

The only reliable approach is something that regularly asks the gateway “what did you collect?” and compares the answer with what WooCommerce recorded.

How Ordafide handles orphaned payments

Ordafide Order Integrity for WooCommerce comes in two parts, and this problem is a good illustration of why.

The free plugin audits what’s in your database. It catches the close relatives of orphaned payments, the ones where an order does exist:

  • Stuck payment: an order left on Pending payment or Failed even though the gateway wrote a payment reference on it.
  • Paid but cancelled: an order with a confirmed payment date sitting in Cancelled or Failed with nothing refunded.
  • Duplicate charge: one gateway payment reference attached to two orders, or the same customer charged twice for an identical basket within minutes.

What the free plugin can’t do, and doesn’t pretend to, is find an order that was never created. There’s no query for a row that doesn’t exist.

Ordafide Pro closes that gap with gateway reconciliation. It connects to Stripe, PayPal, Square, Mollie and Razorpay using read-only API keys, pulls the gateway’s own record of what was collected, and compares it with your orders. Its findings include:

  • Money with no order: exactly the orphaned payments described in this article
  • Paid orders with no payment
  • Amount disagreements between the order and the charge
  • Refunds missing in WooCommerce

Findings are sorted by money at risk and can trigger Slack, SMS, email or webhook alerts, so an orphaned payment surfaces the same day rather than when the customer’s patience runs out. Because the keys are read-only, Ordafide can’t capture, refund or void anything. It tells you what’s wrong and leaves the decision with you.

A quick prevention checklist

  • [ ] Every staging or local copy of the store uses test payment keys
  • [ ] Your live gateway account has only your production webhook endpoint registered
  • [ ] Checkout completes in a few seconds, even with all plugins active
  • [ ] Fatal errors around payment time are reviewed in WooCommerce logs
  • [ ] Wallet payments (Apple Pay, Google Pay) are tested after gateway plugin updates
  • [ ] Gateway payments are reconciled against orders, automatically or at least monthly
How to Reduce Your WooCommerce Return Rate Using Return Reason Data

How to Reduce Your WooCommerce Return Rate Using Return Reason Data

Most advice on reducing returns is generic: “add better photos,” “include a size chart,” “write detailed descriptions.” All true. But it doesn’t tell you which products need better photos, which size chart is wrong, or whether your returns problem is actually a product problem, a shipping problem, or a fraud problem.

The answer is already in your returns. You just need to collect it and look at it.

This guide shows how to measure your WooCommerce return rate, capture useful return reasons, and turn them into fixes that bring the rate down.

What’s a “normal” return rate?

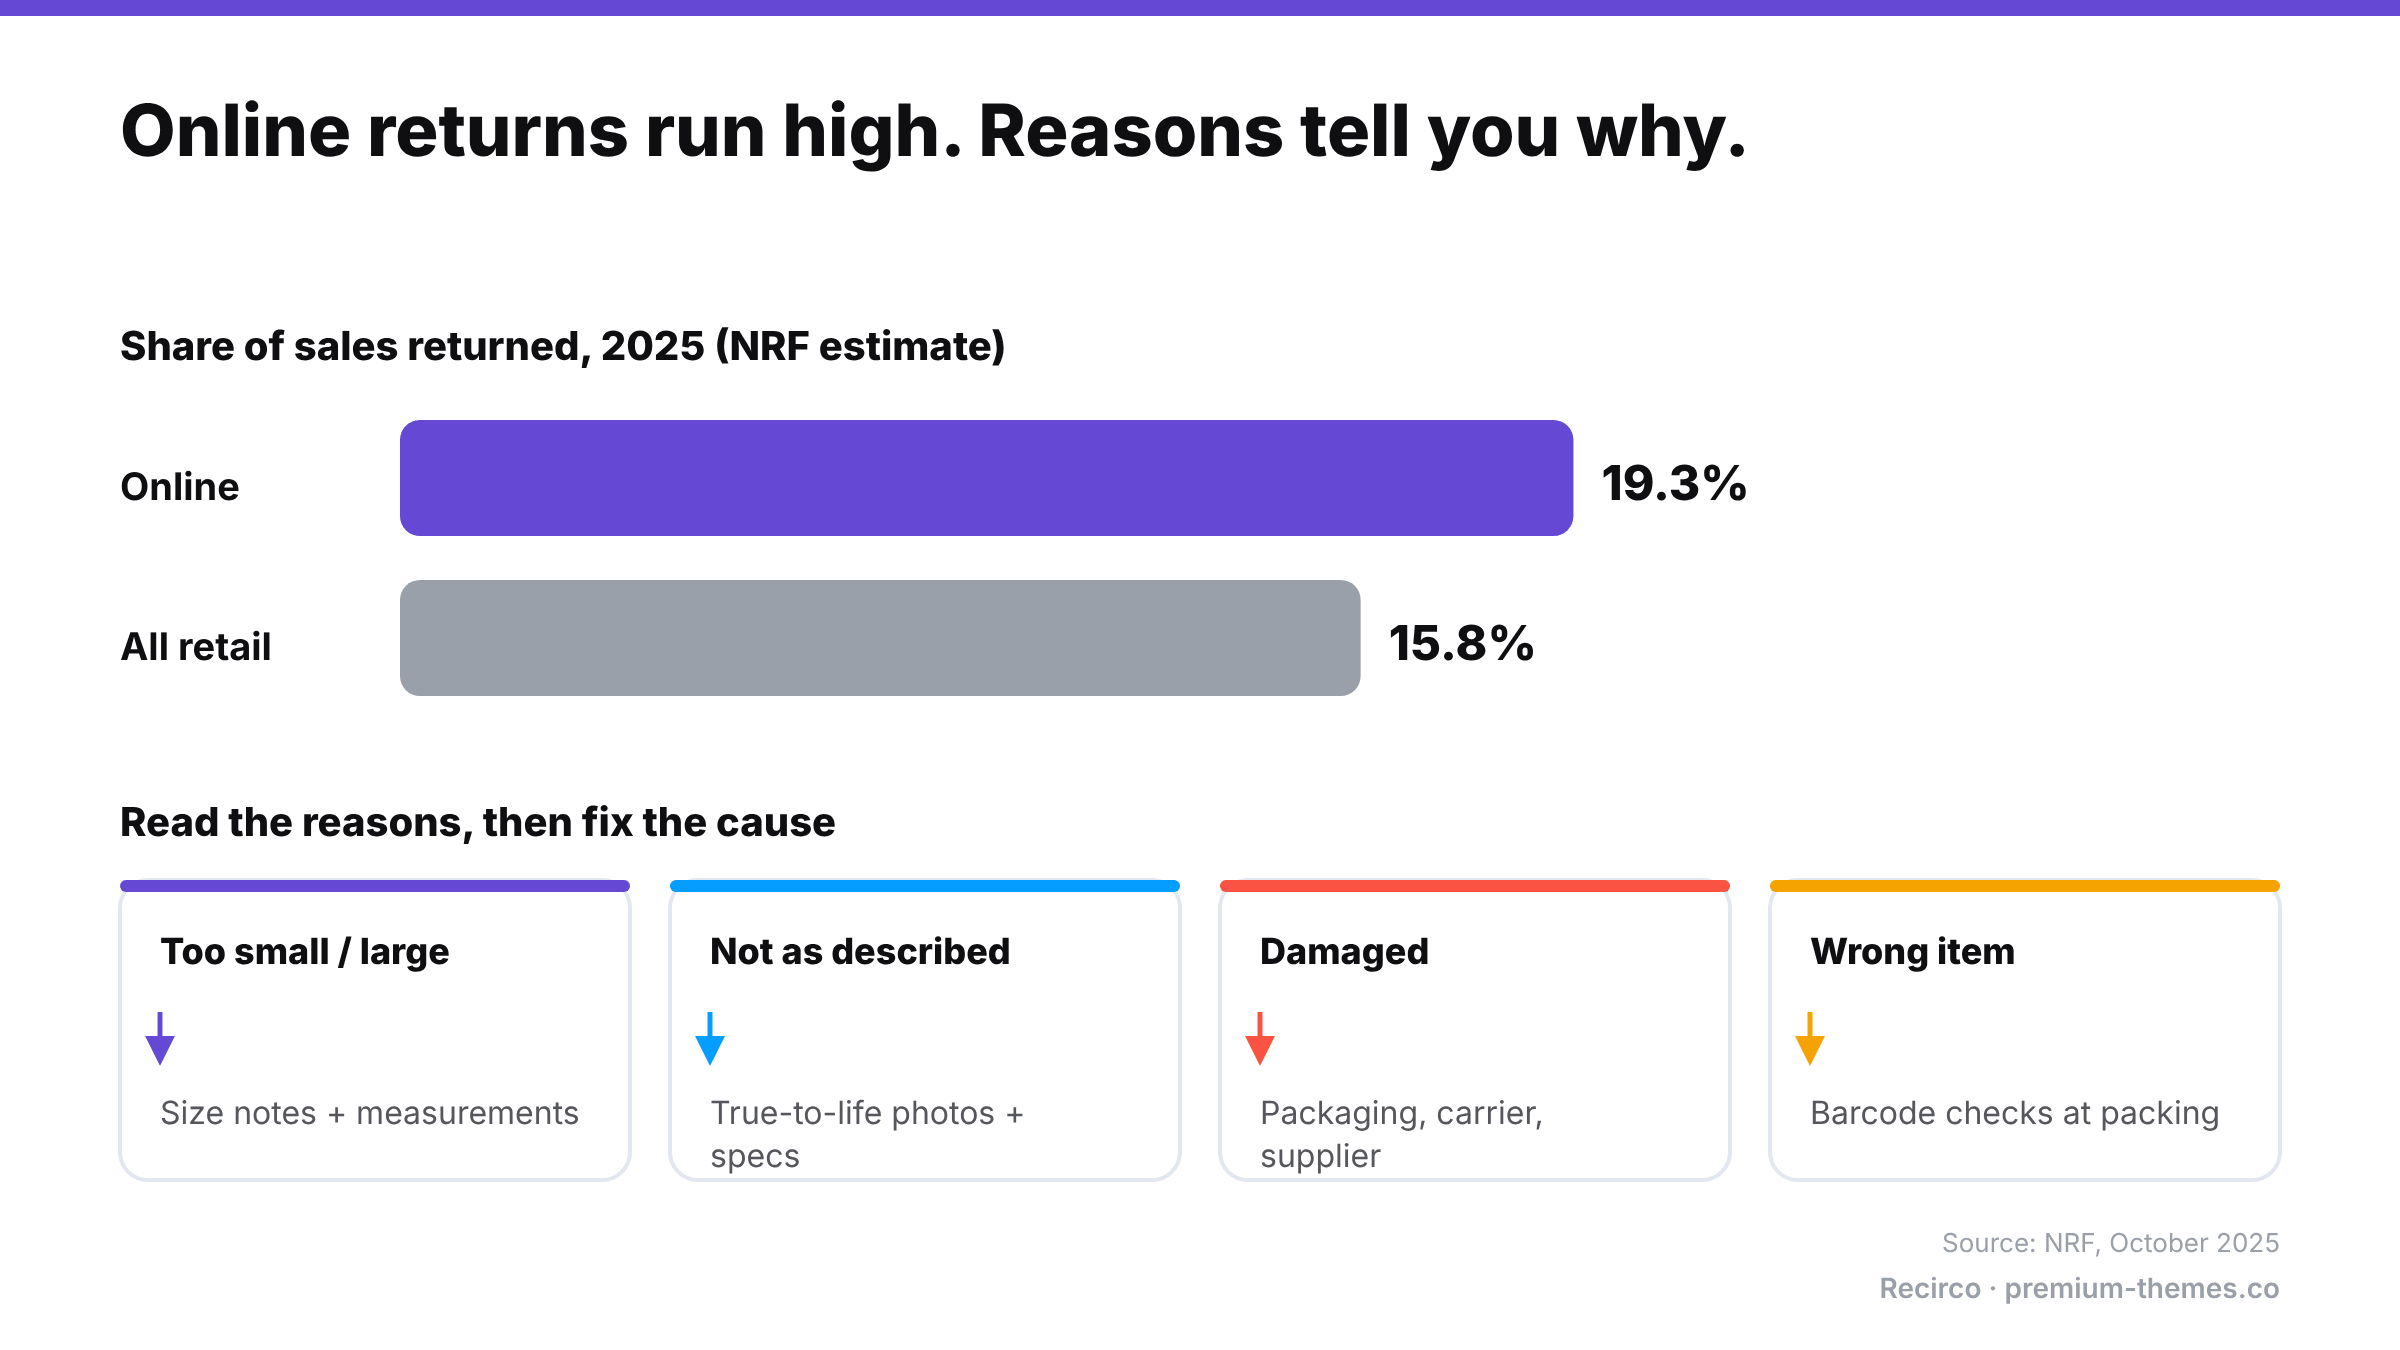
Bar chart: NRF estimated 19.3% of online sales and 15.8% of all retail sales were returned in 2025. Return reasons mapped to fixes: too small or large, add size notes and measurements; not as described, use true-to-life photos and specs; damaged, review packaging, carrier and supplier; wrong item, add barcode checks at packing.

It varies hugely by category. Apparel and footwear sit far higher than electronics accessories or consumables. As a broad benchmark, the National Retail Federation estimated 19.3% of online sales would be returned in 2025, against 15.8% for retail overall (NRF, October 2025).

Your own trend matters more than the industry average. A store going from 12% to 9% has saved real money, whatever the benchmark says.

How to calculate your return rate

Use one of these consistently:

  • By units: units returned ÷ units sold × 100
  • By value: value returned ÷ value sold × 100
  • By orders: orders with a return ÷ total orders × 100

Value-based is usually the most useful for decisions, because returning one $300 jacket matters more than returning one $8 accessory. Calculate it per product and per category, not just store-wide. Averages hide the two or three products causing most of the problem.

Step 1: Collect a reason on every return

You can’t fix what you can’t see. If returns arrive by email, reasons are scattered across threads, inconsistent, and often missing.

A good reason list is short, specific and actionable. For example:

  • Too small
  • Too large
  • Not as described / looks different from photos
  • Damaged or defective
  • Wrong item sent
  • Changed my mind / no longer needed
  • Arrived too late

Make detail required for reasons you can act on (“Damaged”: what was damaged? “Not as described”: what was different?) and optional for the rest.

One caution: shoppers don’t always tell the truth about why they return. Loop’s 2026 survey found only 39% always give the true reason for a return (Loop Returns, July 2026). “Changed my mind” is often under-reported because people pick a reason that sounds more legitimate. Look for patterns across many returns, not individual answers.

Step 2: Find your problem products

Rank products by:

  1. Number of returns
  2. Value returned
  3. Return rate (returns relative to sales, so best-sellers don’t dominate unfairly)

Then look at the reasons for the top 10. You’ll usually find a small number of products with a very clear, dominant reason.

Step 3: Match each reason to a fix

Dominant reason Likely cause Fix
Too small / too large Sizing runs off, unclear size guide Product-specific size notes (“runs small, size up”), measurements in cm/in, fit photos on models with heights
Not as described Photos or copy mislead (colour, material, scale) True-to-life photos, scale references, accurate material and dimension details
Damaged or defective Packaging, carrier, or supplier quality Better packaging; compare by carrier; raise with supplier
Wrong item sent Picking errors Barcode checks, clearer SKUs, review fulfilment process
Arrived too late Shipping estimates too optimistic Honest delivery estimates, especially near holidays
Changed my mind Impulse buying, unclear expectations Better product info, reviews, comparison content

Step 4: Fix the product page, then measure again

Make one change per product, note the date, and compare that product’s return rate and reasons over the next 30–90 days. Return data lags sales, so give it time.

Step 5: Keep an eye on speed and cost

Two more metrics worth tracking:

  • Average days to resolve a return. Slow returns create support tickets, chargebacks and unhappy customers. 71% of consumers say they’re less likely to shop with a retailer again after a poor returns experience (NRF).
  • How returns end: refund vs exchange vs store credit. Reducing returns is one lever; keeping revenue from the returns you do get is the other. (See Exchanges vs refunds.)

Don’t reduce returns by making them harder

It’s tempting to cut returns by hiding the policy, shortening the window, or making the process painful. It works briefly and costs more in the long run: fewer first-time buyers, more chargebacks, and more negative reviews. Shoppers check return policies before buying, and a hostile one loses you the sale before a return ever happens. The goal is fewer unnecessary returns, not fewer possible returns.

Collecting and analysing return reasons in WooCommerce

WooCommerce doesn’t record return reasons or track returns as their own records, so there’s nothing to report on natively.

Recirco – Returns & Exchanges for WooCommerce (free) captures a reason on every returned item through a self-service portal in My Account. It comes with six reasons pre-loaded that you can edit, and each can require an explanation. Every return is stored as a structured record in your own database, so the data is there from day one.

Recirco Pro turns that data into returns analytics:

  • Requests over time (a gap-free daily series, so quiet days show as zero rather than disappearing)
  • Value returned
  • Average days to resolve
  • Reasons ranked by count and by value
  • Most-returned products
  • Date ranges of 7, 30, 90 and 365 days

That’s exactly the data you need for steps 2 to 5: which products, which reasons, how much money, and how fast you’re resolving them.

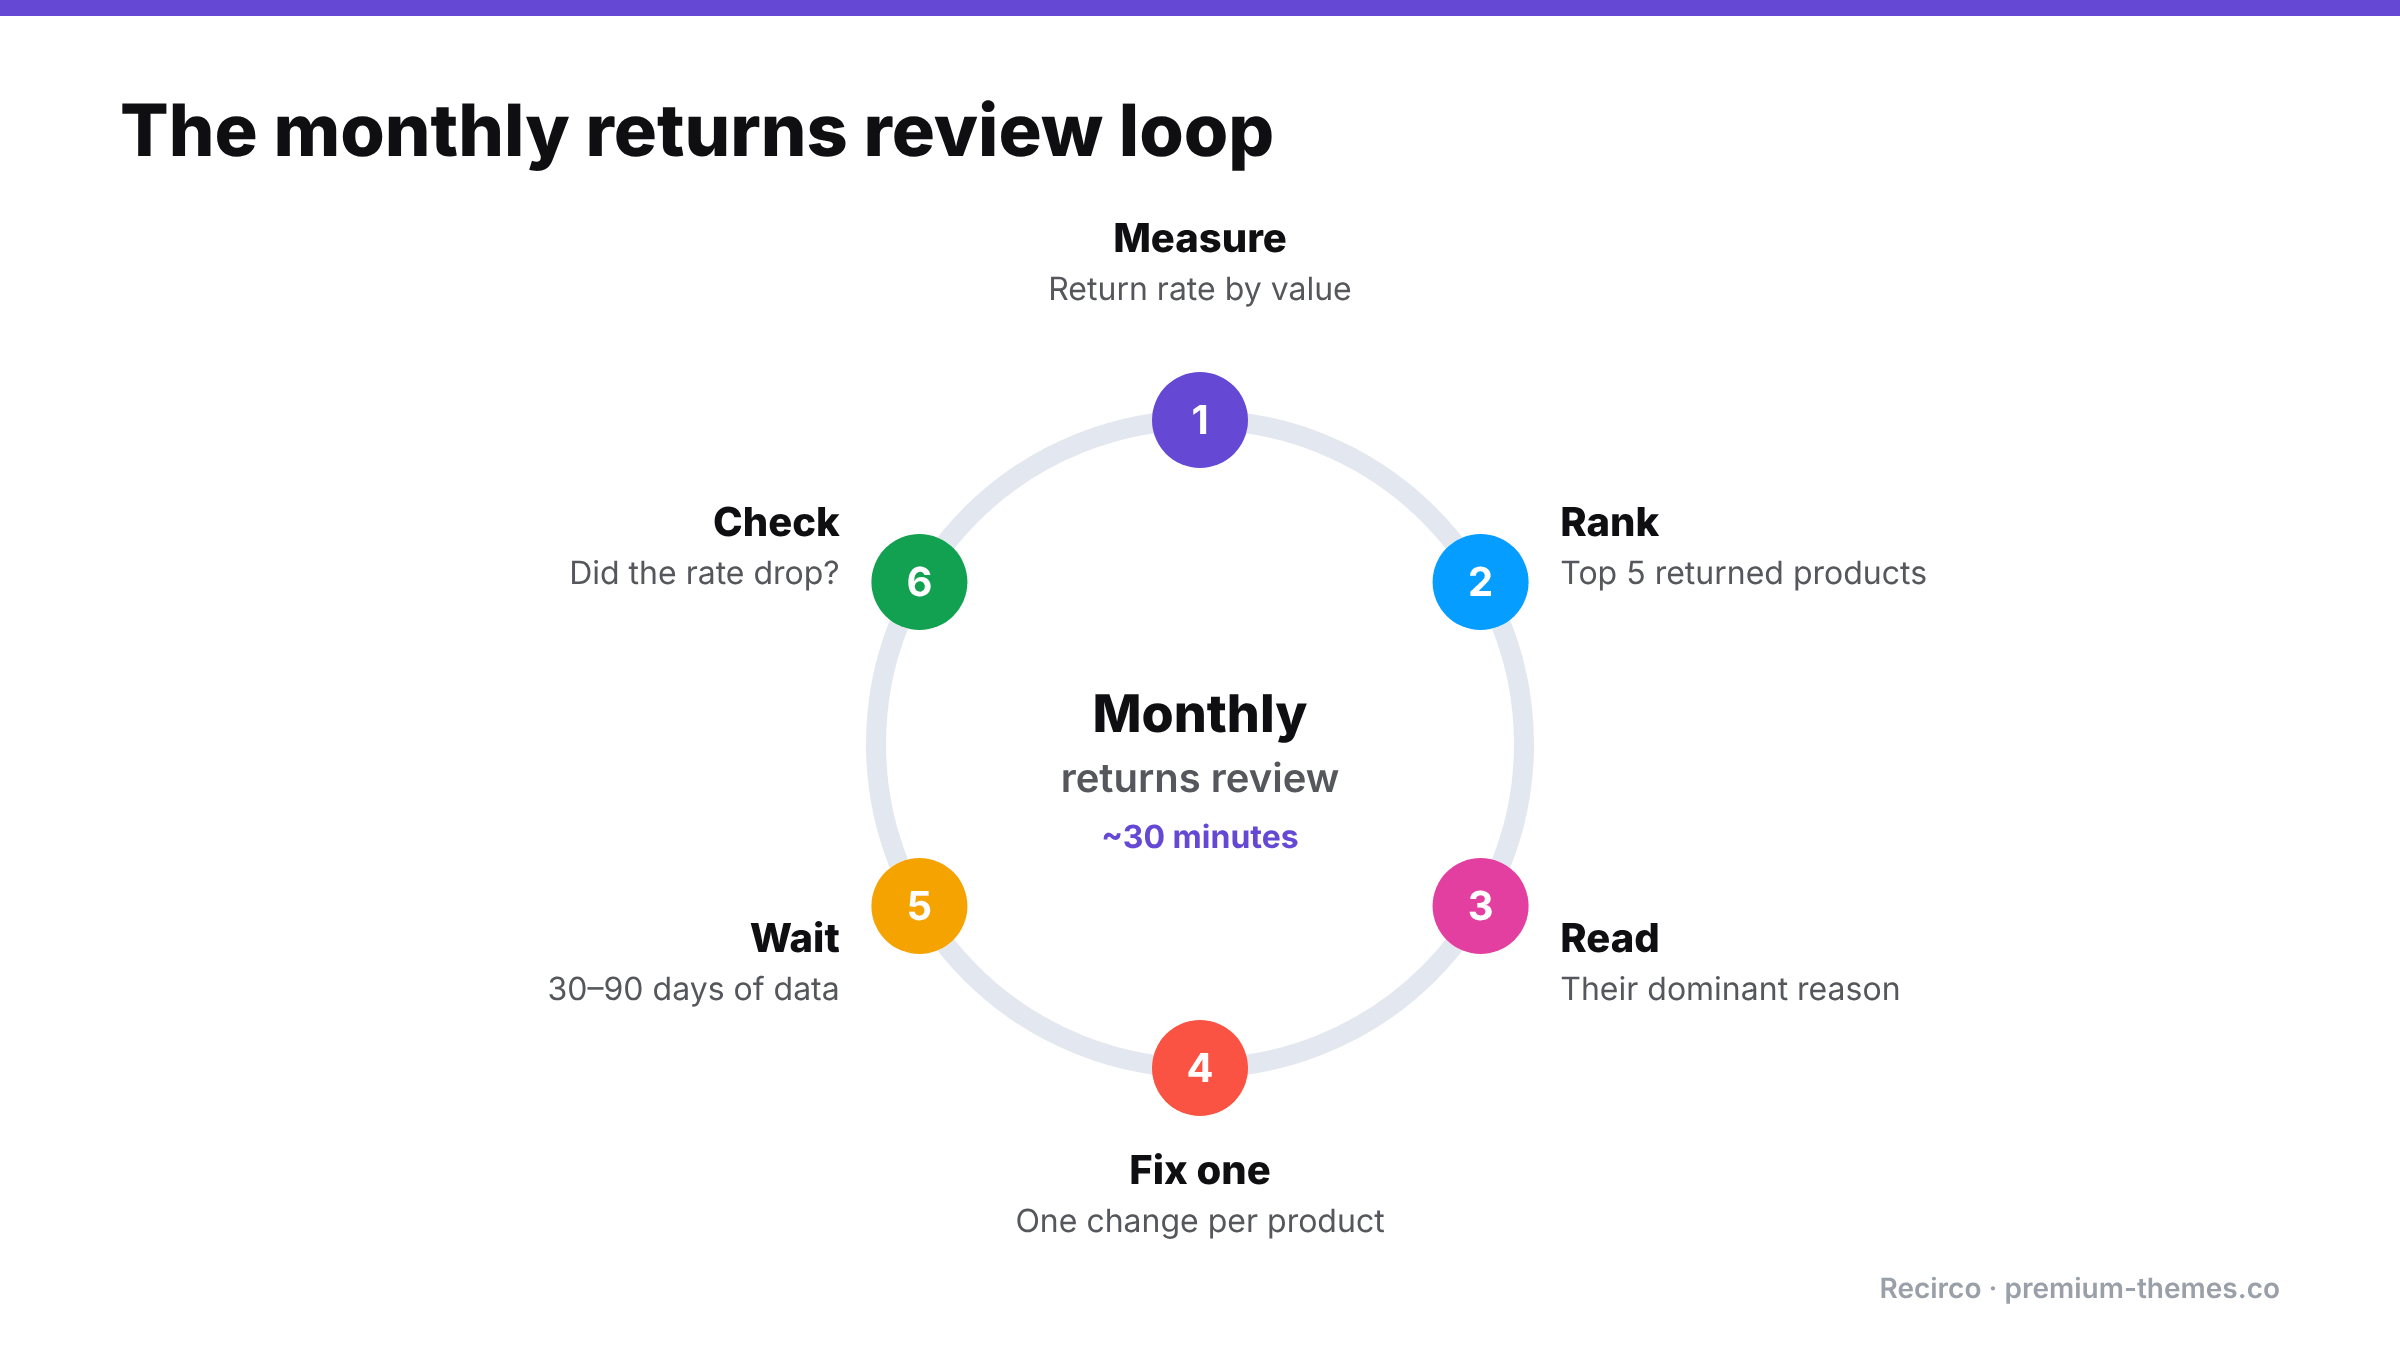
A monthly returns review (30 minutes)

Six-step monthly loop: measure return rate by value, rank the top five returned products, read their dominant reason, fix one thing per product, wait 30 to 90 days for data, then check whether the rate dropped.

  1. Check your overall return rate by value against last month.
  2. List the top 5 most-returned products and their dominant reasons.
  3. Pick one product and make one fix.
  4. Check last month’s fix: did that product’s rate or reason mix change?
  5. Check average days to resolve, and whether it’s getting slower.
  6. Check the share of returns ending as exchange or store credit.
WooCommerce RMA Workflow: Process Returns Without Duplicate Refunds or Wrong Stock

WooCommerce RMA Workflow: Process Returns Without Duplicate Refunds or Wrong Stock

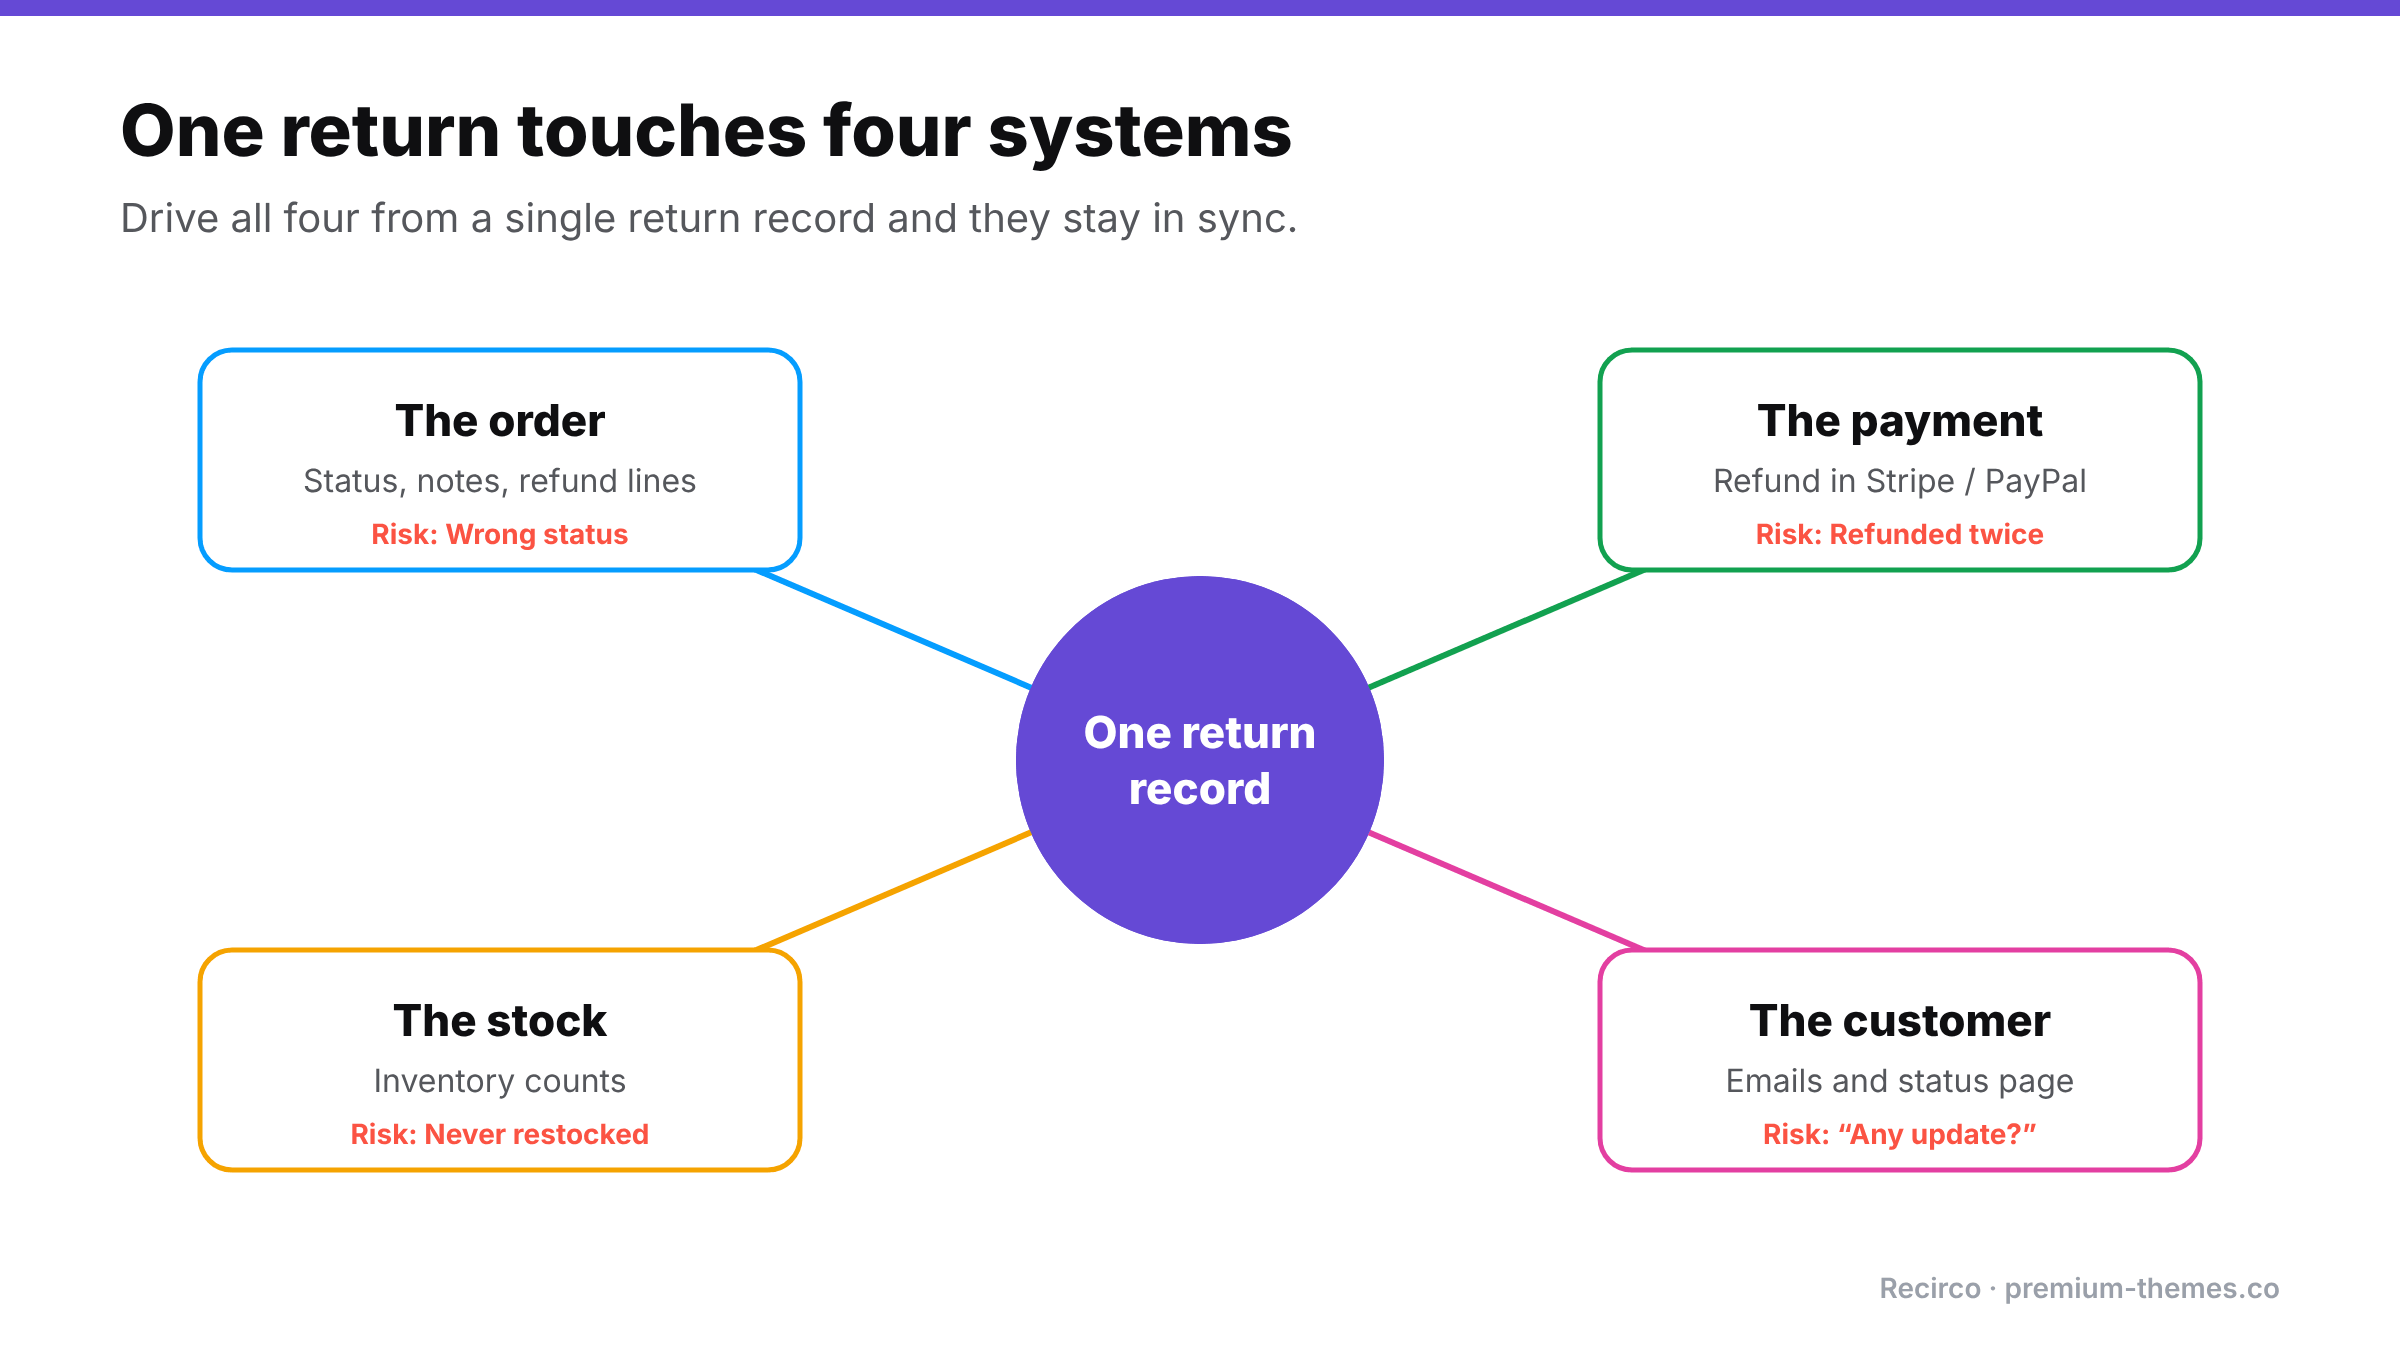
A return touches four different things at once:

1. The order in WooCommerce
2. The payment in your gateway (Stripe, PayPal, etc.)
3. The stock in your inventory
4. The customer, via email

When returns are handled by email and memory, those four drift apart. The refund goes through twice. The item comes back but nobody restocks it. The order says one thing, the gateway says another, and the customer has heard nothing for a week.

This guide sets out a clean RMA (Return Merchandise Authorization) workflow for WooCommerce, the mistakes it prevents, and how to make the store enforce it.

The five most common return-processing mistakes

Hub diagram: one return record connected to the order (risk: wrong status), the payment (risk: refunded twice), the stock (risk: never restocked) and the customer (risk: chasing updates).

1. Inventory drift

A returned item comes back, gets put on a shelf, and is never added back to stock in WooCommerce. Over time your counts drift: products show out of stock when you have them, and your reorder decisions are based on wrong numbers.

The opposite happens too: stock is restocked when the return is requested, and the item never actually comes back.

2. Duplicate refunds

There are three places to issue a refund: the gateway dashboard, the WooCommerce order, and (if you use a returns tool) the return itself. When two people use two different places, the customer gets refunded twice. Refunds made only in the gateway may also never reach WooCommerce, so your records still show the order as paid.

3. Unenforced return windows

Without a system checking dates, late returns get approved to avoid arguments.

4. No data on why items come back

Without a recorded reason on every return, you can’t see that one product’s sizing is wrong or one supplier’s quality has dropped.

5. Fragmented records

The return conversation is in email, the refund in Stripe, the stock change in a spreadsheet, and the order in WooCommerce. Answering “what happened with this return?” means checking four places.

A clean WooCommerce RMA workflow

Here’s a workflow that avoids all five. The key idea: one record per return, moving through fixed statuses, with refunds and stock changes triggered from that record.

1. Request

(Setting this up from scratch? Follow our step-by-step returns portal guide.)

The customer requests a return from My Account, choosing the order, items, quantities and a reason. The system checks eligibility: inside the window, not already refunded, not an excluded product. An RMA number is issued.

2. Review and approve (or reject)

Your team reviews the request in a queue, sees the order history and reason, and approves or rejects with a note. The customer is emailed either way. If approved, they get the return address.

3. In transit

The customer ships the item and adds a tracking number.

4. Received

The item arrives and is inspected. This is usually the right moment to restock, because you only add back stock you physically have, in sellable condition.

5. Refund (or exchange, or credit)

The refund is created from the return record, as a proper WooCommerce refund that is optionally sent to the gateway in the same step. Because it’s linked to the return, the system can prevent a second refund for the same items.

6. Completed

The return is closed, the customer is notified, and the full history stays in an activity log.

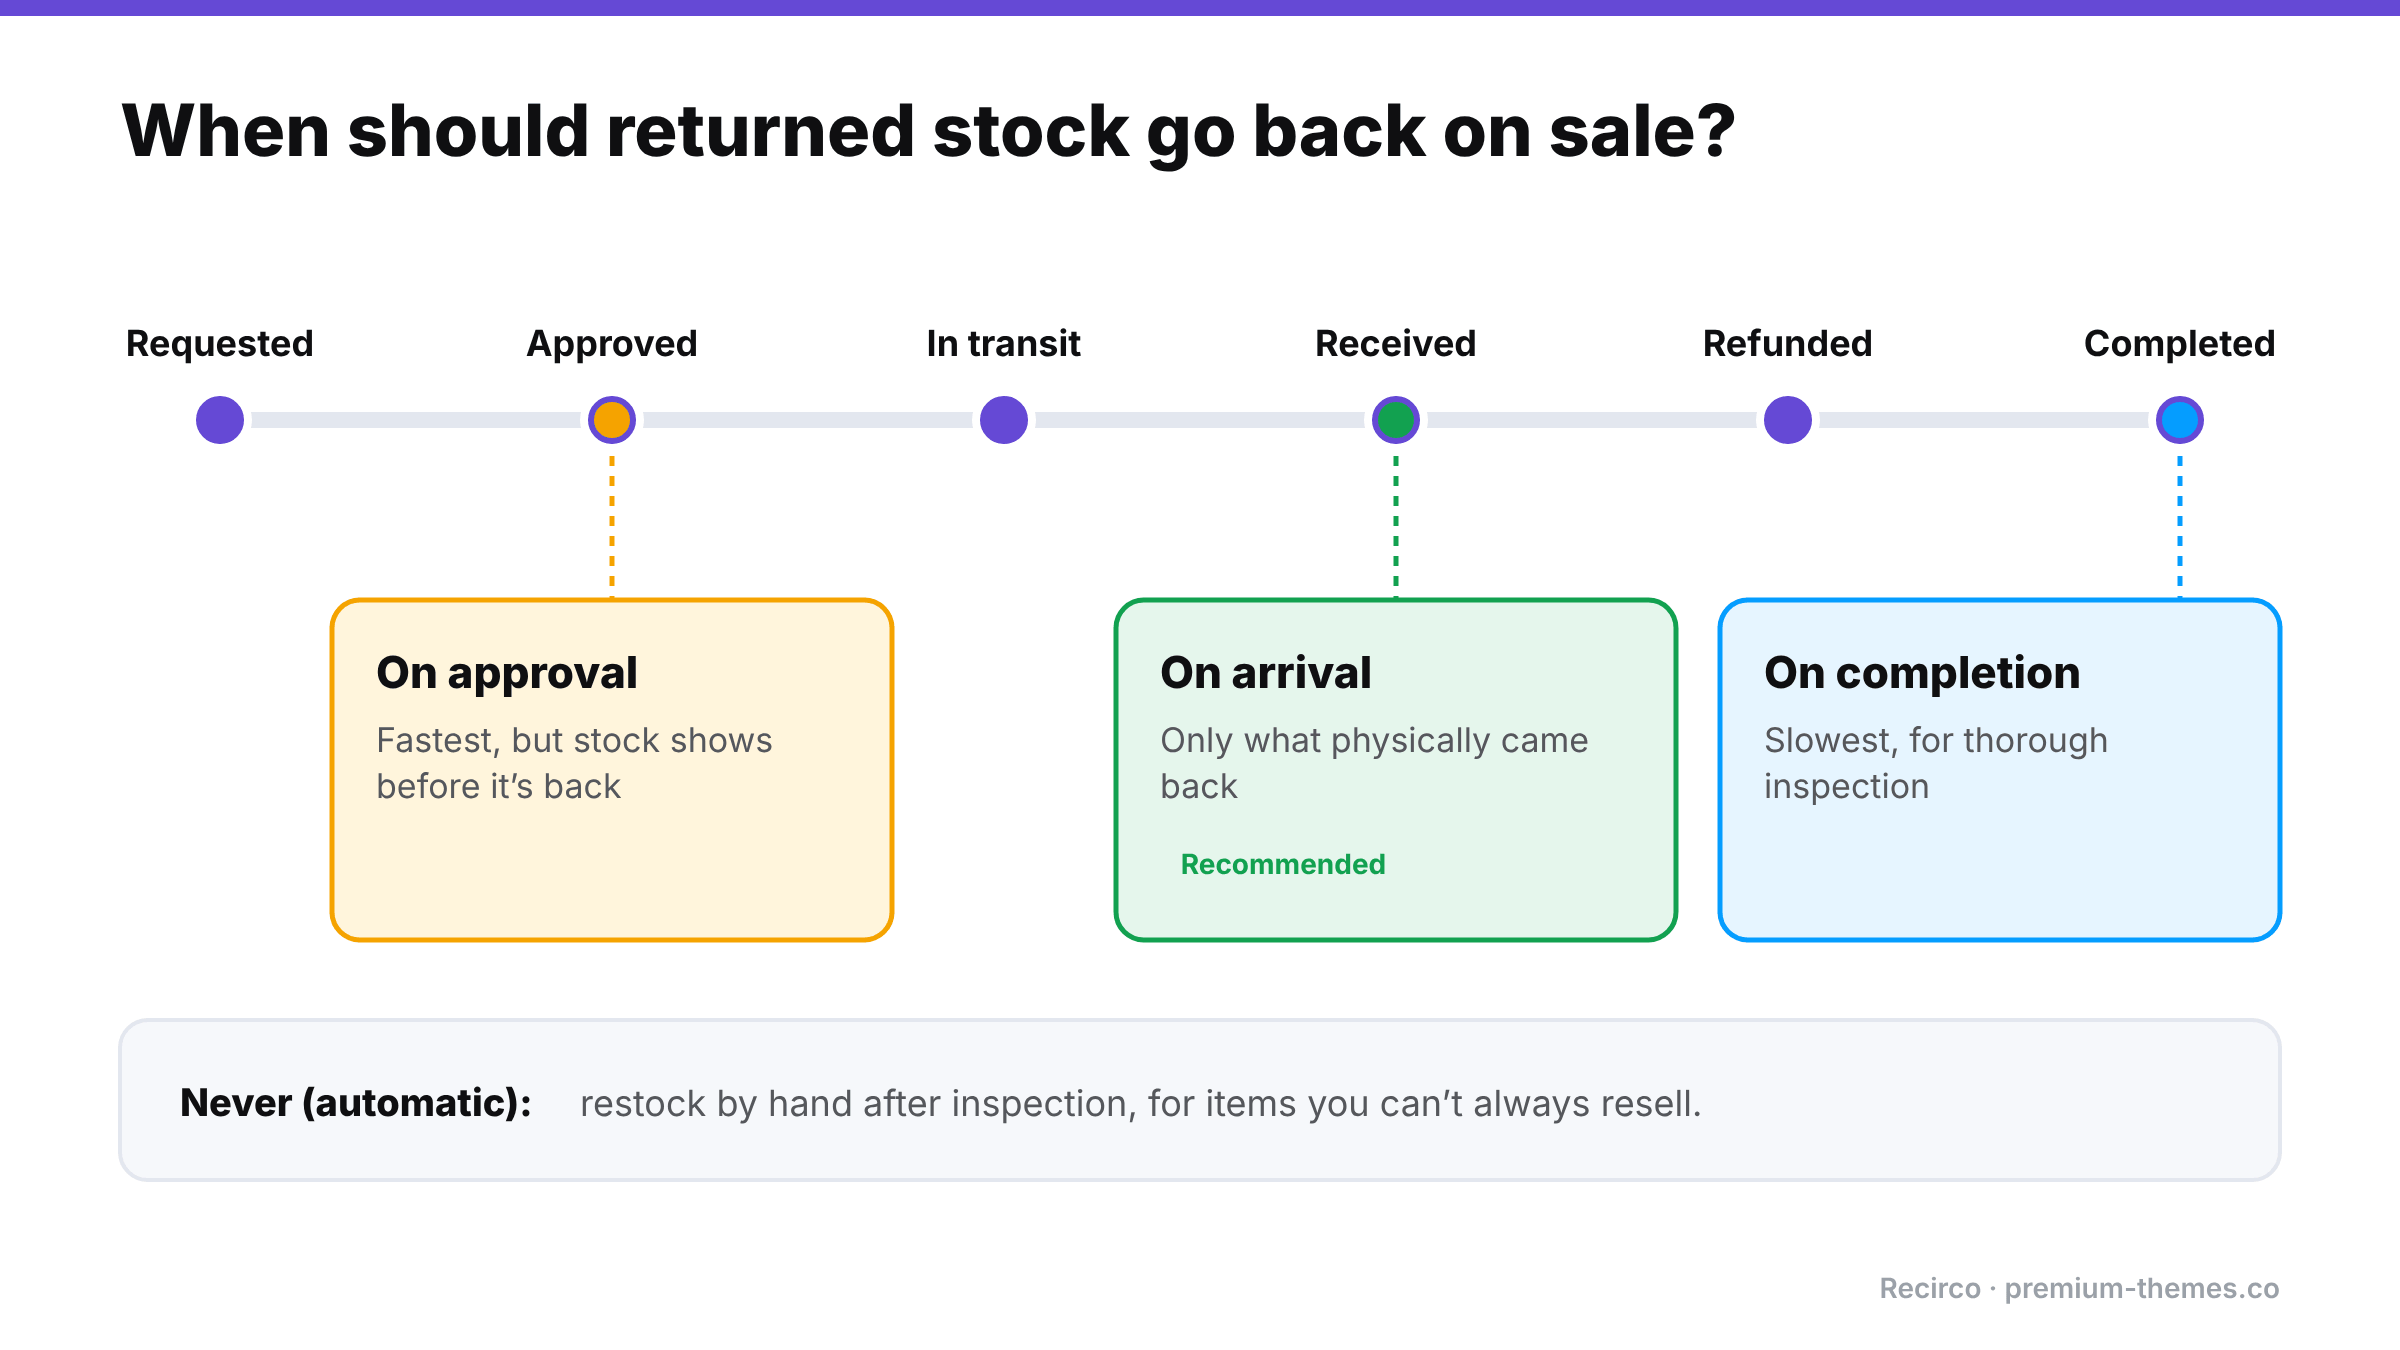
When should you restock?

Return status timeline from requested to approved, in transit, received, refunded and completed, with four restock options: never (restock by hand), on approval (fastest but stock shows before it's back), on arrival (recommended), and on completion (slowest).

If you’re not sure, use on arrival.

Getting refunds right in WooCommerce

A few things worth knowing about how WooCommerce refunds work:

  • Refund from the order, not the gateway. On the order screen, Refund via [gateway] sends the money and records the refund in WooCommerce. A refund made only in the gateway dashboard may never be recorded in WooCommerce.
  • “Refund manually” records a refund in WooCommerce without sending money. Use it when the money was already returned another way (for example, already refunded in the gateway).
  • Partial refunds need the tax split. If you refund one line item, the refund should include the correct share of that line’s net amount and tax. Getting this wrong makes your tax reports inaccurate.
  • “Restock refunded items” on the WooCommerce refund screen adjusts stock at the moment of refund. If your returns tool already restocked on arrival, don’t restock again.
  • Fully refunded orders should move to Refunded. A fully refunded order still sitting in Processing can get shipped by mistake.

Making WooCommerce enforce the workflow

The free Recirco – Returns & Exchanges for WooCommerce plugin is built around exactly this workflow:

  • Seven statuses enforced by a guarded state machine. A return can only move to a valid next status, so steps can’t be skipped or reversed by accident.
  • Restock timing you choose: never, on approval, on arrival, or on completion.
  • Refunds from the return: creates a real WooCommerce refund, optionally sent to the gateway, with net and tax split from the original line. Auto-refund on completion is optional and off by default, and the plugin is designed to prevent duplicate refunds for the same return.
  • Admin queue with search, filters, status counts, a pending badge and bulk approve, reject, mark received and delete.
  • Activity log on every return and a panel on the order edit screen, so the order and its return are in one place.
  • Internal notes or notes emailed to the customer.
  • Six editable emails covering every step.
  • Return windows, eligible statuses, excluded products/categories and reasons.
  • HPOS compatible, data in three dedicated custom tables, and no outbound calls.
  • 26 documented actions and 29 filters for developers who want to connect returns to an ERP, warehouse or helpdesk.

It writes to your orders only when you tell it to.

Recirco Pro adds automation on top: conditional approval rules, carrier return labels via Shippo generated on approval (cheapest rate by default, with manual label upload as a fallback), exchanges, store credit, analytics, and warranty claims with serial numbers and photos.

Is your current process leaking? A quick audit

  • [ ] Can you list every open return and its status in under a minute?
  • [ ] Is there exactly one place your team issues return refunds?
  • [ ] Are returned items restocked at a consistent, defined moment?
  • [ ] Does every return have a recorded reason?
  • [ ] Can a customer see their return’s status without emailing you?
  • [ ] Are late returns rejected by the system, not by a person?

If you answered “no” to two or more, a structured RMA workflow will save you time and money.

Restock timing Good for Risk
Never (automatic) Items that can’t be resold; manual inspection You must remember to restock by hand
On approval Very fast-moving stock, trusted customers Stock shows available before it’s back
On arrival Most stores Small delay before stock is available
On completion Stores that inspect thoroughly before closing Longest delay
Exchanges vs Refunds: How WooCommerce Stores Keep Revenue From Returns

Exchanges vs Refunds: How WooCommerce Stores Keep Revenue From Returns

When a customer returns something, you have three ways to resolve it:

  1. Refund. The money goes back. The sale is gone.
  2. Exchange. They get a different size, colour or product. The sale stays.
  3. Store credit. The money stays with you, to be spent later.

Most WooCommerce stores default to option 1, because it’s the only one WooCommerce supports natively. That’s an expensive default.

This article looks at why exchanges and store credit matter, what the data says about shopper behaviour, and how to offer both in WooCommerce without building a manual process around them.

The scale of the problem

The National Retail Federation estimated US consumers would return $849.9 billion of merchandise in 2025, with 19.3% of online sales returned (NRF, October 2025).

You can’t stop all returns, and you shouldn’t try. Many happen because the customer genuinely needed a different size. But you can change how they end.

What shoppers actually want

Chart: returns currently end as refunds 46%, exchanges 29%, store credit 25%. 75% of consumers prefer a full refund by default, but 87% would consider an exchange if it were easy, and 39% could be swayed by bonus store credit. Source: Loop Returns, July 2026.

Loop’s 2026 survey of 3,000 consumers and 600 retailers across the US, UK and Australia found (Loop Returns, July 2026):

  • 75% of consumers prefer a full refund by default…
  • …but 87% would consider an exchange if the experience were easy enough.
  • The top factors in choosing an exchange were ease of processing (37%) and speed (35%).
  • Incentives work: 39% said bonus store credit could steer them away from a refund, 36% a waived exchange fee, and 35% a speedy replacement.
  • Across retailers surveyed, refunds made up 46% of returns processed, exchanges 29%, store credit 25%.

The takeaway: customers don’t insist on refunds because they hate exchanges. They default to refunds because exchanges are usually harder. Usually that means emailing, waiting for the return to arrive, then placing a new order themselves.

Why exchanges are worth so much

  • You keep the revenue. The original sale stays on your books.
  • You keep the customer. A shopper who gets the right size is far more likely to buy again than one who got a refund and moved on.
  • The customer gets what they wanted. They wanted the product. It just wasn’t quite right.
  • Variant swaps are low-risk. Same product, same price, different size or colour.

Why store credit is worth offering too

Not every return has an obvious replacement. Store credit lets the customer decide later, while the money stays with you.

  • A small bonus changes behaviour. Offering, say, 10% extra as store credit versus a refund is a strong nudge, and costs you far less than losing the full sale.
  • Expiry encourages use (check local laws on credit and gift card expiry before setting one).
  • It brings customers back to your store to spend it, often spending more than the credit.

How WooCommerce handles exchanges and store credit today

Out of the box, it doesn’t.

  • No exchanges. The usual workaround is to refund the original order and ask the customer to place a new one, or manually create a new order and adjust stock by hand. Both are slow and error-prone, and the “refund then reorder” route often ends with just the refund.
  • No store credit. Stores typically generate a one-off coupon code as a substitute. Coupons work, but they’re awkward to track: no running balance, no ledger, and partial use often gets messy.

How to offer exchanges and store credit properly

Recirco – Returns & Exchanges for WooCommerce gives you a free self-service returns portal, approval queue and refund workflow. Recirco Pro adds exchanges and store credit on top.

Exchanges and variant swaps

When requesting a return, the customer picks a replacement right inside the returns portal, such as a different size or colour. When the return is completed, Recirco creates a zero-total replacement order in Processing, so it flows into your normal fulfilment like any other order. No manual order entry, no stock adjustments by hand, and the customer never has to place a new order.

Store credit

Store credit in Recirco Pro is built as an append-only ledger. Every credit and every use is a separate entry, and the balance is calculated from those entries rather than overwritten, so there’s always an audit trail.

  • Bonus percentage to make credit more attractive than a refund
  • Optional expiry
  • A store credit balance page in My Account
  • Applied at checkout, deducted from the order total

Pair it with approval rules

Recirco Pro’s conditional approval rules let you automate decisions. You could auto-approve exchanges (low risk, revenue retained) while holding refund requests above a certain value for review.

Making exchanges the easy choice

Whatever tool you use, the principles are the same:

  1. Show the exchange option first in the returns flow, before refund.
  2. Make it fast. Ship the replacement as soon as you’re comfortable (on approval for trusted customers, on arrival for others).
  3. Incentivize credit. A bonus on store credit is cheaper than a refund.
  4. Keep refunds available. Hiding refunds frustrates customers and, in the EU and UK, conflicts with their legal right to withdraw. Exchanges should be the easy choice, not the only one.
  5. Measure it. Track the share of returns ending as exchange, credit or refund each month. Recirco Pro’s analytics show requests over time, value returned, top reasons and most-returned products.

A quick example

Illustrative bar chart: 100 returns a month at $60 each means $6,000 leaving the business if all are refunded. If a quarter move to exchanges or store credit, $1,500 a month is kept. Illustrative numbers.

Say you process 100 returns a month at an average of $60, and every one ends as a refund. That’s $6,000 a month leaving the business.

If an easy exchange flow and a store-credit bonus moved even a quarter of those to exchanges or credit, you’d keep roughly $1,500 a month in revenue before counting the repeat purchases those customers go on to make. (Illustrative numbers; your results will depend on your products and customers.)

WooCommerce Return Policy: A Free Template, the Rules That Apply, and How to Actually Enforce It

WooCommerce Return Policy: A Free Template, the Rules That Apply, and How to Actually Enforce It

Most WooCommerce return policies have the same problem. The page says “Returns accepted within 30 days,” and then nothing in the store enforces it.

A customer asks to return something on day 47. Your team member doesn’t want an argument, so they approve it. Another customer returns a final-sale item because nothing stopped them from asking. The policy exists, but only on paper.

This guide covers what a good return policy includes, the legal minimums for the main Western markets, a free template you can adapt, and how to make WooCommerce enforce your policy automatically.

This article is general information, not legal advice. Consumer law varies by country and state, so check the rules for the markets you sell to.

Why your return policy affects sales, not just returns

Shoppers read return policies before they buy. Loop’s 2026 Returns Revenue Gap survey of 3,000 consumers in the US, UK and Australia found that 59% always or often check the returns policy before buying, and 58% have abandoned a purchase or walked away from a brand because of its return policy (Loop Returns, July 2026).

The NRF found 82% of consumers say free returns are a major purchase consideration (NRF, October 2025).

A clear policy isn’t just protection. It’s a conversion tool.

What every return policy should cover

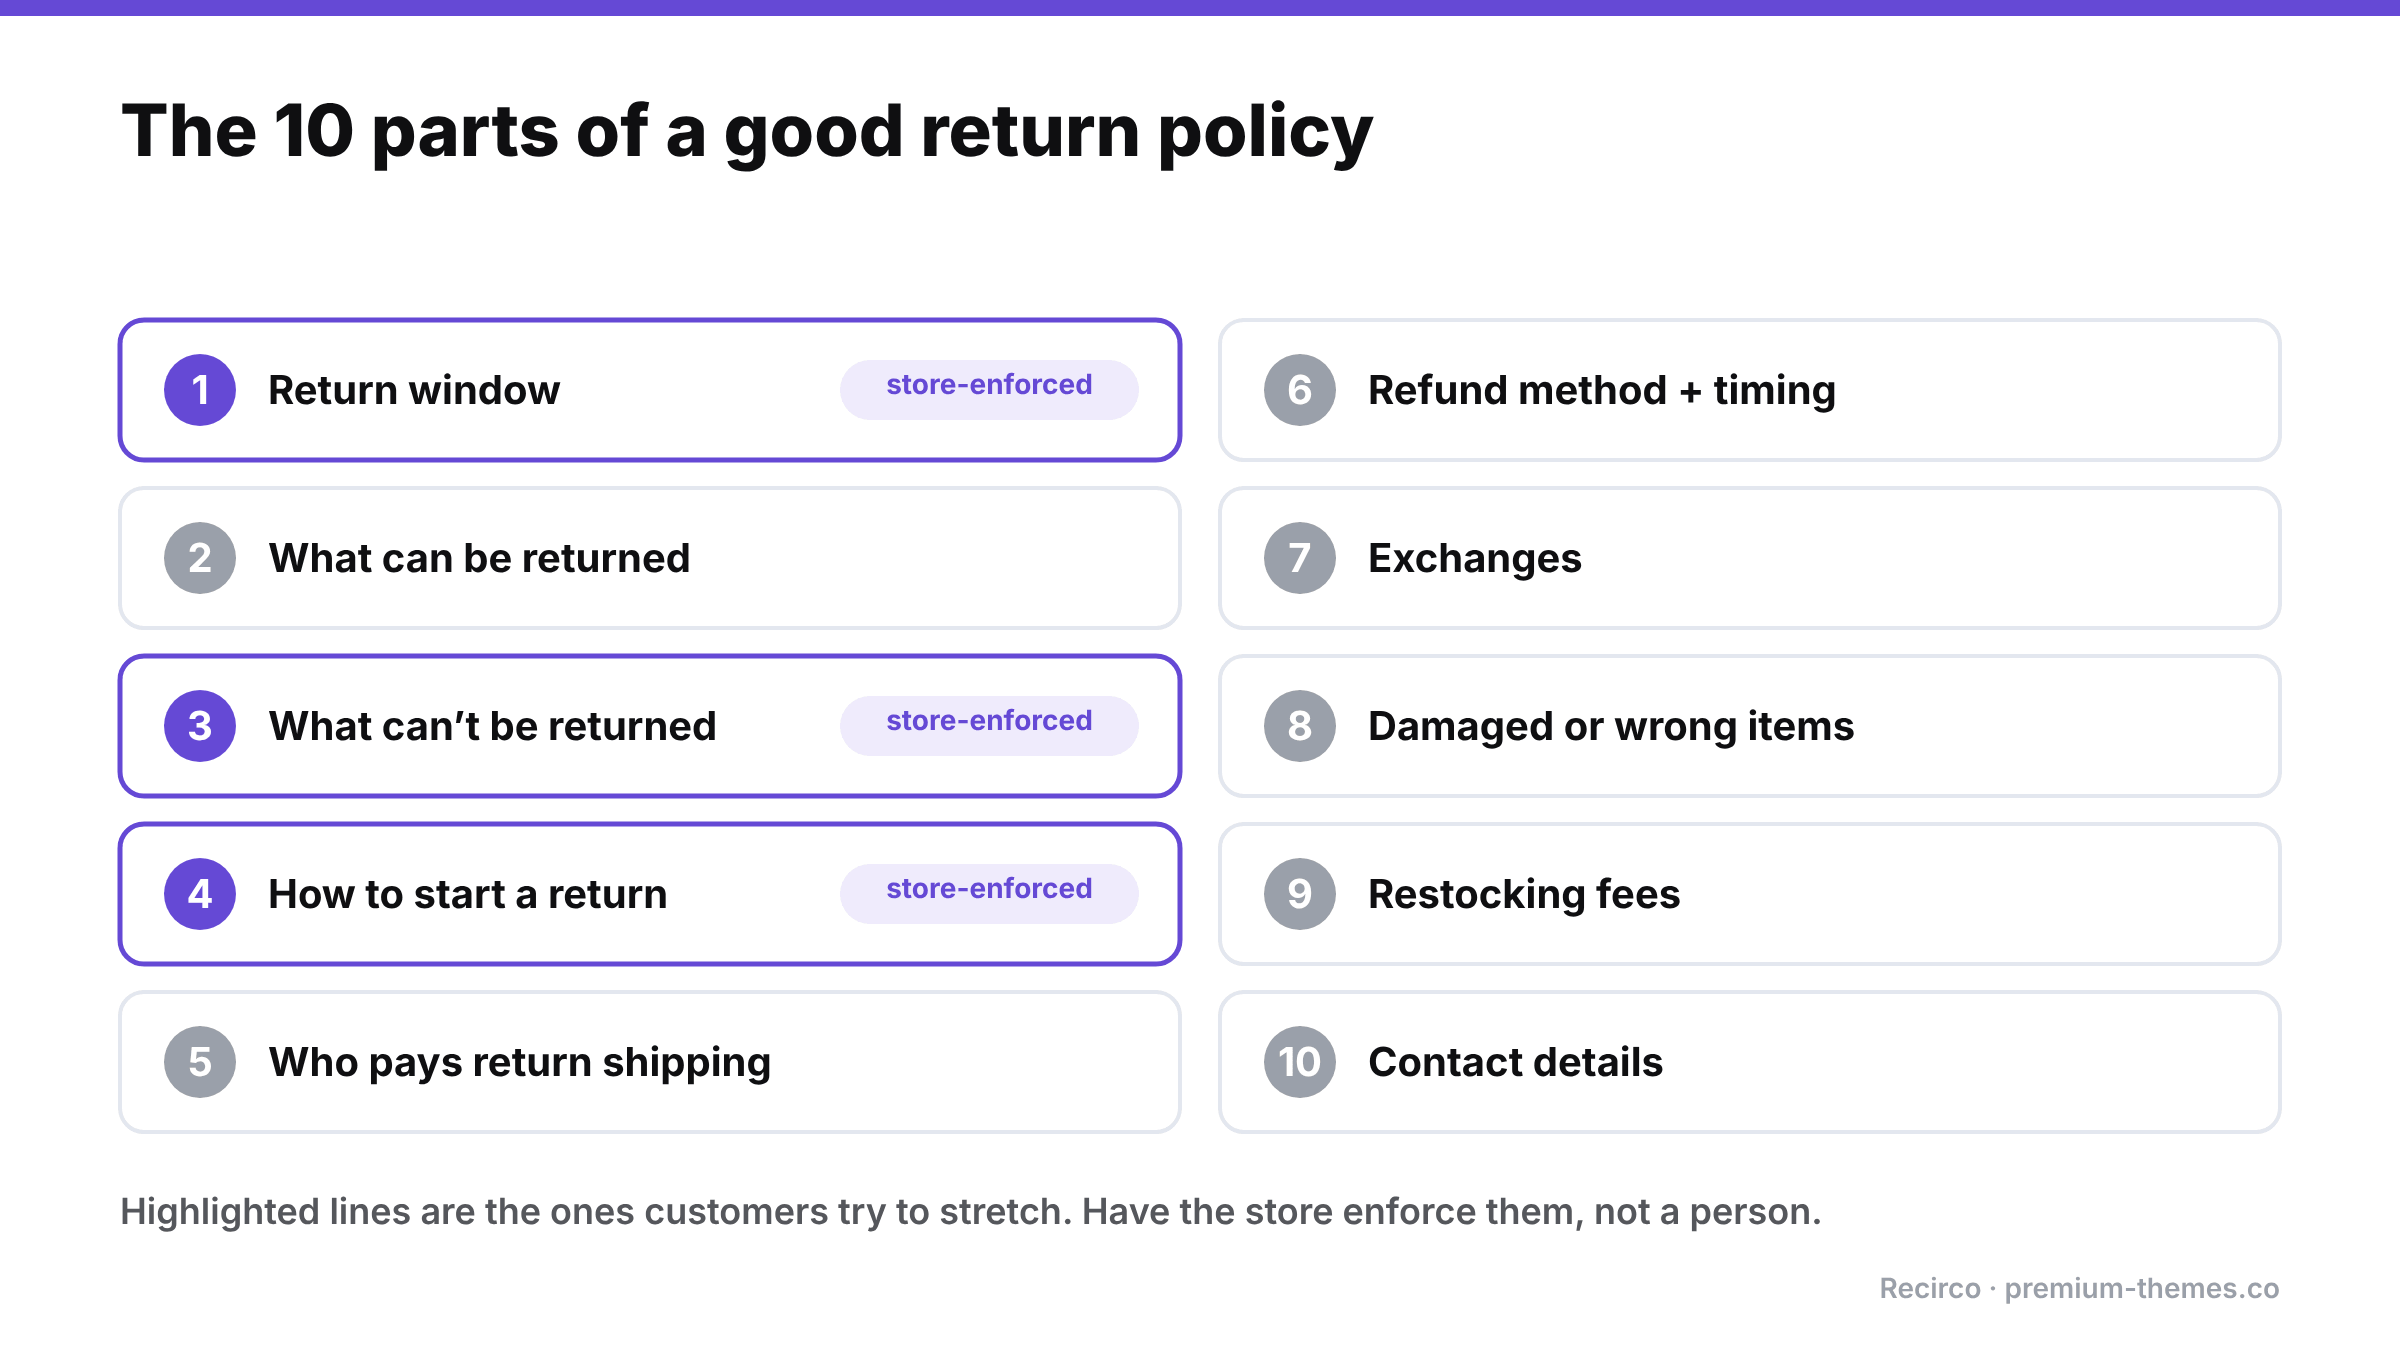
Checklist of ten return policy elements: return window, what can be returned, what can't be returned, how to start a return, who pays return shipping, refund method and timing, exchanges, damaged or wrong items, restocking fees, and contact details. The return window, exclusions and how to start a return should be enforced by the store.

  1. The return window: how many days, and counted from when (order date, delivery date).
  2. What can be returned: condition requirements (unused, tags attached, original packaging).
  3. What can’t be returned: final sale, personalized, hygiene items, perishables, digital downloads.
  4. How to start a return: ideally “from your account,” not “email us.”
  5. Who pays return shipping, and whether a label is provided.
  6. Refund method and timing: original payment method, store credit, or exchange, and how long it takes after the item arrives.
  7. Exchanges: whether you offer them and how.
  8. Damaged or wrong items: a separate, faster process.
  9. Restocking fees, if any.
  10. Contact details for questions.

The legal minimums in key markets

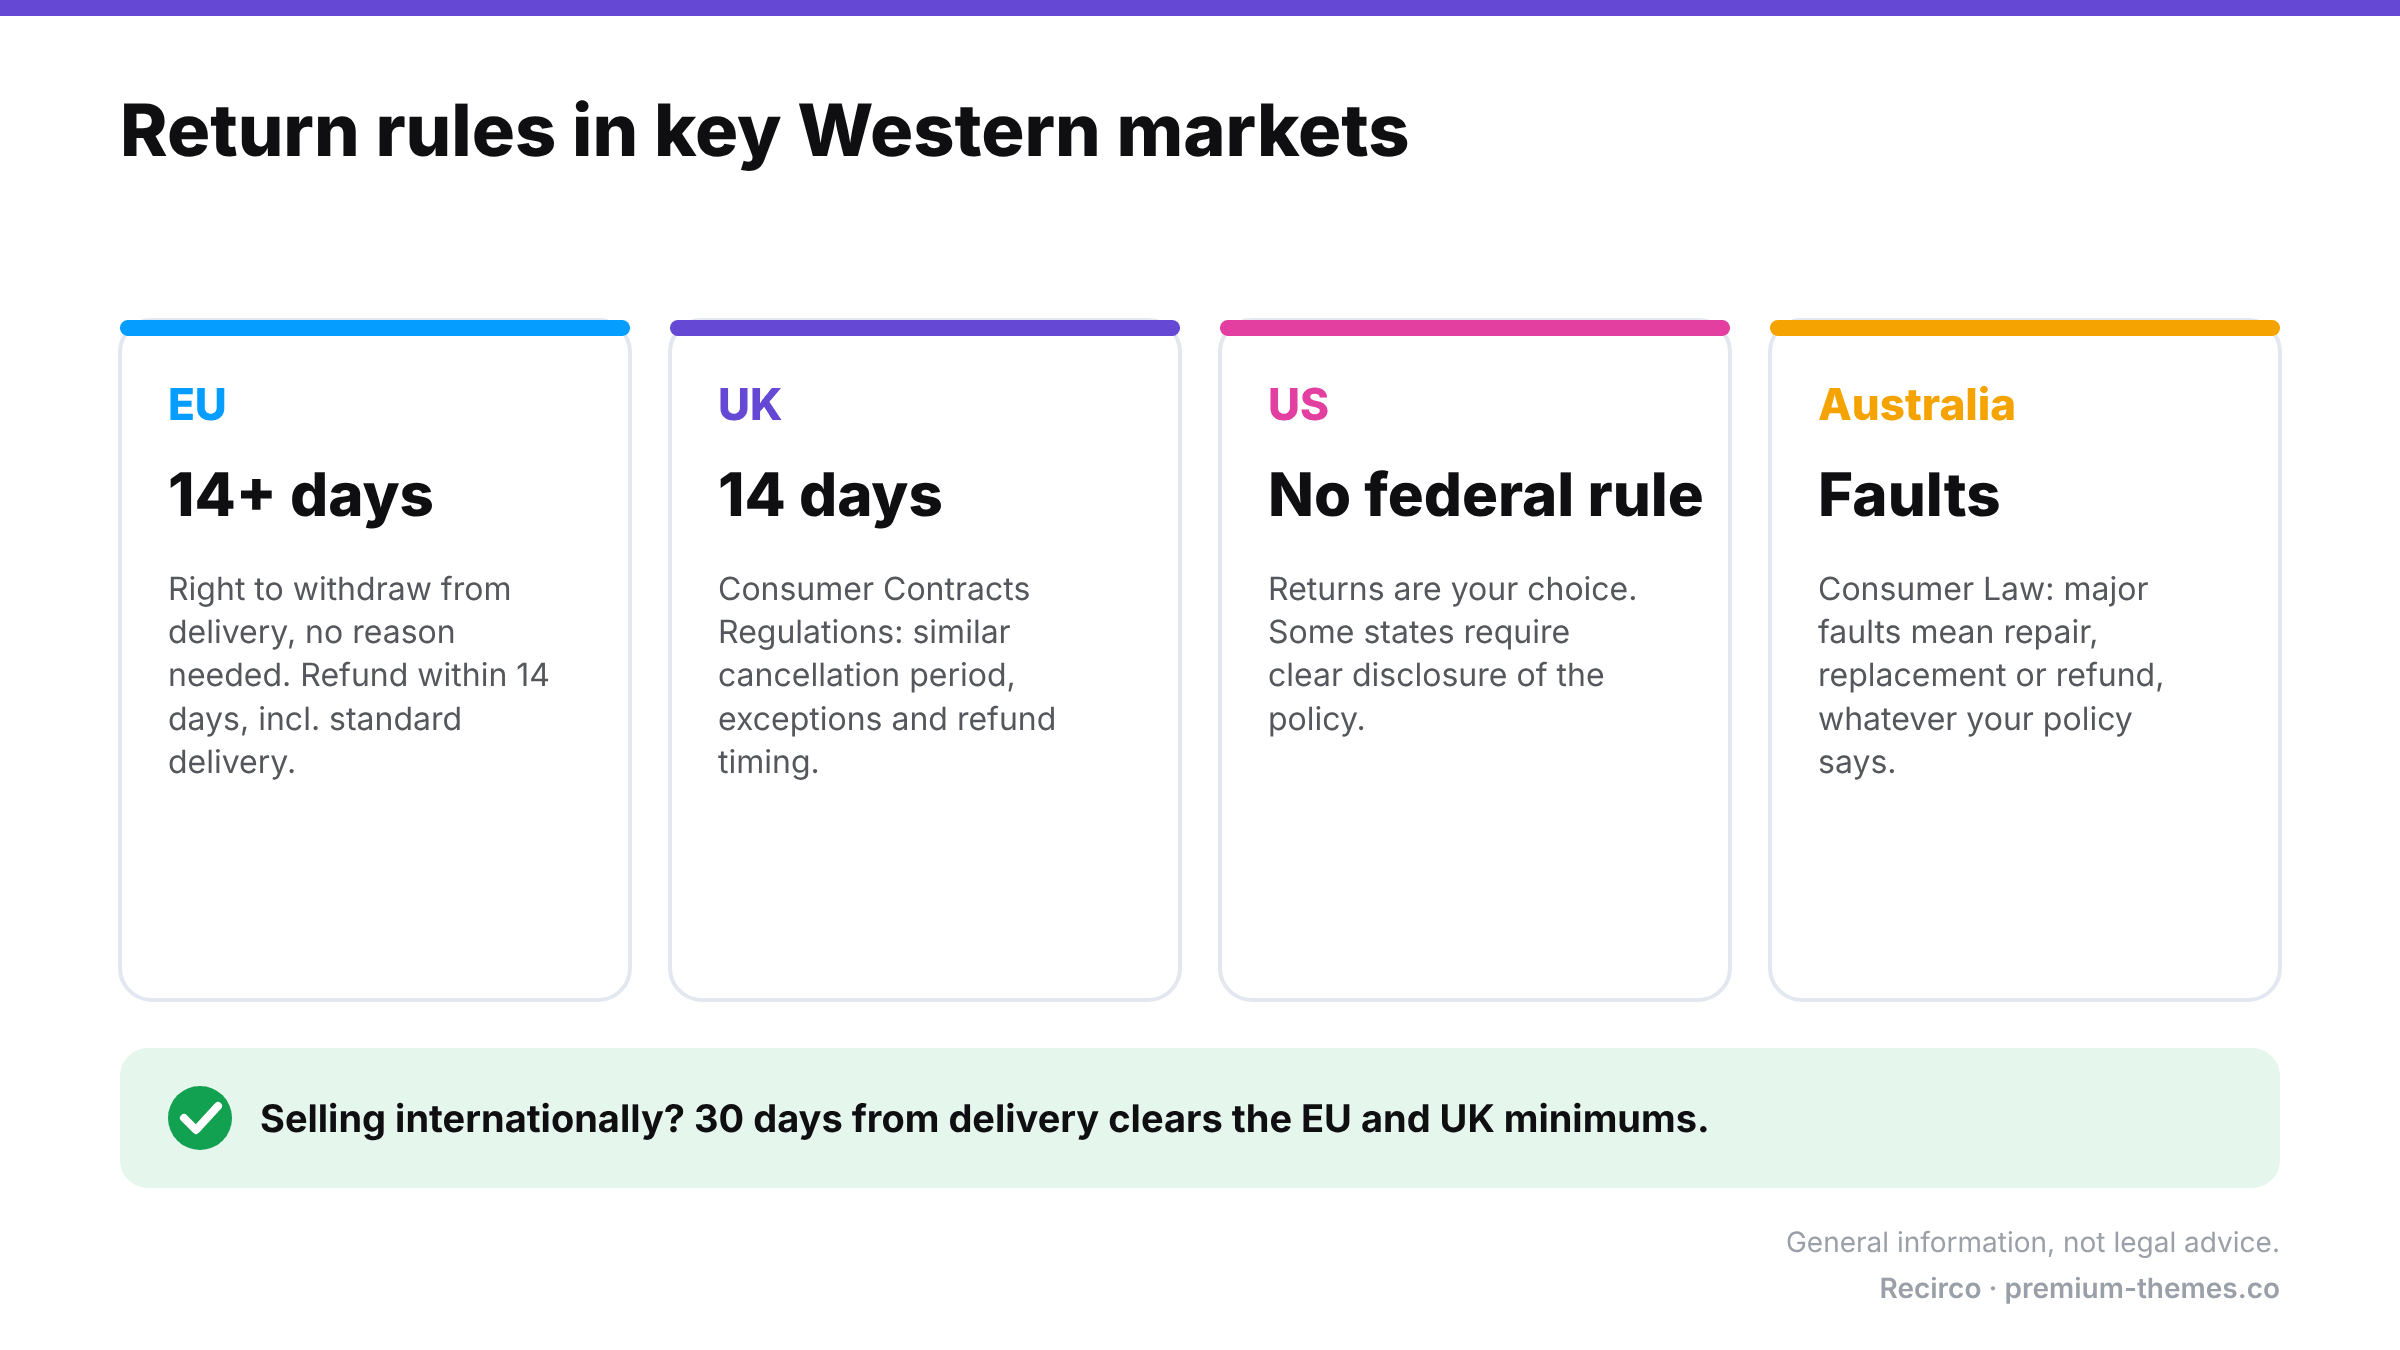
Return rules by market: EU, at least 14 days to withdraw from delivery with a refund within 14 days; UK, 14-day cancellation period; US, no federal rule but some states require disclosure; Australia, major faults require repair, replacement or refund. A 30-day window from delivery clears EU and UK minimums. General information, not legal advice.

European Union

Under the EU Consumer Rights Directive, consumers buying online generally have at least 14 days from receiving the goods to withdraw from the purchase without giving a reason. Once they tell you, you generally have 14 days to refund, including the original standard delivery cost. You may withhold the refund until you receive the goods or proof they were sent back. There are exceptions, such as personalized goods, sealed hygiene products that were unsealed, and perishables. If you don’t inform customers of their right of withdrawal, the period can be extended significantly.

United Kingdom

The Consumer Contracts Regulations give a similar 14-day cancellation period for online purchases, with similar exceptions and refund timing.

United States

There’s no general federal law requiring retailers to accept returns. Some states have rules about disclosing your policy (especially if you don’t offer refunds). Whatever you choose, state it clearly and stick to it.

Australia

Australian Consumer Law gives customers rights to a repair, replacement or refund when goods have a major fault, regardless of your “change of mind” policy. Don’t write a policy that implies otherwise.

The practical takeaway: if you sell internationally, a 30-day window counted from delivery comfortably clears the EU and UK minimums and matches what many shoppers expect.

Free WooCommerce return policy template

Copy this into a page (e.g. Returns & Refunds), replace the bracketed parts, and link it from your footer, product pages and checkout.

—

Returns & Refunds

We want you to love what you ordered. If something isn’t right, you can return it within [30] days of delivery.

How to start a return

Log in to My Account → Returns, choose the order and items, and tell us why. You’ll get a return number (RMA) and our return address straight away. No need to email us.

What can be returned

Items must be unused, in their original condition and packaging, with tags attached.

What can’t be returned

[Final-sale items], [personalized items], [underwear and swimwear for hygiene reasons], [gift cards]. These are marked on the product page.

Return shipping

[Return shipping is free / Return shipping costs are deducted from your refund / We’ll email you a prepaid label once your return is approved.]

Refunds

Once your return arrives and is checked, we’ll refund your original payment method within [5] business days. Your bank may take a few more days to show it.

Exchanges and store credit

[Prefer a different size or colour? Choose an exchange when you request your return and we’ll send the replacement once your return is processed.] [Choose store credit and we’ll add a [10]% bonus.]

Damaged, faulty or wrong items

Please request a return within [7] days of delivery and select “Damaged or defective” or “Wrong item,” with a short description. We’ll make it right at no cost to you.

EU and UK customers

You have the right to cancel your order within 14 days of receiving it without giving a reason. This policy does not affect your statutory rights.

Questions? Contact us at [help@premium-themes.co].

—

Best practices that reduce friction (and abuse)

  • Count from delivery, not order date. It’s fairer, and it’s how EU law counts.
  • Make “how to start a return” self-service. Every email exchange costs you time and frustrates the customer.
  • Ask for a reason on every return. It costs the customer two seconds and gives you the data to fix product pages and sizing.
  • Require detail for some reasons only. “Damaged” needs a description. “Changed my mind” doesn’t.
  • Offer exchanges and store credit alongside refunds. (See Exchanges vs refunds.)
  • Be consistent. Inconsistent exceptions are what train customers to push.

How to enforce your policy in WooCommerce

Here’s the gap: WooCommerce has no concept of a return window or non-returnable products. Your policy page can say anything, but nothing in the store applies it.

The free Recirco – Returns & Exchanges for WooCommerce plugin turns your written policy into rules the store enforces:

Policy line How Recirco enforces it
“Within 30 days of delivery” Return window in days, counted from the order’s completed, paid or created date
“Final sale items can’t be returned” Excluded products and categories never appear as returnable
“Start your return in My Account” A Returns tab in My Account with only eligible items shown
“Tell us why” Configurable reasons, each optionally requiring an explanation
“You’ll get a return number” Automatic RMA numbers with your own prefix
Policy text and return address Shown to customers on the return status page

Customers simply can’t submit a return outside the window or for an excluded item, so your team never has to say no by email. Late or borderline cases you want to allow can still be handled manually.

Recirco Pro goes further with conditional approval rules (seven conditions, four actions: approve, reject with reason, flag, or hold, with the first matching rule winning and the deciding rule named in the activity log). For example, you could auto-approve low-value returns from repeat customers and flag high-value ones for review.

How to Add a Self-Service Returns Portal to WooCommerce (Free, Step by Step)

How to Add a Self-Service Returns Portal to WooCommerce (Free, Step by Step)

WooCommerce can issue refunds. What it can’t do out of the box is handle returns.

There’s no way for a customer to request a return from their account, no approval step, no RMA number, no return reasons, no return window. So most stores end up running returns through email: “Hi, I’d like to return my order…” followed by a back-and-forth to find the order number, which item, why, whether it’s still in the return window, and where to send it.

That works at five returns a month. At fifty, it becomes a part-time job and a source of mistakes: forgotten restocks, refunds issued twice, late returns approved because nobody checked the date.

This guide shows how to replace that email thread with a proper self-service returns portal, for free.

Why it’s worth doing

Comparison. Returns by email: asking for the order number, item and reason, checking dates by hand, forgotten restocks, double refunds, and customers chasing updates. Returns portal: order picked from the account, items and reasons in one form, window enforced automatically, restock at a chosen moment, one linked refund, and a live status page.

Returns aren’t an edge case. The National Retail Federation estimated that 19.3% of online sales would be returned in 2025, and that 76% of consumers are more likely to choose a retailer offering an instant refund or exchange. 71% said they’re less likely to shop with a retailer again after a poor returns experience (NRF, October 2025).

A clear, self-service returns process does three things:

  1. It cuts support time. Customers submit everything you need in one go.
  2. It enforces your policy consistently. The system checks the return window, not a tired staff member.
  3. It builds buying confidence. Shoppers check returns policies before they buy. An easy process removes a reason to hesitate.

What a good WooCommerce returns portal needs

For customers:

  • A Returns area inside My Account, not a separate form they have to find
  • Only eligible orders and items offered (inside the return window, not already refunded, not excluded)
  • Per-item quantities and a reason for each
  • A status page showing what happens next, where to send the item, and an RMA number
  • The ability to add a tracking number and cancel their own request

For your team:

  • A single approval queue with search, filters and bulk actions
  • A clear status workflow that can’t be skipped or reversed by accident
  • Restocking at the right moment
  • Refunds created from the return, with no double-refunding
  • Notes (internal and customer-facing) and an activity log
  • Emails at each step

Step-by-step: setting up a free returns portal with Recirco

We’ll use Recirco – Returns & Exchanges for WooCommerce, a free plugin on WordPress.org. It requires WordPress 6.2+, PHP 7.4+ and WooCommerce 7.0+, supports HPOS and block checkout, and makes no outbound calls. Your returns data stays in your own database.

Step 1: Install and activate

Go to Plugins → Add New, search for Recirco, install and activate. WooCommerce must already be active.

Step 2: Set your return window

Go to WooCommerce → Returns settings and set:

  • Return window (days). How long customers have to request a return.
  • What the window counts from: the order’s completed, paid or created date. “Completed” is usually fairest if you mark orders complete when they ship or are delivered.
  • Eligible order statuses. Typically Completed (and Processing if you allow returns before shipping is marked complete).

Selling to EU customers? EU consumers have a legal right to withdraw from most online purchases within at least 14 days of receiving the goods. Set your window to at least that. More on this in our WooCommerce return policy guide.

Step 3: Exclude what can’t be returned

Exclude specific products or categories such as final-sale items, personalized products, underwear or perishables. Excluded items simply won’t appear as returnable in the portal.

Step 4: Set up return reasons

Recirco comes with six common reasons pre-loaded. You can edit them and choose which ones require an explanation. For example, “Damaged or defective” might require details, while “Changed my mind” doesn’t. Good reason data is how you’ll later reduce your return rate.

Step 5: Add your return address and policy text

Add the address customers should send items to and a short policy summary. Customers see these on their return status page along with the RMA number. You can set your own RMA prefix (e.g. ‘RMA-‘ or ‘RET-‘), customize the portal’s URL slug, and adjust the policy text.

Step 6: Choose when stock goes back

Pick when returned items are added back into inventory: never, on approval, on arrival, or on completion. For most stores, on arrival is safest. You only restock what physically came back.

Step 7: Review the emails

Recirco sends six editable emails (HTML and plain text): request received, admin alert, approved, rejected, completed, and customer note. Adjust the wording to match your brand voice.

Step 8: Test it as a customer

Log in as a test customer with a completed order, open My Account → Returns, and submit a request. If the Returns page shows a 404, go to Settings → Permalinks and click Save once to refresh WordPress’s URL rules.

What processing a return looks like

Return lifecycle alternating between customer and store: customer requests a return in My Account, team approves it, customer ships it back with the RMA number and tracking, team marks it received and restocks, customer is notified, team issues a WooCommerce refund and closes it. Every step is in one activity log.

(For the reasoning behind each step, see our WooCommerce RMA workflow guide.)

  1. The customer submits a request. You get an admin alert and see it in the queue with a pending badge.
  2. You (or a teammate) open it, review the items, reasons and order, and approve or reject. Several at once with bulk actions if you like.
  3. The customer gets the approval email with the RMA number and return address, ships the item, and adds a tracking number.
  4. When the parcel arrives, you mark it received. Stock is restocked if you chose on arrival.
  5. You create the refund from the return. Recirco creates a proper WooCommerce refund, optionally sent through your payment gateway, with net and tax split from the original line. Auto-refund on completion is available but off by default.
  6. The return is completed and the customer is notified. Every step is in the activity log, and a panel on the order edit screen shows the return.

Going further: exchanges, store credit and labels

The free plugin is a complete returns system. If you want to keep more revenue from returns and automate the busywork, Recirco Pro adds:

  • Exchanges and variant swaps. Customers pick a replacement size or colour, and a zero-total replacement order is created on completion.
  • Store credit with an optional bonus percentage and expiry, applied at checkout.
  • Conditional approval rules to auto-approve, reject, flag or hold requests.
  • Carrier return labels via Shippo, generated on approval.
  • Returns analytics: reasons, most-returned products, value returned and time to resolve.
  • Warranty claims with serial numbers and photo uploads.

We go deeper on why exchanges matter in Exchanges vs refunds.

Is Your WooCommerce Checkout Broken Right Now? How to Monitor It Before Customers Notice

Is Your WooCommerce Checkout Broken Right Now? How to Monitor It Before Customers Notice

Here’s a scenario that plays out on WooCommerce stores every day.

A plugin auto-updates overnight. The home page loads. Product pages load. Your uptime monitor shows a green tick. But the checkout throws a JavaScript error, or the payment step silently fails, or the cart empties itself on the way to checkout.

You find out two days later, when someone finally emails to say they couldn’t pay. Or you don’t find out at all, and just wonder why sales were slow that week.

Uptime is not the same as “customers can buy.” This guide explains what actually needs monitoring on a WooCommerce store, the free and paid ways to do it, and a practical setup for both single stores and agencies.

Why uptime monitoring isn’t enough

A typical uptime monitor requests your home page every few minutes and checks it returns a 200. That catches a crashed server. It misses almost everything that loses money in WooCommerce:

  • A broken cart or checkout page (PHP or JavaScript error on one page only)
  • A payment gateway that’s misconfigured, expired, or rejecting every payment
  • Webhooks being blocked, so paid orders never advance
  • The WooCommerce Store API failing, which block-based cart and checkout rely on
  • Background jobs stalling, so emails and stock updates stop
  • Caching serving a stale or broken checkout page
  • A sudden drop in orders because something upstream broke (ads, DNS for a payment script, a geo-blocking rule)

What to monitor on a WooCommerce store

Four monitoring layers: 1, buying pages load (shop, product, cart, checkout, Store API); 2, shoppers can reach payment; 3, incoming orders are correct; 4, order volume is normal. A basic uptime monitor only checks the home page and misses layers 2 to 4.

Think about it in four layers.

Layer 1: Can people reach the buying pages?

Not just the home page, but shop, a product page, cart, and checkout, plus the Store API endpoints the block checkout uses. Each should load quickly and without errors.

Layer 2: Can they get to the payment step?

The real test is adding a product to the cart and reaching checkout. That’s where most plugin conflicts show up. This is called synthetic monitoring: a script behaves like a shopper on a schedule.

A word of caution: synthetic tests should not place real orders. Test orders pollute your reports, trigger fulfilment, and can create real charges. Good synthetic checks stop before payment.

Layer 3: Are orders that come in actually correct?

Orders can be created and still be wrong: stuck on Pending payment, charged twice, cancelled despite payment, missing a confirmation email. That needs integrity checks on the orders themselves. (See stuck pending orders) and (double charges.)

Layer 4: Is order volume normal?

Sometimes nothing is technically “broken” by any test, but orders stop anyway. Comparing the current hour’s orders against comparable past hours (same day of week, same time of day) catches drops and spikes that point to a problem. The trick is avoiding false alarms on naturally quiet hours, which is why median-based comparisons work better than simple averages.

Alerts: the part people get wrong

Alert routing table: critical events like checkout down or payments stopped go to SMS and Slack; high events like a stuck paid order or order volume drop go to Slack and webhook; normal events like an email backlog go to email; everything else goes into a weekly summary. Confirm before alerting, throttle repeats, keep a delivery log.

Monitoring is useless if the alert goes to an inbox nobody reads, and equally useless if it fires so often everyone mutes it. Good alerting means:

  • The right channel: Slack or SMS for “checkout is down,” email for “weekly summary.”
  • Severity routing: urgent things wake someone, minor things wait.
  • Confirmation before alerting: one failed check could be a blip. Two in a row is a problem.
  • Throttling: one alert per issue, not one every five minutes.
  • A delivery log: so you can prove an alert was sent.

A free starting setup

You can get decent coverage for free:

  1. An uptime monitor on your home page and your checkout URL.
  2. WooCommerce → Status → Scheduled Actions checked weekly for past-due actions.
  3. ‘Tools → Site Health’ checked for loopback and REST API problems.
  4. Ordafide Order Integrity for WooCommerce (free) to scan orders for stuck payments, paid-but-cancelled orders, duplicate charges, refund mismatches, total mismatches, and customers who were never emailed. It also shows background queue and email delivery health, and sends an optional weekly summary when there’s something to report.
  5. A manual test purchase after every significant update, using a coupon to make it zero-cost or refunding immediately.

That covers layers 1 and 3 reasonably well. It leaves gaps in layers 2 and 4, and it relies on someone remembering to look.

A complete setup

Ordafide Pro fills those gaps:

  • Synthetic checkout monitoring every 15 minutes across shop, product, cart, checkout and the Store API, with response-time tracking. An optional deep mode adds a test product to a cart. It never creates orders, and a finding is raised only after two consecutive failures.
  • A signed heartbeat endpoint so an external monitor can confirm the store’s own checks are still running.
  • Order volume anomaly detection that compares the current hour with comparable past hours using median-based statistics, flags drops and spikes, and resolves itself when things return to normal.
  • Alerts via Slack, SMS (Twilio), signed webhooks (for Discord, Microsoft Teams, PagerDuty and similar) and email, with severity routing, per-check throttling, retries and a delivery log.
  • Read-only gateway reconciliation with Stripe, PayPal, Square, Mollie and Razorpay to catch payments with no order (see how to reconcile WooCommerce with Stripe and PayPal).

For agencies: monitoring client stores

If you maintain WooCommerce stores for clients, a broken checkout is an emergency you want to hear about before the client does, not from them.

What matters at agency scale:

  • One dashboard for all stores, not 20 logins.
  • Per-store alert routing, so the right person or client channel gets the right alert.
  • Silence detection, so a store that stops reporting entirely gets flagged rather than quietly looking “fine.”
  • Privacy. Clients’ order data shouldn’t be copied into a third-party service.
  • CLI access for scripted checks across many sites.

Ordafide’s free plugin includes WP-CLI commands (`wp ordafide scan`, `wp ordafide findings`, `wp ordafide health`, `wp ordafide digest`). Ordafide Pro adds a multi-store agency dashboard built on signed hourly snapshots that contain only counts and totals, not customer data. It flags any store that’s been silent for two hours, and the Agency licence adds per-store alert routing.

A monitoring checklist

  • [ ] Uptime checks on home and checkout
  • [ ] Synthetic check that reaches checkout without placing an order
  • [ ] Order integrity scan (stuck, duplicate, refund and total mismatches)
  • [ ] Background queue and email delivery monitored
  • [ ] Order volume compared against normal for the hour
  • [ ] Alerts routed to Slack/SMS for urgent issues, with throttling
  • [ ] Manual test purchase after major updates
  • [ ] For agencies: one dashboard and per-store routing
How to Reconcile WooCommerce Orders with Stripe and PayPal (and Find Money With No Order)

How to Reconcile WooCommerce Orders with Stripe and PayPal (and Find Money With No Order)

Your WooCommerce sales report says one number. Your Stripe balance says another. Your PayPal activity says a third. Your accountant wants to know which one is true.

Here’s the uncomfortable fact behind that gap: WooCommerce records what it believes happened. Your payment gateway records what actually happened. They’re two separate sources of truth, and nothing in WooCommerce continuously checks that they agree.

Most of the time they do. When they don’t, the difference is usually real money: customers who paid and never got their order, refunds your reports don’t know about, or stock that’s wrong because a refund never reached WooCommerce.

This guide gives you a practical reconciliation process you can run monthly (or weekly on busier stores), the five mismatches to look for, and how to fix each one.

Why WooCommerce and your gateway drift apart

  • Webhooks fail. The gateway tells WooCommerce about payments and refunds via webhooks. A firewall, a wrong secret, or a crash means WooCommerce never hears about it.
  • People work in two places. Staff issue refunds in the Stripe or PayPal dashboard because it’s faster. WooCommerce never finds out.
  • Checkouts break halfway. A payment succeeds but the order is never created or never updated.
  • Plugins modify totals. Coupons, fees, currency switchers and tax plugins can leave the stored order total different from the amount actually charged.
  • Disputes happen at the gateway. Chargebacks are raised with your gateway, not your store.

The 5 mismatches to look for

Venn diagram of WooCommerce versus the payment gateway. Orders matched by transaction ID sit in the overlap. Only in WooCommerce: paid orders with no payment and refunds marked but never issued. Only in the gateway: money with no order and refunds made in the gateway only. Plus amount disagreements between the two.

1. Money with no order

The gateway shows a successful payment, but there’s no corresponding WooCommerce order. This is the hardest to find, because WooCommerce has nothing to show you. It’s invisible by definition from inside the store. Causes include a checkout that crashed after the charge, or a duplicate charge whose order was never created.

Fix: contact the customer, then either create the order manually (so you fulfil it) or refund the payment.

2. Paid orders with no payment

WooCommerce shows an order as Processing or Completed, but there’s no matching successful payment in the gateway. Causes include an order manually set to Processing by mistake, a payment that was authorized but never captured, or one transaction attached to two orders.

Fix: stop fulfilment until you’ve confirmed payment, then contact the customer or cancel.

3. Amount disagreements

The order total in WooCommerce doesn’t match what the gateway collected. Small persistent differences often come from currency rounding. Bigger ones usually come from a coupon, fee or shipping plugin misfiring, or a manual order edit after payment.

Fix: decide which figure is right, then correct the order (or issue a partial refund) and add a note explaining why.

4. Refunds made in the gateway, missing in WooCommerce

Someone refunded in Stripe or PayPal directly, and WooCommerce still shows the order as fully paid. Your revenue is overstated, stock that came back was never restocked, and the order could even be shipped again.

Fix: record the refund in WooCommerce. Use Refund manually on the order (so WooCommerce doesn’t try to send the money a second time), tick Restock refunded items if the stock came back, and add a note referencing the gateway refund ID.

5. Refund status mismatches inside WooCommerce

These you can catch without the gateway at all: an order set to Refunded by hand with no refund actually issued (the customer never got their money), refunds larger than the order total, and fully refunded orders still sitting in Processing.

A manual reconciliation process

Five steps to reconcile WooCommerce with Stripe and PayPal: export both sides for the same period and timezone; match on transaction ID; sort unmatched lines into the five mismatch types; fix the most expensive first; then fix the cause. Rule: always refund from the WooCommerce order screen.

You can do this with exports and a spreadsheet. It takes time, but it works.

Step 1: Pick a period and export both sides

  • WooCommerce: export orders for the period with order number, date, status, total, payment method and transaction ID. Include refunds.
  • Stripe: export payments (and refunds) for the same period from the Payments section. Use the Payment Intent or charge ID.
  • PayPal: download an activity report for the period from your business account’s reports.

Use the same timezone on both sides, or orders near midnight will appear to be missing.

Step 2: Match on transaction ID, not amount

Match each gateway payment to a WooCommerce order using the transaction ID WooCommerce stores on the order. Matching by amount and date produces false matches whenever two customers buy the same thing.

Step 3: Sort the leftovers into the five buckets

Anything that doesn’t match cleanly belongs in one of the five categories above. Note the amount at stake for each.

Step 4: Fix the most expensive first

Customers who paid and received nothing come first. They’re the ones about to raise a dispute.

Step 5: Fix the cause

A mismatch is a symptom. If you find several stuck payments, check your webhooks (see WooCommerce order stuck on pending payment). If you find gateway-only refunds, agree a rule with your team: refunds are always issued from the WooCommerce order screen.

Where manual reconciliation falls down

  • It’s slow. Exports, lookups and matching easily take hours per month.
  • It’s late. A monthly check means a customer may have waited weeks.
  • It’s fragile. Partial refunds, multiple currencies, and multiple gateways make spreadsheets messy fast.
  • It doesn’t scale to agencies. Doing this across 10 or 20 client stores isn’t realistic.

Automating it

Start free. Ordafide Order Integrity for WooCommerce runs the store-side checks automatically: stuck payments, paid-but-cancelled orders, duplicate charges, refund mismatches and order totals that don’t add up. Findings are sorted by money at risk, each with evidence and next steps, and the plugin sends nothing off your server.

Then reconcile against the gateway. Ordafide Pro connects to Stripe, PayPal, Square, Mollie and Razorpay with read-only API keys and continuously compares what the gateway collected against what WooCommerce recorded. It detects:

  • money with no order
  • paid orders with no payment
  • amount disagreements
  • refunds missing in WooCommerce

Pro also keeps a full event log with CSV/JSON audit export over any date range (with secrets removed), which is useful to hand to an accountant. Because credentials are read-only, Ordafide can’t capture, refund or void anything at the gateway. It tells you what’s wrong and links you to the order.

A sensible reconciliation rhythm

Store size Store-side checks Gateway reconciliation
Under ~100 orders/month Weekly Monthly, manually
Hundreds of orders/month Continuous (automated) Weekly or continuous
Thousands/month, or multiple gateways Continuous Continuous, with alerts
Agencies managing client stores Continuous on every store Continuous, with per-store alerts
WooCommerce Order Emails Not Sending? Check Action Scheduler, WP-Cron and SMTP

WooCommerce Order Emails Not Sending? Check Action Scheduler, WP-Cron and SMTP

When WooCommerce order emails stop arriving, the store looks perfectly healthy. Orders come in. The dashboard loads. There’s no error message anywhere.

The only symptom is your inbox filling up with “Did my order go through?” messages, and sometimes chargebacks from customers who assumed they’d been scammed.

This guide walks through the causes in the order you should check them, from the quick settings mistakes to the silent background-queue failures that catch out even experienced developers.

First: is it one email, one customer, or everything?

Symptom to cause guide: one customer missing an email points to a typo or spam; one email type stopped points to it being disabled in settings; nothing sending since a migration points to missing SMTP; late or burst emails point to a stalled Action Scheduler or WP-Cron; admin emails arriving but not customer emails points to disabled customer emails or a plugin conflict.

The pattern tells you where to look:

Symptom Most likely cause
One customer didn’t get their email Typo in their address, or it went to spam
One email type stopped (e.g. Completed order) That email was disabled in settings
No emails at all, from the moment you migrated Mail sending is broken (no SMTP)
Emails arrive hours late, or in bursts Background queue (Action Scheduler / WP-Cron) is stalled
Admin emails arrive but customer emails don’t Customer emails disabled, or a recipient/plugin issue

Step 1: Check the email settings

Go to WooCommerce → Settings → Emails. Every email (Processing order, Completed order, Customer invoice, New order and so on) has its own enable toggle. Plugins, staging tools and well-meaning colleagues sometimes switch these off.

While you’re there, check the “From” address. If it uses a domain your mail service isn’t authorized to send for, receiving servers may reject or junk the message.

Step 2: Check that WordPress can send email at all

By default, WordPress sends mail with PHP’s `mail()` function. Many hosts restrict it, and messages sent this way often fail SPF/DKIM checks and land in spam, or are silently discarded with no error.

The fix is to send through a proper mail provider over SMTP or an API using an SMTP plugin, and to set up SPF, DKIM and DMARC records for your sending domain. Then send a test email from the SMTP plugin.

If test emails work but order emails still don’t, keep going. The problem is upstream of the mail server.

Step 3: Check the background queue (the silent killer)

Diagram of the chain behind a WooCommerce order email: a visitor or server cron triggers WP-Cron, which runs Action Scheduler, which processes order updates, which send email through SMTP to the customer's inbox. Common break points: DISABLE_WP_CRON without a server cron, blocked loopback requests, a backlog of past-due actions, and PHP mail without SMTP.

WooCommerce relies on Action Scheduler, a background job queue, for a lot of order-related work, and some payment gateways hand parts of their payment confirmation to it. Action Scheduler is triggered by WP-Cron. And WP-Cron, by default, only runs when someone visits your site.

When this chain breaks, work queues up and doesn’t run. Order status changes that depend on queued work don’t happen, so the emails tied to those status changes don’t send either. There is no error and nothing on screen changes.

How to check

Go to WooCommerce → Status → Scheduled Actions and open the Pending tab.

  • A handful of actions scheduled in the future is normal.
  • Dozens or hundreds of actions that are past due means nothing is running the queue.
  • A large number in the Failed tab means jobs are running but crashing. Open one to see the error.

Common reasons the queue stops

  • DISABLE_WP_CRON’ is set to ‘true’ in ‘wp-config.php’, usually by a host or performance plugin, but no real server cron job was set up to replace it.
  • Loopback requests are blocked. WP-Cron works by your site making an HTTP request to itself. A firewall, basic-auth password, or DNS issue that blocks this kills the scheduler. `Tools → Site Health` reports loopback failures.
  • Low traffic. On a quiet store, if no one visits, WP-Cron doesn’t run.
  • A huge backlog. On busy stores the Action Scheduler tables can grow to hundreds of thousands of rows, and the queue can’t keep up.
  • A fatal error in one job that keeps failing and retrying.

How to fix it

1. Set up a real cron job on your server (most hosts offer this in the control panel) to run WP-Cron every few minutes, for example:
‘*/5 * * * * wget -q -O – “https://yourstore.com/wp-cron.php?doing_wp_cron” >/dev/null 2>&1’
or, with WP-CLI: ‘wp cron event run –due-now’
2. Then disable visitor-triggered cron with ‘define( ‘DISABLE_WP_CRON’, true );’ so the two don’t compete.
3. Clear the backlog by running it, not deleting it. Pending actions may include real customer emails and order updates. With WP-CLI you can run ‘wp action-scheduler run’. On very large backlogs, ask your host for help.
4. Fix loopback if Site Health reports it failing: whitelist your own server IP in the firewall, or remove basic-auth from production.
5. Investigate failed actions and fix the plugin causing them.

Step 4: Resend the emails customers missed

Once the cause is fixed, the emails that never went out won’t magically send themselves. For each affected order, open it, choose Order actions → Email invoice / order details to customer (or Resend new order notification for the admin copy), and update.

The hard part is working out which orders were affected. WooCommerce doesn’t give you an easy per-order record of whether each customer email was actually handed to your mail server.

Watching this automatically

Ordafide Order Integrity for WooCommerce is a free plugin that watches the two things that make everything else fail at once:

  • Background job queue health: how far behind Action Scheduler is, how many jobs failed, and the most likely cause in plain language, plus the WordPress scheduler’s status.
  • Order email delivery: every WooCommerce email recorded against its order, with the result the mail server returned, and a one-click resend.

Its Customer never emailed check flags paid orders where no customer email reached your mail server, or where every attempt was rejected. A loopback test checks whether your site can call itself (it only calls your own site, and only when you press the button), and an optional weekly summary email tells you when there’s something to look at.

Resending is one of only two repairs the plugin can make, and every resend is written to an activity log. Ordafide sends no data to third parties and has no account or licence key.

If you’d rather be alerted the moment the queue stalls instead of finding out in a weekly summary, Ordafide Pro adds Slack, SMS, email and webhook alerts, plus synthetic checkout monitoring every 15 minutes.

Quick checklist

  • Every needed email is enabled in WooCommerce → Settings → Emails
  • Mail goes through SMTP or an email API, with SPF/DKIM/DMARC set up
  • No pile of past-due actions in Scheduled Actions
  • A real server cron runs WP-Cron if `DISABLE_WP_CRON` is set
  • Site Health shows loopback requests working
  • Affected customers have had their emails resent