All posts by Baljit S.

Return Shipping Labels for WooCommerce: Who Pays, Which Carrier, and How to Automate It

After “can I return it?”, the next question every customer asks is: “How do I send it back, and who pays?”

It sounds like a logistics detail. It’s actually one of the most important decisions in your returns policy. It affects whether people buy in the first place, how quickly returns reach you, how many arrive with a tracking number, and how much each return costs you.

The NRF found 82% of consumers say free returns are a major purchase consideration, up from 76% the year before (NRF, October 2025). Loop’s 2026 survey found 92% say return fees influence how they shop (Loop Returns, July 2026). But free returns cost real money, and for a small WooCommerce store, paying for every return label can eat a large part of the margin on the original sale.

This guide works through the options, the true costs, the policies that balance customer expectations with margin, and how to stop emailing labels by hand.

The four return shipping models
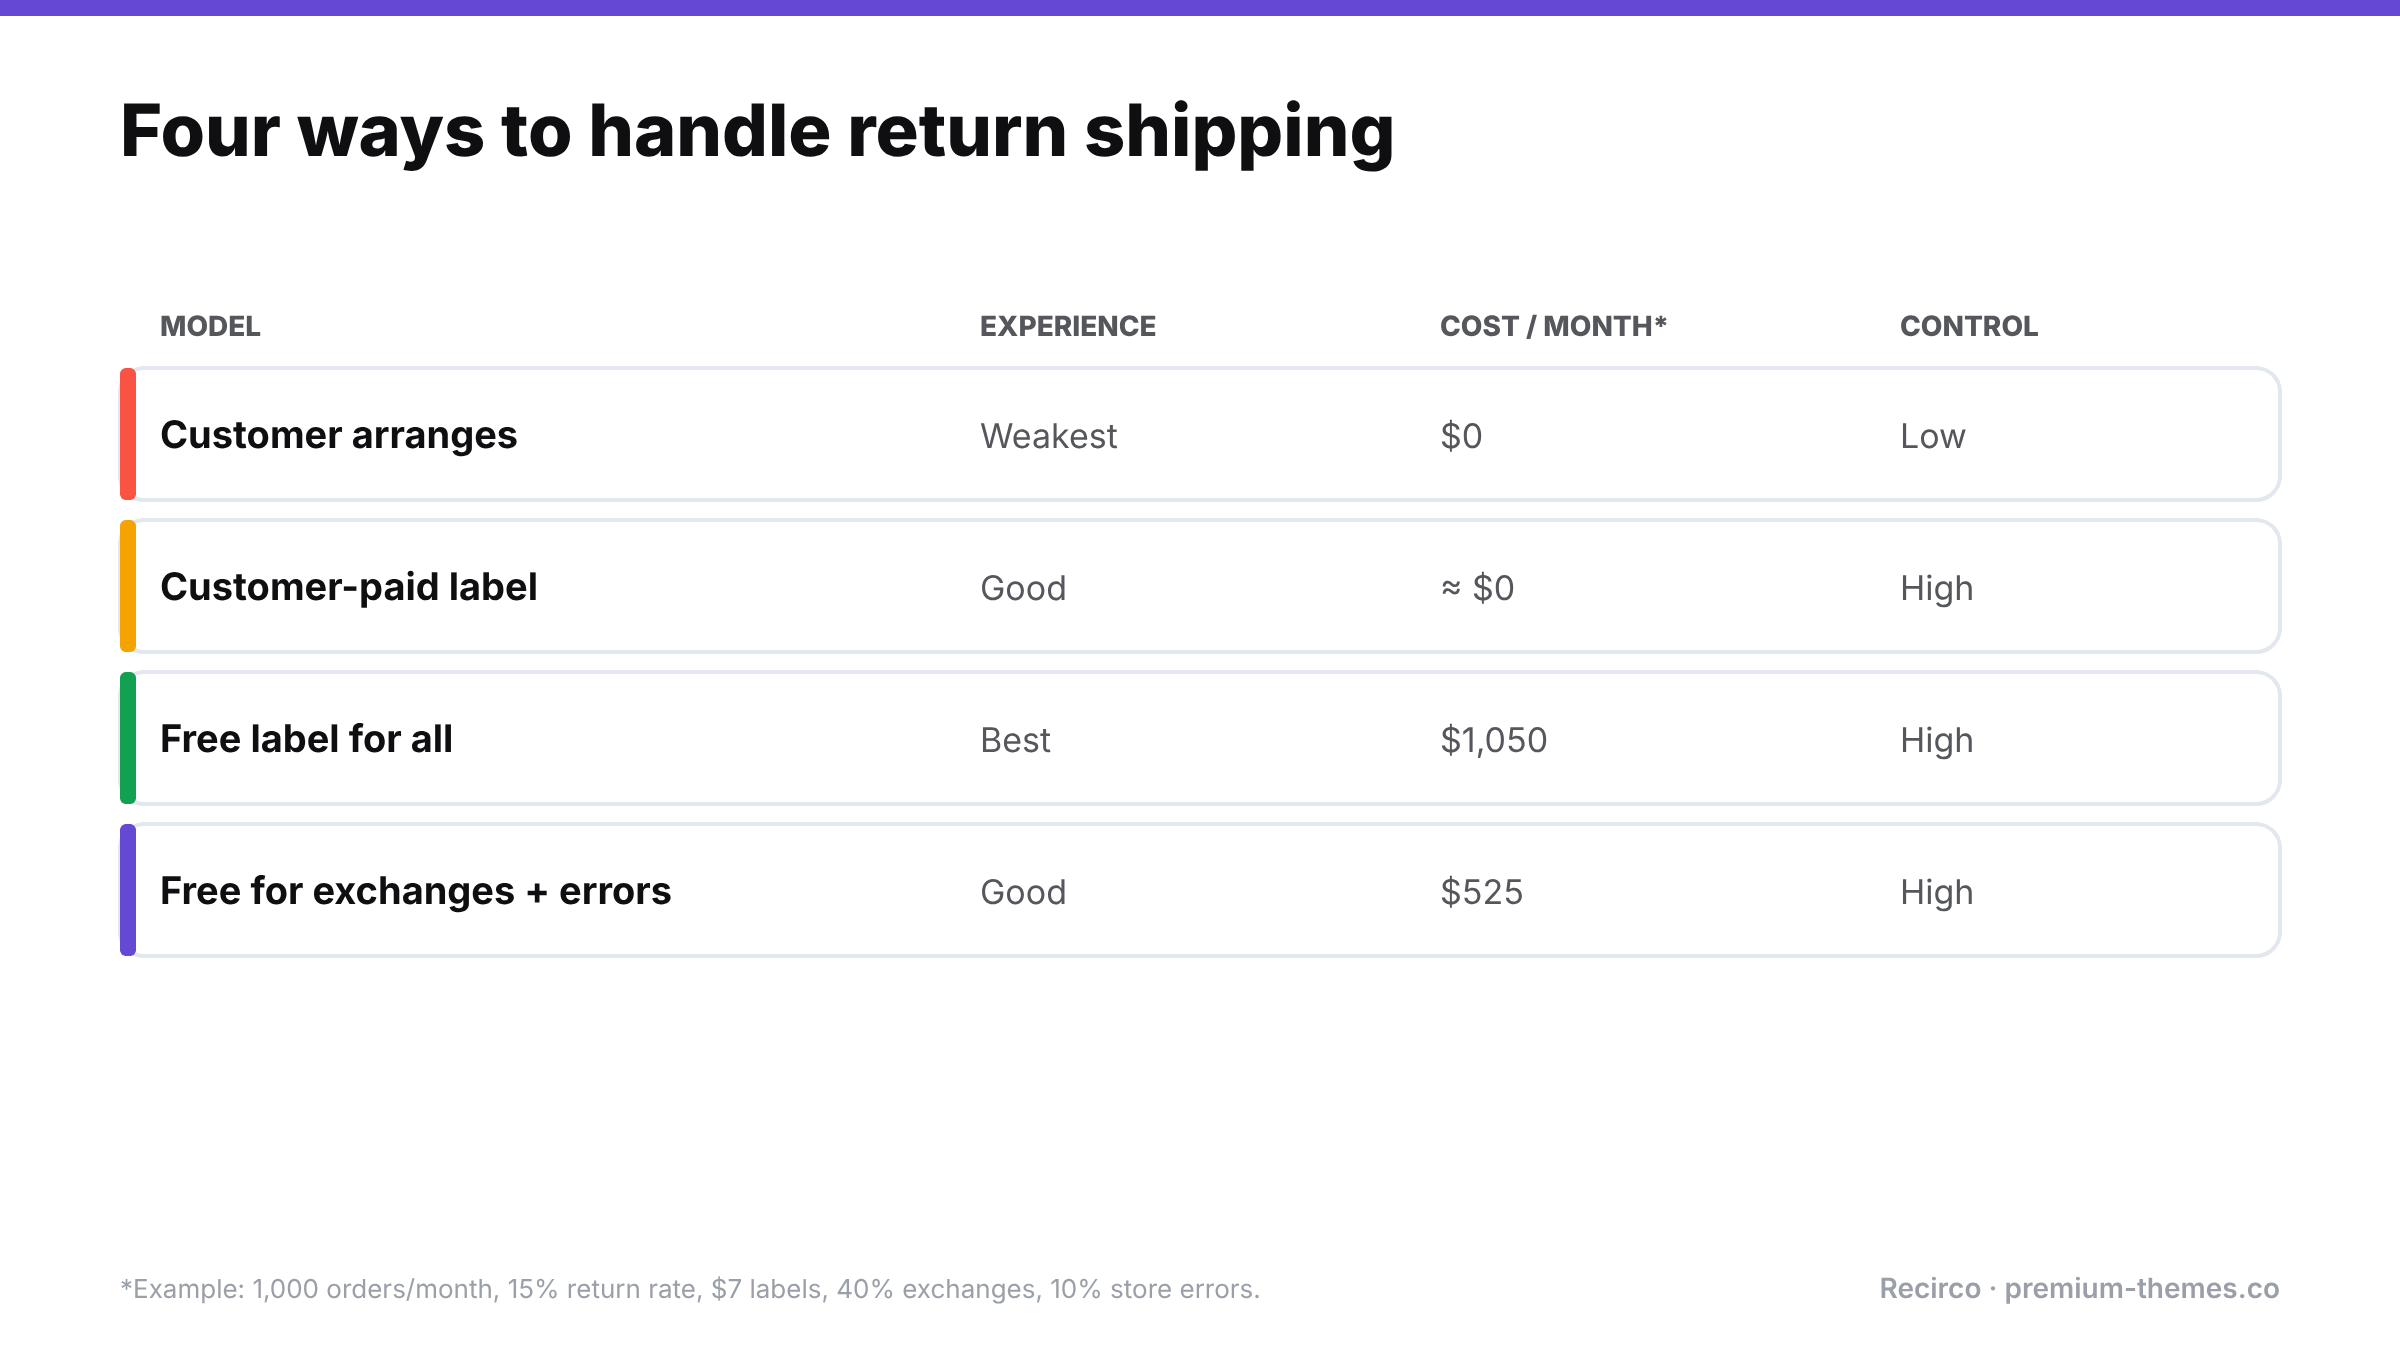
Comparison of return shipping models for a store with 1,000 orders a month: customer arranges ($0, weakest experience), customer-paid label (about $0, good), free label for all ($1,050 a month, best), free for exchanges and store errors ($525 a month, good).

Model How it works Customer experience Your cost Your control
Customer arranges and pays Customer ships to your address their own way Weakest None Low: any carrier, often no tracking
Customer pays via your label You provide a label; its cost is deducted from the refund Good Low (admin) High: your carrier, tracked
Free prepaid label You provide and pay for the label Best Full label cost High
Conditional free returns Free for some cases (exchanges, faults, loyalty), paid for others Good Partial High

Model 1: Customer arranges and pays

The traditional default for small stores: here’s our address, send it back however you like.

Upside: no cost, no setup.
Downside: customers pick the cheapest untracked option, parcels get lost, and you argue about whether something was sent. Returns arrive unpredictably, sometimes without any reference. And many customers find the hassle a reason not to buy.

Model 2: Customer-paid label (deducted from refund)

You generate a tracked label on your carrier account and deduct its cost (or a flat fee) from the refund.

Upside: tracked returns on your carrier at your negotiated rate; the customer doesn’t need to visit a carrier counter to buy postage; low cost to you.
Downside: still a fee, which customers notice.

Model 3: Free prepaid label

You generate the label and pay for it.

Upside: the experience customers increasingly expect; converts better; returns arrive faster and tracked.
Downside: cost. If your average order is $40 and a return label costs $8, free returns on a 20% return rate add a meaningful percentage to your costs across all orders.

Model 4: Conditional free returns

Free labels where it pays for itself or where fairness demands it; paid elsewhere. Common conditions:

  • Free for exchanges, paid for refunds. This nudges customers toward keeping the revenue, and was among the incentives consumers said could steer them away from refunds in Loop’s survey (a waived exchange fee, 36%).
  • Free when it’s your fault: damaged, defective or wrong item.
  • Free for loyalty members or orders above a certain value.
  • Free during holiday season for gift purchases.

For most growing WooCommerce stores, Model 4 is the sweet spot: customers get free returns for the cases that matter most, and you avoid subsidising every change of mind.

Working out what return shipping really costs you

A quick calculation helps make the decision on numbers rather than gut feeling:

Monthly return shipping cost = orders per month × return rate × share of returns you pay for × average label cost

Example: 1,000 orders × 15% return rate × 60% you pay for (exchanges + faults) × $7 label = $630 a month.

Then set that against what free returns gain you: higher conversion (82% of shoppers weigh free returns when buying), more exchanges instead of refunds, faster returns that get stock back on sale sooner, and fewer support tickets about lost parcels.

Comparing the models on the same store

Take a store with 1,000 orders a month, a $50 average order, a 15% return rate (150 returns), and a $7 average label cost. Suppose 40% of returns are exchanges, 10% are damaged or wrong items, and 50% are change-of-mind refunds.

Model Labels you pay for Monthly cost Notes
Customer arranges 0 $0 Untracked parcels, lost returns, worst conversion
Customer-paid label 0 (fee recovered) ≈ $0 Tracked; fee visible to customers
Free for everything 150 $1,050 Best experience; highest cost
Free for exchanges + store errors 75 $525 Half the cost; nudges toward exchanges

Conditional free returns halve the cost of fully free returns in this example, while still giving free returns to the customers you most want to keep (exchanges) and the ones you owe (your errors). And because some change-of-mind refunds will become exchanges to get a free label, the real cost often ends up lower still, with more revenue kept.

Choosing a carrier and label approach

Things to look for in your return label set-up:

  • Tracking on every return label
  • Rates that reflect your volume (multi-carrier platforms often have discounted rates)
  • Label format customers can use: printable PDF, and ideally QR codes for printer-less drop-off where the carrier supports it
  • Drop-off convenience for your customers’ locations
  • Pay-on-use options, where you only pay for labels that are actually scanned (offered by some carriers and platforms, so worth asking about)
  • Generation at the right moment. On approval, not before, so you don’t pay for labels for returns you reject.

Multi-carrier platforms such as Shippo give you access to several major carriers through one account and API, and can compare rates for each label.

Packaging and drop-off instructions

A label is only half the job. Returns arrive damaged or unidentifiable surprisingly often, because customers weren’t told how to send them. Include short instructions in the approval email and on the return status page:

  • Use the original packaging if possible, or a sturdy box or mailer.
  • Include the return number on a slip inside the parcel (or print it on the label).
  • Remove or cover old shipping labels so the parcel doesn’t go back to the customer.
  • Keep the drop-off receipt until the refund arrives.
  • Send within [14] days of approval.

International returns

If you sell abroad, return shipping gets harder:

  • Cross-border labels cost more, and some carriers can’t produce return labels from every country.
  • Customs: returned goods may need paperwork marking them as returns rather than new imports, otherwise you may be charged duties on your own goods.
  • Long transit times mean more “where’s my refund?” contact.

Common approaches: offer prepaid international labels only for higher-value orders; let international customers ship at their own cost with tracking; or, for low-value items, refund without requiring a return. State your international rules separately in your policy.

The manual way (and why it doesn’t scale)

Without automation, the label process typically looks like:

  1. Customer emails asking to return.
  2. You approve by email.
  3. You log in to your carrier or shipping platform, enter the customer’s address and parcel details, buy the label, download the PDF.
  4. You email the PDF to the customer.
  5. You note the tracking number somewhere, usually not against the order.
  6. You watch for the parcel.

At five returns a week it’s tolerable. At fifty, it’s hours of copy-paste a week, with addresses mistyped and tracking numbers lost.

Automating labels with Recirco
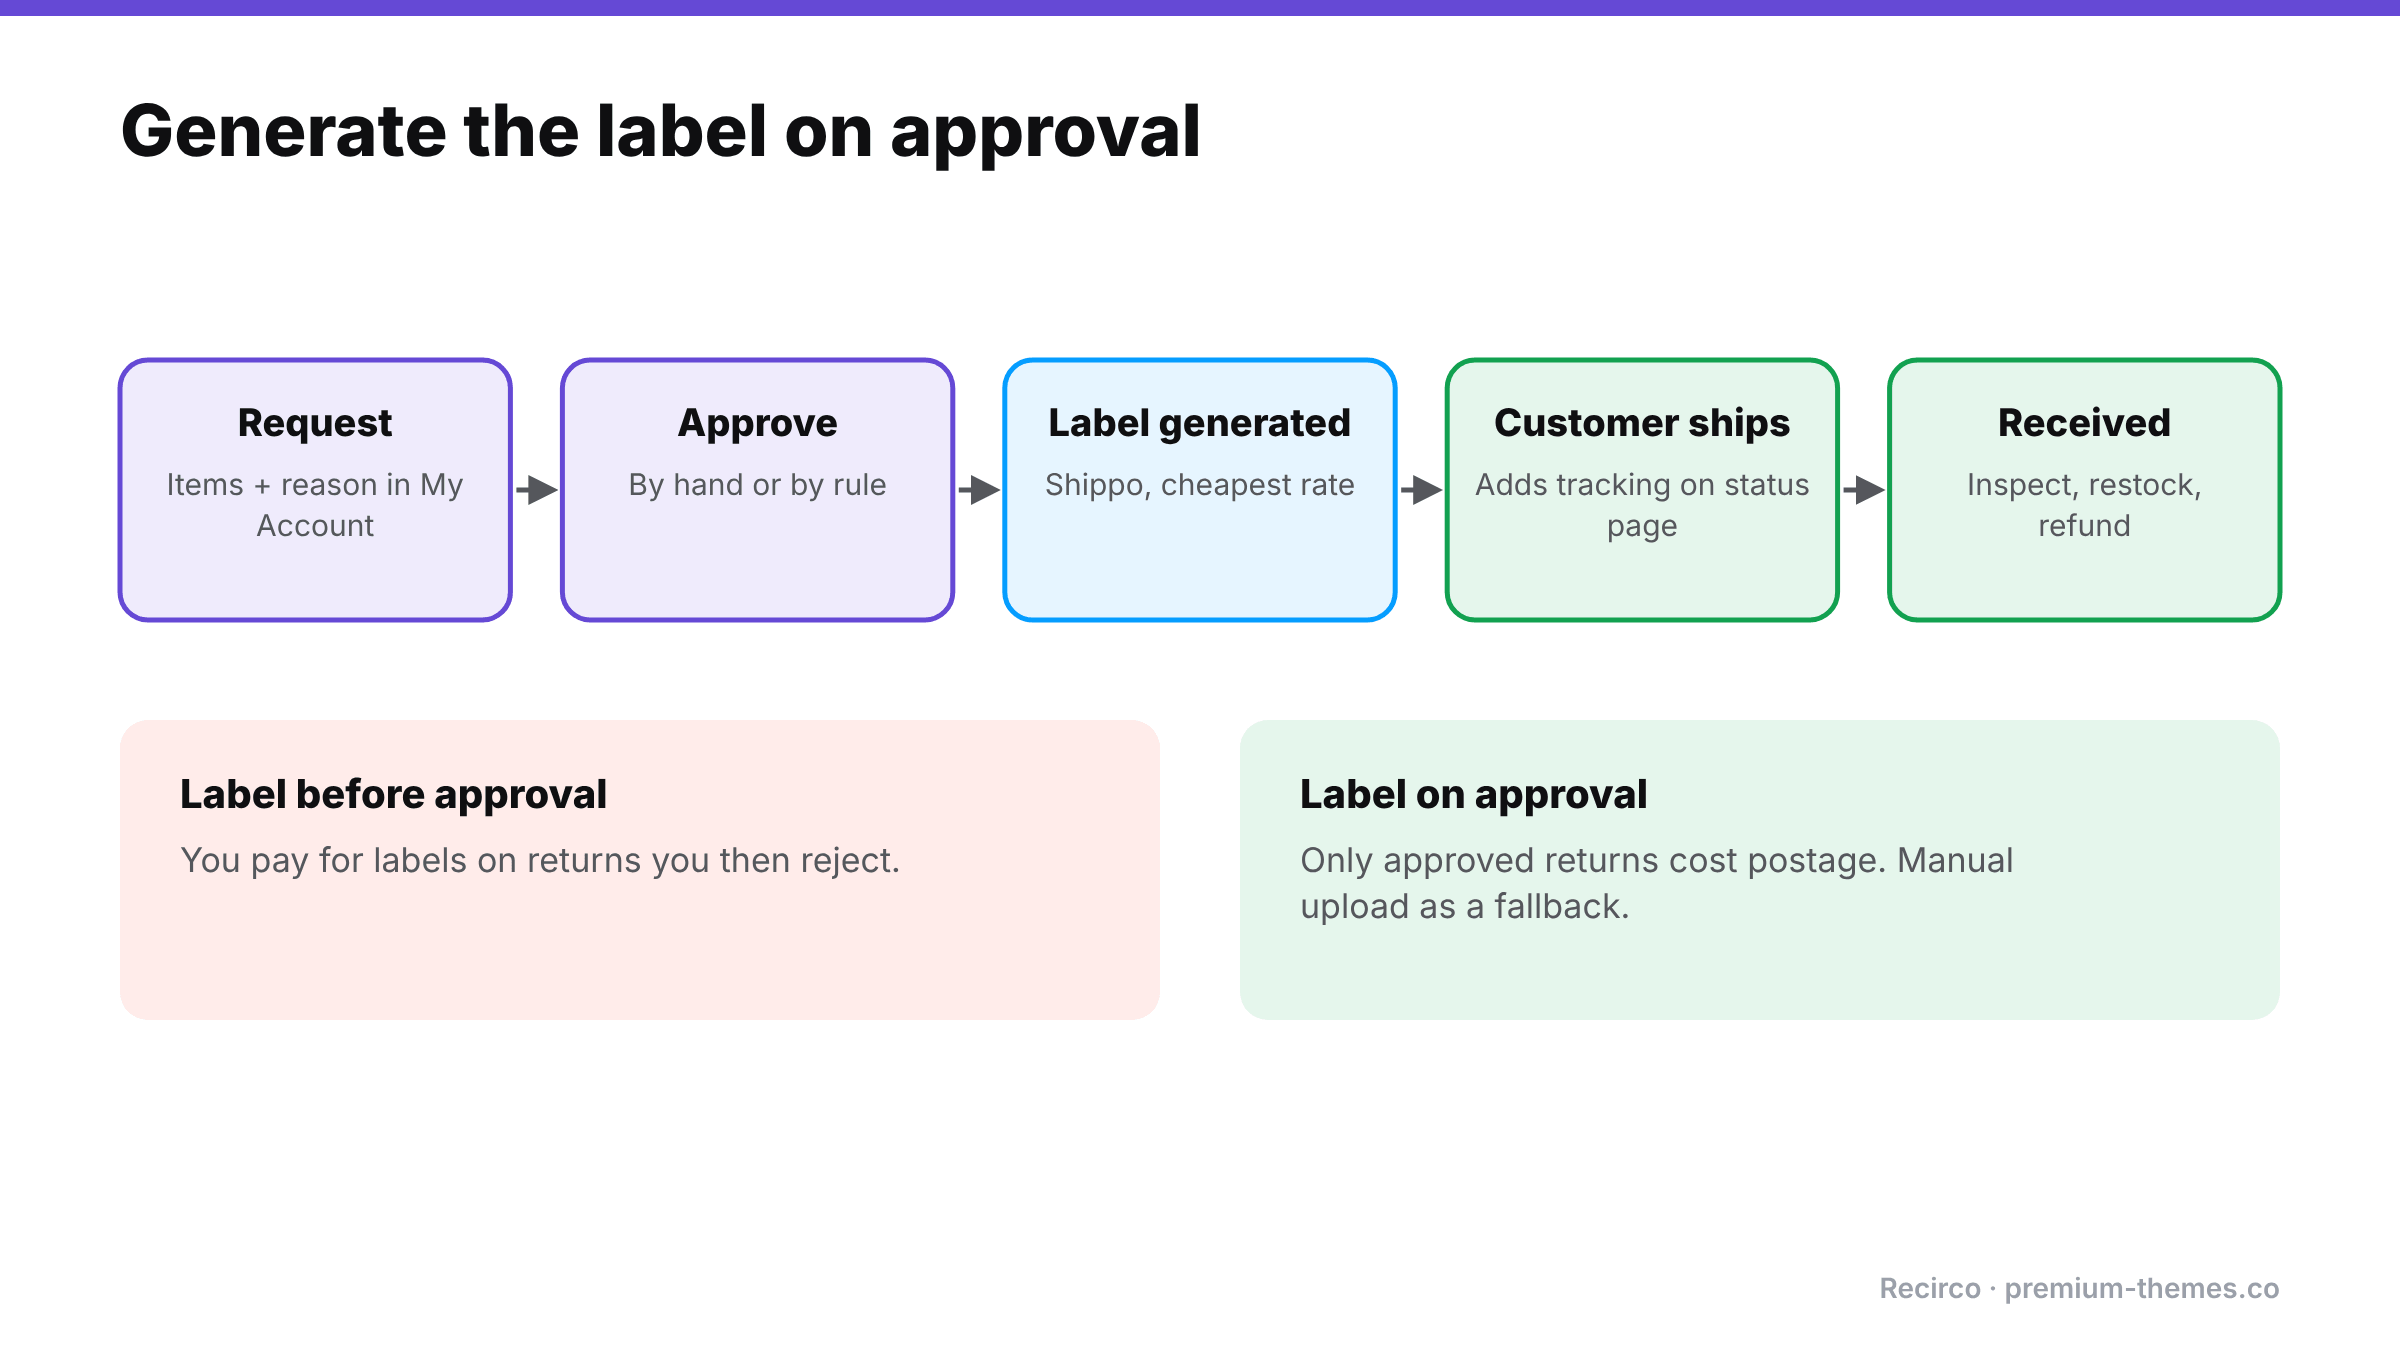
Flow: request, approve, label generated through Shippo at the cheapest rate, customer ships and adds tracking, item received and refunded. Generating labels before approval wastes postage on rejected returns; generating on approval means only approved returns cost postage.

Recirco – Returns & Exchanges for WooCommerce (free) already removes most of the manual steps around the label:

  • Customers start returns from My Account → Returns, choosing items and reasons.
  • On approval, customers see your return address and RMA number on the return’s status page and in the approval email.
  • Customers can add their own tracking number to the return, so you know what’s in transit.
  • If a label exists, Recirco can display it to the customer. The free plugin shows labels but doesn’t generate them.

Recirco Pro adds carrier label generation:

  • Shippo integration, using the cheapest available rate by default.
  • Labels generated automatically on approval, so you never pay for a rejected return.
  • Manual label upload, for when you create a label elsewhere or use a carrier outside Shippo.
  • A provider interface for other carriers, so the label step isn’t locked to one service.

Combined with Pro’s conditional approval rules, you can implement Model 4 cleanly. For example, auto-approve exchanges and fault claims (label generated immediately, free to the customer), while holding change-of-mind refunds for review. And with analytics on value returned and reasons, you can see exactly which return types your label spend goes on.

Policy wording for each model

Customer-arranged:

Please return items to [address] using a tracked service, quoting your return number. Return postage is your responsibility, and we can’t accept responsibility for parcels lost in transit without tracking.

Customer-paid label:

Once your return is approved, we’ll email you a prepaid tracked label. [$6.95] will be deducted from your refund to cover it.

Free label:

Returns are free. Once your return is approved, we’ll email you a prepaid tracked label.

Conditional free:

Exchanges and returns of damaged, faulty or incorrect items are free: we’ll email you a prepaid label when your return is approved. For other refunds, [$6.95] is deducted from your refund for the prepaid label, or you can return the item at your own cost using a tracked service.

Reviewing your label spend

Once labels are automated, review the spend quarterly. Which reasons drive the most labels? Are exchanges growing as a share of returns? Is one product generating a disproportionate share of return shipping? Often the cheapest way to cut label cost is fixing the product page that causes the returns.

Mistakes to avoid

  • Generating labels before approval. You pay for labels on returns you then reject.
  • No tracking requirement. Lost returns turn into disputes.
  • Hidden fees. Deducting a label fee the customer didn’t know about invites complaints and “credit not processed” disputes.
  • Same rules for every reason. Charging customers to return your mistake (wrong item, damaged) is a fast way to a bad review, and in many places it isn’t allowed for faulty goods anyway.
  • Ignoring the data. If return shipping is a large cost, the best saving is often fewer returns. Look at your reasons. (Reduce your return rate)
Holiday Returns Season: How to Prepare Your WooCommerce Store for the January Surge

Every store owner plans for Black Friday. Far fewer plan for what comes after it.

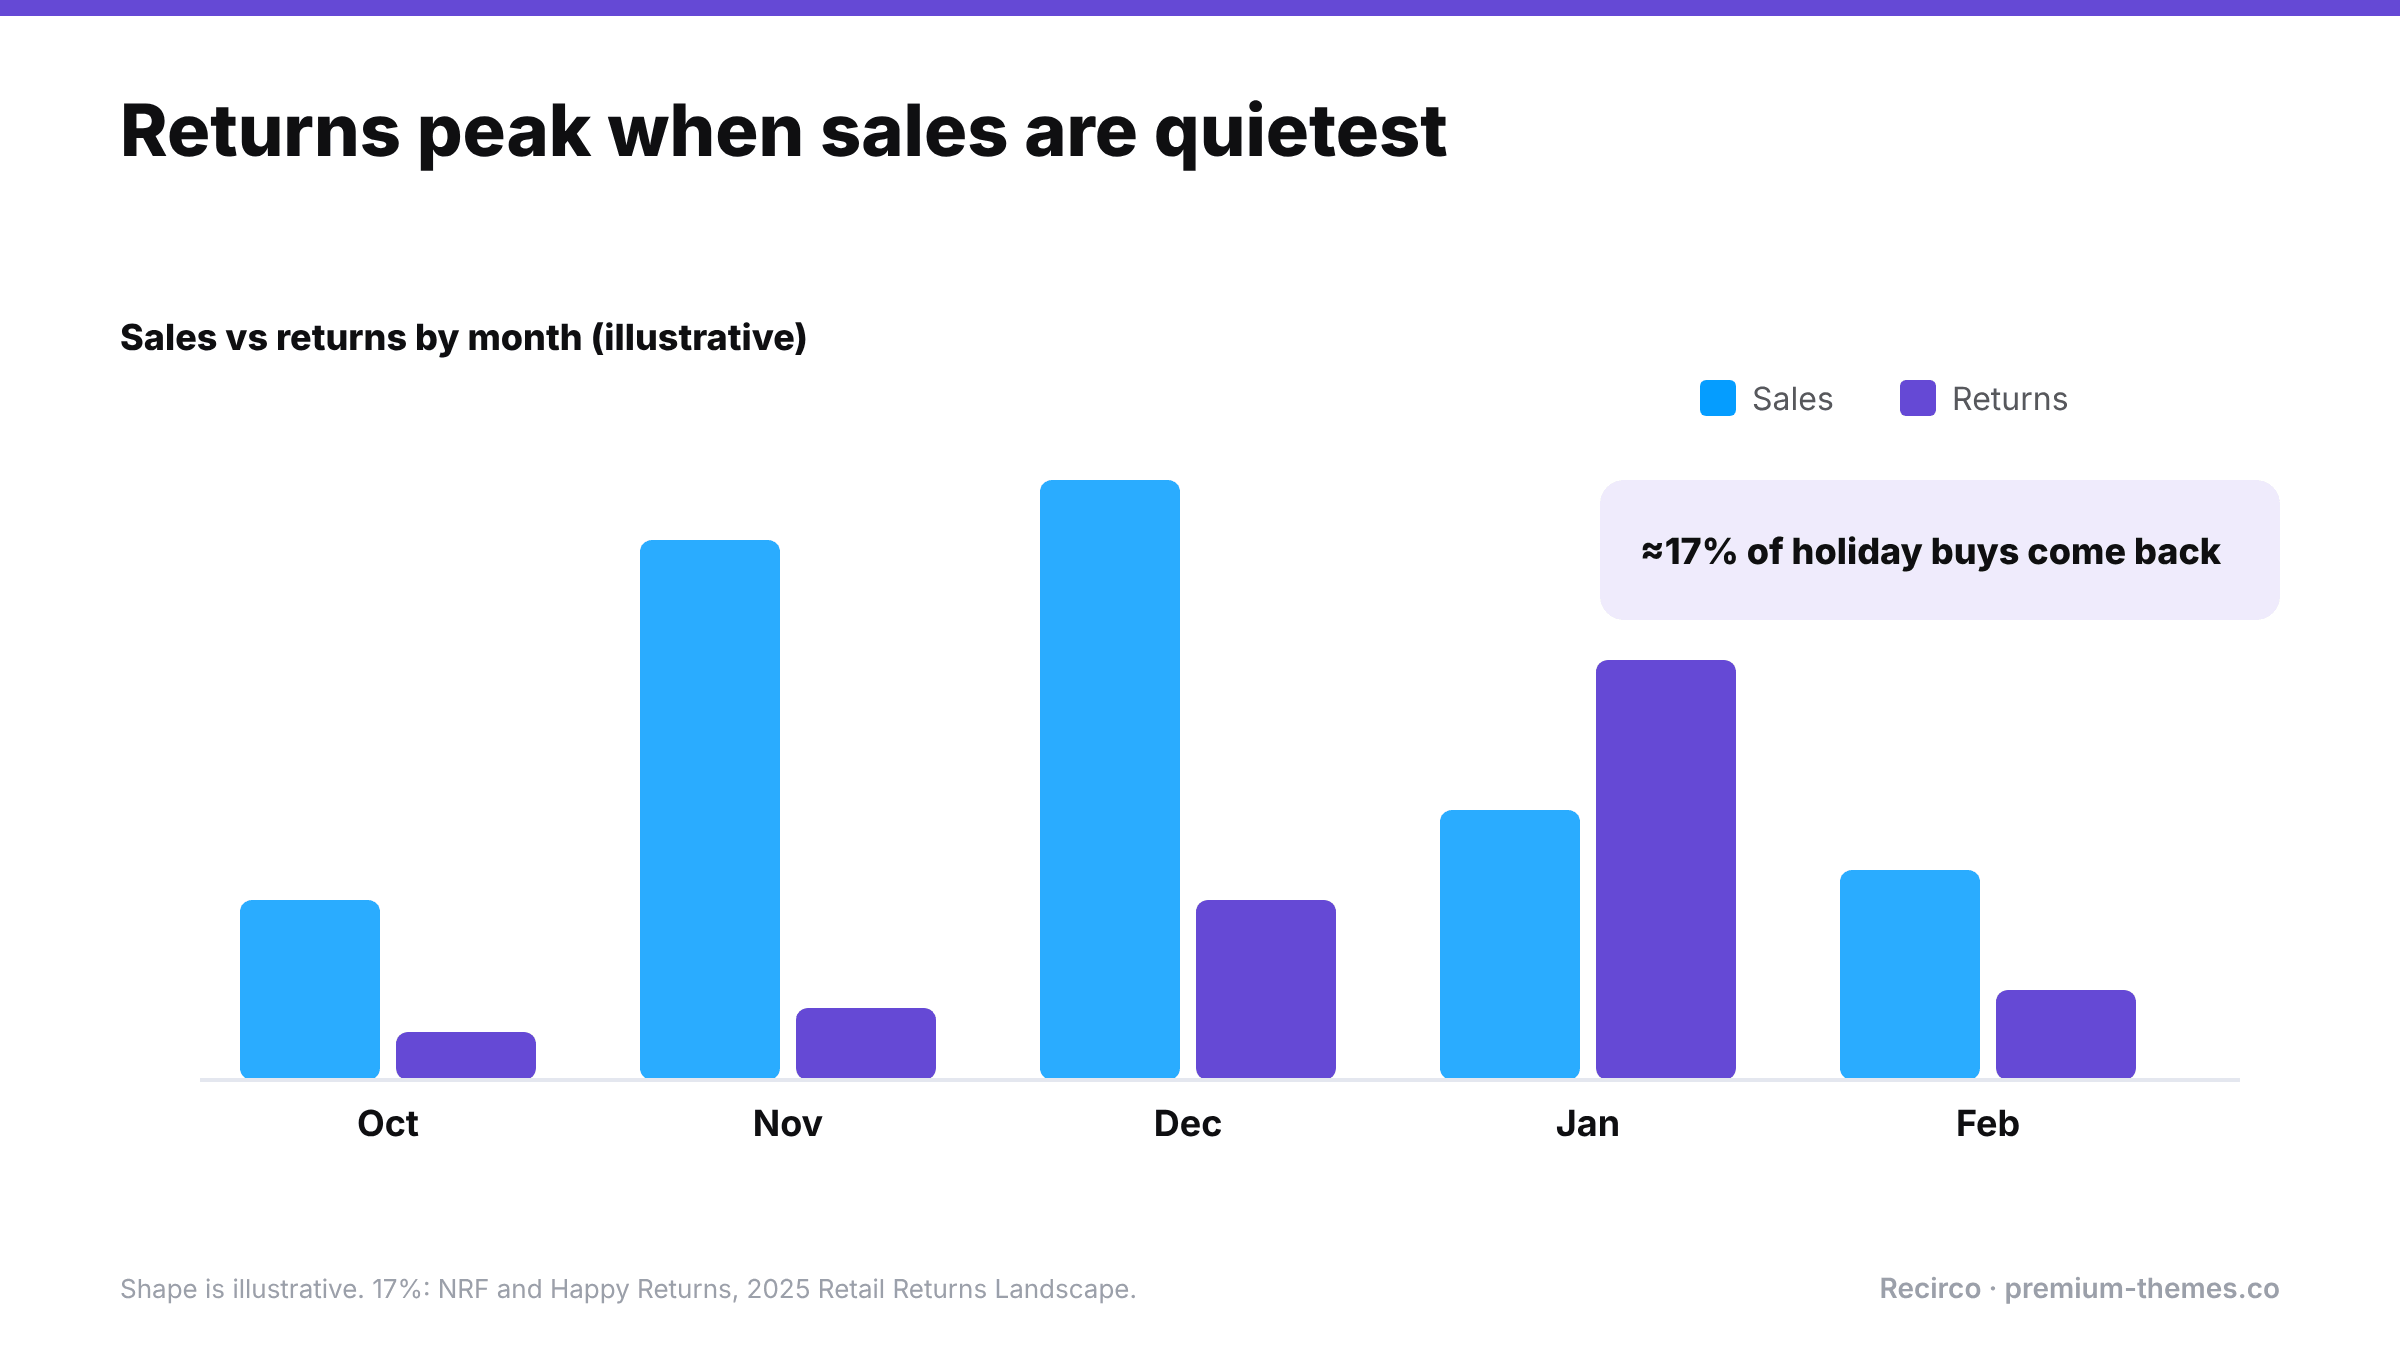
Holiday purchases come back at a higher rate than the rest of the year. The NRF and Happy Returns expected 17% of holiday merchandise to be returned in 2025, against 15.8% of retail sales across the whole year (NRF / Retail Insight Network, October 2025). Gifts don’t fit, duplicates arrive, impulse sale purchases look less exciting in January.

For a WooCommerce store this creates a predictable crunch. Returns pile up in the slowest sales weeks of the year, often while your team is on holiday. Gift recipients who aren’t your customers try to return things. Extended holiday windows get applied inconsistently. And the revenue you worked so hard for in November leaks out in January.

This guide covers how to prepare: the policy decisions to make now, how to handle gift returns, how to turn holiday returns into exchanges rather than refunds, and how to keep the operation running when volume peaks.

What makes holiday returns different

Illustrative chart of sales and returns from October to February: sales peak in November and December while returns peak in January. About 17% of holiday purchases are expected to be returned (NRF and Happy Returns, 2025).

  1. Volume is concentrated. Returns from November and December purchases cluster in late December and January.
  2. Many returners didn’t buy the item. Gift recipients have no account, no order number, and no idea what was paid.
  3. Return windows get confusing. An item bought on 20 November with a 30-day window expires before Christmas, before the gift is even opened.
  4. Expectations are higher. Shoppers check holiday return policies before buying gifts, and generous policies sell.
  5. Your team is smaller. Holidays mean fewer people to process more returns.
  6. Fraud ticks up. Wardrobing around parties and events, and “gifts” bought specifically to return.

Decision 1: Extend your return window for holiday purchases

Most retailers extend returns for holiday purchases, typically letting items bought from early November be returned until mid or late January. It’s become a standard expectation and a genuine selling point in gift-buying season.

How to set it up well:

  • Decide the dates now. For example: “Items bought between 1 November and 24 December can be returned until 31 January.”
  • Publish it on product pages, the cart, checkout and your returns policy page from early November. It’s a conversion tool, so use it in your Black Friday messaging.
  • Make sure your system enforces it. If your returns system uses a fixed number of days, temporarily raise it to cover the latest date you’ll allow, then lower it again afterwards. Note the dates in your calendar so the change isn’t forgotten.
  • Remember the legal minimum still applies. EU and UK customers have at least 14 days from delivery regardless; your extended window simply goes further.

Communicate holiday dates in the right places

Customers need to see your extended window when they buy, not just when they return. Put it:

  • in a site-wide banner during November and December (“Gifts bought now can be returned until 31 January”)
  • on product pages, near the add-to-cart button
  • in the cart and checkout, where gift buyers hesitate
  • in order confirmation emails for orders placed in the holiday period
  • on your returns policy page, with exact dates

Decision 2: How you’ll handle gift returns

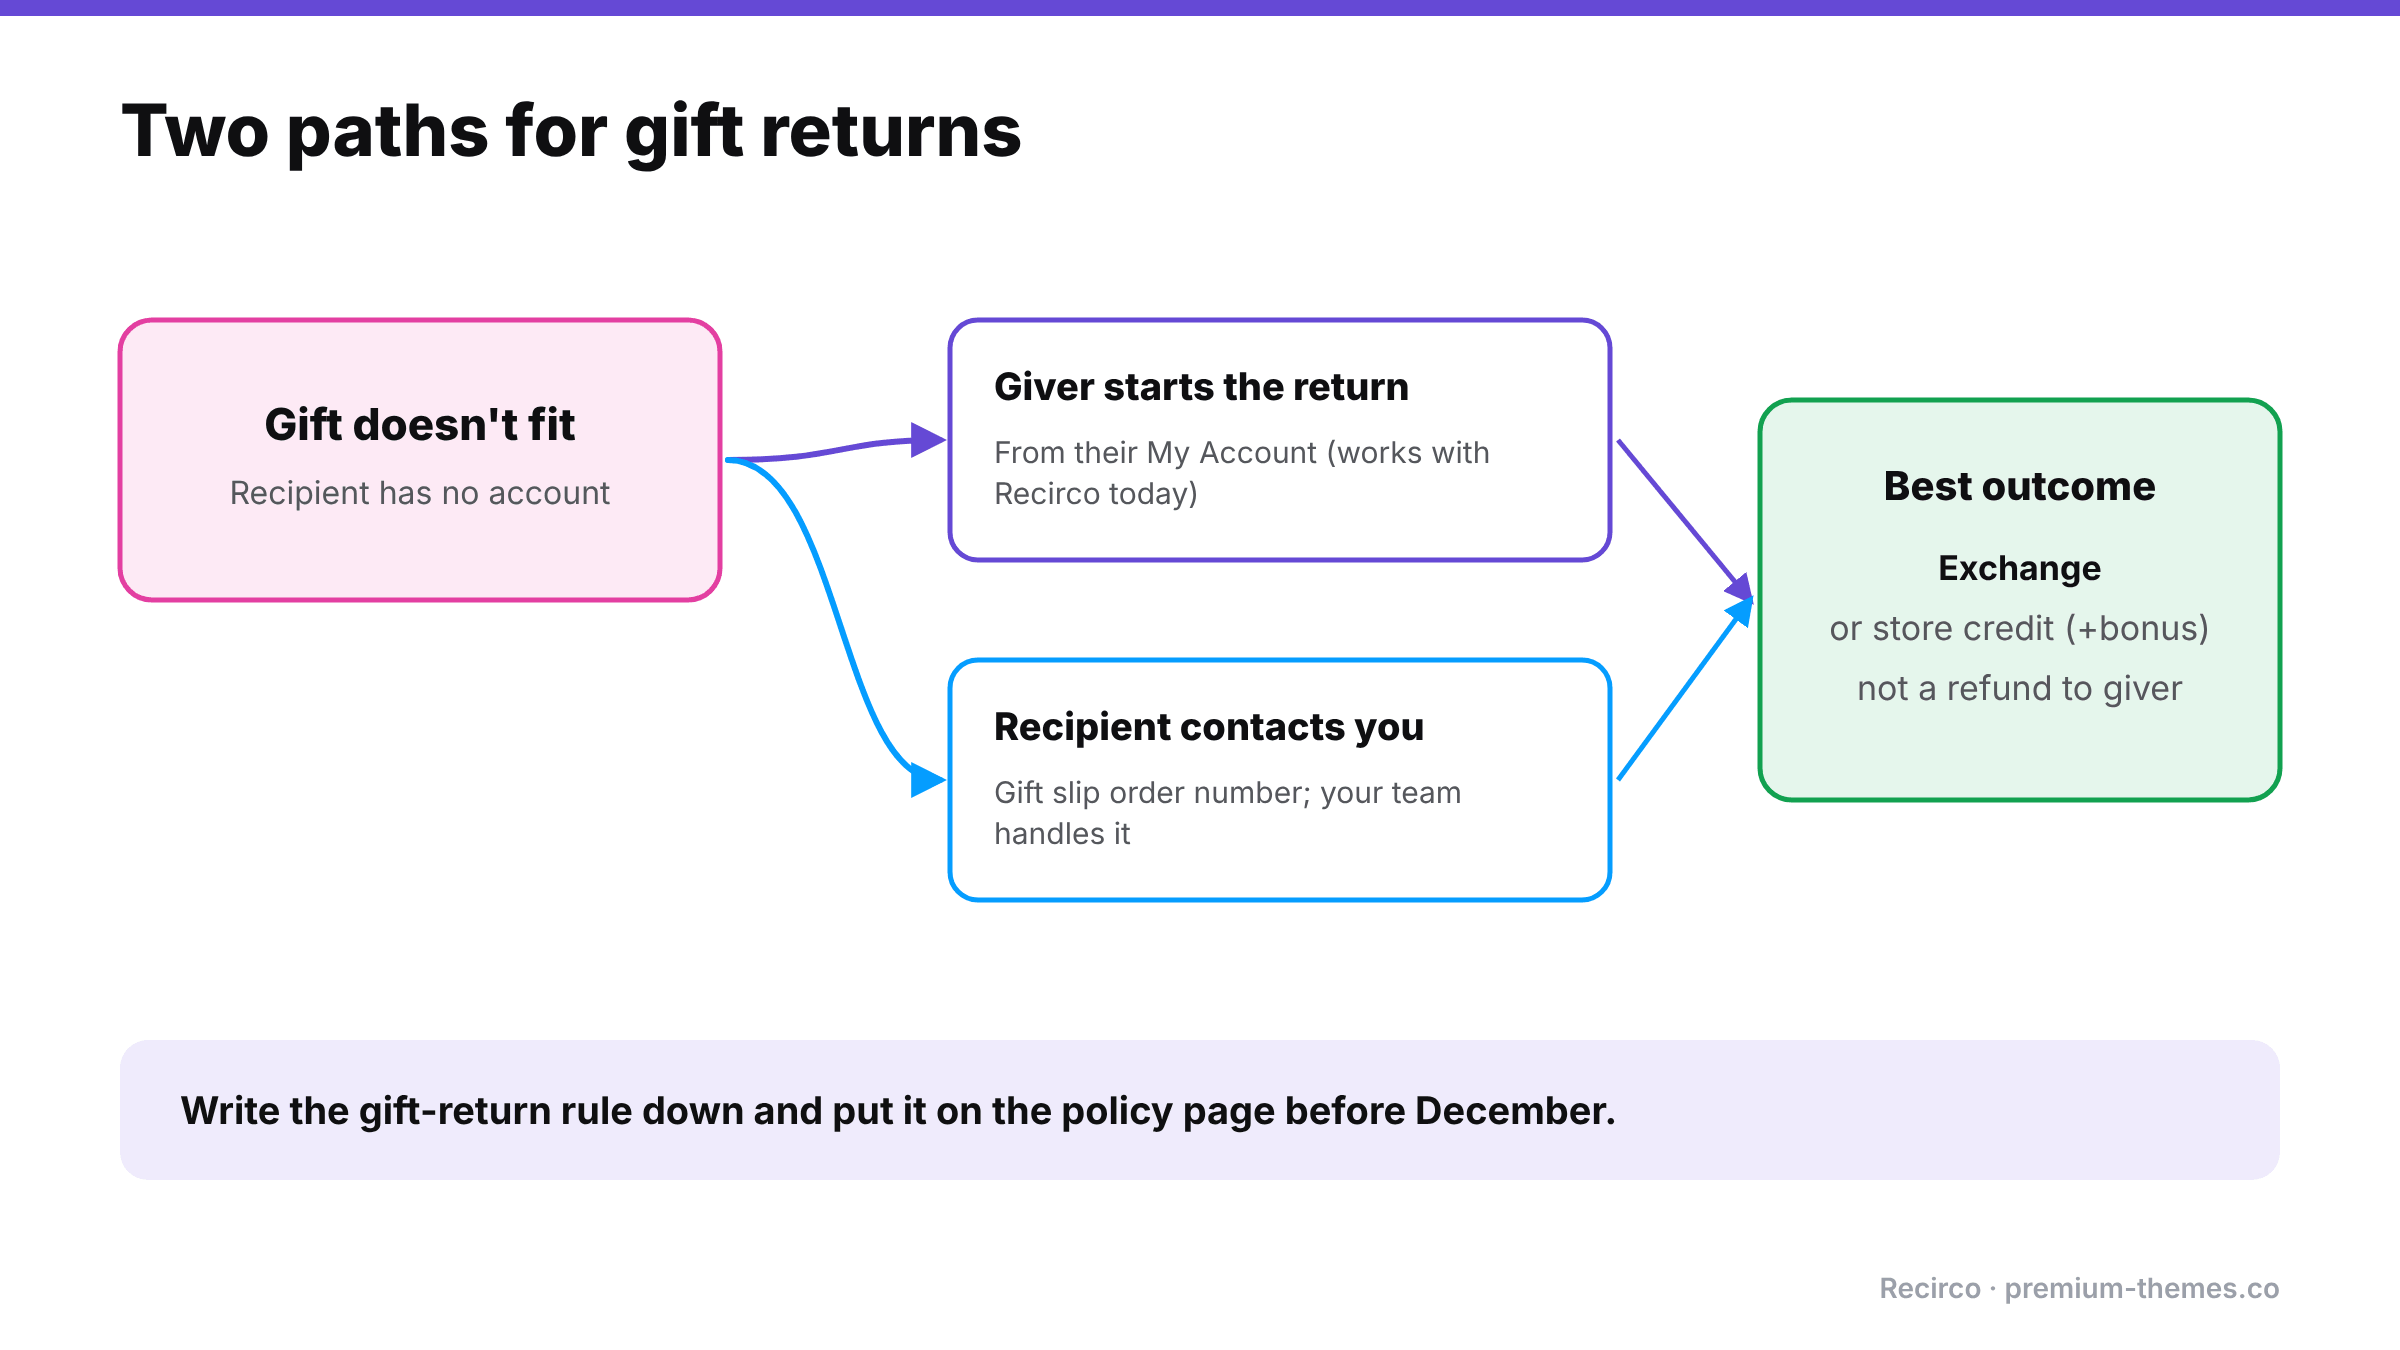
Gift returns: when a gift doesn't fit and the recipient has no account, either the giver starts the return from their account, or the recipient contacts you with the gift slip order number. Best outcome is an exchange or store credit, not a refund to the giver.

Gift returns are where most holiday friction lives. The person returning the item:

  • probably doesn’t have an account with you,
  • doesn’t have the order number,
  • shouldn’t see what the giver paid,
  • and usually wants an exchange or store credit, not a refund to the giver’s card.

Common approaches:

Approach How it works Trade-off
Giver handles it The original buyer requests the return from their account Simple and secure; awkward for the recipient
Gift receipt / gift order number Recipient contacts you with a gift reference; you process manually Friendly; manual work for your team
Exchange or credit only for gifts Gift returns become exchanges or store credit, never refunds to the giver Keeps revenue; avoids revealing the price; needs clear policy

Whatever you choose, write it down. “Gift returns: please ask the person who bought the gift to start the return from their account, or contact us with the order number from the gift slip and we’ll arrange an exchange or store credit.”

Recirco note: the current version of Recirco requires returns to be requested from a customer account, so gift returns work through the giver’s account or through your team handling the recipient’s request. Plan your gift-return wording around that.

Decision 3: Make exchanges and credit the easy option

January is when keeping revenue matters most: sales are slow, and every refund comes straight off the best quarter you’ve had. Holiday returns are also unusually well suited to exchanges: wrong size, wrong colour, duplicate gift.

Loop’s 2026 survey found that while 75% of consumers prefer a refund by default, 87% would consider an exchange if it were easy enough, and 39% could be swayed by bonus store credit (Loop Returns, July 2026]).

For the holiday window:

  • Show exchange first in the returns flow.
  • Offer bonus store credit (say 10%) instead of a refund, especially for gift returns.
  • Ship exchanges fast. Speed is one of the top reasons people choose exchanges.

(More on exchanges vs refunds])

Write the holiday messages now

You won’t want to write customer communications on 27 December. Draft these in advance:

Auto-reply for the support inbox:

Thanks for getting in touch. Our team is back on [date] and we’re replying in order. If you’d like to return or exchange something, you can start it now from My Account → Returns; it takes about two minutes and you’ll get your return number and address straight away. Holiday purchases can be returned until 31 January.

Approval email addition (holiday period):

Because it’s our busiest returns season, refunds may take up to [5] working days after your return arrives. Exchanges ship as soon as your return is approved.

Gift-return reply:

Thanks for letting us know. If the gift doesn’t fit, the easiest option is an exchange or store credit, so you can choose something you love. Please ask the person who sent the gift to start the return from their account, or reply with the order number on your gift slip and we’ll take care of it.

Decision 4: Staffing and service levels

Work out roughly how many returns to expect. Take your November–December order count, multiply by your normal return rate, and add a margin for the holiday uplift. Then plan:

  • Who processes returns between Christmas and mid-January, and how many hours that needs.
  • What you’ll automate. Approving routine returns automatically is the biggest time saver.
  • Target times: for example, approve within one working day, refund within three working days of arrival.
  • A holiday auto-reply that points people to the self-service returns page and states realistic timings.

A quick volume estimate

Say you shipped 3,000 orders in November and December, and your normal return rate is 12%. Holiday uplift (using the NRF’s 17% holiday figure against a 15.8% full-year rate as a rough guide) suggests your holiday rate could run around 13%. That’s roughly 390 returns, most of them landing between 26 December and the end of January, about five weeks.

That’s around 75–80 returns a week. If each takes 6 minutes to approve, receive, inspect, restock and refund by hand, that’s 8 hours a week, during a period when you may have half your normal team. Automating approvals for routine returns and using bulk actions for receiving can cut that substantially. Knowing the number in advance is what lets you plan.

Decision 5: Warehouse and restocking

  • Inspect and restock fast. January returns are often your best January stock. Items back on sale quickly can be resold, especially in clearance.
  • Restock on arrival, not on approval, so stock levels reflect what’s physically there.
  • Batch processing: set aside fixed times each day for receiving returns rather than handling them ad hoc.

Decision 6: Watch for abuse without slowing everyone down

Holiday season brings wardrobing (party outfits, event equipment) and “buy to return” behaviour. Flag rather than block: hold returns of high-value occasion items or from customers with many recent returns for a closer look, and approve the rest. (Return fraud guide)

Turning January returns into January sales

Returned holiday stock is often in perfect condition. Get it back on sale fast, ideally in your January clearance, and you recover margin from inventory that would otherwise sit in a back room until spring. A clear rhythm helps: receive in the morning, inspect and restock by lunchtime, and let your clearance pages reflect the restocked sizes the same day.

Setting it up with Recirco

Recirco – Returns & Exchanges for WooCommerce (free) handles the core of holiday returns:

  • Self-service returns portal in My Account: customers start returns themselves, any time, including when your team is off.
  • Configurable return window in days, counted from the completed, paid or created date. Raise it for the holiday period and lower it again in February.
  • Custom policy text in the portal, where you can state your holiday dates and gift-return rules.
  • Approval queue with bulk approve, reject and mark received, plus filters, search and a pending badge, built for clearing a backlog quickly.
  • Restock timing (on arrival recommended) and refunds from the return with correct tax.
  • Six editable emails so customers get updates without emailing you.

Recirco Pro adds the tools that keep holiday revenue and save time:

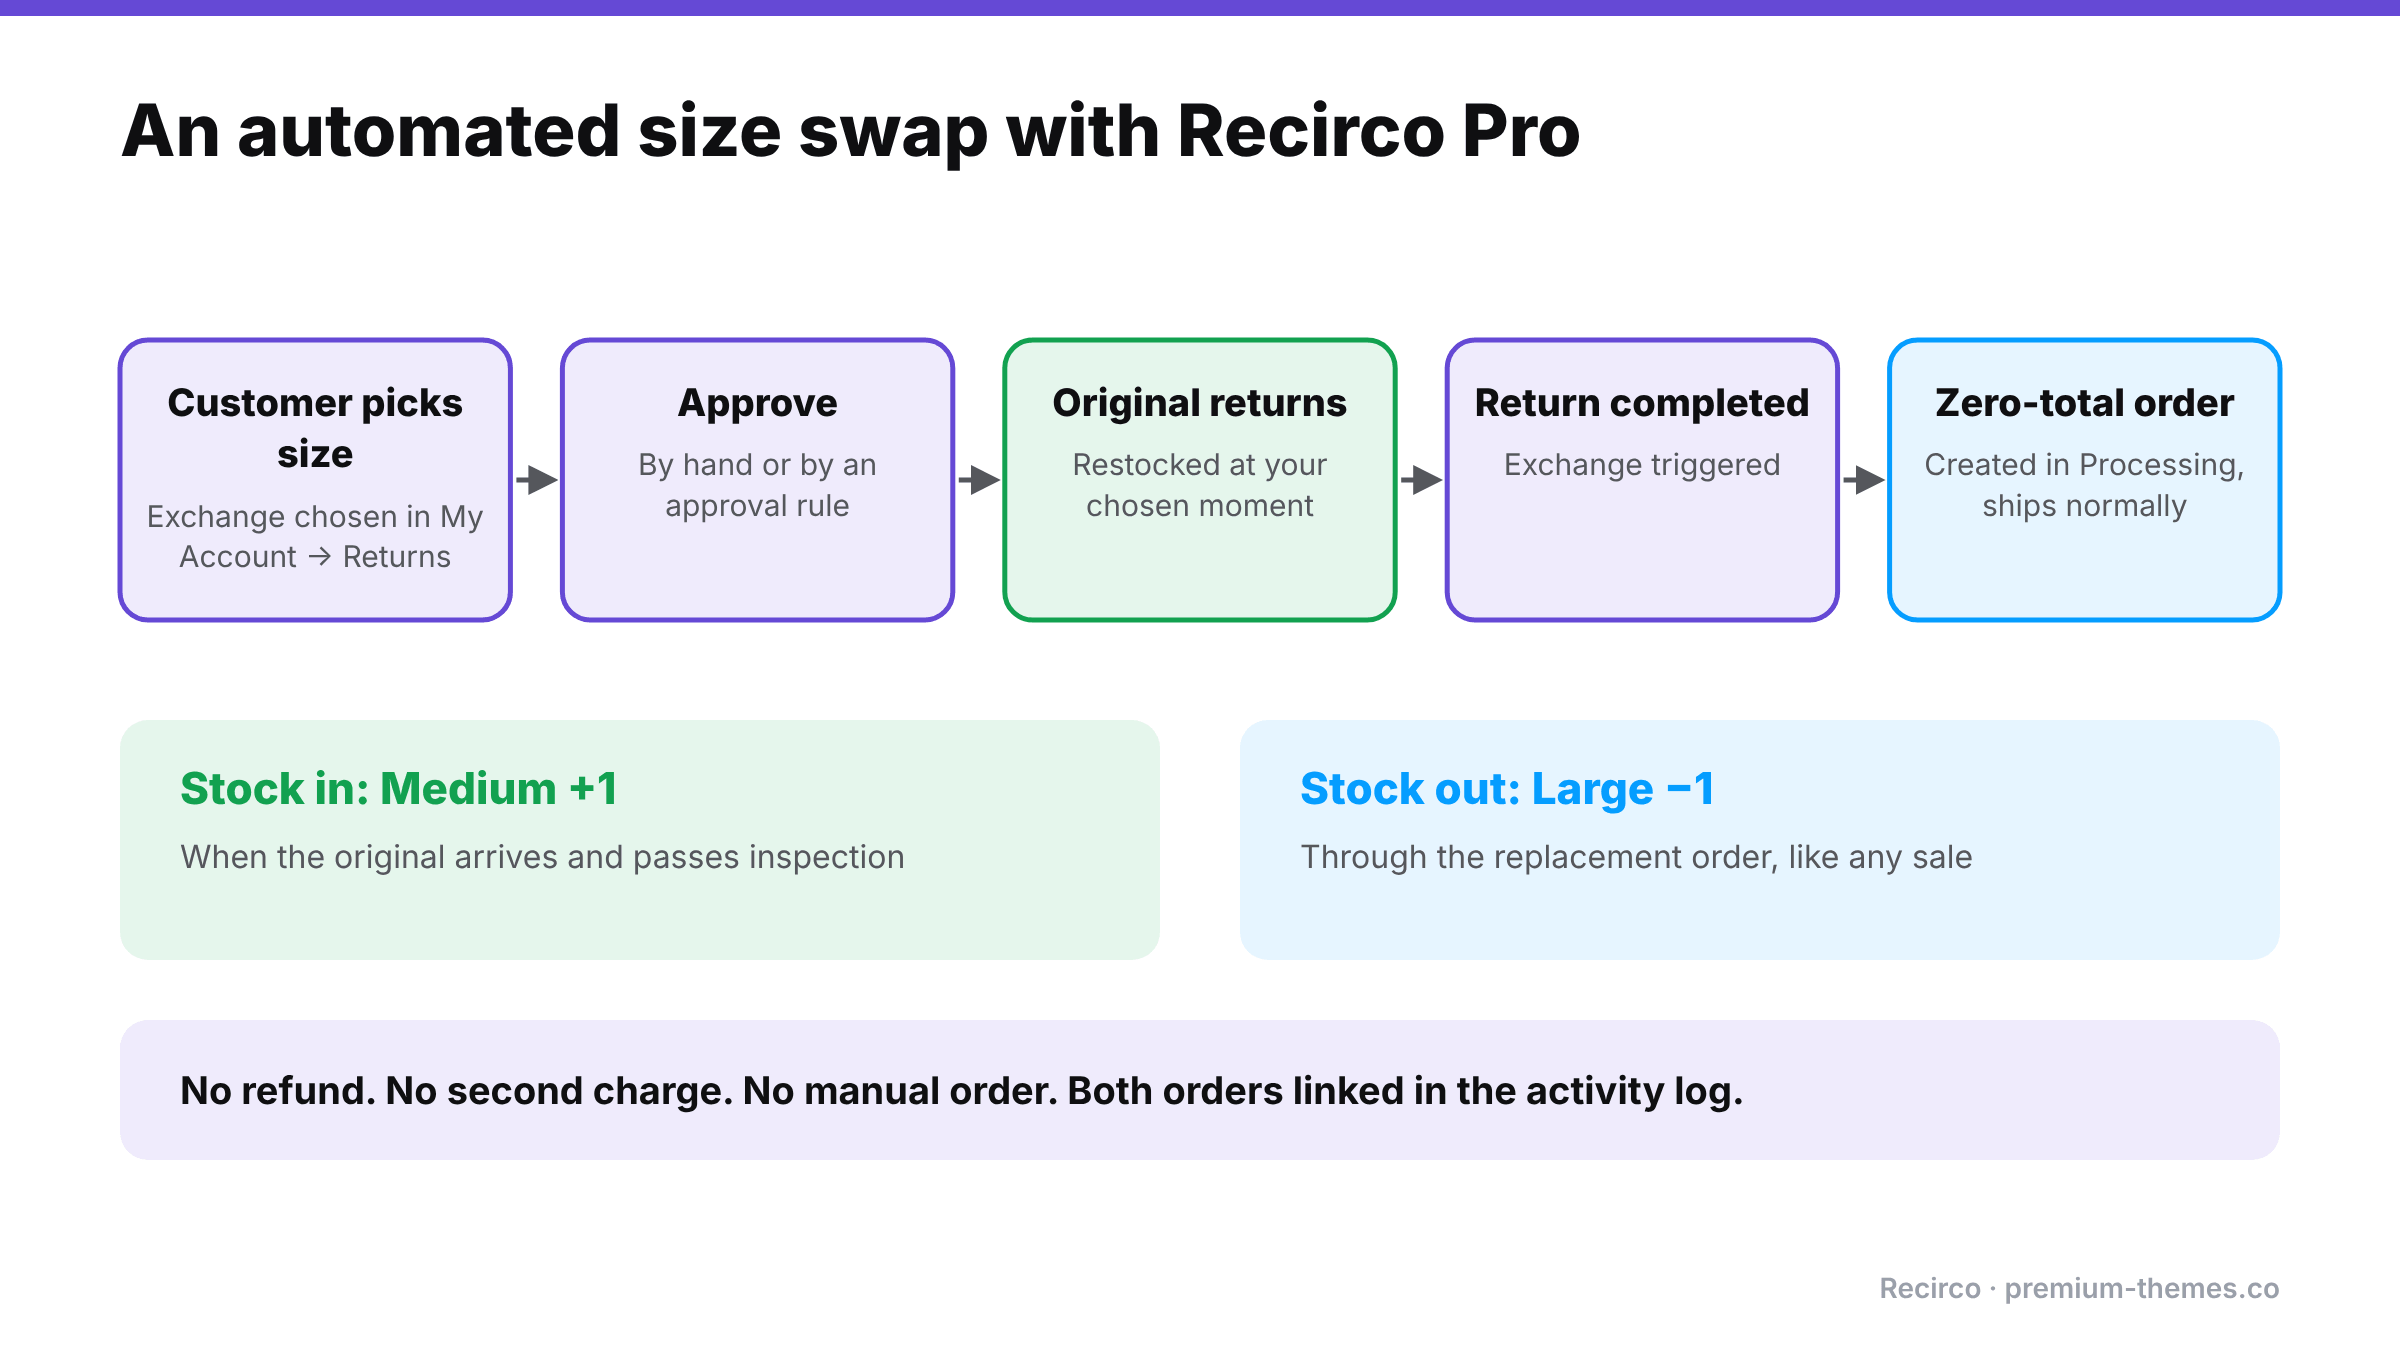
  • Exchanges and variant swaps: customers pick the replacement in the portal; a zero-total replacement order is created in Processing on completion.
  • Store credit with a bonus percentage and optional expiry, applied at checkout. Ideal for gift returns.
  • Conditional approval rules to auto-approve routine returns over the holidays and hold high-value or high-risk ones.
  • Carrier return labels via Shippo, generated on approval.
  • Analytics with 7/30/90/365-day ranges to compare this January with last.

Holiday returns timeline

October / early November

  • [ ] Holiday return dates decided and published
  • [ ] Gift return process written down
  • [ ] Exchange and store credit options switched on and tested
  • [ ] Return window setting adjusted (and a reminder set to change it back)

Late November – December

  • [ ] Holiday returns policy highlighted in sale messaging
  • [ ] Staffing rota for 26 December – mid January agreed
  • [ ] Auto-approval rules reviewed
  • [ ] Holiday auto-reply drafted

January

  • [ ] Daily returns processing slots
  • [ ] Restock on arrival, quickly
  • [ ] Monitor exchange vs refund share

February

  • [ ] Return window restored to normal
  • [ ] Review: volume, top reasons, exchange share, time to resolve

Return Fraud and Serial Returners: Protecting Your WooCommerce Store Without Punishing Good Customers

A post on Reddit’s ecommerce communities captured a frustration a lot of store owners share. An apparel merchant, about two years in, noticed a small group of customers who kept buying, returning, and apparently wearing items before sending them back. Returns were auto-approved with no flags and no customer history, so the pattern only became obvious after it had cost real money. Their question: how do you spot repeat return abuse before approving the refund?

The replies were revealing. Some said ban them. Some said charge for returns. One commenter claimed that “90% of problems often come from about 2% of customers”. Others pushed back: frequent returns might mean the sizing is wrong, not that the customer is dishonest.

Both sides are right, and that’s the challenge. The NRF and Happy Returns estimated that 9% of all returns in 2025 were fraudulent (NRF, October 2025). That’s a real cost. But the other 91% are honest, and the same report found 71% of shoppers are less likely to buy again after a poor returns experience. Clamp down on everyone and you lose more good customers than you stop bad ones.

This guide covers the common types of return fraud and abuse, the signals that identify them, and how to set up WooCommerce so risky returns get a closer look while honest customers sail through.

The main types of return fraud and abuse

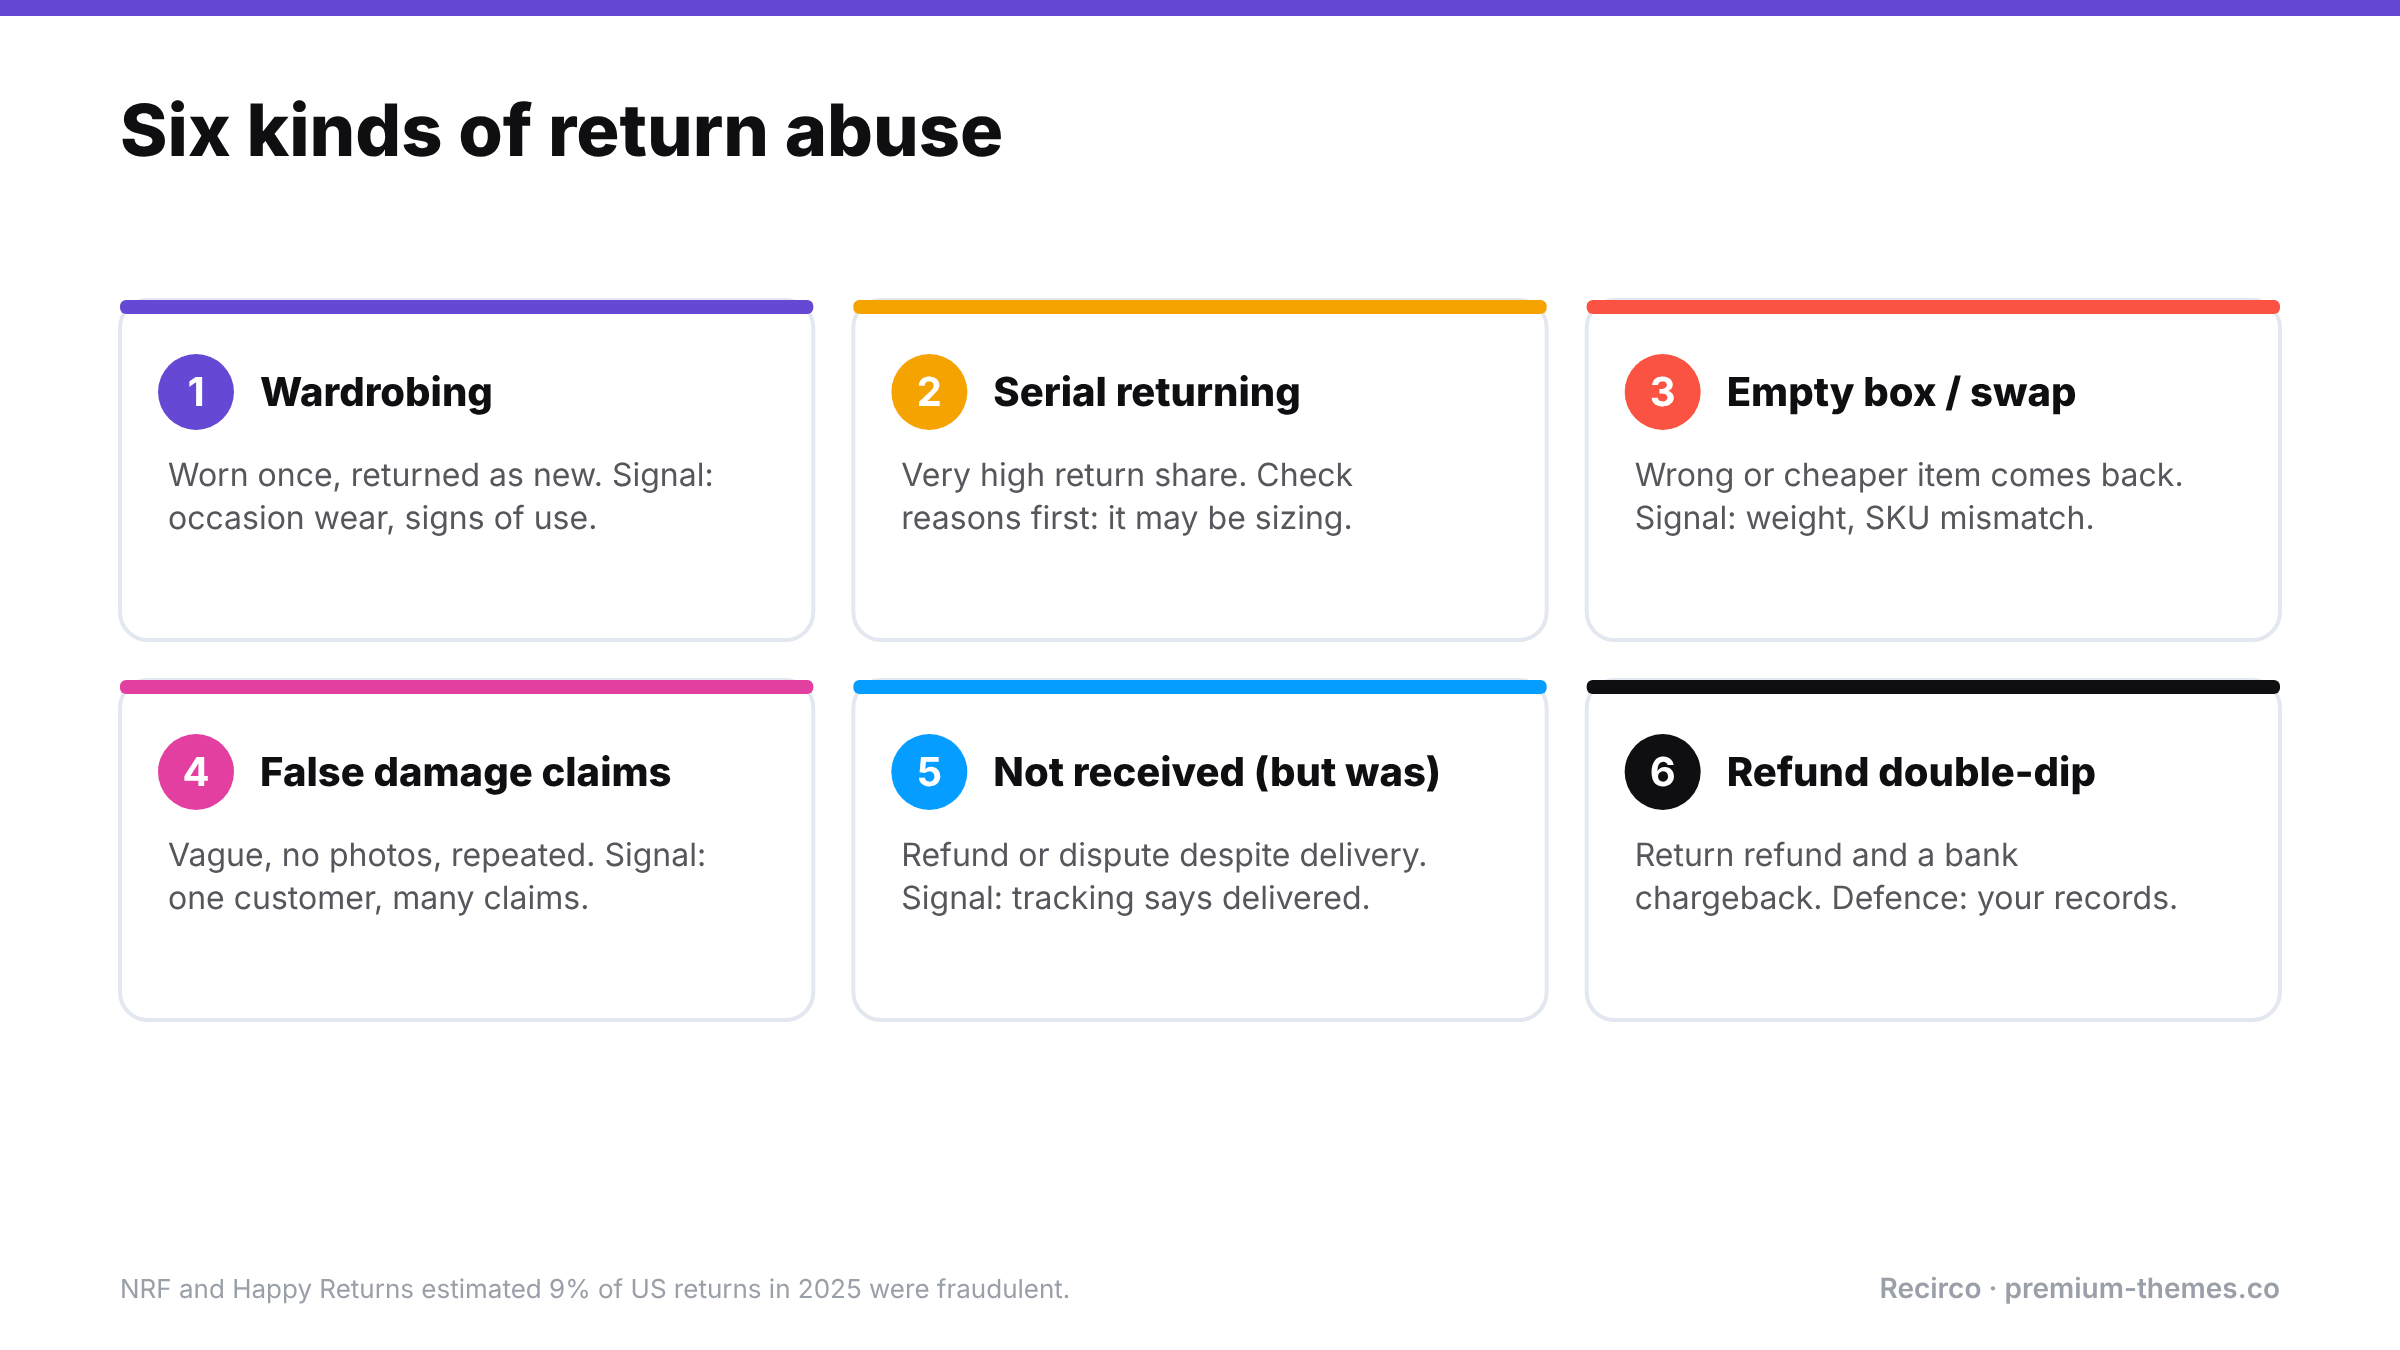
Six return abuse types and signals: wardrobing, serial returning (often a sizing problem), empty box or item swap, false damage claims, claiming non-delivery despite delivery, and double-dipping with both a refund and a chargeback. About 9% of US returns in 2025 were estimated to be fraudulent.

Type What happens Typical signal
Wardrobing Item bought, worn or used once (an event, a photo shoot), then returned Fashion, occasion wear, cameras; returns just inside the window; signs of wear
Serial returning A customer returns a very high share of what they buy High return rate per customer over time
Empty box / wrong item returned Box returned empty, or with a cheaper or counterfeit item Weight mismatch; inspection finds wrong item
False damage claims Item claimed damaged or defective when it wasn’t Vague descriptions; no packaging photos; repeat claims
“Item not received” while receiving it Customer claims non-delivery to get a refund, or disputes with their bank Delivery confirmed; history of similar claims
Return outside the policy Late returns, used items, excluded products, pushed through by persistence Requests outside window; excluded categories
Refund double-dipping Customer requests a return refund and files a chargeback Dispute on an order already refunded

Not all of these are “fraud” in a legal sense. Serial returning and late returns are often policy abuse, and sometimes not abuse at all. Your process should treat them differently.

Step 1: Separate honest-but-expensive from abusive

Before tightening anything, look at why your heavy returners return.

  • If a customer returns lots of items with “Too small” / “Too large” reasons, your size guide may be the problem. Fix the product page and offer exchanges instead of refunds. (See reducing your return rate with reason data.)
  • If they consistently return items after events or weekends, in visibly used condition, that’s wardrobing.
  • If returns come with “Damaged” claims and no evidence, that needs scrutiny.

Return reasons and history turn a vague suspicion into a clear picture. Without them, you’re guessing, and guessing usually means treating everyone the same.

Three high returners, three different answers

Customer A has returned 6 of 9 orders this year. Every return reason is Too small, mostly on one brand of jeans. Items come back unworn with tags. Not abuse. That brand runs small. Add a sizing note to those product pages, offer an exchange, and Customer A will likely become a profitable regular.

Customer B has returned 5 of 7 orders, mostly dresses and occasion wear, each requested on a Monday or Tuesday, close to the end of the return window. Two arrived with makeup marks and creased fabric. Likely wardrobing. Hold their future returns for inspection, refund only after arrival, and enforce the condition rules in your policy.

Customer C has made three “arrived damaged” claims in two months on different products, each with a one-word description and no photos, while other customers ordering the same products report no damage. Suspicious. Require photos of the item and packaging for future claims, and hold them for review.

Three customers with high return rates, and only two of them are a problem. Reasons and history are what tell them apart.

Step 2: Make the policy do the work

Most abuse thrives on ambiguity: late returns that get approved because nobody checked the date, used items accepted because the policy didn’t say “unused”, gifts kept because nobody asked for them back. Tighten the policy text, then enforce it automatically so no one has to argue:

  • Return window counted from delivery or completion, enforced by the system rather than staff.
  • Condition rules: unworn, unwashed, tags attached, original packaging. Consider non-removable tags for occasion wear.
  • Excluded categories: final sale, personalized, intimate apparel, opened hygiene products.
  • Evidence for claims: photos required for damage and fault reasons.
  • Consequences stated plainly: “Items returned used or incomplete may be refused or refunded partially.”

([Return policy template](/blog/woocommerce-return-policy/))

Step 3: Route by risk, not by rule-for-everyone

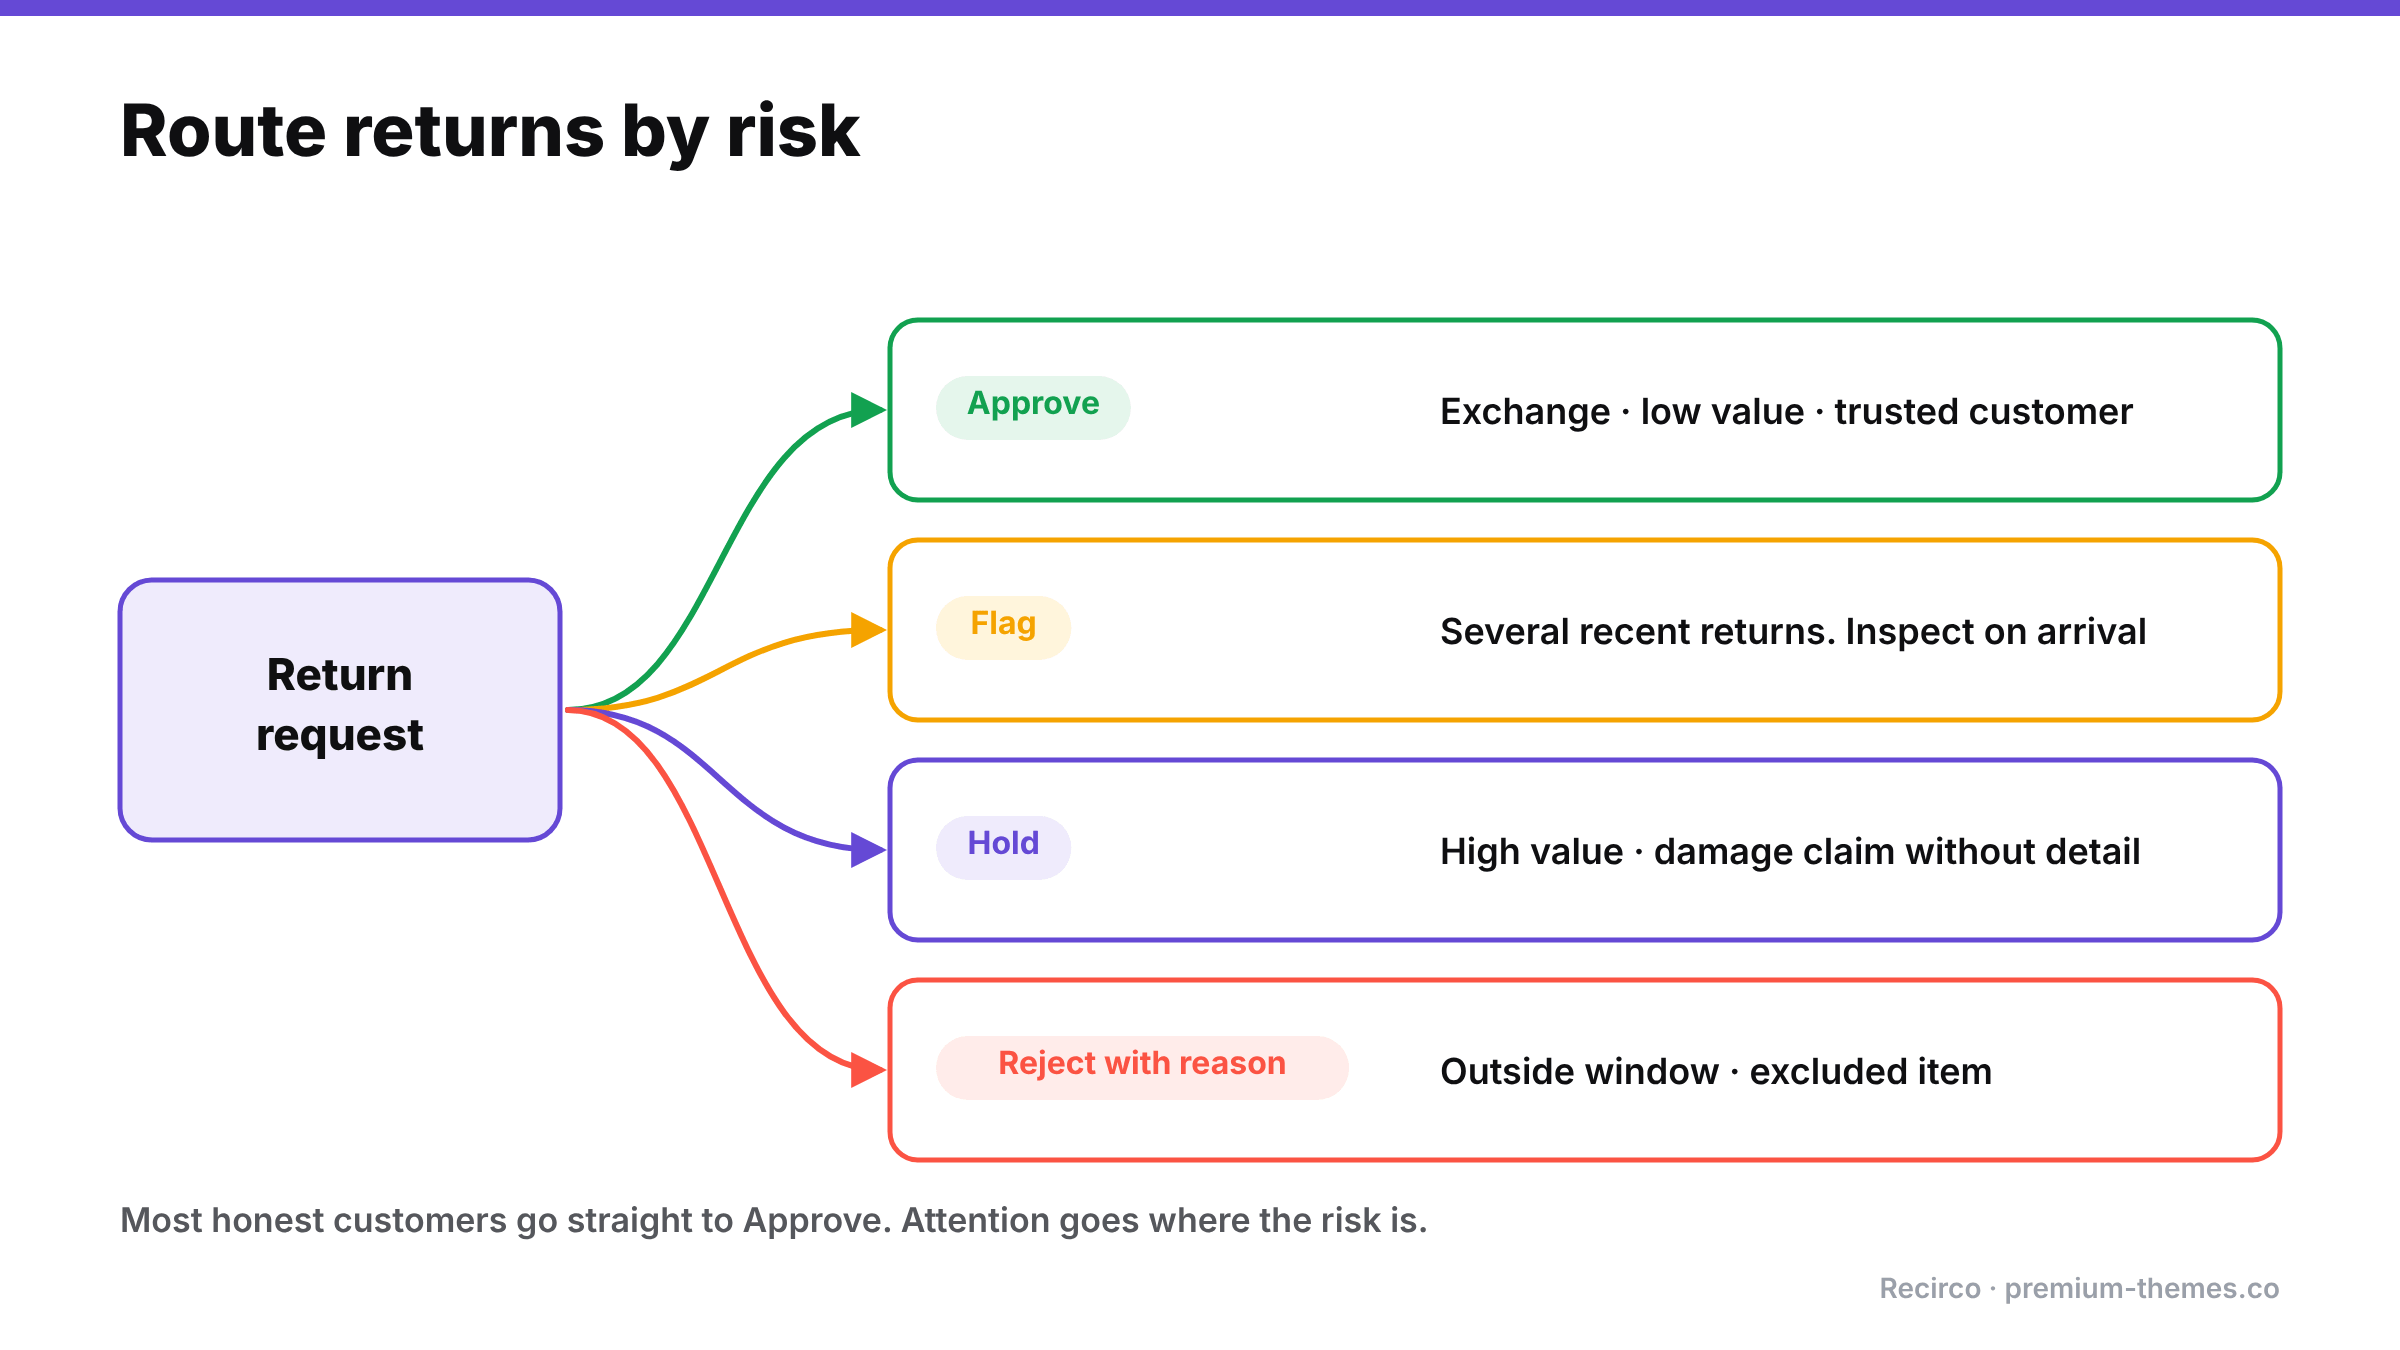
Routing diagram: a return request goes to approve (exchanges, low value, trusted customers), flag (several recent returns, inspect on arrival), hold (high value, damage claim without detail), or reject with reason (outside window, excluded item).

The best idea from that Reddit thread, and from others like it, was risk-based routing: automate the obvious cases, and send the rest to a human with context.

Return Route
Low value, trusted repeat customer, normal reason, inside window Auto-approve
Exchange for a different size Auto-approve (revenue kept, low risk)
High-value order Hold for manual review
Customer with several recent returns Flag for review
Damage claim without detail Hold; request evidence
Outside window or excluded item Reject with a clear reason (or flag if you allow exceptions)

This keeps the experience fast for the large majority while focusing your attention where risk actually is.

Step 4: Inspect what comes back

For anything above a low-value threshold:

  • Weigh parcels against expected weight.
  • Check SKU, serial number and condition before refunding.
  • Restock only after inspection. If you restock on approval, abuse gets into your sellable stock.
  • Refund after arrival for higher-risk returns, not on approval.

A simple inspection checklist

Keep it next to wherever returns are unpacked:

  1. Match the return number to the parcel and the request.
  2. Check the item and SKU match what was ordered and requested.
  3. Check the serial number for warranty products.
  4. Check condition: tags attached, unworn, unwashed, no marks, odours or damage.
  5. Check completeness: accessories, parts, manuals, packaging.
  6. Photograph anything that fails inspection before you do anything else.
  7. Record the outcome on the return (accepted, partially accepted, refused) with a note.
  8. Restock only accepted items.

It takes a minute per parcel and gives you evidence if a customer disputes a refused or partial refund.

Step 5: Keep a record, and act on patterns

Every return should record the customer, items, reason, description, condition on arrival, decision and who made it. Patterns then become visible:

  • Customers whose returns are repeatedly refused on inspection
  • The same serial number appearing in more than one claim
  • Damage claims that cluster on one customer rather than one carrier

For genuine, repeated abuse, many stores’ terms reserve the right to refuse future orders or returns. Use it sparingly, based on records rather than hunches.

When a refund becomes a chargeback

One form of abuse sits between returns and payments: the customer requests a return, gets refunded, and disputes the original charge with their bank. Without records, you can end up refunding twice. Your defence is documentation: the return record, the refund in WooCommerce, the gateway refund ID, and the customer emails. Respond to the dispute with that evidence promptly.

What not to do

  • Don’t hide the return policy or make returns deliberately painful. You’ll lose honest customers at the checkout before any fraudster is deterred.
  • Don’t treat every high returner as a fraudster. Check reasons first.
  • Don’t refund before inspecting high-value returns.
  • Don’t let staff judge exceptions differently. Inconsistency is what serial abusers exploit.
  • Don’t refund in two places. Double refunds aren’t customer fraud, but they’re just as expensive. (See refund status mismatches.)

Setting it up in WooCommerce with Recirco

WooCommerce has no returns system, so out of the box there’s no window enforcement, no reasons, no history and no approval step. Recirco – Returns & Exchanges for WooCommerce adds them for free:

  • Return window enforcement in days, measured from the order’s completed, paid or created date. Late requests simply can’t be submitted.
  • Eligible order statuses and excluded products and categories, so final-sale and hygiene items are never offered as returnable.
  • Per-unit eligibility, so the same unit can’t be returned twice.
  • Reasons on every return, each optionally requiring an explanation, so damage claims arrive with detail.
  • Approval queue with search, filters and bulk actions. Nothing is refunded until someone approves it (unless you enable auto-refund on completion).
  • Restock timing: on arrival or on completion is the safe choice for abuse-prone categories.
  • Activity log and notes on every return: an evidence trail if a customer later disputes the charge.
  • Refunds from the return, designed to prevent duplicate refunds for the same return.

Recirco Pro adds the risk-routing layer:

  • Conditional approval rules: a set of seven conditions and four actions (approve, reject with reason, flag, hold). The first matching rule wins, and the activity log names the deciding rule, so every automated decision is explainable. Auto-approve the routine, hold the risky. (Check the Recirco documentation for the exact conditions available and map your risk signals to them.)
  • Photo uploads with claims (up to 5 photos, 5 MB each) and warranty serial-number registration, which deters false damage and warranty claims.
  • Exchanges and store credit, which give honest “wrong size” returners a better path than a refund and reduce the incentive for refund abuse.
  • Analytics: reasons ranked by count and value, most-returned products, value returned. That separates product problems from customer problems.

Note: the current version of Recirco requires customers to have an account to request a return. For abuse prevention that’s a benefit: every return is tied to a known customer and their history.

A balanced anti-abuse policy (template)

Fair returns

We want returns to be easy for our customers. To keep them that way:

  • Returns must be requested within [30] days of delivery from My Account → Returns.
  • Items must be unworn, unwashed and returned with all tags and packaging.
  • [Final-sale, personalized and hygiene items] can’t be returned.
  • Damage and fault claims need a short description and photos.
  • We inspect every return. Items returned used, damaged by the customer or incomplete may be refused or partially refunded.
  • We may decline future orders or returns where we see repeated misuse of this policy.
  • This doesn’t affect your statutory rights.

Damaged, Defective or Under Warranty: Handling WooCommerce Claims With Photos and Serial Numbers

Not every return is a change of mind. Some of the most important ones are claims:

  • “It arrived smashed.”
  • “It stopped working after three weeks.”
  • “This isn’t what I ordered.”
  • “It’s still under warranty and the motor has failed.”

These are the returns where getting it right matters most. The customer has a genuine grievance, often a legal right, and usually a short fuse. Handle it well and you keep a customer who trusts you. Handle it badly (slow, sceptical, endless emails asking for photos) and you get a chargeback, a public review, or both.

They’re also the returns most open to abuse. “Damaged on arrival” is an easy claim to make and a hard one to disprove without evidence.

This guide sets out a claims process for WooCommerce that’s fast for genuine claims, consistent for your team, and evidence-based enough to deter abuse.

Four kinds of claim (and why they need different handling)

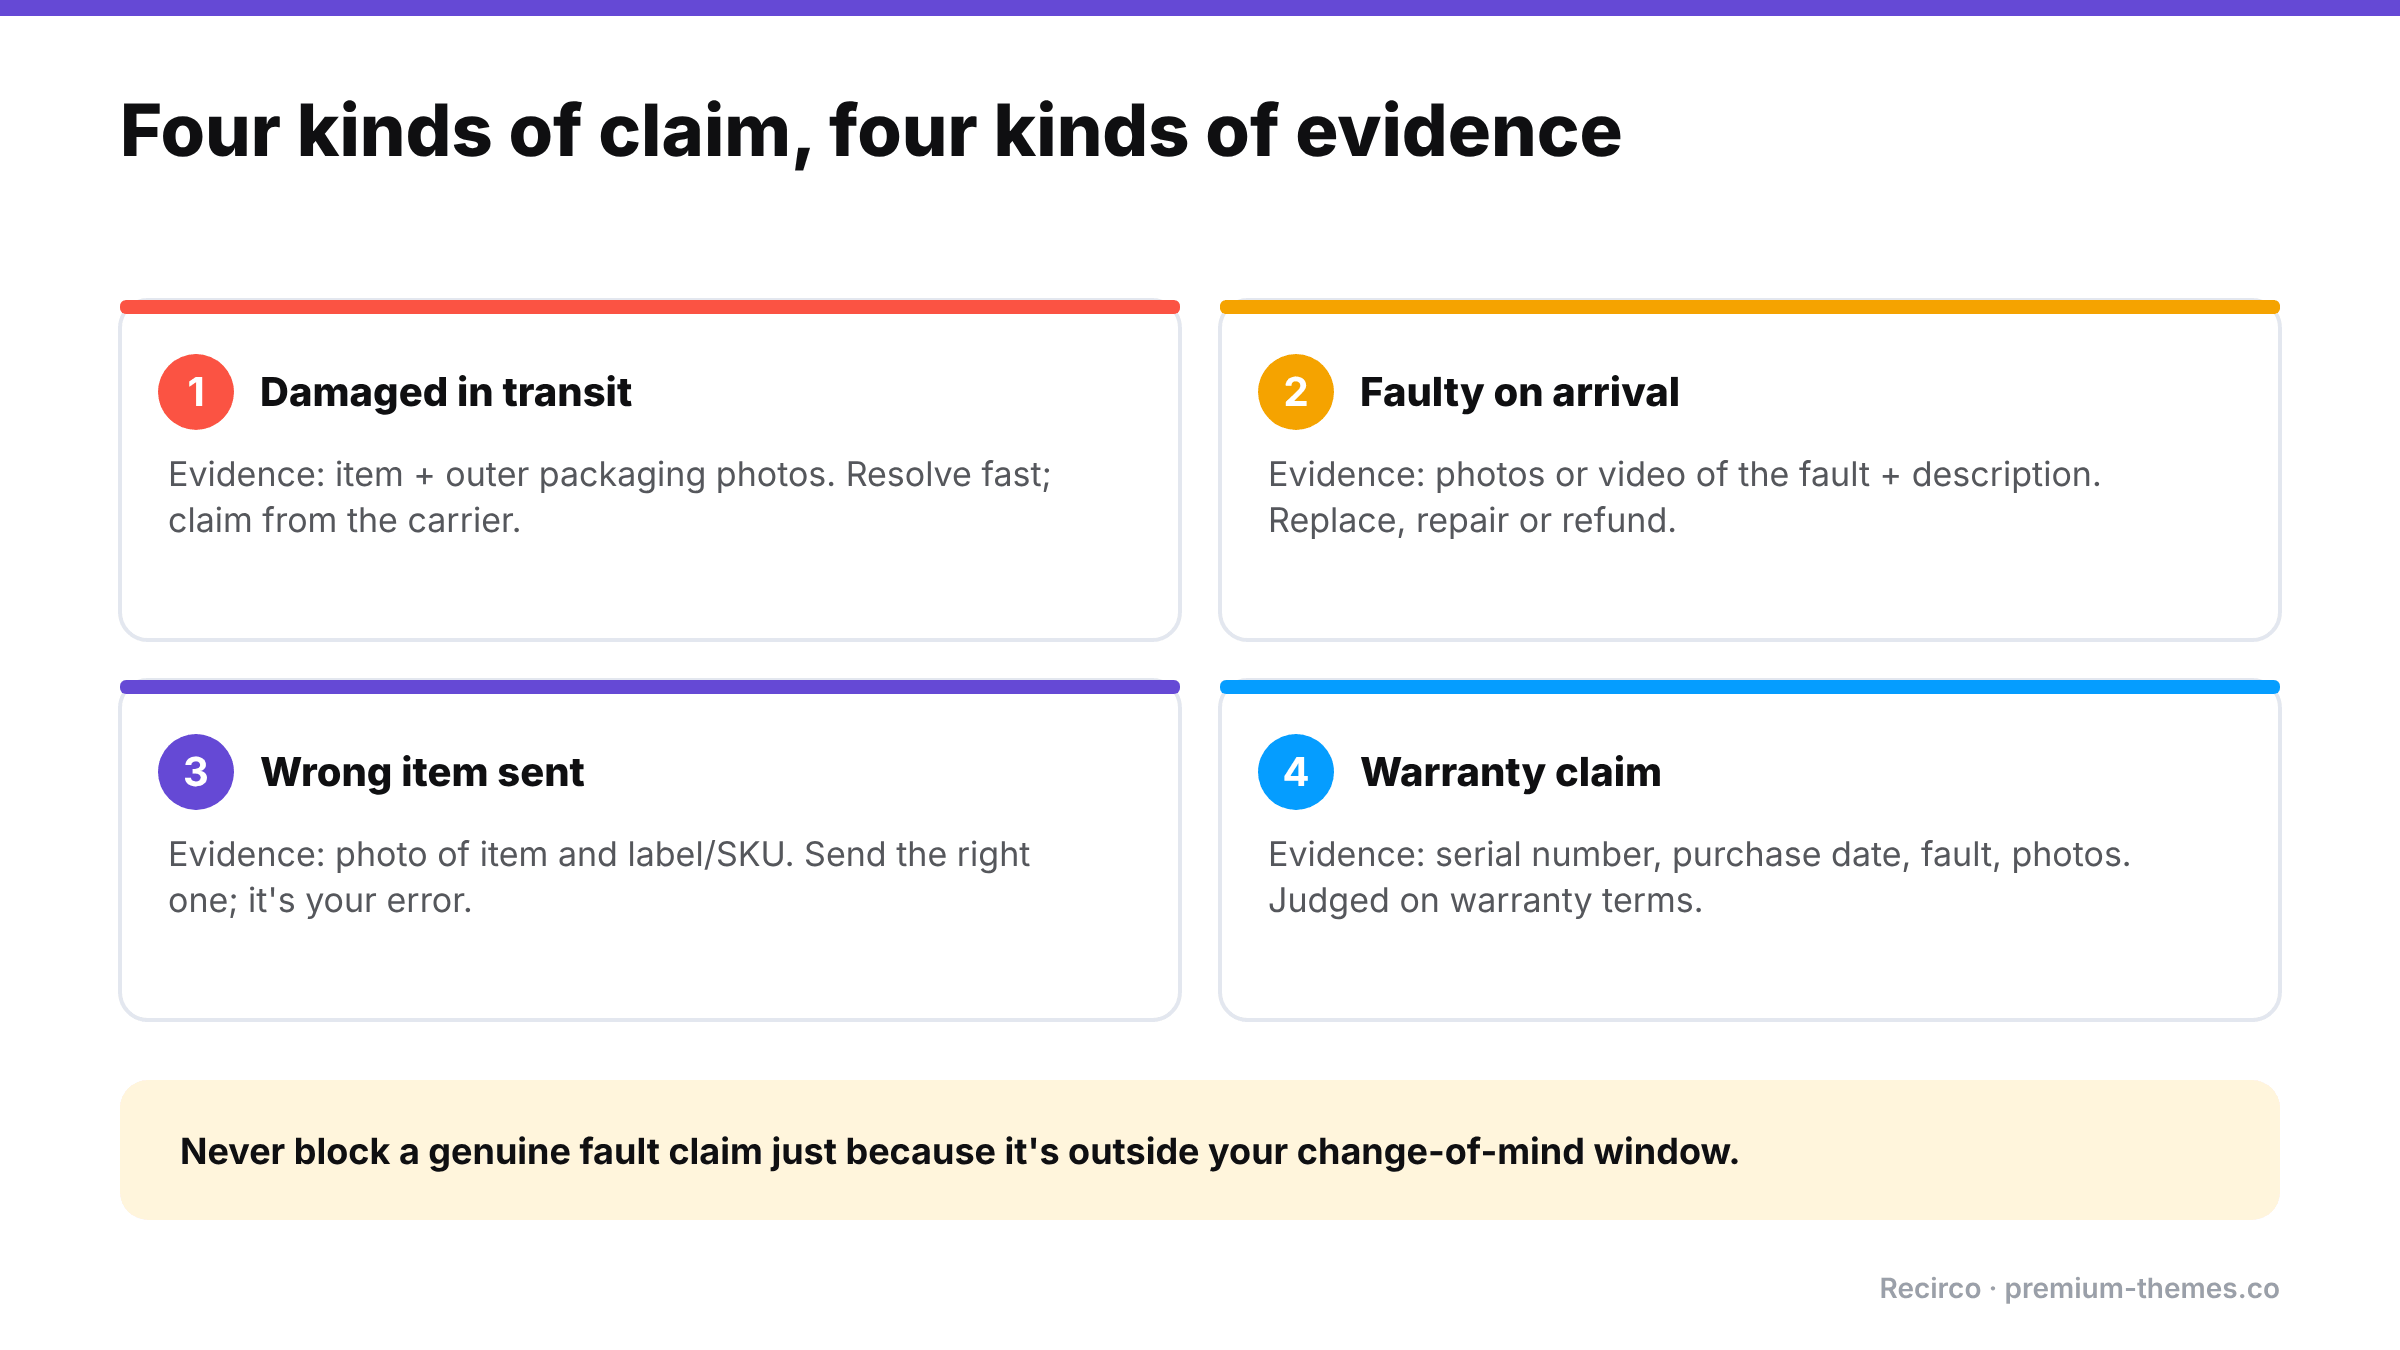
Four claim types and evidence: damaged in transit needs item and packaging photos; faulty on arrival needs photos or video and a description; wrong item needs a photo of the item and label; warranty claims need serial number, purchase date, fault description and photos. Don't block fault claims because they're outside the return window.

Claim Typical timing Key evidence Usual resolution
Damaged in transit Days after delivery Photos of item and packaging Replacement or refund; carrier claim
Defective / faulty on arrival First days or weeks Photos/video of fault; description Replacement, repair or refund
Wrong item sent Days after delivery Photo of item and label/SKU Correct item sent; return or keep the wrong one
Warranty claim Months later Proof of purchase, serial number, fault description, photos Repair, replacement, or refund per warranty terms

Mixing them into one generic “return” flow causes problems. A warranty claim 11 months after purchase shouldn’t be rejected because it’s outside your 30-day return window. A damaged-in-transit claim shouldn’t wait until the broken item is posted back before you act.

Know your obligations first

Your warranty and your return window are not the only rules that apply. In many markets, consumer law gives buyers rights for faulty goods regardless of your policy:

  • EU: sellers are generally liable for lack of conformity that becomes apparent within at least two years of delivery (the legal guarantee), separate from the 14-day withdrawal right.
  • UK: the Consumer Rights Act gives a short-term right to reject faulty goods (30 days), then rights to repair or replacement, and further remedies after that.
  • Australia: the Australian Consumer Law’s consumer guarantees mean a major fault entitles the customer to a repair, replacement or refund, whatever your policy says.
  • US: implied warranties under state law, plus the terms of any written warranty you offer.

 This is general information, not legal advice. Check the rules for each market you sell to.

The practical takeaway: your claims process should never block a legitimate fault claim just because it’s outside your change-of-mind return window.

Designing the process

1. Let customers start a claim themselves, with the right reason

A customer with a broken item shouldn’t have to compose an email. Offer clear reasons in your returns portal:

  • Damaged in transit
  • Faulty / not working
  • Wrong item received
  • Warranty claim

Make a description required for each, so you get “the left hinge snapped when opening the box” rather than “broken”.

2. Ask for photos up front, once

The single biggest time-waster in claims handling is the follow-up email: “Could you send a photo?” Ask for photos as part of the claim, and say exactly what you need:

  • The item showing the damage or fault
  • The outer packaging (for transit damage, essential for carrier claims)
  • The shipping label (for wrong-item claims)
  • The serial number plate (for warranty claims)

3. Capture serial numbers for warranty products

For electronics, appliances, tools and anything with a meaningful warranty, record serial numbers. They let you:

  • confirm the item was bought from you, and when
  • check it’s still inside its warranty period
  • spot the same serial being claimed twice
  • identify batches with recurring faults

4. Decide when you need the item back

Collecting a broken $15 item can cost more in shipping than the item is worth. Set a threshold:

  • Below the threshold: photo evidence is enough; send a replacement or refund; customer keeps or disposes of the item.
  • Above it: item comes back (with a prepaid label) for inspection, repair or a supplier claim.

5. Respond fast to transit damage and wrong items

These are almost always your problem (or your carrier’s), and the customer did nothing wrong. Aim to approve within one working day and ship the replacement promptly. Use the photos to file the carrier claim yourself.

6. Record everything against the order

Reason, description, photos, serial number, decision, who made it, and what was sent or refunded. When the same customer claims again, or a supplier asks for evidence, it’s all in one place.

7. Feed the data back

Claims are product feedback with photos. If one product has repeated “faulty” claims, talk to the supplier. If “damaged in transit” clusters on one carrier or one packaging type, change it.

What a good claim looks like when it arrives

Compare two versions of the same claim reaching your team.

Email version: “Hi, my order arrived broken. Please help.” No order number, no photos, no detail. Your team replies asking for the order number and photos. The customer replies two days later with one blurry photo. You ask for a photo of the packaging. They’ve thrown it away. Five emails and a week later, you send a replacement anyway, without evidence for a carrier claim.

Portal version: order #7731 selected automatically from the customer’s account; item “Ceramic table lamp”; reason “Damaged in transit”; required description “Base cracked into two pieces, box crushed on one corner”; four photos attached: lamp, crack close-up, outer box, shipping label. Your team approves in two minutes, ships a replacement the same day, and files the carrier claim with the photos already in hand.

Same customer, same broken lamp. The second version took a fraction of the time, kept the customer happy, and recovered the cost from the carrier.

Using claims data to fix problems upstream

Every claim is a data point. Reviewed monthly, claims data answers questions that are otherwise expensive to investigate:

  • Is one product failing more than others? A spike in “faulty” claims on one SKU or one batch of serial numbers points at a supplier problem. Raise it with photos and serials as evidence.
  • Is one carrier or service damaging more parcels? Compare “damaged in transit” rates by shipping method.
  • Is packaging good enough? If damage clusters on fragile categories, change the packaging for those products before changing carriers.
  • Are “wrong item” claims rising? That’s a picking problem: check labelling, bin locations and new staff training.

A claims process that captures structured reasons, photos and serials turns this from guesswork into a ten-minute monthly review.

Working with your carrier on damage claims

When an item is damaged in transit, the cost usually belongs to the carrier, if you can prove it. Carriers typically want the claim filed within a set period, photos of the damaged item and the packaging, the tracking number, and proof of the item’s value. Some want the packaging kept for inspection. Because a good claims process collects photos and the order details at the moment the customer reports the damage, you can file the carrier claim the same day instead of chasing evidence weeks later.

Deterring abuse without punishing honest customers

A good claims process deters most abuse simply by asking for specific evidence consistently. Beyond that:

  • Packaging photos make “it arrived broken” harder to fake.
  • Serial number checks stop claims for items bought elsewhere and repeat claims on one unit.
  • Warranty dates from the purchase date stop out-of-warranty claims passing as in-warranty ones.
  • Rules that flag rather than reject, such as several claims from one customer in a short period, or very high-value claims, send those cases to a human without slowing everyone else.

What you shouldn’t do is make every customer jump through hoops because of a few bad actors. (More on this in return fraud and serial returners.)

Setting it up with Recirco

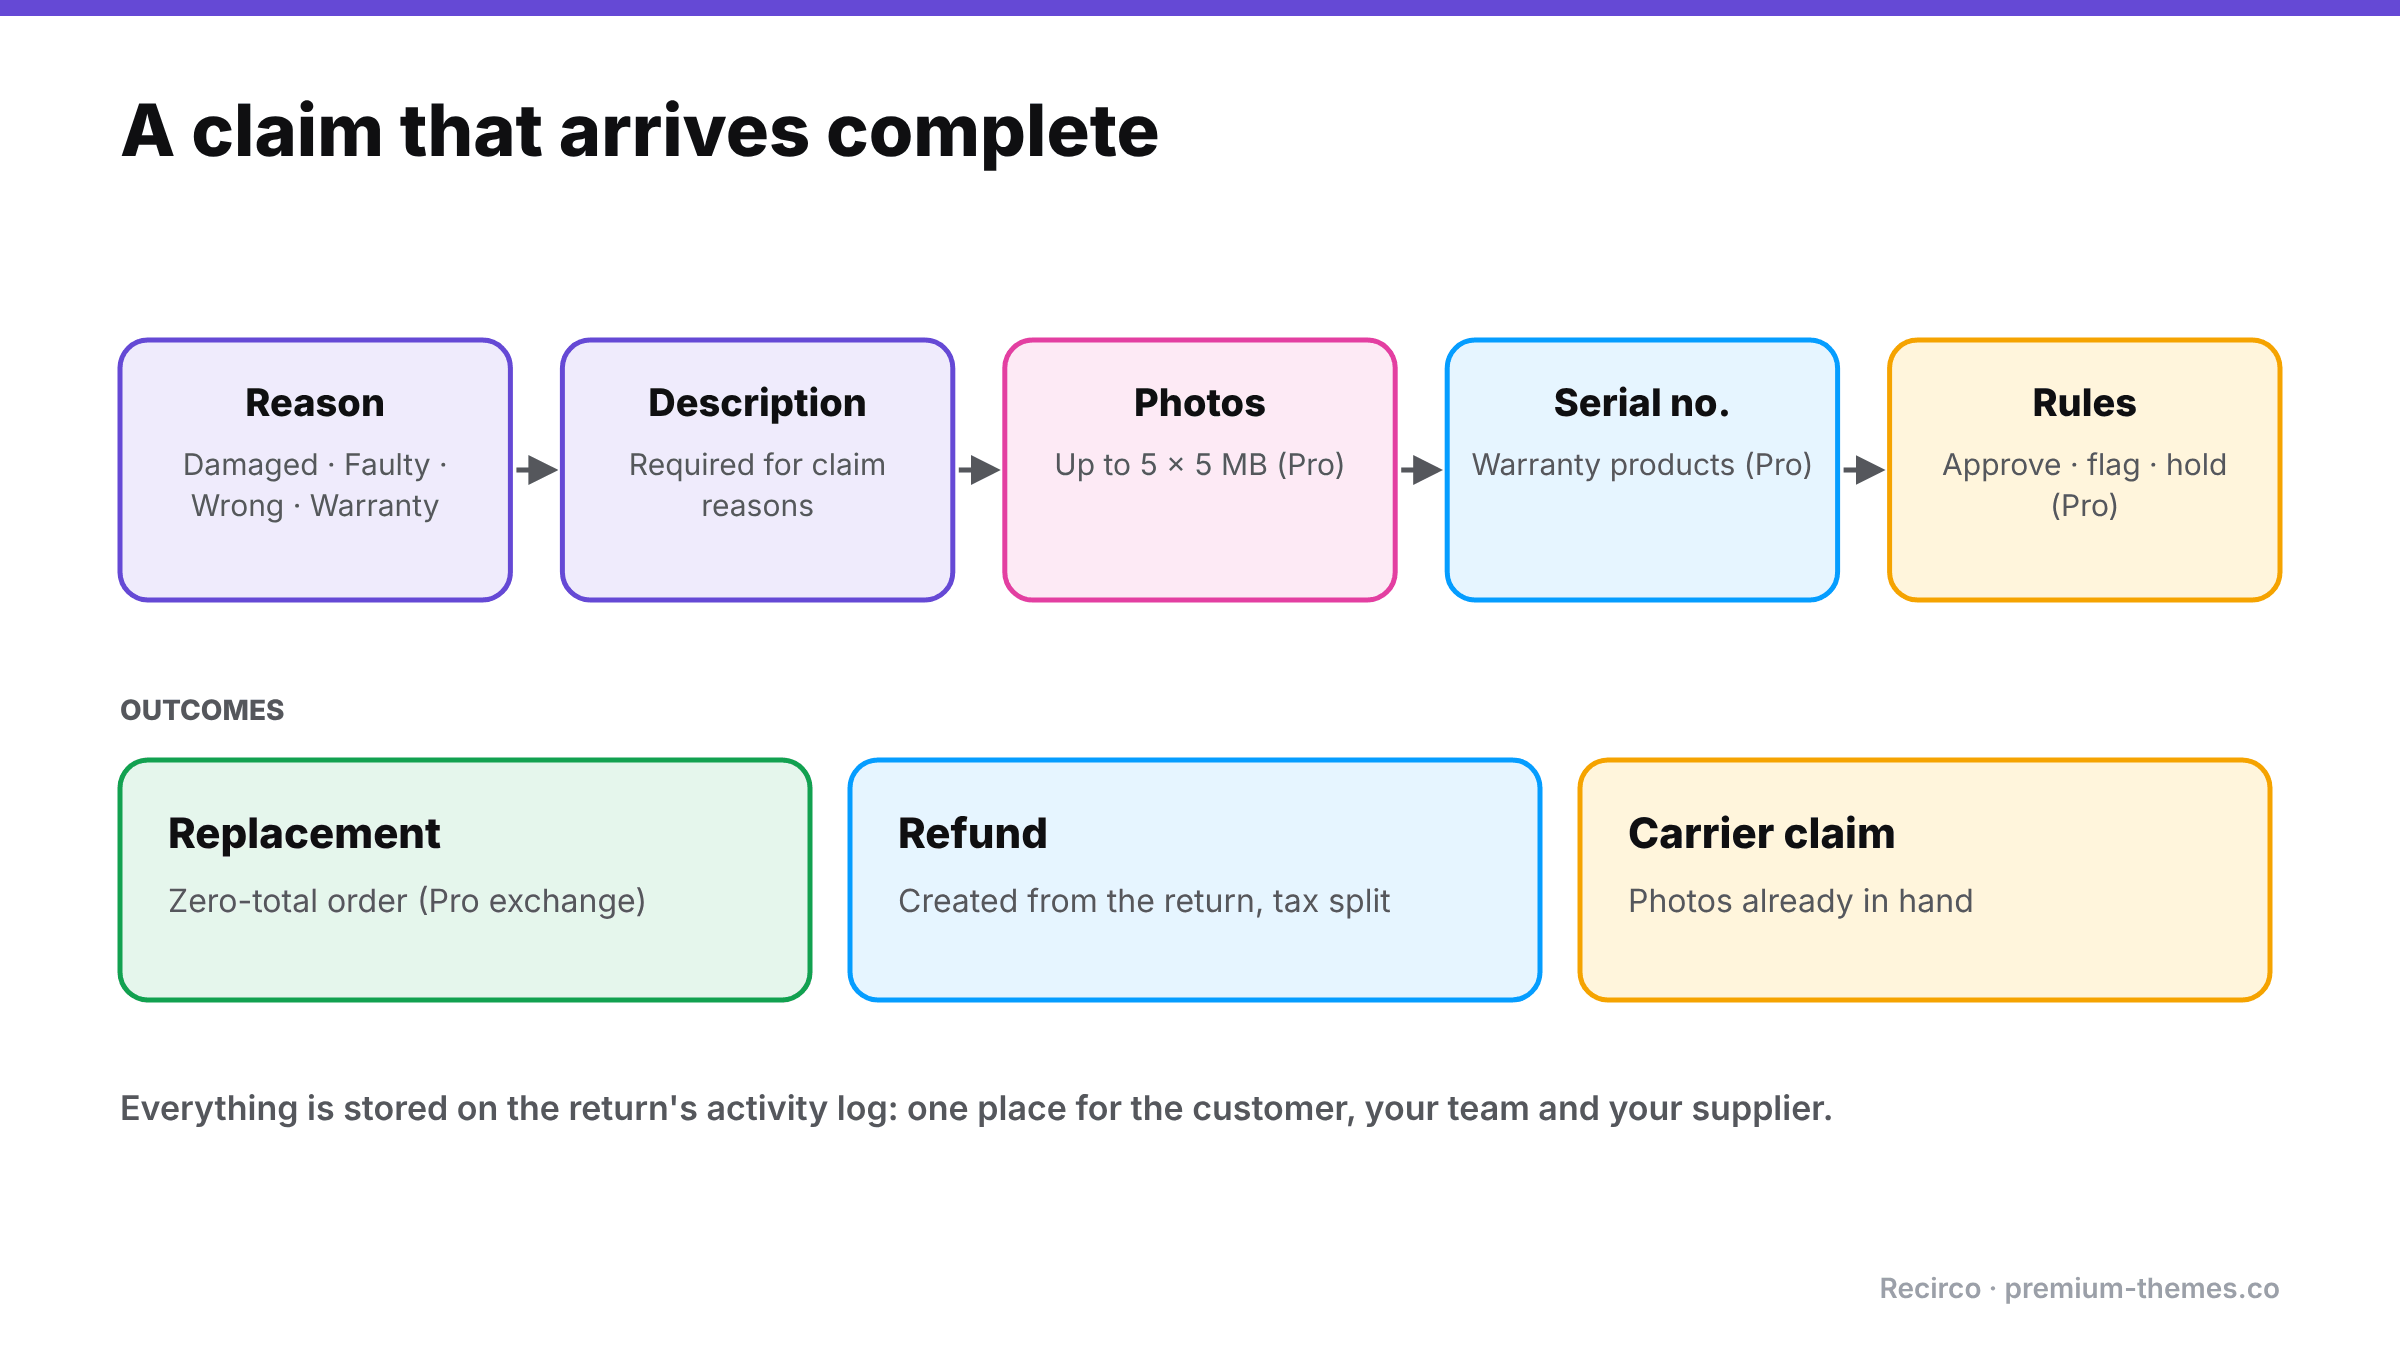
Claims flow: reason, required description, up to five photos, serial number for warranty products, then approval rules. Outcomes: a replacement order, a refund created from the return, or a carrier claim using the photos already collected. Everything stored on the return's activity log.

Recirco – Returns & Exchanges for WooCommerce (free) gives you the foundation:

  • A self-service returns portal in My Account, where customers pick the order, items and a reason. Recirco ships with six seeded reasons you can edit, and each reason can require an explanation. Set “Damaged”, “Faulty” and “Wrong item” to require details.
  • An admin queue with search, filters and bulk actions, so claims don’t get lost among change-of-mind returns.
  • Internal notes and customer notes, plus an activity log on every return.
  • Restock timing you choose. For damaged and faulty items, you’ll typically restock never (automatically) and decide after inspection.
  • Refunds from the return, with net and tax split correctly.

Recirco Pro adds the claims-specific tools:

  • Warranty management: set a warranty length per product, let customers register serial numbers, and calculate cover from the purchase date, so warranty claims are judged on warranty terms, not your return window.
  • Photo uploads: customers attach up to 5 photos per claim (5 MB each) when they submit, so the evidence arrives with the claim.
  • Conditional approval rules: automatically approve, reject with a reason, flag or hold claims based on conditions, with the first matching rule winning and the deciding rule recorded in the activity log. Fast-track low-value transit damage; hold high-value warranty claims for inspection.
  • Exchanges: send a replacement of the same or a different variant as a zero-total order in Processing.
  • Carrier labels via Shippo, generated on approval, for claims where you want the item back.
  • Analytics: reasons ranked by count and value, and the most-returned products. Your early-warning system for supplier quality problems.

A claims policy you can adapt

Damaged, faulty or wrong items

If your order arrives damaged, faulty or isn’t what you ordered, start a claim from My Account → Returns within [7] days of delivery. Choose the matching reason, describe the problem, and attach photos of the item and its packaging. We’ll respond within one working day and send a replacement or refund at no cost to you. For items under [$25], you won’t need to send anything back.

Warranty claims

Products marked with a warranty are covered for [12 months] from the date of purchase. Register your serial number in your account. To claim, choose “Warranty claim”, enter the serial number, describe the fault and attach photos. If we need the item back, we’ll email you a prepaid label.

This policy doesn’t affect your statutory rights.

How Much Should You Refund? Returns on Coupon, Discounted, BOGO and Free-Shipping Orders

Returning a full-price item from a single-item order is easy: refund what they paid.

Now try this one. A customer used a 20% off coupon on a three-item order that qualified for free shipping over $75. They return one item. The remaining two now total less than $75. How much do you refund?

Or: a buy-one-get-one-free deal, and they return the paid one. Or the free one. Or a gift-with-purchase promotion where they keep the gift and return the purchase.

These questions trip up store owners and support teams every day, and the answers you give can quietly cost you money (over-refunding) or customers (under-refunding and arguing). This guide works through the common discount scenarios, the principles behind fair refunds, and how to make the right amount the default.

This is practical guidance, not legal advice. Consumer law in some places sets rules on refund amounts, especially for faulty goods and statutory withdrawal rights. Check the rules where you sell.

The core principle: refund what was actually paid for the item

The fairest, most defensible rule is simple:

Refund the amount the customer actually paid for the returned item, after its share of any discount, plus or minus any shipping your policy says.

Not the list price. Not the order total divided by the number of items. The item’s share of what was paid.

The good news: WooCommerce already works this way for coupons. When a coupon is applied, WooCommerce spreads the discount across the eligible line items and stores each line’s subtotal (before discount) and total (after discount). The refund form pre-fills from the line total, the discounted amount actually paid for that line. As long as you refund through the line items rather than typing an amount, you start from the right number.

Scenario 1: Percentage coupon on the whole order

Order: 3 items at $40 each = $120. Coupon 20% off → $24 discount. Paid: $96.
Return: 1 item.

WooCommerce allocates the discount to each line: each item’s line total is $32.
Refund: $32 (plus that line’s tax, if any).

Common mistake: refunding $40, the shelf price. That over-refunds by $8 per item, and on a busy sale weekend that adds up.

Scenario 2: Fixed-amount coupon on the cart

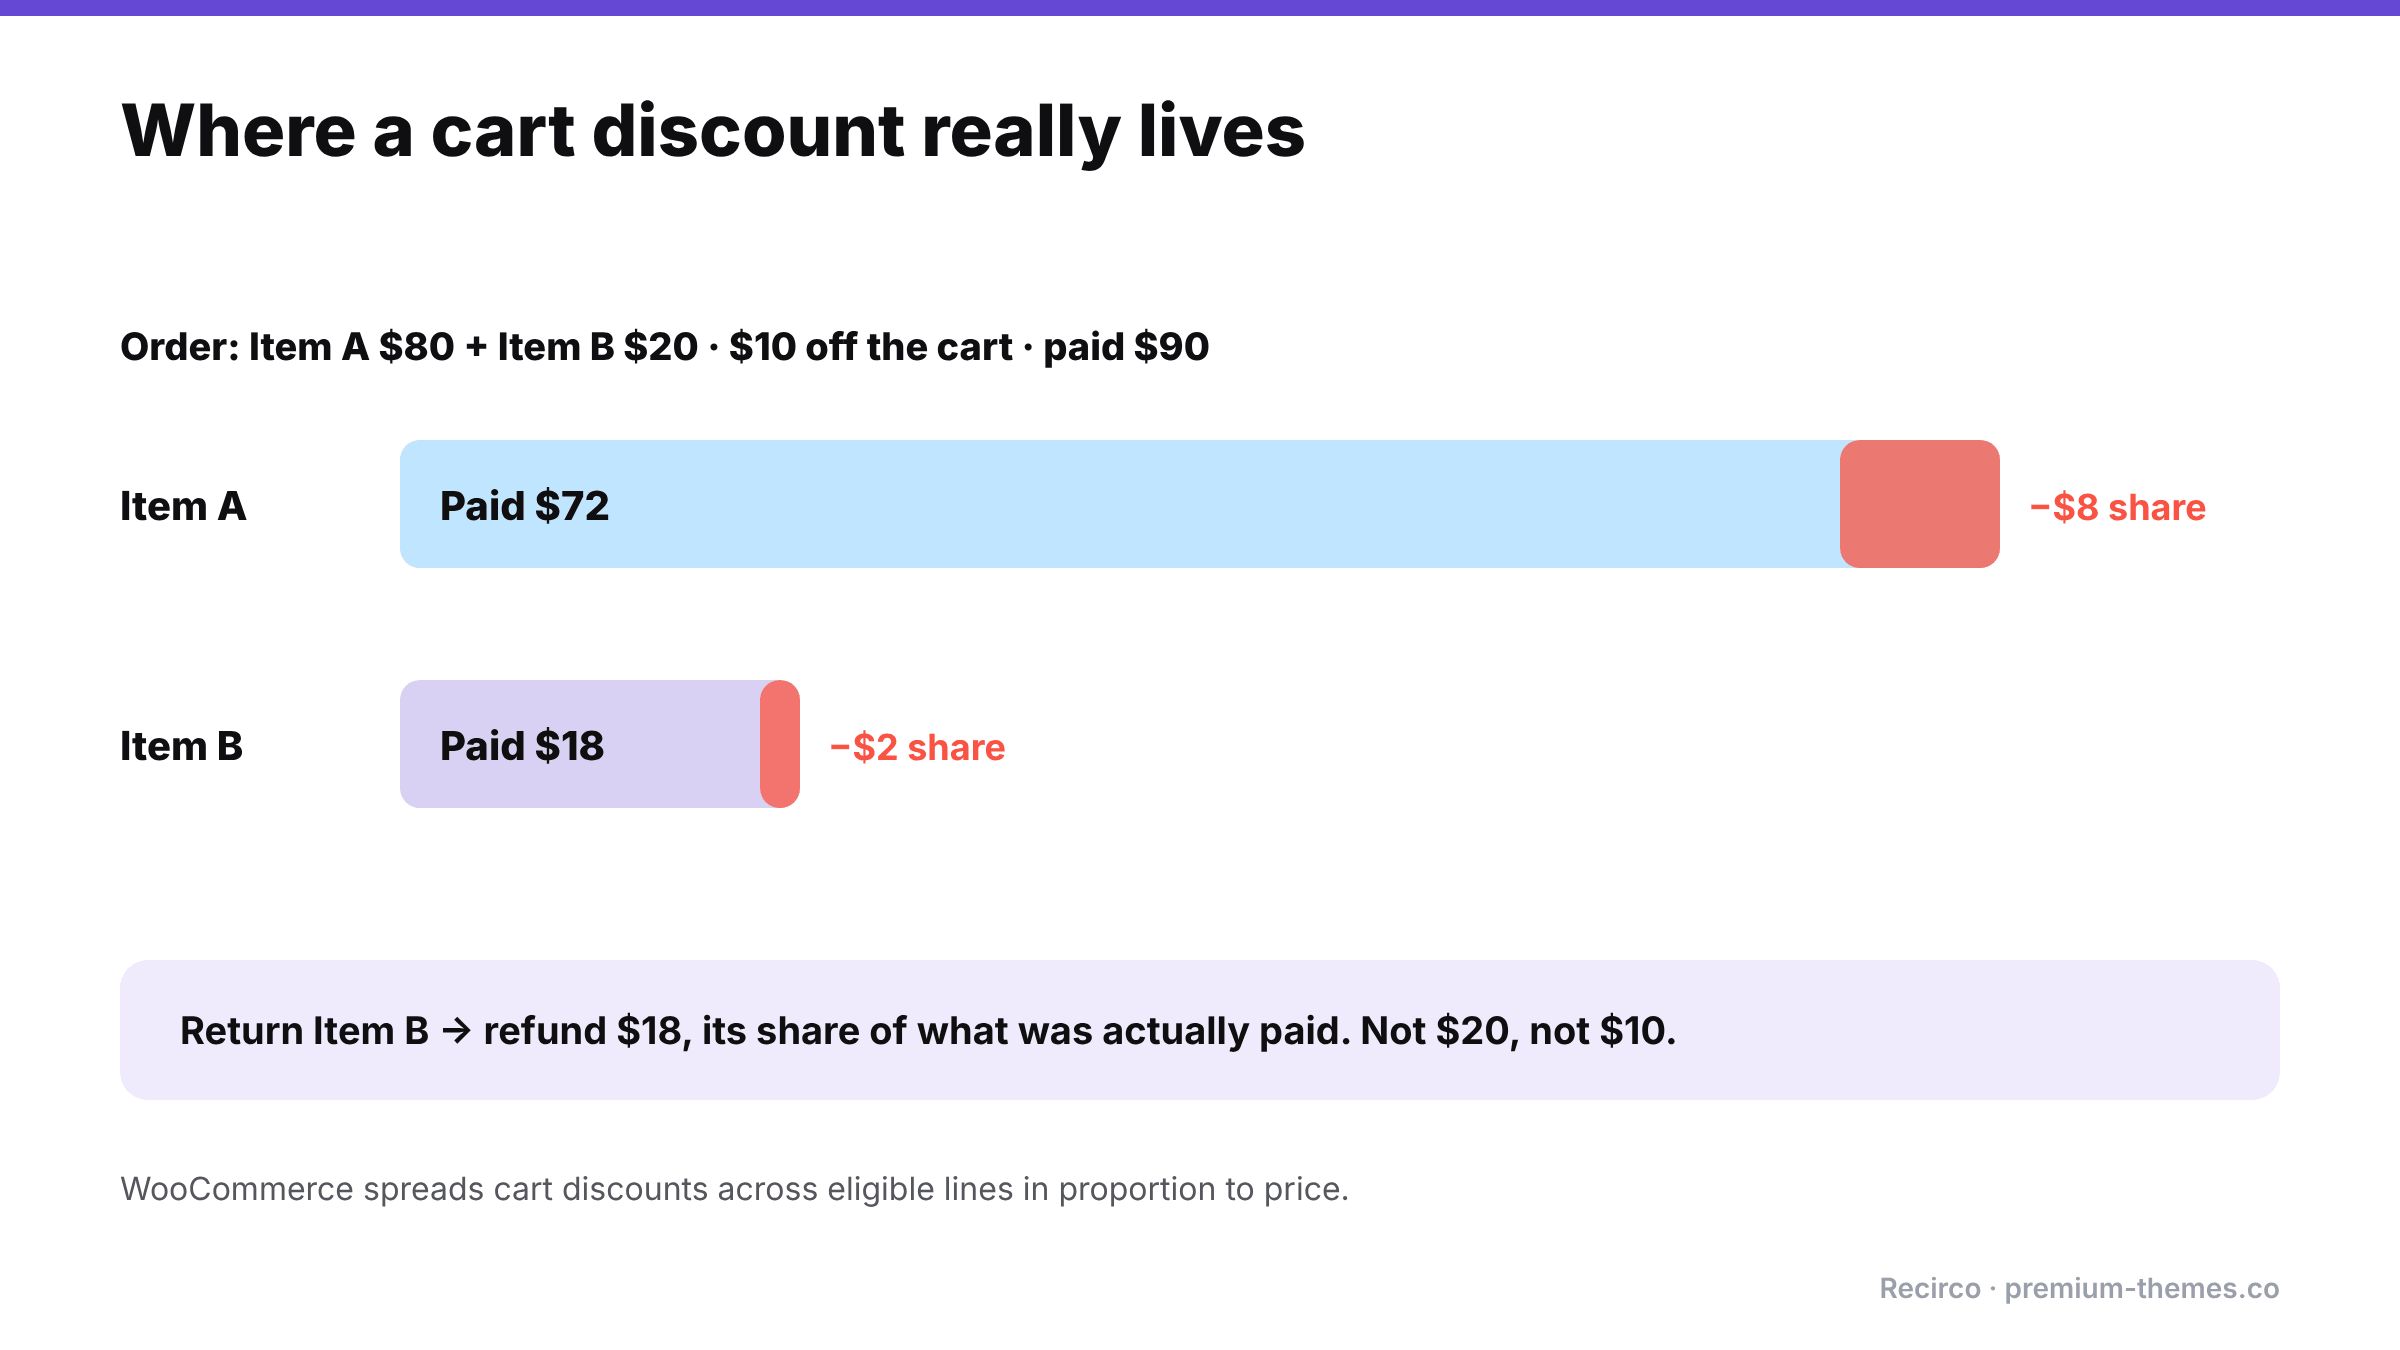
Diagram: a $10 cart discount on an $80 item and a $20 item is spread proportionally, $8 to the first and $2 to the second, so the items cost $72 and $18. Returning the $20 item refunds $18.

Order: Item A $80 + Item B $20 = $100. Coupon $10 off cart. Paid: $90.
Return: Item B.

WooCommerce spreads a fixed cart discount across the eligible items in proportion to their price: A gets $8 of the discount, B gets $2. B’s line total: $18.
Refund: $18.

Why proportional is fair: if you gave B the whole $10 discount, you’d refund only $10 and the customer would feel cheated. If you gave none, you’d refund $20 and lose the $2 they never paid.

Scenario 3: The return breaks a minimum-spend discount

Order: 3 items at $30 = $90. Coupon “$15 off orders over $75”. Paid: $75.
Return: 1 item. The remaining $60 no longer qualifies for the coupon.

Two defensible approaches:

  • Proportional (simplest, most common): refund the returned line’s discounted amount: $25. The customer keeps the full benefit on the remaining items.
  • Recalculate (strict): the customer would have paid $60 for the two items they kept, without the coupon. They paid $75. Refund $15.

The strict approach is logically defensible, but customers often see it as a penalty, and it generates complaints. Many stores choose proportional for goodwill and simplicity. Whichever you choose, put it in your return policy (“Discounts that depended on a minimum spend may be adjusted if items are returned”) so it isn’t a surprise.

Scenario 4: Buy one, get one free (BOGO)

Order: 2 items at $30, “buy one get one free”. Paid: $30.
Return: 1 item.

How the BOGO plugin recorded the discount decides the default:

  • If it put a $30 line and a $0 line, refunding the free one gives $0 and refunding the paid one gives $30. The customer effectively gets the “free” one for nothing either way.
  • If it spread the discount (two lines at $15), each item refunds at $15.

Fair approach: treat BOGO as 50% off each item. Returning one item refunds half of what was paid ($15). The customer keeps one item for $15, which is fair since they no longer meet the “buy two” condition.

Policy tip: state it plainly: “Items bought on multi-buy offers are refunded at the price paid per item under the offer.”

Scenario 5: Bundles and kits

Order: “Starter kit” bundle of 3 products for $99 (worth $130 separately).
Return: 1 product from the kit.

If the bundle is sold as a single product, you either accept only whole-kit returns, or refund a defined portion. If it’s sold as separate line items with a bundle discount, refund the returned line’s share of the discounted price, like Scenario 2.

Policy tip: many stores make bundles returnable only as complete bundles. If that’s your rule, enforce it by making individual bundle components non-returnable through your returns system rather than arguing case by case.

Scenario 6: Gift with purchase

Order: $70 serum + free travel bag (gift with purchases over $60). Paid: $70.
Return: the serum, keeping the bag.

Fair approaches: ask for the gift back too, or deduct its value from the refund, or let it go for low-value gifts. Most stores let low-value gifts go to avoid friction, and state that gifts over a certain value must be returned with the qualifying item.

Scenario 7: Free shipping threshold

Order: 2 items totalling $80 with free shipping over $75. Paid: $80.
Return: a $30 item. The kept item ($50) wouldn’t have qualified.

Options:
– Ignore it (most common): shipping was free, nothing to adjust.
– Deduct standard shipping from the refund, since the customer no longer qualifies. This is legitimate if stated in your policy, but it’s a frequent source of complaints.

Also decide whether you refund shipping paid by the customer when they return everything. In the EU, a consumer withdrawing from a distance contract is generally entitled to a refund of the standard delivery cost (not premium delivery they chose). Elsewhere it’s your policy choice.

Scenario 8: Store credit or gift card used as payment

If part of the order was paid with store credit or a gift card, refund in the same proportions by default: card portion back to card, credit portion back as credit. That stops customers converting non-refundable credit into cash through returns.

Why getting this right matters more than it looks

The difference between refunding list price and refunding the price paid seems small on one return. Across a sale season it isn’t.

Suppose you run a 25%-off Black Friday sale, sell 2,000 items averaging $40, and see a 15% return rate: 300 returned items. If each is refunded at the $40 list price instead of the $30 actually paid, you’ve given away $3,000 you never received. That money comes straight out of margin, on top of the cost of handling the returns.

The opposite mistake costs too. Under-refund (deduct discounts the customer doesn’t understand, or argue over pennies) and you buy yourself support tickets, bad reviews and occasionally a “credit not processed” chargeback, which costs a dispute fee on top of the refund you end up giving anyway.

Consistent, explainable rules avoid both.

Explaining an adjusted refund to the customer

When your policy means refunding less than the customer expects, say so before they’re surprised by their bank statement. A short note works:

“We’ve refunded $25.00 for the returned item. That’s the amount you paid for it after your 20% discount code. The other two items keep their discount. Your refund should appear within 5–10 working days.”

Customers rarely argue with a clear explanation. They argue with a number they don’t understand.

Turning rules into defaults

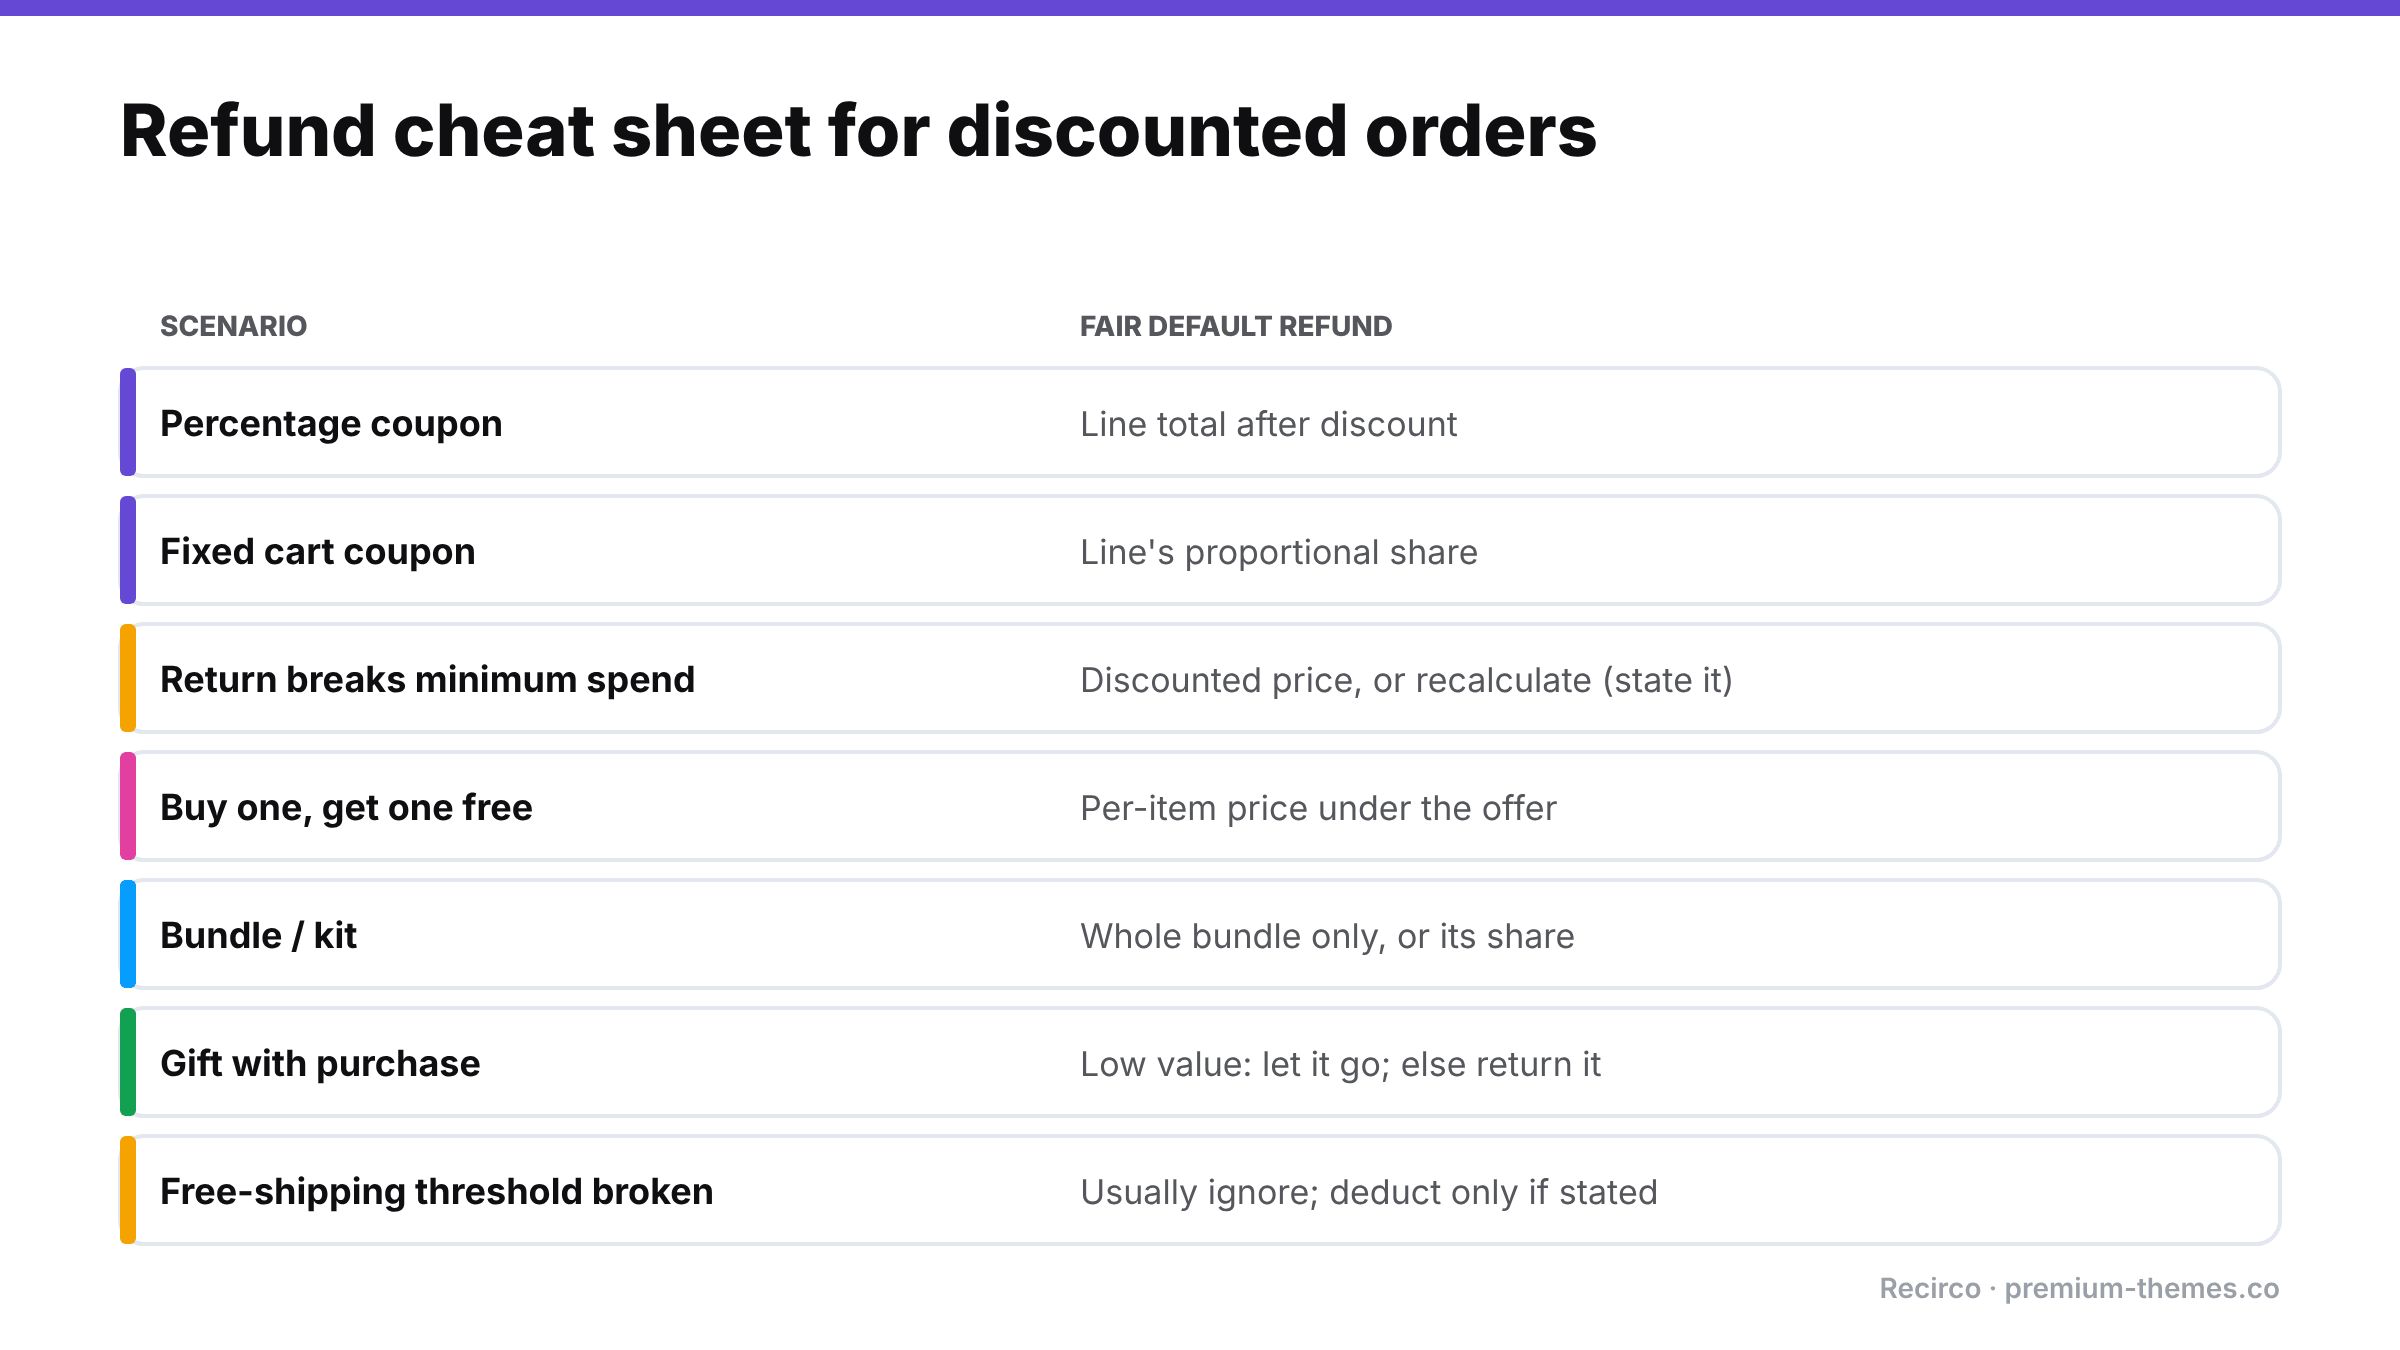
Refund cheat sheet: percentage coupon, refund the line total after discount; fixed cart coupon, the line's proportional share; broken minimum spend, the discounted price or a stated recalculation; BOGO, the per-item price under the offer; bundles, whole bundle only or its share; gifts, let low-value ones go; free-shipping threshold, usually ignore.

The scenarios above are manageable when one experienced person handles every return. They fall apart when several people handle returns, each doing their own arithmetic.

Three practices keep refunds consistent:

  1. Always refund through line items, never by typing an amount into the total. WooCommerce’s line totals already include coupon allocation, and the refund form splits net and tax.
  2. Write the edge cases into your policy: minimum-spend discounts, BOGO, bundles, gifts, free-shipping thresholds. Then support can point to it.
  3. Create refunds from the return record, so the system that knows which units came back also creates the refund for those units.

How Recirco helps

Recirco – Returns & Exchanges for WooCommerce is a free returns portal and approval queue that takes the arithmetic out of individual hands:

  • Customers return specific items and quantities, chosen from their order in My Account → Returns. Only eligible units are offered.
  • Refunds are created from the return as genuine WooCommerce refunds for the returned lines, with net and tax split from the original line, so they start from the discounted amount actually paid, not the shelf price. You can still adjust the amount before refunding when your policy says so (for example, deducting a broken minimum-spend discount). Send it through the gateway or record it manually.
  • Excluded products and categories, so bundles you only accept as complete sets, final-sale items or gifts can be made non-returnable in the portal itself.
  • Duplicate-refund prevention, so the same returned unit can’t be refunded twice.
  • Notes: internal for your team, or sent to the customer, so you can explain any adjustment in writing.
  • Policy text shown in the portal, so customers see your rules on discounts and gifts before they submit.

Recirco Pro adds exchanges (often the best answer for discounted items, since a size swap keeps the original deal intact), store credit with optional bonus, and conditional approval rules to flag returns from high-value or heavily discounted orders for a closer look.

Policy wording you can adapt

Returns on discounted and promotional orders

  • Refunds are for the amount you paid for each item after any discount.
  • If a discount depended on a minimum spend or number of items and your return takes the order below it, [we’ll still refund the full amount you paid for the returned items / the refund may be adjusted to reflect the discount you no longer qualify for].
  • Items bought on multi-buy offers (e.g. buy one, get one free) are refunded at the price paid per item under the offer.
  • Bundles can only be returned complete.
  • Free gifts worth more than [$20] must be returned with the item that qualified for them.
  • Free shipping is [not deducted / deducted at our standard rate] if a return takes your order below the free-shipping threshold.

Partial Returns in WooCommerce: Refunding One Item Without Breaking Status, Tax or Stock

A worked example

Full returns are simple: everything comes back, everything is refunded, the order is closed.

Most real returns aren’t like that. A customer orders three shirts and sends one back. They order a set and return one piece. They keep the jacket but return the belt they bought with it. Partial returns are the everyday reality of returns, and they’re where WooCommerce’s refund system surprises people most.

Store owners on the WordPress.org support forums regularly run into the same confusions: a partial refund that leaves the order stuck On hold, a status change that suddenly refunds the whole order, a second refund email the customer didn’t expect, tax reports that don’t match. This guide explains how WooCommerce actually handles partial refunds, the traps to avoid, and a clean process for partial returns.

How WooCommerce handles a partial refund

On the order screen, clicking Refund opens a refund form against the order’s line items. For a partial refund you:

  1. Enter the quantity being refunded on each line (for example, 1 of 3 shirts).
  2. WooCommerce fills in the line total and tax for that quantity. You can override them.
  3. Optionally enter amounts against shipping and fee lines.
  4. Tick Restock refunded items if the goods are coming back into sellable stock.
  5. Add a reason (stored on the refund, optionally visible to the customer).
  6. Choose Refund via [gateway] to send the money, or Refund manually to only record it.

WooCommerce then creates a refund record linked to the order and to those specific line items.

What it doesn’t do for a partial refund is change the order status. That’s deliberate, and it’s the source of most confusion.

Trap 1: The status doesn’t change

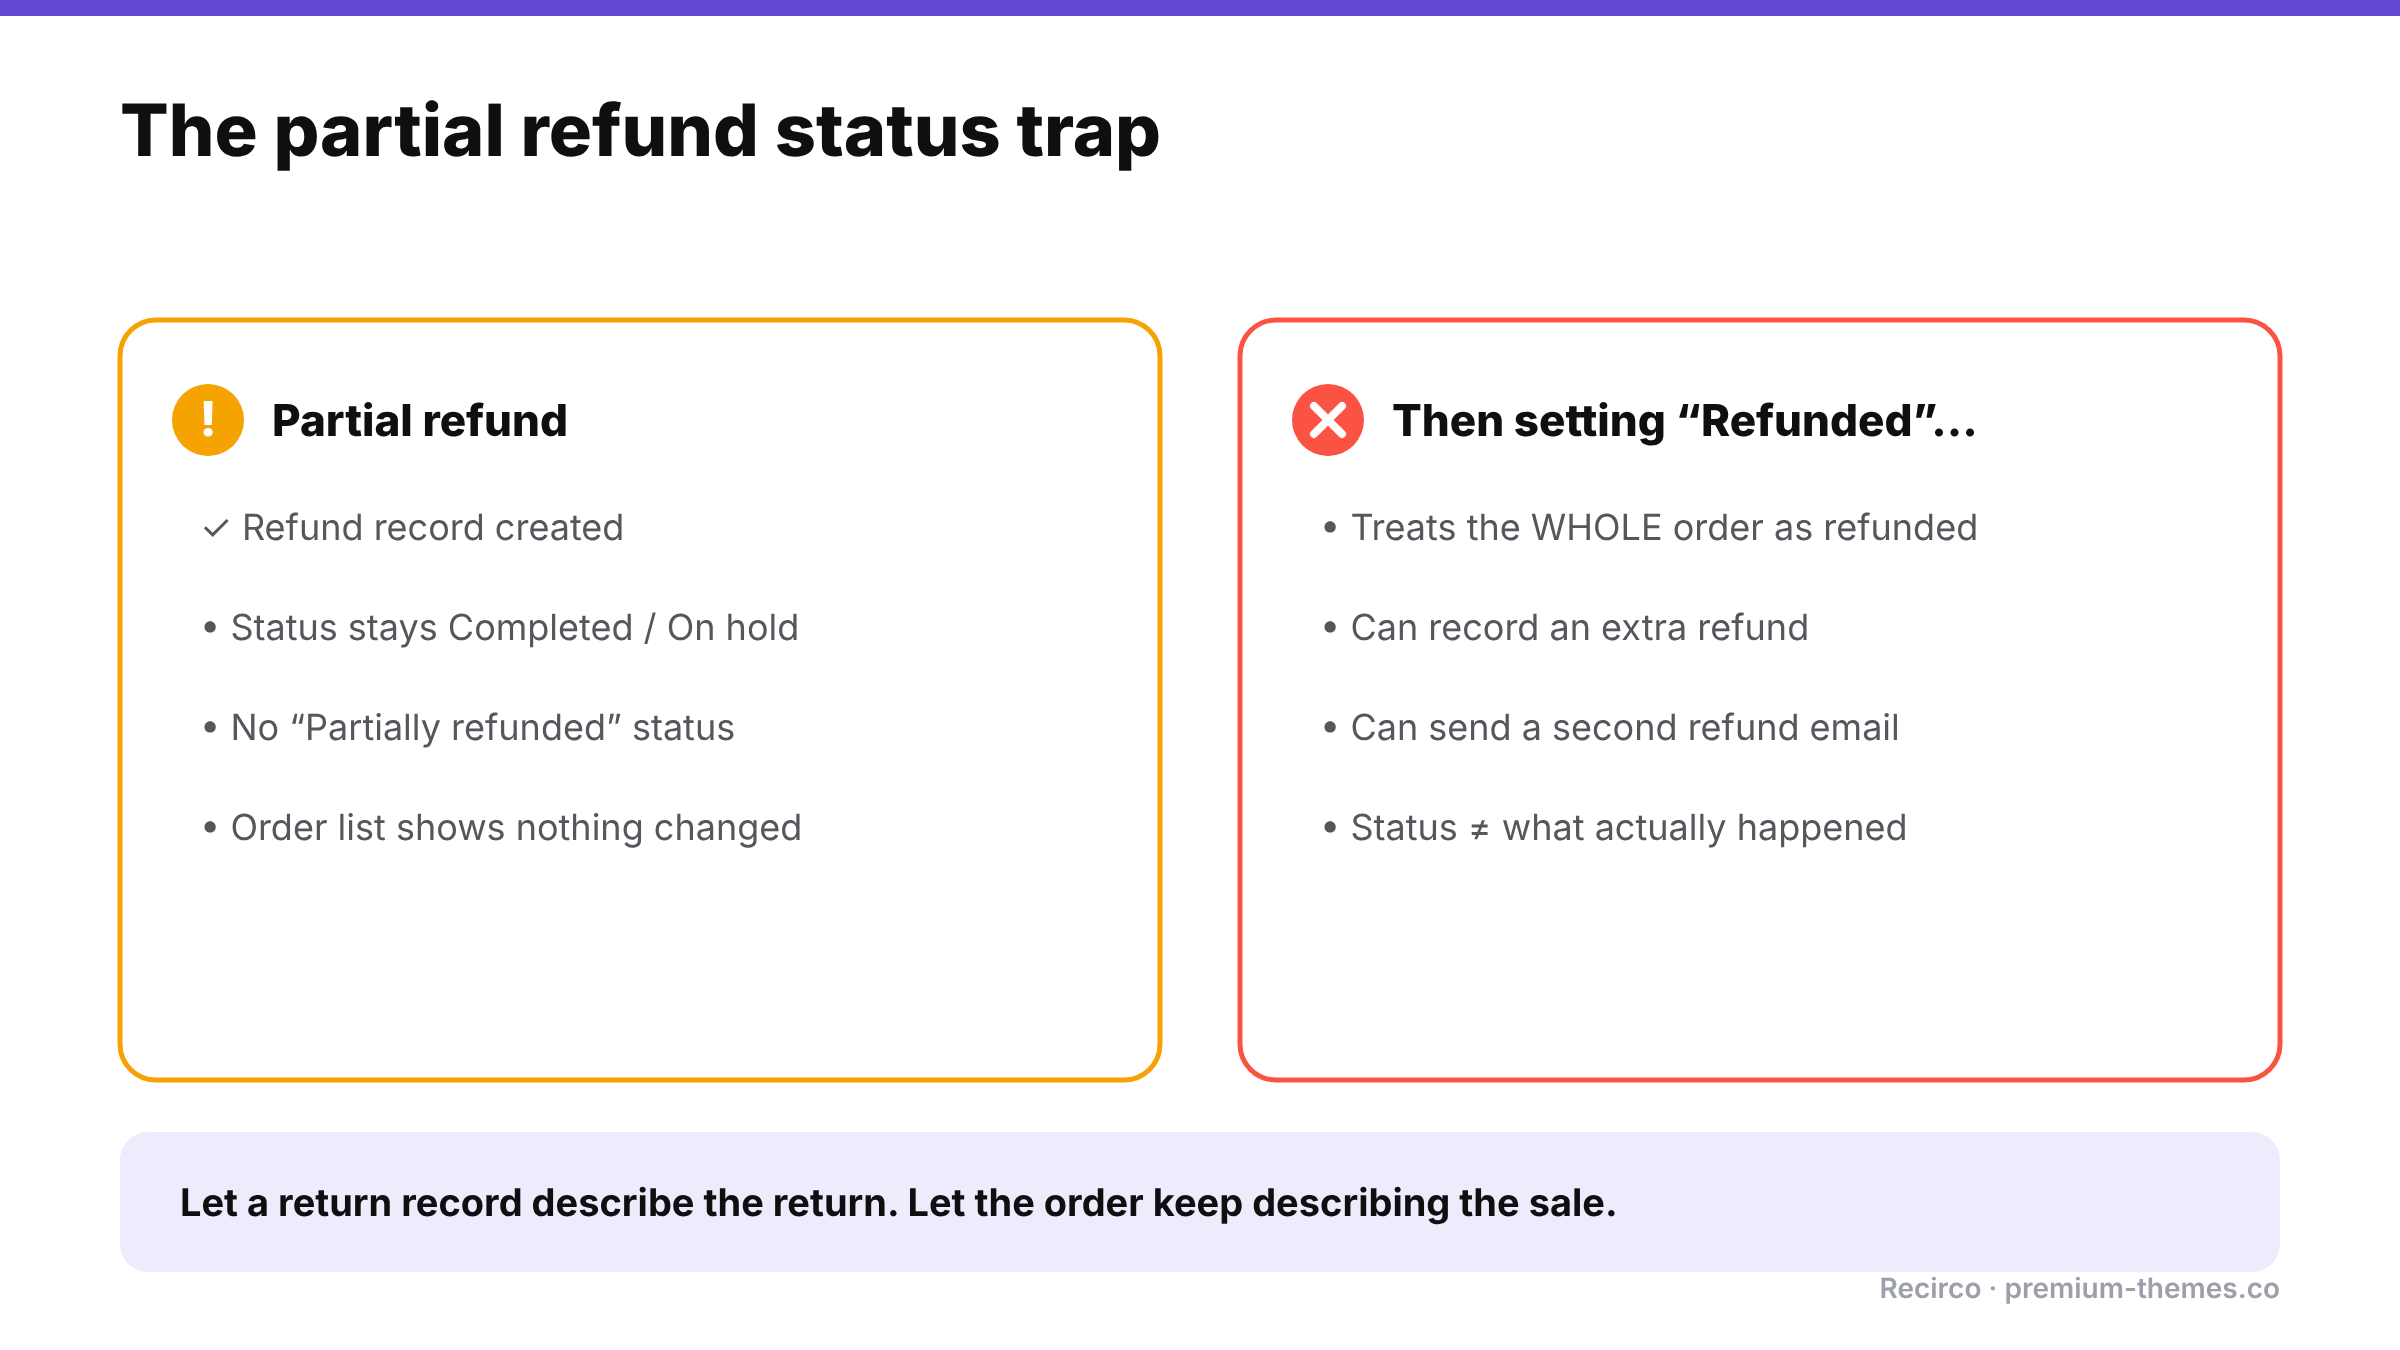
Partial refunds create a refund record but leave the order status unchanged, with no partially refunded status. Then setting the status to Refunded treats the whole order as refunded, can record an extra refund and send a second email. Use a return record to describe the return.

A partially refunded order keeps whatever status it had: Processing, Completed, or On hold. There’s no built-in “Partially refunded” status.

In one WordPress.org thread, WooCommerce support confirmed this behaviour with a bank-transfer order: after a partial refund, the order stayed On hold. The store owner expected it to move on and couldn’t make it change without refunding everything.

Why it matters: anyone scanning the orders list sees a normal Completed order and has no idea part of it was returned. Reporting by status undercounts refunds.

What to do:

  • Look at refund lines on the order (shown in red under the items), not the status, to know whether something was refunded.
  • If your team relies on statuses, consider adding a custom “Partially refunded” status with an order-status plugin, as suggested in that thread.
  • Better: track the return itself as its own record (see below), so the order doesn’t have to carry that meaning.

Trap 2: Setting “Refunded” refunds everything

The same thread uncovered a second trap. For manual refunds, changing the order status to Refunded told WooCommerce the entire order was refunded. That recorded a refund for the remaining amount and triggered another refund email to the customer.

Rule: never set Refunded on a partially returned order to “tidy it up”. Refunded means the whole order.

Trap 3: Tax that doesn’t match the item

If you type a refund amount into the total box instead of using the line-item quantities, WooCommerce can’t tell which item or how much tax you refunded. Your tax reports may then show the wrong tax refunded.

Rule: always refund through the line items, using quantities, so net and tax are split correctly. If you change an amount, change the line’s net and tax fields, not just the total.

Trap 4: Discounts spread across items

If the order had a coupon, the discount is spread across the items. Refunding one item at its full list price over-refunds the customer. WooCommerce’s line totals already reflect the discount, so using the line item’s actual paid amount (which the refund form pre-fills) is safer than typing the shelf price. More on this in how much to refund on discounted orders.

Trap 5: Shipping

When one of three items comes back, do you refund any shipping? Most stores don’t: shipping was a cost to deliver the whole order. Some refund it when the return is the store’s fault (damaged, wrong item). Whatever your policy, apply it consistently and say so in your return policy. If you do refund shipping, enter it on the shipping line rather than inflating the item refund, so your shipping revenue reports stay accurate.

Trap 6: Restocking the right thing, at the right time

Restock refunded items increases stock when the refund is recorded. If you refund before the item has actually arrived, you’ve added phantom stock. If you refund after it arrives but forget the tick, stock stays low.

Rule: decide when restocking should happen (usually when the item arrives and passes inspection) and make sure only one step does it.

Trap 7: Refunding twice from two places

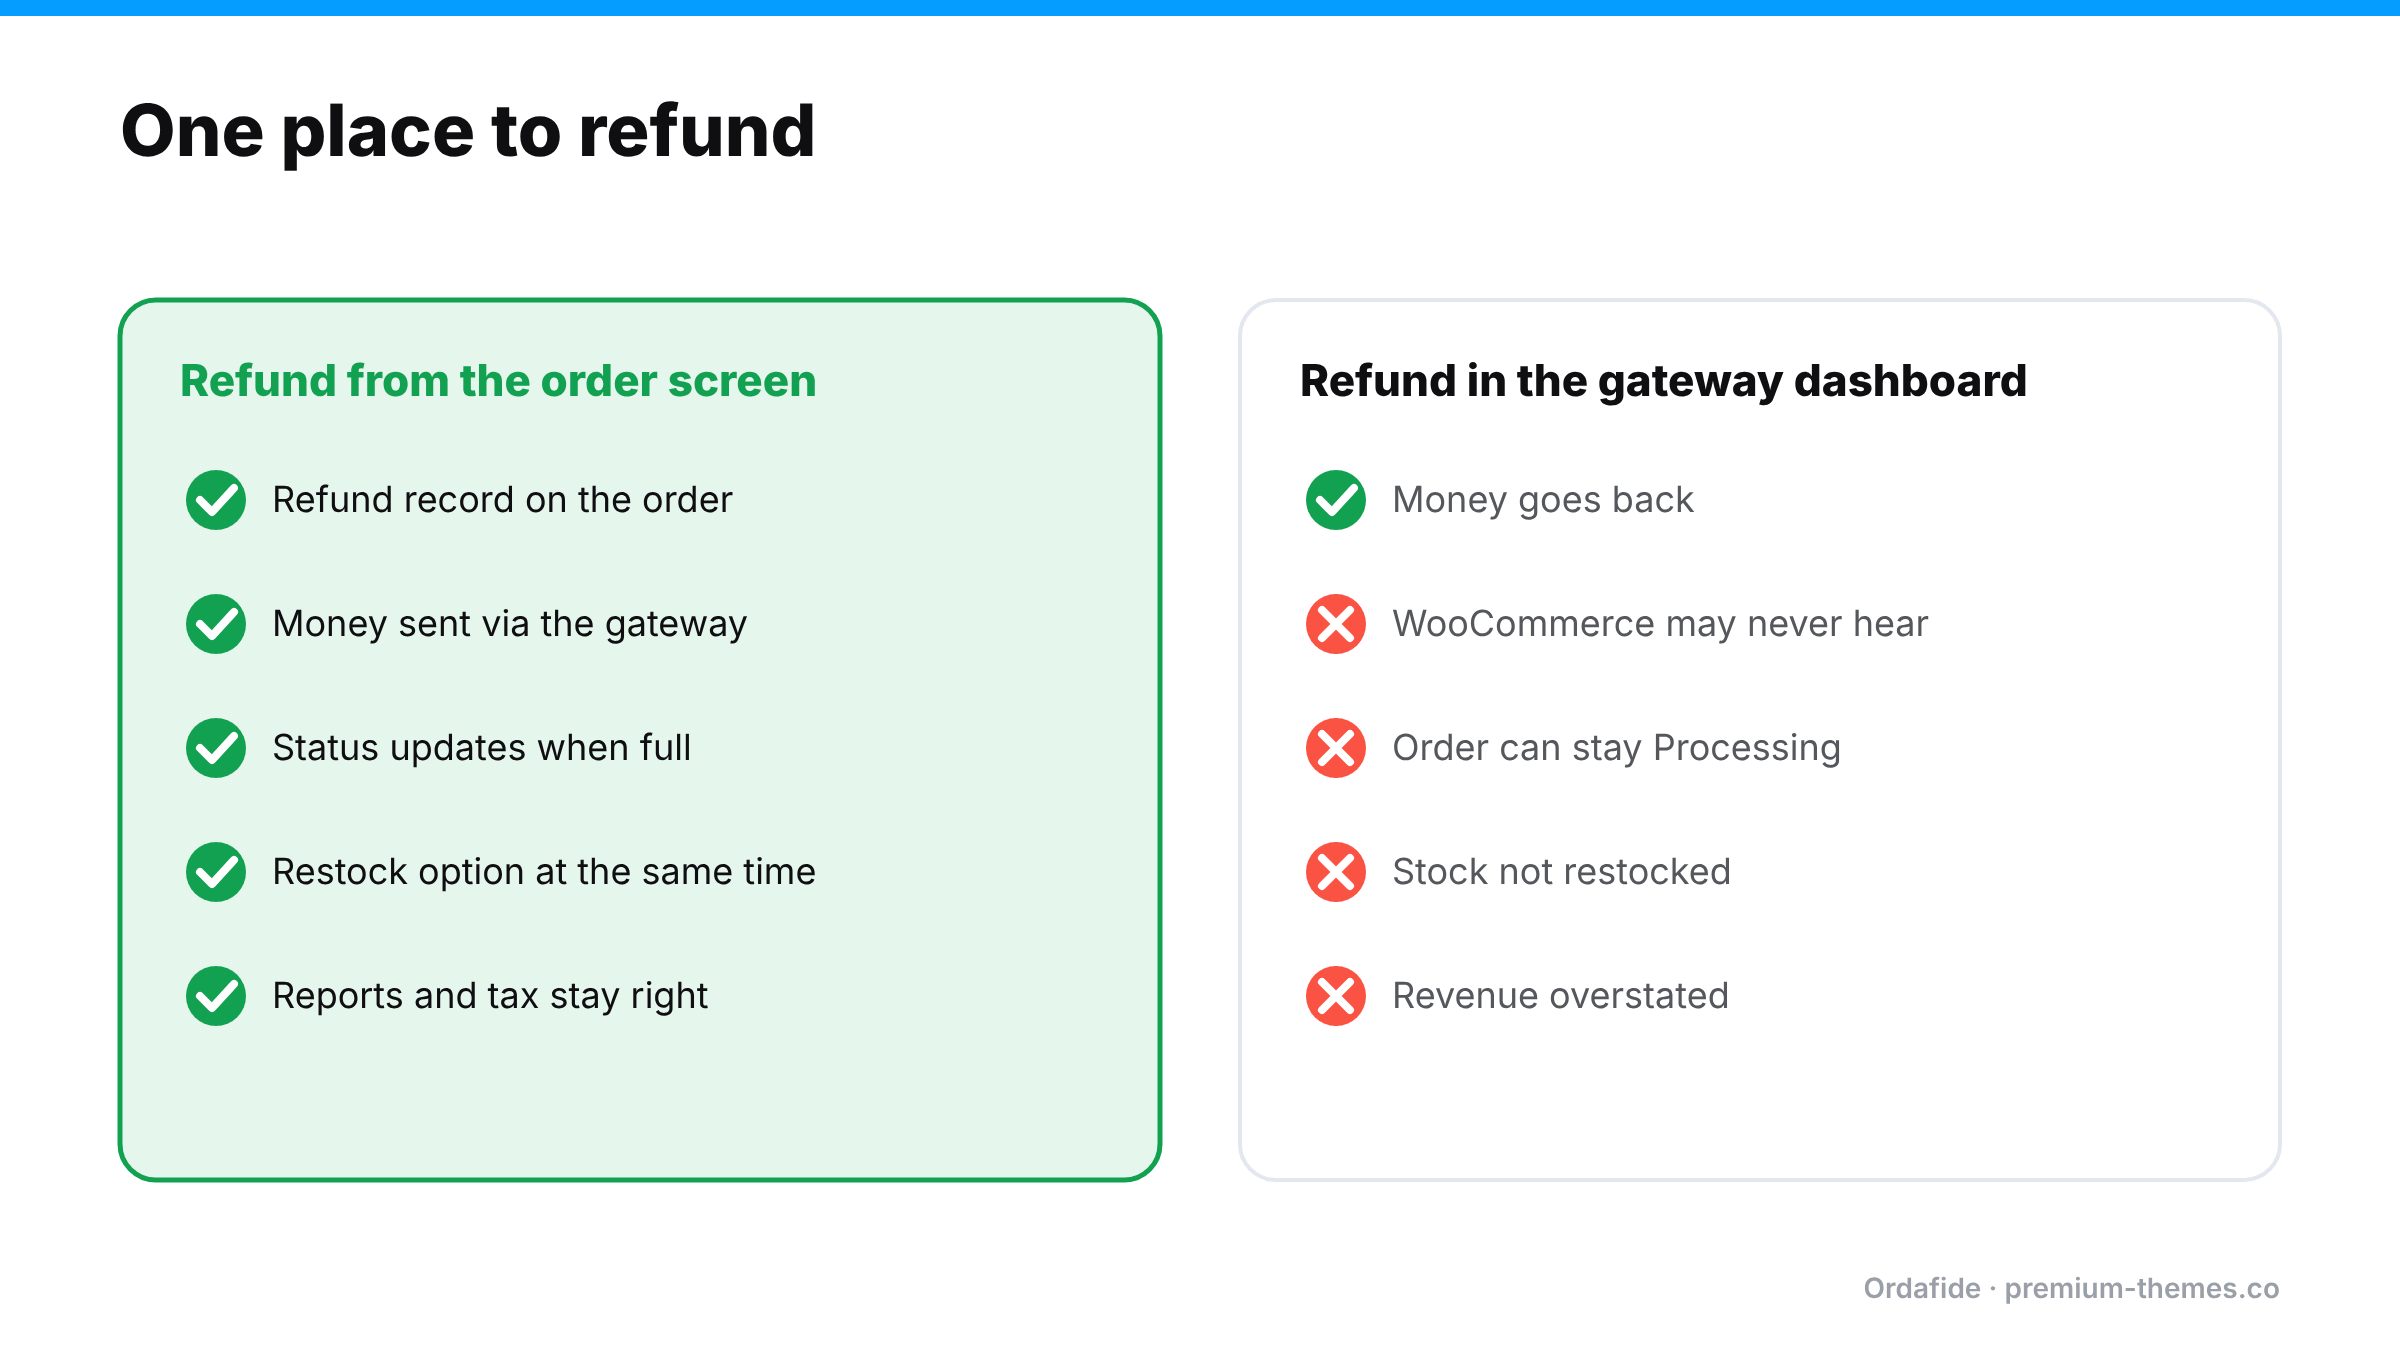
Partial returns are where double refunds happen most: one person refunds the item in the Stripe dashboard, another records it in WooCommerce via gateway. The customer gets the item’s value twice.

Rule: one place to refund, always the WooCommerce order (or a returns system that creates the WooCommerce refund for you).

A worked example

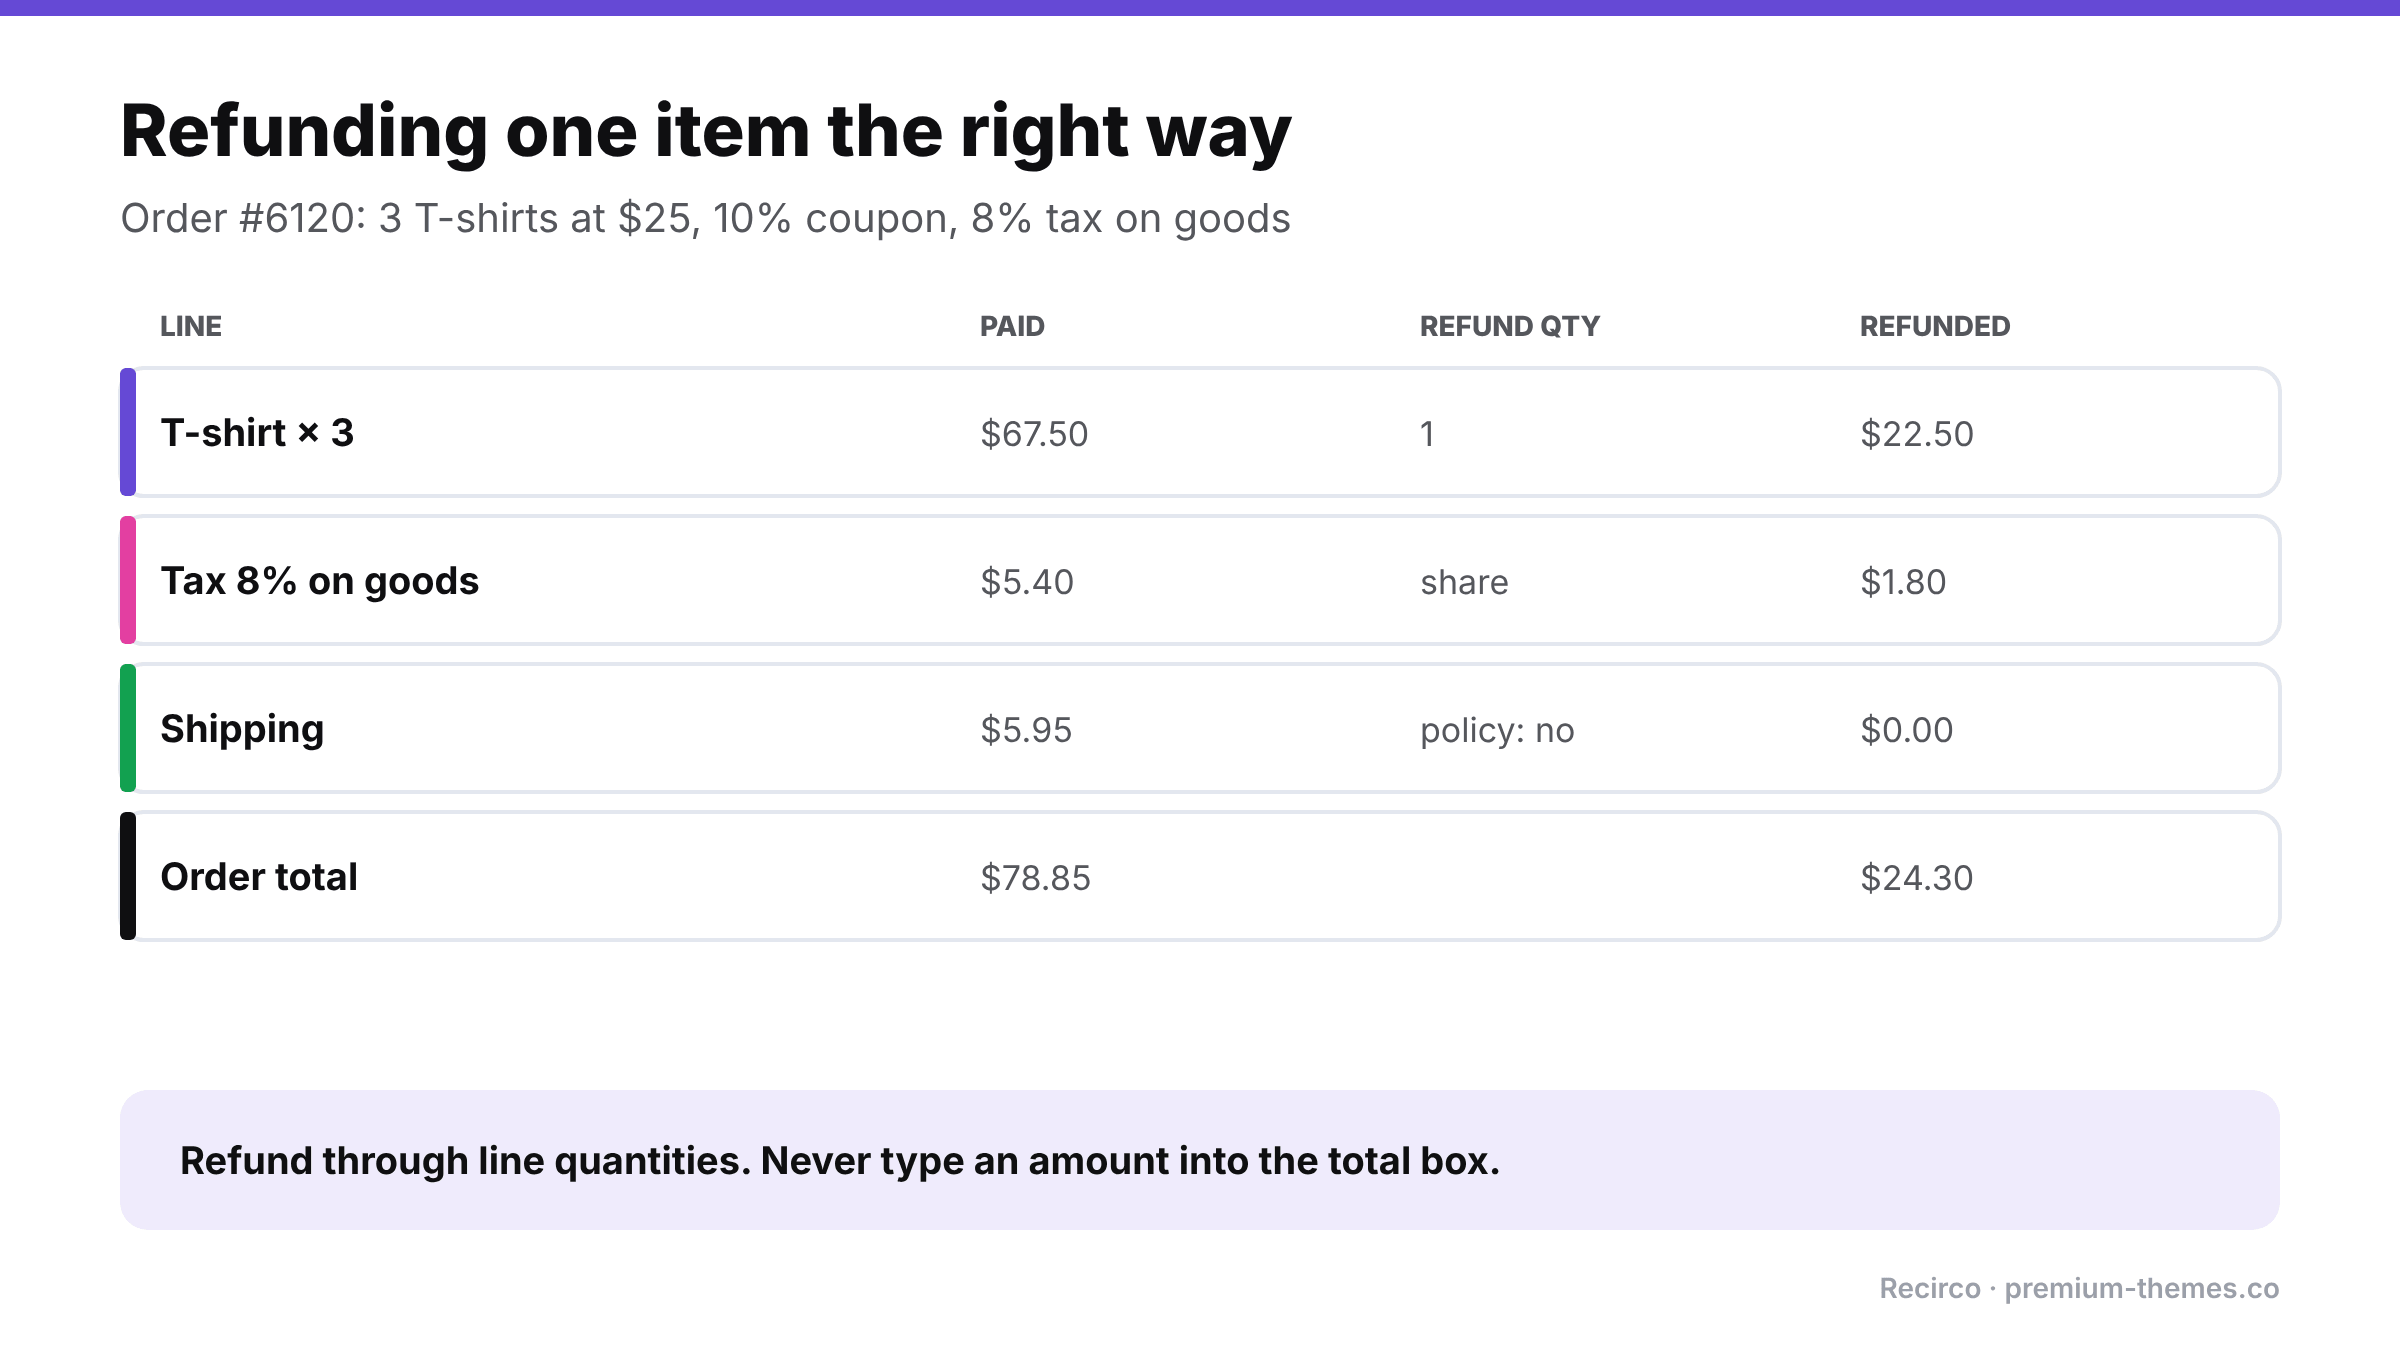
Worked partial refund: three T-shirts paid $67.50 after a coupon; refunding one gives $22.50. Tax of $5.40 gives a $1.80 refund share. Shipping of $5.95 isn't refunded by policy. Total refund $24.30 of a $78.85 order. Refund through line quantities, not the total box.

Trap 1: The status doesn’t change’ an

Order #6120: 3 × T-shirt at $25 = $75, 10% coupon (−$7.50), shipping $5.95, tax 8% on goods only ($5.40). Total paid: $78.85.

The customer returns one T-shirt because it’s too small.

Wrong way: a team member clicks Refund, types $25 in the refund amount box, ticks restock, and refunds via Stripe. Problems: the customer paid $22.50 for that shirt after the coupon, so they’re over-refunded by $2.50. No tax was refunded on the line, so your tax report still shows $5.40 collected on goods that partly came back. And the refund isn’t tied to a line item, so reporting can’t tell which product was returned.

Right way: click Refund, enter quantity 1 on the T-shirt line. WooCommerce pre-fills the line’s share: $22.50 net plus $1.80 tax. Shipping stays at 0 (your policy doesn’t refund shipping on partial returns). Restock ticked because the shirt arrived in sellable condition. Refund via Stripe: $24.30.

Result: the customer paid for what they kept, tax is accurate, the T-shirt is back in stock, and reports show one shirt returned. The order stays Completed, which is correct, because most of it was kept.

Partial returns over time

Customers sometimes return items from the same order in two or three separate batches. Each partial return should be checked against what’s already been returned, not just against the original order. Otherwise a customer can request a return for an item they’ve already sent back and been refunded for, and a busy team member approves it.

This is another reason to track returns as their own records: the system can see “2 of 3 already returned” and only offer the one remaining unit.

A clean partial-return process

  1. The customer requests a return for specific items and quantities, with a reason for each. Not “I’d like to return something from order #4102” by email.
  2. Eligibility is checked per item. Is each one inside the return window, not excluded, not already returned or refunded?
  3. The return is approved, and the customer gets a return number and address.
  4. The items arrive and are inspected. Restock now, only what came back in sellable condition.
  5. The refund is created from the return, through the line items, using paid amounts with net and tax split, sent through the gateway. One refund, in one place.
  6. The order keeps its status, but the return record shows exactly what came back, when, why and how much was refunded.
  7. The customer is told at each step, so nobody emails asking “did you get it?”

The key idea is to stop asking the order to describe the return. Orders describe sales. Let a separate return record describe returns.

How Recirco handles partial returns

Recirco – Returns & Exchanges for WooCommerce is free and built around exactly that idea:

  • Per-unit eligibility in the customer portal. In My Account → Returns, customers choose the order, then the specific items and quantities they’re returning, each with a reason. Only eligible units are offered: inside your return window, not already refunded, not on your excluded products or categories list. A customer who already returned one shirt can’t request the same unit twice.
  • A return record per request with its own RMA number, status and activity log, plus a panel on the order edit screen so you see the order and its returns together.
  • Restock timing you choose: never, on approval, on arrival, or on completion. Set it once, and the right step does the restocking.
  • Refunds created from the return. Recirco creates a real WooCommerce refund for the returned lines, with net and tax split from the original line, optionally sent through your gateway. Auto-refund on completion is available but off by default, and the plugin is designed to prevent duplicate refunds for the same return.
  • Seven statuses enforced by a guarded state machine, so a return can’t skip from “requested” to “refunded” by accident.
  • Six editable emails (received, admin alert, approved, rejected, completed, customer note) keep the customer informed at each step.

Your order statuses stay meaningful, your tax and stock stay right, and “what happened with this return?” has a single place to look.

Recirco Pro adds exchanges (so a partially returned item can be swapped for a different variant instead of refunded), store credit as a refund alternative, conditional approval rules, carrier return labels, and analytics on value returned and the products most often sent back.

Partial refund cheat sheet

Situation Do this Avoid this
One of several items returned Refund via line-item quantity Typing an amount in the total box
Order had a coupon Use the pre-filled paid line amount Refunding at list price
Shipping not refundable Leave shipping line at 0 Including shipping in the item amount
Shipping refundable (your error) Enter it on the shipping line Inflating the item refund
Item not back yet Wait, or refund without restocking Restocking before arrival
Want order to look “done” Leave status; check refund lines Setting status to Refunded
Money already returned elsewhere Refund manually to record it Refund via gateway (double refund)

Customer Ordered the Wrong Size? How to Handle an Exchange in WooCommerce (3 Methods)

It’s the most common return in fashion, footwear and anything with variations: the customer loves the product but ordered a medium when they needed a large.

They don’t want their money back. They want the right size. You want to keep the sale. It should be the easiest transaction in retail.

Then you open WooCommerce and look for the exchange button. There isn’t one.

You’re not alone. On the WordPress.org support forums there’s a thread from a store owner whose customer bought the wrong size and returned it for an exchange. They asked a simple question, how to edit the order to remove the wrong item and add the right one, and the thread closed with zero replies. It’s a common problem with surprisingly little good guidance.

This guide covers three ways to handle a size or colour exchange in WooCommerce, the trade-offs of each, and the mistakes that cause stock and reporting problems.

Why exchanges are awkward in WooCommerce

WooCommerce models a sale as an order with a payment. It supports two ways to change what happened afterwards:

  • Editing the order (only practical before payment or for small corrections), and
  • Refunding all or part of it.

An exchange is neither. The original sale stands: same price, same customer, same payment. But one unit of stock comes back and a different unit goes out. WooCommerce has no record type for “this item was swapped for that one”, so every method is a workaround or needs a plugin.

What a good exchange needs to get right

Whatever method you use, check it against these five requirements:

  1. Stock in: the returned variation goes back into stock, once it physically arrives and is sellable.
  2. Stock out: the replacement variation’s stock goes down.
  3. Money: the customer isn’t charged again (for a like-for-like swap), and your revenue isn’t counted twice or refunded by mistake.
  4. Fulfilment: the replacement appears in your normal picking and shipping process, with the right address.
  5. Records: anyone looking later can see what happened: what came back, what went out, and why.

Method 1: Edit the original order (small stores, low volume)

How it works: you change the line item on the original order from the wrong variation to the right one.

Steps:

  1. Wait until the original item has arrived back (or decide to ship first, see the note below).
  2. Open the order. Note: WooCommerce only lets you edit line items when the order is in an editable status (Pending payment or On hold). For a Processing or Completed order, you’d need to change the status to On hold temporarily, which may trigger emails depending on your setup.
  3. Remove the wrong item and add the correct variation at the same price. Don’t click Recalculate if it would change tax or discounts on a paid order. Adjust the line total if needed so the order total stays the same.
  4. Adjust stock manually: add one to the returned variation, subtract one from the new one (line edits don’t always adjust stock the way you’d expect).
  5. Return the order to Processing so it’s picked and shipped again.
  6. Add a clear order note: “Exchanged M → L on [date], original received [date].”

Pros: no extra orders; reports show one sale.
Cons: fiddly; easy to get stock wrong; status changes can trigger confusing emails; the history of what was originally shipped is lost except in notes; doesn’t scale.

Best for: occasional exchanges on a small store, handled by one careful person.

Method 2: Refund and reorder (the most common workaround)

How it works: refund the original item and create a new order for the replacement.

Steps:

  1. Receive the returned item.
  2. Refund the item from the original order (Refund via [gateway]) with Restock refunded items ticked.
  3. Either ask the customer to place a new order, or create one for them manually in WooCommerce → Orders → Add order, which means taking payment again or marking it paid.

Pros: stock and records are correct; uses only standard WooCommerce features.
Cons: the customer gets money back and has to buy again, and many won’t. The “exchange” quietly becomes a refund. Card fees on the original sale usually aren’t returned. If you create the new order manually and mark it paid without payment, your reports show revenue twice. And the customer waits for both the refund and the new order.

Best for: price-different exchanges where money genuinely needs to move, or when you don’t mind losing some exchanges to refunds.

Method 3: Zero-total replacement order (the clean approach)

How it works: the original order is left untouched. The returned item comes back into stock. A new order for the replacement at zero cost is created, linked to the original, and goes through your normal fulfilment.

Steps (manually):

  1. Receive the returned item and add it back to stock.
  2. Create a new order for the customer containing the replacement variation, with the line price set to 0.
  3. Set it to Processing so it’s picked and shipped like any other order. Stock for the replacement reduces normally.
  4. Add a note on both orders linking them (“Exchange for #4102” / “Replaced by #4188”).

Pros: no refund, no second charge; stock correct on both sides; replacement flows through normal shipping; clean records; revenue counted once.
Cons: manual effort per exchange; easy to forget the cross-reference notes; still depends on someone remembering to restock.

Best for: any store doing more than a handful of exchanges, especially once automated.

Comparing the three methods

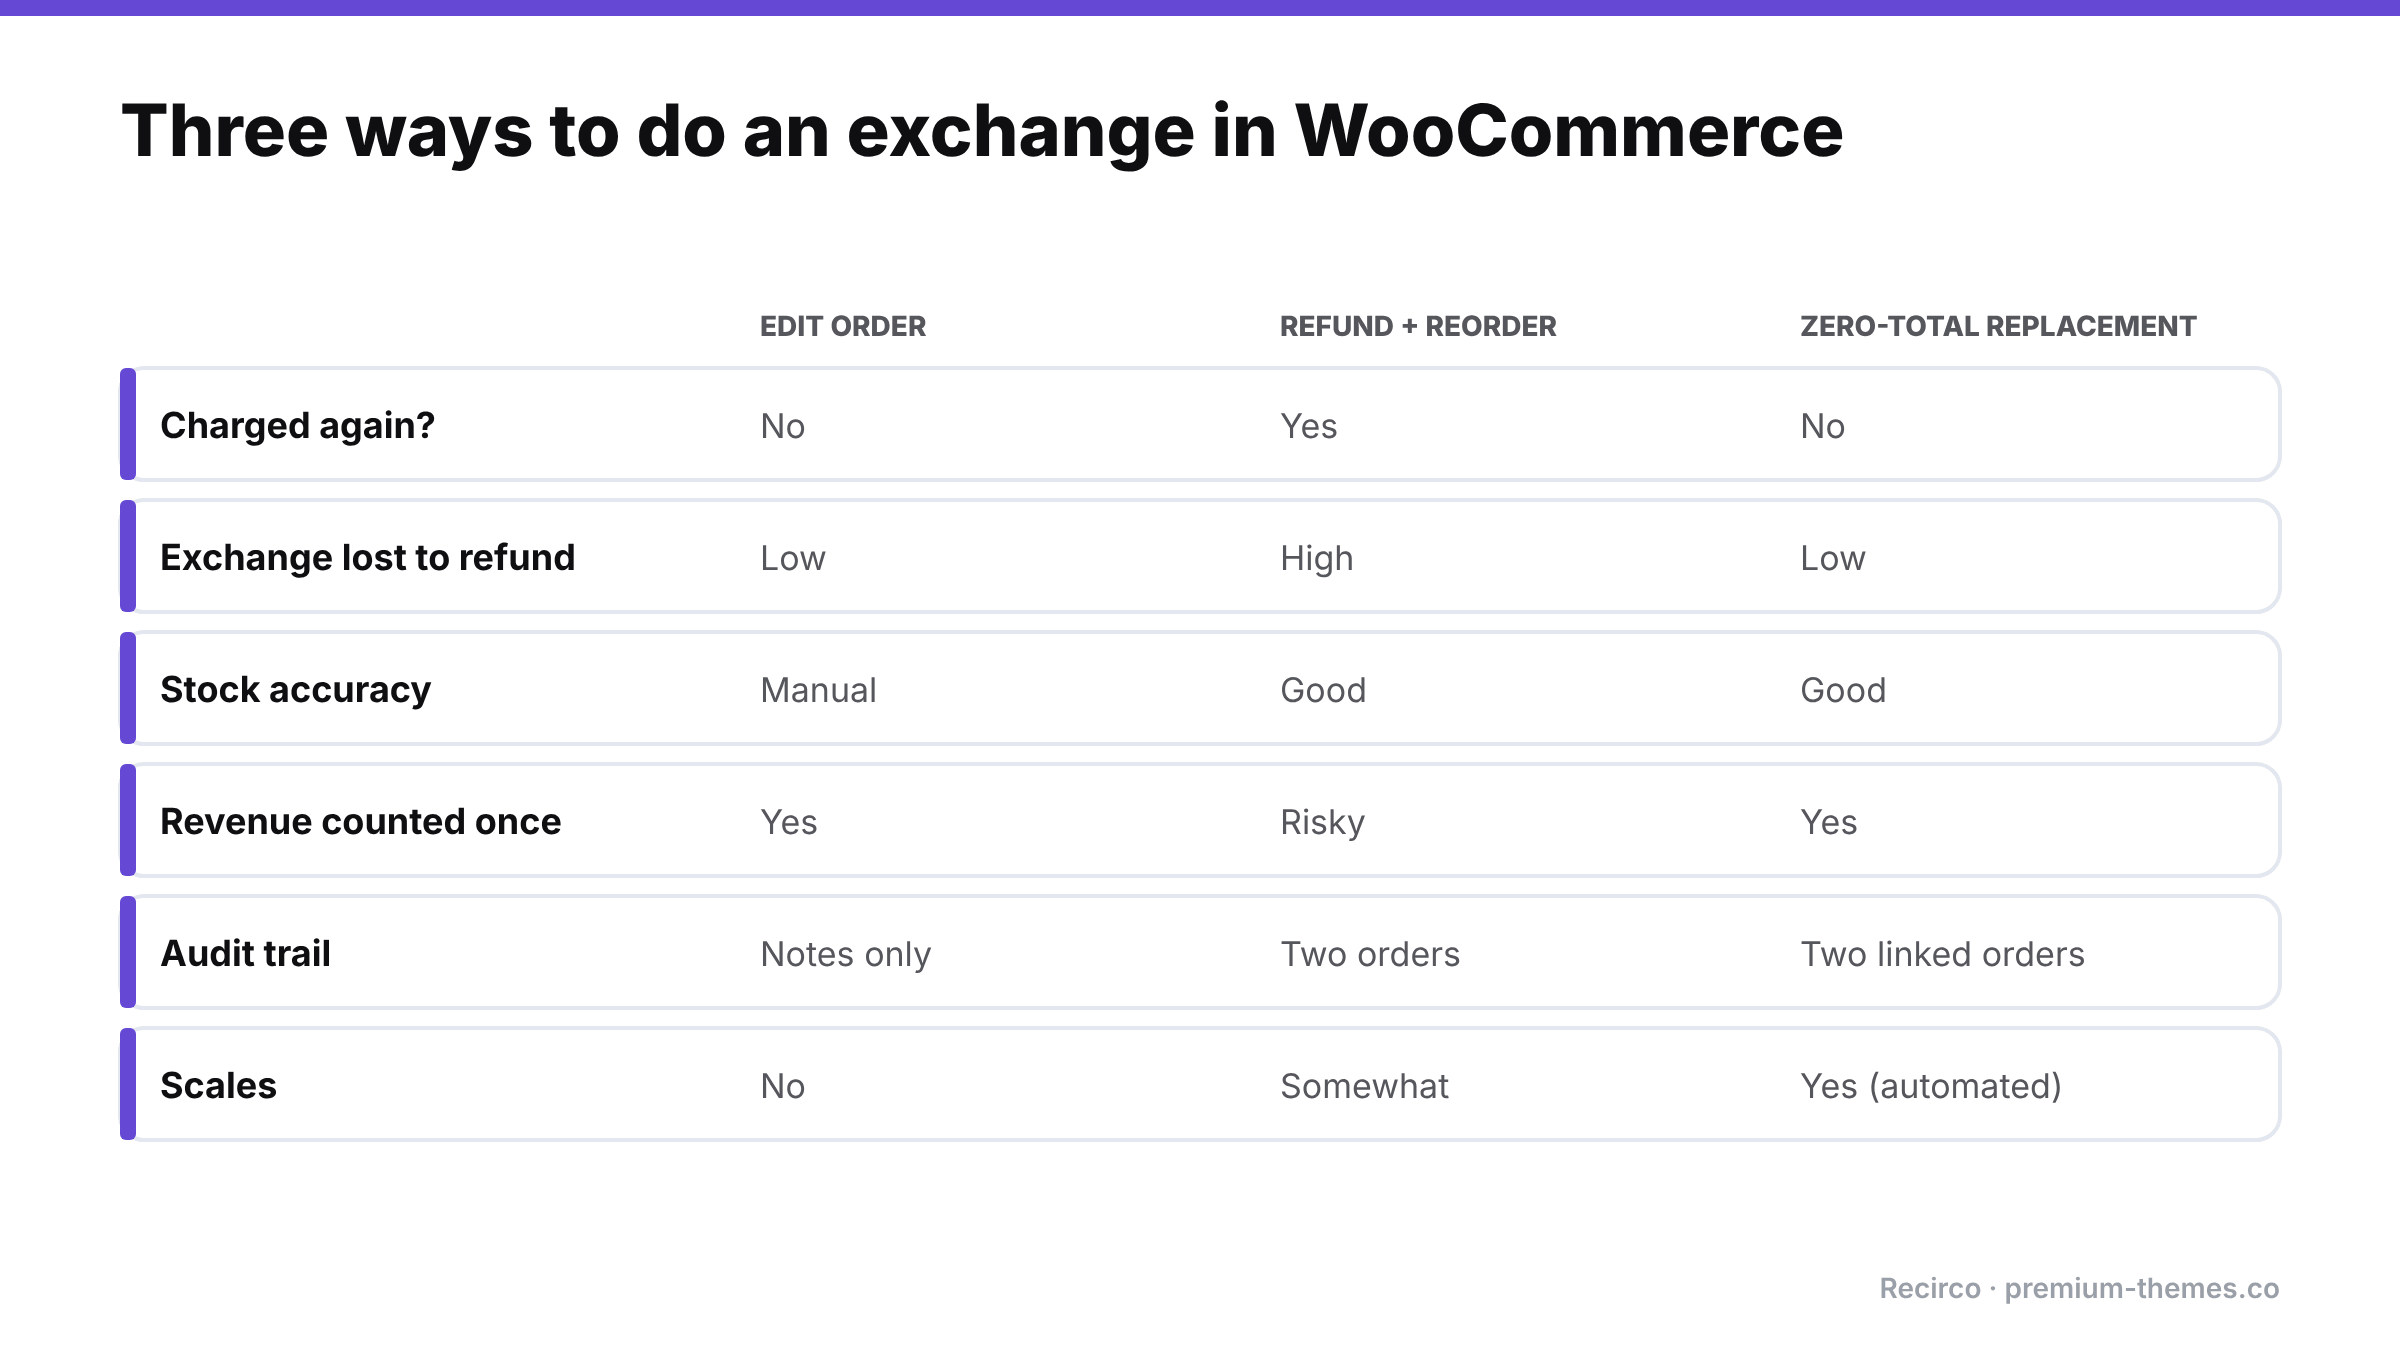
Comparison of three exchange methods: editing the order, refunding and reordering, and a zero-total replacement order, across whether the customer is charged again, risk of losing the exchange to a refund, stock accuracy, revenue counting, audit trail and scalability. The zero-total replacement scores best.

Edit order Refund + reorder Zero-total replacement
Customer charged again? No Yes (or manual “paid” order) No
Risk of exchange becoming a refund Low High Low
Stock accuracy Manual, error-prone Good Good
Revenue reporting Good Risk of double-counting Good
Audit trail Notes only Two separate orders Two linked orders
Effort per exchange High Medium Medium (manual) / Low (automated)
Scales No Somewhat Yes (automated)

Ship first or wait for the return?

A policy decision you need to make:

  • Wait for the return (safest): the replacement ships once the original arrives. No risk of losing both items, but the customer waits longer, often a week or more.
  • Ship immediately (fastest): the replacement ships when the exchange is approved. Customers love it, but you carry the risk of the original never coming back.

Many stores ship immediately for repeat customers or low-value items, and wait for new customers or high-value items. Whatever you choose, apply it consistently. If you ship first, track unreturned originals and follow up.

Speed matters more than you might think. In Loop’s 2026 survey of consumers in the US, UK and Australia, speed (35%) and ease of processing (37%) were the top factors in whether people preferred an exchange over a refund, and 87% said they’d consider an exchange if the experience were easy enough ([Loop Returns, July 2026](https://www.loopreturns.com/blog/returns-revenue-gap/)).

Common exchange mistakes

  • Restocking twice. Restocking when the exchange is approved and when the item arrives.
  • Forgetting to restock at all. The returned medium sits on a shelf while WooCommerce says you’re out of mediums.
  • Charging shipping twice without telling the customer, or refunding the original shipping when you didn’t intend to.
  • Losing the link between the original and replacement orders, so nobody can answer “what happened with my exchange?”
  • Treating price-different exchanges as like-for-like. If the replacement costs more or less, money needs to move: charge or refund the difference explicitly.
  • No reason recorded. “Wrong size” exchanges are your best sizing data. If you don’t record the reason, you can’t fix the size guide.

Exchanges and your numbers

Exchanges confuse reporting if you don’t think about them up front. A few points to agree with whoever does your books:

  • Revenue: with a zero-total replacement order, the original sale is the only revenue. The replacement adds an order to your order count, but not to revenue. If your team measures performance by order count, separate exchange orders out (a consistent order note or tag helps).
  • Cost of goods: you’ve shipped two units and received one back. If the returned unit is resellable, cost of goods is unchanged; if not, it’s a write-off. Track it.
  • Shipping cost: the replacement shipment and any return label are real costs of the exchange. Many stores absorb them because the alternative, a refund, costs more.
  • Exchange rate as a KPI: the share of returns that end as exchanges rather than refunds is one of the best indicators of how much revenue your returns process keeps. Measure it monthly.

Automating size exchanges with Recirco

Flow: the customer picks a replacement size in My Account, the exchange is approved, the original returns and is restocked, the return completes, and a zero-total replacement order is created in Processing. Stock goes up for the returned medium and down for the new large. No refund, no second charge.

Recirco – Returns & Exchanges for WooCommerce gives you a free self-service returns portal in My Account, an admin approval queue, return windows, reasons and restocking rules. That covers the “item comes back” half: the customer requests the return, picks a reason such as Too small, ships it with the RMA number, and the item is restocked at the point you choose (on approval, on arrival or on completion).

Recirco Pro adds the “replacement goes out” half with exchanges and variant swaps, which is Method 3 done automatically:

  1. In the returns portal, the customer chooses exchange and picks the replacement, such as a different size or colour, themselves.
  2. You approve it in the queue (or let a conditional approval rule approve it automatically).
  3. When the return is completed, Recirco creates a zero-total replacement order in Processing, so it flows into your normal fulfilment.
  4. The returned item follows your restock setting; the replacement reduces stock like any normal order; both are tied together in the return’s activity log.

No refund, no second charge, no manual order entry, no lost link between orders, and the customer never has to place a new order themselves.

Because every exchange records a reason, Recirco Pro’s analytics then show which products and reasons drive exchanges, so you can see that, say, one style’s mediums are coming back as “too small” far more than others. That’s the cue to update the size guide. (See how to reduce your return rate using reason data.)

A simple exchange policy you can publish

Exchanges

Ordered the wrong size or colour? Request an exchange from My Account → Returns within [30] days of delivery, choose the replacement you’d like, and send the original back using the return number we give you.

Same-price exchanges are free. We’ll ship your replacement [as soon as your return is approved / as soon as your return arrives].

If the item you’d like costs more or less, we’ll [charge / refund] the difference.

Agency Playbook: Monitoring Orders and Payments Across Every Client WooCommerce Store

If you run a WordPress agency or freelance practice with WooCommerce clients, you already know this phone call:

“Our sales have been dead since Thursday. Did you change something?”

Maybe you did update a plugin. Maybe the client’s payment gateway changed something. Maybe their marketing person installed a new popup plugin. It doesn’t matter: you’re the one they call, and you’re the one who looks bad, because you found out from the client rather than the other way round.

Most agency care plans cover updates, backups, uptime and security. Very few cover the thing clients actually care about: is the store taking money correctly? This playbook shows how to close that gap across many client stores without drowning in dashboards, and how to turn it into something clients happily pay for.

The coverage gap in a typical care plan

Table: a typical agency care plan covers site online and site secure and backed up, but not whether customers can check out, whether paid orders are processed, whether customers get their emails, or whether orders match the money.

What clients care about Typical care plan covers it?
Site is online ✅ Uptime monitor
Site is secure ✅ Security plugin, updates
Site can be restored ✅ Backups
Site is fast ⚠️ Sometimes
Customers can actually check out ❌ Rarely
Paid orders are processed ❌ Rarely
Customers get their emails ❌ Rarely
Orders match the money ❌ Almost never

The bottom four rows are where clients lose money, and where agencies lose clients. An uptime monitor that checks the home page every five minutes will happily report 100% uptime through a three-day checkout outage.

What can go wrong on a client store (that you won’t hear about)

From experience across many stores, the order-level failures that reach agencies as angry calls are:

  1. Checkout broken after an update: JavaScript conflicts, optimization plugins, template overrides, block/classic incompatibilities. (Guide)
  2. Webhooks blocked: a security plugin, WAF or host firewall change stops payment confirmations, so paid orders sit on Pending payment and auto-cancel. (Guide)
  3.  Background queue dead: `DISABLE_WP_CRON` set by a host migration without a server cron; emails and order processing stop. (Guide)
  4. Card testing attack on an unprotected checkout. (Guide)
  5. Client-installed plugins that break totals, emails or checkout without telling you.
  6. Gateway account changes: new keys, expired credentials, reconnect required.
  7. Refund chaos: client staff refunding in the gateway dashboard, so orders get shipped after refund. (Guide)

Each one is invisible to standard monitoring, and each one is, in the client’s eyes, your fault.

The playbook

1. Define what “healthy” means for every store

Agree with each client, in writing, what you monitor and how fast you respond. For order health, a reasonable baseline is:

  • Checkout tested automatically at least every 15–30 minutes
  • Paid-but-stuck orders flagged within a day
  • Duplicate charges and refund mismatches flagged within a day
  • Background queue and email delivery checked daily
  • Unusual drops or spikes in order volume flagged within the hour

2. Standardize the toolset across stores

Running a different monitoring approach on every client site is how things get missed. Pick one stack, install it everywhere during onboarding, and configure it the same way. Variation should be in thresholds, not tools.

3. Keep client data where it belongs

Clients, especially in the EU and UK, increasingly ask where their customers’ data goes. A monitoring approach that copies order and customer data into a third-party service creates a data-processing question you then have to answer. Prefer tools that run on the client’s own server and, if they report centrally, send only aggregates (counts and totals), not customer details.

4. Route alerts to the right people

Not every alert should wake you up, and some alerts should go to the client:

  • Your team: checkout down, payments failing, queue dead (technical)
  • The client: paid order stuck, duplicate charge, refund mismatch (operational, since they need to contact customers)
  • Both: severe order volume drop

Per-store routing turns “the agency should have known” into “the agency told us within the hour”.

5. Detect silence, not just errors

A store that stops reporting entirely (site down hard, monitoring plugin deactivated, hosting suspended) produces no errors. Your central view must flag stores that have gone quiet.

6. Script the routine

For maintenance windows and monthly reports, use the command line. Running the same audit across 20 sites by clicking through 20 dashboards doesn’t scale. Running one script does.

7. Report it

Clients don’t value monitoring they can’t see. A monthly line in your report (“We checked 12,400 orders this month. 3 paid orders were stuck; we fixed them within 4 hours. Checkout was available 99.97% of the time.”) makes the service tangible and justifies the fee.

Building it with Ordafide

Diagram: client stores running Ordafide and Pro send signed hourly snapshots with counts and totals only to an agency dashboard that flags stores silent for two hours. Alerts are routed per store: technical issues to the agency team, operational issues like stuck paid orders to the client, severe volume drops to both.

Ordafide was designed with agencies as one of its two core audiences. Here’s how it maps to the playbook.

On every client store (free)

  • Six order integrity checks: stuck payment, paid but cancelled, duplicate charge, refund mismatch, order total mismatch, customer never emailed. Findings are sorted by money at risk with evidence and next steps.
  • Store health: Action Scheduler backlog and failures, WP-Cron status, loopback test, plus a per-order email delivery log with one-click resend.
  • WP-CLI commands for scripting across sites: `wp ordafide scan`, `wp ordafide findings`, `wp ordafide health`, `wp ordafide digest`.
  • Runs entirely on the client’s server: no account, no licence key, no API, no analytics, no phone-home.
  • HPOS native, batch scanning through Action Scheduler so large stores don’t time out, and a built-in Help screen clients can read themselves.
  • Safe by design: only two repairs (resend a customer email; restore an order to Processing when WooCommerce already recorded a confirmed payment date), both logged, the status change reversible. It never captures, refunds or voids payments.

Across the portfolio (Pro)

Ordafide Pro adds what agencies need at scale:

  • Multi-store agency dashboard built on signed hourly snapshots that contain only counts and totals, not customer data, so you get a portfolio view without moving personal data around.
  • Silence detection: stores that haven’t reported for two hours are flagged.
  • Per-store alert routing (Agency licence), so each client’s alerts go to the right Slack channel, phone or email.
  • Synthetic checkout monitoring every 15 minutes across shop, product, cart, checkout and the Store API, without creating orders, raising a finding only after two consecutive failures.
  • Order volume anomaly detection (drops and spikes, median-based, auto-resolving).
  • Gateway reconciliation with Stripe, PayPal, Square, Mollie and Razorpay using read-only keys.
  • Alerts to Slack, SMS (Twilio), signed webhooks (Discord, Teams, PagerDuty and others) and email, with severity routing, throttling, retries and a delivery log.
  • CSV/JSON audit export for monthly client reports.

Licences are sized for agencies: the Growth tier covers 5 stores and includes the multi-store dashboard with self-service licence moves between stores; the Agency tier covers 25 stores and adds per-store alert routing.

The same incident, with and without order monitoring

Without. Thursday 16:00: a client’s marketing assistant installs a “free shipping bar” plugin. It conflicts with the gateway’s script on mobile. Mobile checkout stops working; desktop is fine. Your uptime monitor is green. Thursday evening, Friday and the weekend pass. Monday 10:30, the client calls: mobile sales are zero, they’ve lost their best weekend of the month, and they want to know why you didn’t catch it. You spend two hours finding the plugin, and the relationship takes a hit you’ll feel at renewal time.

With. Thursday 16:30: the 15-minute synthetic check fails twice in a row on the checkout step. An alert reaches your team’s Slack. By 17:00 an anomaly alert confirms orders have dropped well below the normal Thursday-afternoon level. Your developer sees the new plugin in the activity log, deactivates it, confirms checkout works, and emails the client: “Your new shipping bar plugin broke mobile checkout. We’ve switched it off and checkout is working again. Here’s an alternative that’s compatible.” The client is impressed, not angry.

Same plugin, same break. The difference is an hour versus four days, and a renewal versus a cancellation.

Pricing order monitoring

Agencies price this in different ways. Common approaches:

  • Add-on to the existing care plan: a fixed monthly uplift for “order and payment monitoring”, positioned as revenue protection.
  • Tiered by store revenue: stores doing more revenue have more at stake per hour of downtime, so a higher tier with faster response makes sense.
  • Included in premium tiers only: use it as the reason clients upgrade.

Whatever you choose, base the conversation on the client’s own numbers: “Your store averages $X an hour. A checkout outage found in 15 minutes instead of on Monday saves you $Y.” That’s a much easier sell than “monitoring”.

Turning it into a paid service

Order monitoring is one of the easiest care-plan upgrades to sell, because the value is concrete:

  • Position it as revenue protection, not tech maintenance. “We make sure your checkout works and your paid orders are processed, and we tell you within the hour if not.”
  • Use a real finding in the pitch. Run the free Ordafide scan on a prospect’s store (with permission). It’s common to find something: a stuck paid order, a duplicate charge, a refunded order still in Processing. A real example with a dollar figure sells the plan better than any brochure.
  • Tier it. Basic (weekly scan and report) → Standard (daily checks, alerts to you) → Premium (15-minute checkout monitoring, gateway reconciliation, per-client alert routing, monthly audit report).
  • Report monthly. Orders checked, issues found, money protected, response times.

Talking to clients about their own staff

Some order problems on client stores aren’t technical at all. Client staff refund in the gateway dashboard, change order statuses by hand, or install plugins without telling you. Monitoring will catch the effects, but it’s worth a short onboarding conversation:

  • Refunds are issued from the WooCommerce order screen, never the gateway dashboard.
  • Statuses follow payments and refunds. Don’t change them to “make something happen”.
  • Plugin installs go through you, or at least get mentioned to you.
  • Who receives which alerts and what they’re expected to do about them.

A one-page “how we keep your store’s orders healthy” sheet, left with the client, prevents a surprising share of incidents.

Onboarding checklist for a new client store

  • [ ] Ordafide installed and first scan run; existing findings reviewed with the client
  • [ ] Email delivery confirmed (SMTP, SPF/DKIM) and email log active
  • [ ] Action Scheduler healthy; real server cron in place if WP-Cron disabled
  • [ ] Gateway webhooks verified; staging copies use test keys
  • [ ] Checkout monitoring and volume anomaly detection on (Pro)
  • [ ] Gateway reconciliation connected with read-only keys (Pro)
  • [ ] Alert routing agreed: what goes to you, what goes to the client
  • [ ] Store added to your multi-store dashboard (Pro)
  • [ ] Client briefed on refund rules (“always refund from the order screen”)

The 15-Minute Weekly WooCommerce Order Health Check (Free Checklist)

Most WooCommerce maintenance advice is about the site: update plugins, back up the database, optimize images, check uptime. That’s all sensible. But it misses the thing that actually pays the bills: are the orders right?

A store can be fast, secure, fully updated and perfectly backed up while quietly:

  • leaving paid orders on Pending payment,
  • charging some customers twice,
  • shipping orders that were already refunded,
  • never emailing receipts,
  • and recording totals that don’t match the money.

None of these produce error messages. They show up as customer complaints, chargebacks and reconciliation gaps weeks later.

This article gives you a 15-minute weekly routine for checking order health, explains what each step catches and why, and shows how to automate most of it so it keeps happening on the busy weeks too.

Why weekly?

  • Daily is ideal for high-volume stores, but it’s rarely sustained by hand.
  • Monthly is too slow. Customers who paid and received nothing won’t wait a month.
  • Weekly catches most problems while customers are still patient, and it’s frequent enough to become a habit.

Pick a fixed slot (Monday at 10:00 works well, after the weekend’s orders) and put it in the calendar.

The 15-minute routine

Timeline of a 15-minute weekly routine: paid but not moving (3 minutes), On hold, duplicates, refunds, background queue and email, totals, and order volume (2 minutes each). Do it at the same time every week, or let the Ordafide weekly summary do the checking.

Minute 0–3: Orders that are paid but not moving

Check: filter WooCommerce → Orders by Pending payment, Failed and Cancelled for the last 7–10 days. Open any that look like real customers (real names, sensible addresses, not card-testing junk).

Look for: a gateway transaction ID, a payment note, or a paid date on an order that isn’t Processing or Completed.

Why: these are customers who paid and won’t receive anything. Webhook failures and the Hold stock auto-cancel timer are the usual causes. (Full guide)

Action: verify in the gateway, move to Processing, resend the confirmation email, apologize.

Minute 3–5: The On hold queue

Check: filter by On hold.

Look for: bank transfers you haven’t matched, card authorizations that need capturing before they expire, payments that are actually settled at the gateway.

Why: On hold orders fall outside the Processing queue your team works from. (Full guide)

Minute 5–7: Duplicates

Check: sort recent orders by customer or email and scan for the same customer, same total, minutes apart.

Look for: two orders with the same transaction ID (one payment, two orders) or two different transaction IDs (charged twice).

Why: duplicate charges are a leading cause of “duplicate processing” disputes. (Full guide)

Minute 7–9: Refunds that don’t add up

Check: filter by Refunded and spot-check a few for refund records. Then look at Processing orders older than your normal fulfilment time for red refund lines.

Look for: “Refunded” orders with no refund, fully refunded orders still in Processing, refunds larger than the order.

Why: refunded orders get shipped; promised refunds never arrive. (Full guide)

Minute 9–11: The background queue and email

Check: WooCommerce → Status → Scheduled Actions → Pending. Are there many past-due actions? Check the Failed tab too. Then send yourself a test email from your SMTP plugin.

Why: when the queue stalls, emails, stock updates and some payment processing stop, silently. (Full guide)

Minute 11–13: Totals

Check: open three or four recent orders that used a coupon, a different currency, or an unusual shipping method. Do items − discounts + shipping + fees + tax equal the total?

Why: pricing, tax and currency plugins can leave orders that don’t add up. ([Full guide](/blog/woocommerce-order-total-wrong/))

Minute 13–15: Volume sanity check

Check: compare this week’s order count and revenue with the same week last month or last year in WooCommerce → Analytics. Look at day-by-day: is there a day with suspiciously few orders?

Why: a day with almost no orders is often a broken checkout nobody noticed. A day with hundreds of failed orders is often card testing. (Checkout guide · Card testing guide)

What you’ll typically find (and what to do)

Here are the kinds of findings a first audit usually turns up on an established store, and how to handle each one.

“Order #5520, Cancelled, $142. Order notes show a Stripe payment ID.”
The webhook didn’t arrive within the Hold stock window, so WooCommerce cancelled a paid order. Check Stripe: payment succeeded. Restore to Processing, check stock, resend the confirmation, ship, and email an apology. Then find out why the webhook failed. One stuck order usually means others.

“Orders #5531 and #5532, same customer, $38 each, 40 seconds apart, different transaction IDs.”
A genuine double charge. Confirm with the customer that they wanted one, refund #5532 from the order screen, and look at checkout speed.

“Order #5490, Processing, $95. Refunded in full four days ago.”
Stop! Make sure it isn’t in today’s picking list. Change the status to Refunded (carefully, so you don’t trigger a second refund) and find out who refunded it and where.

“Scheduled Actions: 1,240 past-due.”
The queue isn’t running. Check `DISABLE_WP_CRON`, set up a real server cron, and let the backlog drain. Then check whether any customers missed confirmation emails during the stall.

“Order #5544: items + shipping + tax = $72.40; stored total = $67.40.”
A discount was applied without a matching line. Check which pricing plugin did it, and whether other orders are affected.

The first audit is usually the biggest. After that, weekly findings tend to be small and quick, and anything unusual stands out clearly.

Adapting the routine to your store size

  • Under ~20 orders a week: you can open every order. The routine takes 10 minutes. Focus on paid-but-not-moving and refunds.
  • Hundreds of orders a week: sampling stops working. Use filters, sort by customer, and lean on automated checks for full coverage.
  • Thousands of orders a week: a weekly manual check is too slow. Problems need finding in hours, not days. Automate the checks, set alerts, and keep the weekly slot for reviewing trends and fixing root causes.
  • Multiple stores: script it. Running the same check by hand across stores doesn’t last more than a few weeks.

Keep a simple log

Write down what you found each week: date, issue, number of orders, money involved, cause, fix. After a month or two, patterns emerge. Maybe the same gateway keeps leaving orders stuck, or duplicates cluster on mobile. The log turns firefighting into fixing.

Week Issue Orders Value Cause Fixed?
3 Nov Paid but cancelled 2 $118 Webhook blocked by WAF Yes: WAF rule
10 Nov Duplicate charge 1 $45 Double click, slow checkout Refunded; investigating speed
17 Nov None found

Why manual audits fail (and what to do about it)

Comparison. Manual audits get skipped in busy weeks, sample a few orders, can't see gateway-only problems, find issues days late and depend on one person. Automated checks run every time, cover every recent order, compare with the gateway in Pro, alert within the hour in Pro and send a weekly summary.

Be honest: will this routine still happen in the week before Christmas? During a product launch? When you’re ill?

Manual audits have predictable weaknesses:

  • They’re skipped when you’re busy, which is exactly when problems are most likely and most expensive.
  • They’re sampled. You can’t open every order, so you check a few and hope.
  • They miss the invisible. Payments with no order, refunds only at the gateway, and charges that differ from the order can’t be seen from WooCommerce screens at all.
  • They’re slow to react. A weekly check means a problem that starts on Tuesday is found next Monday.

The fix is to automate the checks and keep the human part for deciding and acting.

Automating the routine with Ordafide

[Ordafide Order Integrity for WooCommerce](https://wordpress.org/plugins/ordafide-order-integrity-for-woocommerce/) is a free plugin that does most of the routine above automatically, across every recent order, not a sample:

Routine step Ordafide (free)
Paid but not moving Stuck payment and Paid but cancelled checks
Duplicates Duplicate charge check
Refunds Refund mismatch check
Queue and email Store health: Action Scheduler backlog and failures, WP-Cron status, loopback test, and an order email delivery log with one-click resend
Totals Order total does not add up check with a rounding tolerance

Findings appear in one inbox, sorted by money at risk, each with the evidence and what to check before touching anything. There’s an optional weekly summary email, sent only when there’s something to report, so the routine comes to you. For developers and agencies, WP-CLI commands (`wp ordafide scan`, `wp ordafide findings`, `wp ordafide health`, `wp ordafide digest`) let you script it.

Your 15 minutes becomes: open the weekly summary, work through the findings, done.

Ordafide Pro covers the remaining steps that the free plugin structurally can’t:

  • Gateway reconciliation (Stripe, PayPal, Square, Mollie, Razorpay) for the invisible cases: money with no order, paid orders with no payment, amount disagreements, refunds missing in WooCommerce.
  • Order volume anomaly detection for the “suspiciously quiet day” and “overnight spike” checks, hourly rather than weekly.
  • Synthetic checkout monitoring every 15 minutes, so a broken checkout is found in minutes.
  • Real-time alerts to Slack, SMS, email or webhook, so urgent problems don’t wait for Monday.

Making it stick

A routine only works if it survives busy weeks. A few things help:

  • Give it an owner. One named person, with a named backup for holidays.
  • Put it in the calendar as a recurring meeting with yourself. A fixed slot is far more likely to happen than “sometime on Monday”.
  • Start with the weekly summary email. If Ordafide’s weekly summary arrives and lists nothing, the routine takes two minutes. If it lists findings, you know exactly where to start.
  • Track time saved. Note how long each issue took to fix when found early, versus the customer complaints and disputes you used to handle. It keeps the habit motivated.
  • Review the log monthly. Repeated causes deserve a permanent fix, not another weekly repair.

The aim isn’t to spend 15 minutes a week forever. It’s to fix the causes so the weekly check becomes boring. A boring audit means a healthy store.

The printable checklist

Weekly order health check: 15 minutes

  • [ ] Pending / Failed / Cancelled: any with payment evidence?
  • [ ] On hold: every order has a reason and a next step?
  • [ ] Duplicates: same customer, same basket, minutes apart?
  • [ ] Refunded: every one has a refund record?
  • [ ] Processing: any with refund lines?
  • [ ] Scheduled Actions: past-due backlog or failures?
  • [ ] SMTP test email delivered?
  • [ ] Sample totals add up (coupon, currency, unusual shipping)?
  • [ ] Order volume normal day by day?
  • [ ] Log updated with anything found

The Chargebacks You Cause Yourself: Preventing ‘Not Received’ and ‘Duplicate’ Disputes in WooCommerce

When store owners think about chargebacks, they usually think about fraud: stolen cards, professional scammers, “friendly fraud” from customers who received their order and claim they didn’t.

Those are real. But a large share of disputes have a much less dramatic cause: the store got something wrong, and the customer didn’t hear about it in time.

  • They paid, but the order never moved forward, so nothing shipped.
  • They were charged twice.
  • They were promised a refund that was never issued.
  • They never received a confirmation email, panicked, and called their bank.

From the customer’s point of view, each of these is a legitimate reason to dispute. From yours, each is a dispute you could have prevented. You might even have won the customer’s loyalty instead, if you’d caught the problem first.

This guide maps the order failures that turn into chargebacks, shows how to catch each one before the customer acts, and explains what to do when a dispute arrives anyway.

What a chargeback actually costs

A chargeback isn’t just a refund. When a customer disputes a payment:

  • The disputed amount is pulled from your balance immediately, pending the outcome.
  • You pay a dispute fee. Stripe charges $15 per dispute in the US, win or lose. Other gateways charge similar or higher amounts.
  • You spend time gathering evidence and responding.
  • Your dispute rate rises. Stripe treats dispute activity above 0.75% as excessive, and card networks run their own monitoring programmes with their own thresholds. High rates can lead to reviews, reserves, higher fees or account closure.
  • You often lose the customer, even if you win.

For a small store, a handful of avoidable disputes a month is a meaningful cost, and a meaningful risk to the payment account the whole business depends on.

The four self-inflicted dispute types

Table mapping store failures to disputes and Ordafide checks: paid orders stuck or cancelled become product-not-received disputes; paid with no order also becomes not received; charged twice becomes duplicate processing; refund promised but not issued becomes credit not processed; no confirmation email becomes an unrecognized charge.

Card networks use different codes, but customer-driven disputes usually fall into a few groups. Four of them are frequently caused by store-side order failures.

1. “Product not received” when the order was never processed

The failure: the customer paid, but the order is stuck on Pending payment, was auto-cancelled by the Hold stock timer, or never created at all. Nothing ships. The customer waits a week, then two, then disputes.

The irony: you’d happily have shipped it. You just didn’t know.

Root causes: blocked or failed webhooks; a checkout crash after payment; a wallet payment that never confirmed; a staging site with live keys. (See orders stuck on pending payment) and payment received but no order.)

2. “Duplicate processing” when the customer was charged twice

The failure: a double click, a page refresh, a request replay or a plugin retry produced two charges. The customer notices two lines on their statement and disputes one.

Why it becomes a dispute: many customers go straight to their bank instead of emailing you, especially if the second charge appears days later.

Root causes: slow checkout, firewall replays, gateway plugin retries. (See customer charged twice.)

3. “Credit not processed” when a refund was promised but not issued

The failure: someone changed the order status to Refunded without creating a refund, or a refund failed silently, or a return was approved but never refunded. The customer was told the money was coming. It isn’t.

Why it becomes a dispute: “credit not processed” is one of the easiest disputes for a customer to win when you have no record of a refund.

Root causes: refund status mismatches. (See refund status mismatches.)

4. “Unrecognized” or “did not authorize” when the customer never got a receipt

The failure: the payment worked, but the confirmation email never arrived because the background queue stalled, SMTP failed, or the email was switched off. Days later the customer sees an unfamiliar descriptor on their statement and assumes fraud.

Why it becomes a dispute: no email, plus a statement descriptor that doesn’t obviously match your store name, equals “I don’t recognize this charge”.

Root causes: stalled Action Scheduler or WP-Cron, broken mail delivery. (See order emails not sending.)

Three disputes, three different endings

Three customers with the same failed order: found by nobody leads to a dispute three weeks later; found by the customer on day four leads to a fix with a poor experience; found by the store the next morning leads to a same-day fix. Who notices first decides the outcome.

To see how much timing matters, follow three customers whose orders failed in the same way: a webhook was blocked, so each paid order sat on Pending payment and was auto-cancelled an hour later.

Customer A: found by nobody. They wait for delivery. After ten days with no parcel and no email, they search their inbox, find nothing, and call their bank. You learn about it from a dispute notification three weeks later. You lose the sale, pay the dispute fee, and the customer never returns.

Customer B: found by the customer. After four days they email you: “Where’s my order?” You investigate, find the payment in Stripe, restore the order and ship it. No dispute, but they’ve had a poor experience and you spent 30 minutes on it.

Customer C: found by you. The morning after, your integrity scan flags a paid but cancelled order. You restore it to Processing, ship it that day, and send a two-line apology. The customer probably never knew anything was wrong. Cost: five minutes.

Same failure, same customer type, wildly different outcomes. The only variable was who noticed first, and when.

The prevention principle: get there before the bank does

Every one of these disputes has a window: the time between the failure and the customer losing patience. In that window, a short email from you (“We noticed a problem with your order, here’s what we’ve done”) almost always prevents the dispute.

The window is usually days, not hours. Customers typically wait for an expected delivery date, or for their statement, before acting. That’s plenty of time if you know about the problem. Without detection, the dispute notice is the first you hear of it.

So prevention comes down to three things:

  1. Detect the order failure quickly
  2. Fix the order (ship it, refund the duplicate, issue the promised refund, resend the receipt)
  3. Tell the customer before they look at their statement

Detecting the four failures

Failure What to look for Where
Paid but not processed Orders with a payment reference or paid date sitting in Pending, Failed or Cancelled WooCommerce orders + gateway
Paid with no order Successful gateway payments with no matching order Gateway only
Charged twice Same customer, same basket, minutes apart; one transaction ID on two orders WooCommerce orders + gateway
Refund not processed Orders marked Refunded with no refund record; approved returns without refunds WooCommerce orders + returns system
No receipt Paid orders with no customer email sent or accepted Email log

You can work through this manually with exports and spreadsheets, as described in our [reconciliation guide](/blog/reconcile-woocommerce-orders-stripe-paypal/). Or you can automate it.

Automating detection with Ordafide

Ordafide Order Integrity for WooCommerce (free) runs six checks against your recent orders that line up closely with the dispute types above:

Ordafide check Prevents
Stuck payment: pending/failed orders carrying a gateway payment reference “Not received”
Paid but cancelled: confirmed payment date, but Cancelled or Failed, nothing refunded “Not received”
Duplicate charge: one payment reference on two orders, or the same basket charged twice within minutes “Duplicate processing”
Refund mismatch: marked Refunded with no refund record; over-refunds; fully refunded but still Processing “Credit not processed” (and shipping refunded orders)
Customer never emailed: paid orders where no customer email reached your mail server “Unrecognized”
Order total does not add up “Incorrect amount” disputes

Findings are sorted by money at risk, each explains what to check in your gateway, and Ordafide can resend the customer email or restore an order to Processing when WooCommerce already recorded a confirmed payment date. Both actions are logged, and the status change can be undone. The free plugin sends nothing to any third party.

Ordafide Pro adds the gateway’s side of the story with read-only reconciliation against Stripe, PayPal, Square, Mollie and Razorpay. That’s what catches money with no order, the cleanest possible “not received” dispute, plus amount disagreements and refunds missing in WooCommerce. Pro’s alerts (Slack, SMS, email, webhook) shrink detection time from “whenever someone checks” to minutes, and its CSV/JSON audit export gives you an evidence trail if a dispute arrives anyway.

To be clear about the limits: Ordafide doesn’t see or manage disputes themselves (those live in your gateway), and it can’t prevent true fraud. It prevents the disputes caused by your store’s own order failures, which are the ones you have the most power over.

Reducing “unrecognized charge” disputes further

Two cheap fixes worth doing today:

  • Check your statement descriptor. In your gateway settings, make sure the descriptor customers see on their statement clearly matches your store or brand name. “WWW.SHOPNAME.COM” beats a legal entity name nobody recognizes.
  • Make the confirmation email unmistakable. Include the amount, the descriptor they’ll see, and how to contact you. A customer who can match the statement line to an email doesn’t dispute it.

The customer email that prevents a dispute

When you find a failure, speed and clarity matter more than polish. A template that works:

Subject: About your order #5520

Hi Sam, while checking orders today we found that your payment on 3 November went through, but a technical problem on our side stopped your order from being processed. That’s our mistake, and we’re sorry.

We’ve fixed it: your order is now being packed and will ship today. You’ll get tracking by email this afternoon. You won’t be charged again.

If you have any questions, just reply to this email.

Three things make it work: it names the order and payment the customer will see on their statement, it says what you’ve done (not what went wrong technically), and it states clearly that they won’t be charged twice. For duplicate charges, replace the middle paragraph with the refund amount and expected timing.

When a dispute arrives anyway

  1. Check the order immediately. Is this one of the four self-inflicted types? If the customer is right (they never got the goods, or were charged twice), it’s usually better to accept the dispute or refund than to fight. Contesting a valid dispute costs time and often a second fee.
  2. If you shipped and have proof, respond with tracking, delivery confirmation, order and email records, and any customer communication.
  3. Reply to the customer too. Some customers will withdraw a dispute once they see you’ve responded.
  4. Fix the root cause. Every self-inflicted dispute points at a failure that will happen again.

A monthly dispute review

Once a month, list every dispute and tag it:

  • Fraud: card stolen, true unauthorized use
  • Friendly fraud: customer received goods and disputed anyway
  • Self-inflicted: order failure on your side (stuck, duplicate, refund, no receipt)
  • Service: quality, description or delivery problems

Track the self-inflicted share over time. It should fall steadily as detection improves. If it doesn’t, the table above tells you which failure to fix next.

WooCommerce Order Total Doesn’t Add Up? Fixing Coupon, Tax, Shipping and Currency Mismatches

Every WooCommerce order should satisfy a simple equation:

Items − discounts + shipping + fees + tax = order total = amount charged

Most of the time it does. But WooCommerce lets dozens of plugins change those numbers: coupons, dynamic pricing, tax services, shipping calculators, payment fees, currency switchers, gift cards. Any one of them can leave an order where the parts don’t add up to the whole, or where the whole doesn’t match what the customer was actually charged.

Nothing alerts you when this happens. The order looks normal. You only find out when an accountant can’t reconcile a month, a tax report is off, or a customer points out they were overcharged.

This guide covers the six common causes, how to find affected orders, and how to keep totals honest.

Two different problems

It helps to separate:

  1. The order doesn’t add up internally. Line items, shipping, fees and tax don’t sum to the stored order total.
  2. The order adds up, but the charge was different. The order is internally consistent, but the gateway took a different amount.

The first can be found by inspecting your own database. The second can only be found by comparing with the gateway.

The six common causes

Six causes of WooCommerce total mismatches: coupon or pricing plugin failures, tax plugin misfires, missing shipping or fee lines, currency rounding, manual edits after payment, and prices changing mid-checkout.

1. A coupon or discount plugin failed part-way

Advanced coupon, BOGO and dynamic pricing plugins modify cart items and totals during checkout. If one fails mid-calculation (an error, a timeout, a conflict with another pricing plugin), the stored line items and the stored total can disagree. Sometimes the customer is charged the discounted price but the items show full price, or vice versa.

2. A tax plugin misfired

External tax services calculate tax by calling an API at checkout. If the call times out or fails, some plugins fall back to WooCommerce’s built-in rates, to zero, or to a cached value. The order may then show tax that doesn’t match the address, or a total that doesn’t include the tax lines shown.

3. Shipping or fee lines didn’t apply

Shipping and payment fee plugins add lines to the order. If a line fails to save while the total was calculated with it (or the reverse), the order is out of balance. Often this means you undercharged for shipping.

4. Currency switcher rounding

Multi-currency plugins convert prices and round them. Rounding each line separately versus rounding the total can produce small, persistent differences, often a cent or two per order. Individually trivial; across thousands of orders, it’s a reconciliation headache. Worse, if the plugin and the gateway disagree about the currency or amount, the charge can differ from the order.

5. Manual order edits

Editing an order after payment (adding an item, changing a quantity, adjusting shipping) and clicking Recalculate can change the total, while the payment stays the same. Editing without recalculating can leave the total stale. Either way, the order no longer matches the charge.

6. Prices changed between page load and payment

Scheduled sales starting, coupons expiring or dynamic pricing rules changing while the shopper is on the checkout page can create mismatches. WooCommerce’s documentation notes that from WooCommerce 11.1, block-based checkout stops an order if the total increases between page load and Place order, asking the customer to refresh. Decreases still go through. That’s a welcome safeguard, but it doesn’t cover classic checkout, plugins that modify totals after the order is created, or the other causes above.

A worked example

Worked example: items $50, discount $5, shipping $6.95, fees $0, tax $4.16, so the expected total is $56.11. Two mismatches: a stored total of $51.11 caused by a hidden discount, and a gateway charge of $61.11 caused by a surcharge with no fee line.

Here’s a real-looking order that doesn’t add up, to show how small the signals can be.

Line Amount
T-shirt × 2 @ $25.00 $50.00
Coupon SPRING10 (10%) −$5.00
Shipping: Standard $6.95
Tax (8% on items after discount + shipping) $4.16
Expected total $56.11
Stored order total $51.11

The difference is exactly $5. On investigation, a second discount plugin also applied a $5 “first order” discount to the total, but didn’t add a visible line for it. The customer was charged $51.11, which is fine for them, but your sales report shows $50 of items, a $5 coupon, $6.95 of shipping and $4.16 of tax, which adds up to $56.11, so $5 of revenue that never existed. Multiply by every first-time customer for a quarter, and your books are noticeably wrong.

Now the opposite case: the order lines add up to $56.11, the stored total is $56.11, but the gateway shows $61.11. A payment fee plugin added a $5 surcharge at the gateway step without recording a fee line. The customer was overcharged by your records’ standards, and won’t be pleased if they notice.

Neither order would look strange in the orders list.

Multi-currency: why cents go missing

Currency switchers convert each price from your base currency and round it. The problem is where the rounding happens:

  • Convert and round each line, then add: €22.73 + €22.73 + €6.32 = €51.78
  • Add in base currency, then convert and round once: €51.77

Both are defensible. But if the plugin calculates one way and your tax report, the gateway, or a later recalculation uses the other, every order carries a cent or two of drift. Tax is particularly sensitive, because tax rounding rules (per line or per order) are set in WooCommerce → Settings → Tax and interact with the currency plugin’s own rounding.

A tolerance-based check is the practical answer: ignore differences of a cent or two, and investigate anything bigger. That’s why Ordafide’s total check has a configurable rounding tolerance rather than demanding exact matches.

Questions to ask before installing a pricing or tax plugin

  • What happens to an order if your plugin errors mid-checkout? Does checkout stop, or continue with partial data?
  • Do you add visible order lines for every discount or fee you apply?
  • Is your plugin compatible with both block and classic checkout, and with HPOS?
  • How do you handle rounding in other currencies?
  • What does your plugin do when its external API is unreachable?

A vendor who answers these clearly is much less likely to leave you with mismatched totals.

Symptoms you might be seeing

  • Accountant reports WooCommerce revenue ≠ gateway deposits by more than fees
  • Tax reports that don’t match what was collected
  • Customers saying their coupon wasn’t applied, or they were charged more than the order email shows
  • Orders where shipping shows $0 but the customer chose a paid method
  • A steady trickle of one-cent differences in multi-currency stores

How to find affected orders

Manual spot check

Open a sample of recent orders and add up items, minus discounts, plus shipping, fees and tax. Compare with the total. Then compare the total with the amount shown in the gateway for that transaction ID.

It works for a handful of orders. It isn’t practical for hundreds, and it’s the kind of job that never gets done in a busy month.

Automatic check with Ordafide (free)

Ordafide Order Integrity for WooCommerce includes an “Order total does not add up” check. For each recent order it compares items + shipping + fees + tax with the stored total and flags any order that’s out by more than a rounding tolerance you configure. That tolerance matters for multi-currency stores, so a cent of rounding doesn’t flood you with findings while real errors still show up.

Findings come with the numbers side by side and are sorted by money at risk, so a $40 missing shipping line ranks above a 2-cent rounding difference. The check reads only your own database, sends nothing anywhere, and never changes your orders.

Comparing with what was actually charged (Pro)

If an order adds up internally but the gateway took a different amount, only the gateway knows. Ordafide Pro reconciles orders against Stripe, PayPal, Square, Mollie and Razorpay with read-only API keys and flags amount disagreements between the order and the charge, alongside money with no order, paid orders with no payment, and refunds missing in WooCommerce. For accountants, Pro’s CSV/JSON audit export covers any date range.

Fixing affected orders

  1. Decide which number is right. Usually the gateway charge is the truth about money; the line items are the truth about what was sold.
  2. If the customer was undercharged: decide whether it’s worth recovering. For small amounts, often not. Add a note and fix the cause.
  3. If the customer was overcharged: issue a partial refund through the order screen (Refund via [gateway]) for the difference and apologize.
  4. If it’s a records-only problem (the charge was right, the order lines are wrong): correct the lines carefully and add a note explaining why. Avoid hitting Recalculate unless you understand what it will do with taxes and coupons.
  5. Tell your accountant about any systematic issue and when it started.

Explaining it to your accountant

When mismatches turn up, your accountant needs three things: how many orders, how much money, and since when. A clear note might read:

“Between 3 March and 18 April, a discount plugin applied an extra $5 first-order discount without recording a line. 214 orders are affected. Customers were charged correctly; our reports overstate revenue by $1,070. The plugin was removed on 18 April. Order IDs attached.”

That turns a confusing reconciliation gap into a known, bounded adjustment. It’s only possible if you can list affected orders quickly, which is exactly what an automated total check gives you. Without one, the investigation itself becomes the expensive part.

Keep a short log of pricing, tax and currency plugin changes (what changed, when, and why). When a mismatch appears, the first question is always “what changed around then?”, and the log answers it.

Preventing mismatches

  • Minimize overlapping pricing plugins. Two plugins that both change prices or discounts are the most common source of trouble.
  • Test checkout with every coupon type after updating coupon, pricing or tax plugins.
  • Check tax plugin failure behaviour. Know what your tax plugin does when its API is unreachable, and prefer plugins that block checkout over ones that silently charge the wrong tax.
  • Configure multi-currency rounding deliberately and check the gateway receives the same currency and amount as the order.
  • Lock down post-payment edits. Agree a process for editing paid orders, including whether and when to recalculate, and always add a note.
  • Use block checkout where it fits, to benefit from the total-increase protection in recent WooCommerce versions.
  • Scan regularly. A weekly Ordafide scan or its weekly summary email shows new mismatches while they’re still easy to explain.

A note for agencies

Total mismatches often start right after a client installs “just one more” discount or upsell plugin. Ordafide’s WP-CLI commands (`wp ordafide scan`, `wp ordafide findings`) let you include an order-total check in your maintenance scripts across client sites, and Ordafide Pro’s multi-store dashboard puts every store’s findings on one screen.

Refunded Orders Still Getting Shipped: Fixing WooCommerce Refund Status Mismatches

Refunds feel like the simple part of running a store. A customer asks for their money back, you click a button, done.

Except WooCommerce stores a refund in three places that are supposed to agree: the refund record on the order, the order status, and the payment gateway. When they disagree, odd and expensive things happen:

  • An order is fully refunded but still sits in Processing, so your warehouse picks and ships it. The customer gets the goods and their money.
  • An order is marked Refunded but no refund was ever issued. The customer never gets their money, and they file a dispute.
  • A refund is made in PayPal or Stripe, but WooCommerce still shows the order as paid. Revenue, stock and reports are all wrong.

These cases come up again and again on the WordPress.org support forums. This guide explains each mismatch, why it happens, how to find the ones already in your store, and how to make refunds reliable.

How WooCommerce refunds are supposed to work

When you refund from the order screen, WooCommerce:

  1. Creates a refund record attached to the order (amount, items, reason, who did it).
  2. If you chose Refund via [gateway], it asks the gateway to send the money back. If you chose Refund manually, it only records the refund. You’re saying the money went back some other way.
  3. If the order is now fully refunded, it changes the status to Refunded and sends the customer a refund email.
  4. If you ticked Restock refunded items, it increases stock.

For a partial refund, step 3 doesn’t happen. The order keeps its existing status. That’s by design, and it confuses a lot of people.

The four mismatches

Four refund mismatches: fully refunded but still Processing, so it gets shipped; marked Refunded with no refund issued; refunded at the gateway only, so WooCommerce still shows paid; refund larger than the order. Free Ordafide flags the first, second and fourth; Pro adds gateway-only refunds.

Mismatch 1: Fully refunded, still Processing

What happens: the refund records add up to the full order total, but the status never changed. Because your team works from the Processing list, the order gets shipped.

Why:

  • The refund was recorded in several partial steps, and the final step didn’t trigger the status change.
  • A plugin conflict or customization interfered with the status update.
  • The refund was made at the gateway, the gateway plugin recorded it via webhook, but the status update failed.

One WordPress.org thread describes exactly this with the WooCommerce PayPal gateway: refunding sent the customer refund emails and reversed the charge, but the order stayed in Processing. Changing the status manually then sent a second refund email. The issue disappeared after later updates, but the owner had no way of knowing which past orders were affected.

Cost: the full value of the goods, plus shipping, plus the refund.

Mismatch 2: Marked Refunded, but no refund exists

What happens: someone changed the status to Refunded from the status dropdown, intending to refund, but never actually created a refund. Or they did it manually expecting the gateway to act.

Why: status and refund are separate actions. Changing the dropdown on its own doesn’t tell your gateway to send money (behaviour can vary by gateway plugin, so never rely on it).

Cost: a customer who believes they were refunded, or was promised one, and wasn’t. That’s a near-guaranteed chargeback and a lost customer.

Mismatch 3: Refunded at the gateway, not in WooCommerce

What happens: a team member refunds in the Stripe or PayPal dashboard because it’s quicker. WooCommerce never hears about it, or hears but fails to record it.

Why: some gateway plugins import dashboard refunds via webhooks, some don’t, and webhooks fail (see orders stuck on pending payment for why).

Cost: revenue overstated; stock that came back never restocked; reports and tax figures wrong; possibly the order still in Processing (back to mismatch 1).

Mismatch 4: Refund larger than the order

What happens: refunds on one order exceed what was paid. This can come from refunding twice (once at the gateway, once in WooCommerce), or from a manual refund entered with the wrong amount.

Cost: money you didn’t need to give away, and a messy reconciliation.

The partial refund trap

Partial refunds deserve their own warning. WooCommerce support confirmed in a WordPress.org thread that:

  • a partial refund doesn’t change the order status. A partially refunded On hold order stays On hold;
  • for manual refunds, setting the status to Refunded refunds the entire order, which can trigger a second refund email or a larger refund than intended.

The thread’s suggested workaround was a custom “Partially refunded” status via an order-status plugin. Whatever you choose, make sure your team knows that status alone doesn’t tell you whether an order has been refunded. Read the refund lines on the order.

Why it matters beyond the single order

It’s tempting to treat each mismatch as a one-off customer-service problem. But refund records feed several other parts of the business:

  • Revenue reports. WooCommerce Analytics subtracts recorded refunds. Missing ones overstate revenue; duplicated ones understate it.
  • Tax. Tax collected and tax refunded are reported from order and refund records. If a refund isn’t recorded, you may report and remit tax on a sale you reversed.
  • Stock. Restocking happens when refunds are recorded with Restock refunded items. A refund made only at the gateway never restocks, so products show out of stock when they’re on your shelf.
  • Customer history. Support teams look at an order and see “paid” or “refunded”. If that’s wrong, they give the customer wrong answers.
  • Disputes. If a customer disputes a charge, your evidence comes from the order record. A missing or wrong refund record weakens your case.

So a mismatch costs more than the one order. It quietly distorts the numbers you run the business on.

Finding mismatches already in your store

Manually

  1. Filter WooCommerce → Orders by Processing and open orders older than your usual fulfilment time. Look for refund lines (shown in red under the order items).
  2. Filter by Refunded and spot-check that each one actually has refund records totalling the order amount.
  3. Export refunds from your gateway for the last 30–90 days and check each one appears on the matching WooCommerce order.
  4. Look for orders where the refunded total exceeds the order total.

This is slow, but doable once. The trouble is it needs repeating, because mismatches keep happening as long as people, plugins and webhooks are involved.

Automatically with Ordafide

Ordafide Order Integrity for WooCommerce is free and runs a Refund mismatch check on your recent orders that flags:

– orders marked Refunded with no refund record (mismatch 2)
– refunds larger than the order (mismatch 4)
– fully refunded orders still marked Processing (mismatch 1), the ones about to be shipped

Each finding explains why it matters, shows the evidence, and tells you what to check before changing anything. Findings are sorted by money at risk, and you can ignore ones you’ve reviewed. Everything runs on your own server, and the plugin never refunds, captures or voids anything.

Mismatch 3, refunds that only exist at the gateway, can’t be seen from inside WooCommerce. Ordafide Pro reconciles with Stripe, PayPal, Square, Mollie and Razorpay using read-only keys and flags refunds missing in WooCommerce, along with money with no order, paid orders with no payment and amount disagreements.

Fixing each mismatch

Fully refunded, still Processing: stop fulfilment immediately. Confirm the refund at the gateway, then change the status to Refunded. If the refund was already completed, choose the status change carefully so you don’t trigger a second refund. Add a note.

Marked Refunded, no refund: check the gateway. If no money went back, issue the refund now from the order screen (Refund via [gateway]) and apologize to the customer. If the money did go back outside WooCommerce, record it with Refund manually so the books agree.

Refunded at gateway only: record it in WooCommerce using Refund manually (not via gateway, or you’ll refund twice), tick Restock refunded items if goods came back, and note the gateway refund ID.

Over-refund: check the gateway for what was actually returned. If the excess was real money, decide whether to recover it from the customer. If it was a recording error, adjust and note it.

A worked example: one week, three mismatches

To make this concrete, here’s how mismatches tend to appear on a real store over a single week.

Monday. A customer cancels a $78 order before it ships. A team member, in a hurry, opens Stripe and refunds it there. The Stripe plugin’s webhook is being blocked by a recently installed security plugin, so WooCommerce never records the refund. The order stays in Processing.

Wednesday. The warehouse picks the Processing list, including that $78 order, and ships it. The customer now has their money and the goods. (Mismatch 1 and 3 at once.)

Thursday. A different customer emails asking for a refund on a damaged item. A new team member changes the order status to Refunded from the dropdown, assuming that sends the money. It doesn’t with this gateway. The customer waits. (Mismatch 2.)

The following week. The second customer, hearing nothing, files a dispute with their bank. Meanwhile the first team member notices the Monday order in the Stripe dashboard, realizes it wasn’t recorded, and, to “fix it”, clicks Refund via Stripe on the WooCommerce order. Stripe rejects it because the charge is already refunded. Had the first refund been partial, the second could have gone through and pushed the total refunded past what the customer paid. (A near-miss for mismatch 4.)

Three people, three reasonable shortcuts, a shipped order, a dispute and a reconciliation mess. None of it was visible on the orders screen. All of it was findable by comparing refund records, statuses and the gateway.

A refund policy for your team

Paste this into your team handbook and adapt it:

How we refund

  1. All refunds are issued from the WooCommerce order screen using Refund via [gateway]. Never from the Stripe or PayPal dashboard.
  2. Never change an order’s status to Refunded to “do” a refund. Create the refund; the status follows.
  3. For partial refunds, select the items and quantities being refunded, and tick Restock refunded items only if the goods are back and sellable.
  4. If money was returned outside WooCommerce (bank transfer, gateway dashboard), record it with Refund manually and note the reference.
  5. Before shipping anything that’s been in Processing more than two days, check it has no refund lines.
  6. Return-related refunds go through our returns system, not ad hoc.

Making refunds reliable

Comparison. Refunding from the WooCommerce order screen creates the refund record, sends money via the gateway, updates the status, offers restocking and keeps reports right. Refunding in the gateway dashboard returns the money, but WooCommerce may never hear, the order can stay Processing, stock isn't restocked and revenue is overstated.

  1. One place to refund. Make it a rule: refunds are issued from the WooCommerce order screen, never the gateway dashboard. The order screen talks to the gateway; the dashboard often doesn’t talk back.
  2. Never use the status dropdown to refund. Status follows refunds, not the other way round.
  3. Check refund lines before shipping. Add “no refund lines” to your packing checklist for orders that have been in Processing a while.
  4. Use a returns workflow for return-related refunds. If refunds come from product returns, a structured returns tool that creates the refund from the return record prevents double refunds. Our sister plugin Recirco does this.
  5. Scan regularly. A weekly Ordafide scan (or its weekly summary email) catches the mismatches that slip through anyway.