All posts by Baljit S.

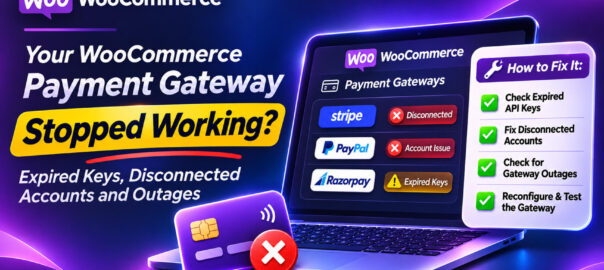
Your WooCommerce Payment Gateway Stopped Working: Expired Keys, Disconnected Accounts and Outages

Most WooCommerce payment problems affect some orders: a stuck webhook here, a double charge there. This one is different. When the payment gateway connection itself breaks, every customer fails at the last step. Your store keeps attracting buyers, keeps filling carts, and takes no money at all.

The forums are full of variations: “Invalid secret key, please check your entry”, “There was a problem connecting to the Stripe API endpoint”, “Error: Stripe payments API key”, and threads about gateways switching to new connection methods that left stores unable to accept payments until they reconnected. WooCommerce’s own guide to failed orders lists authentication issues and expired API keys alongside card declines as a main cause of failures.

This guide covers the ways a gateway connection breaks, how to recognize each one fast, how to recover, and how to make sure you find out within minutes rather than from a customer’s angry email.

How to recognize a gateway-level failure

A gateway-level failure has a distinctive signature:

  • Every payment attempt fails, or the payment form doesn’t appear at all
  • Failed orders share the same error in their notes (authentication, invalid key, connection error), not varied card declines
  • It started at a specific moment, often after a change
  • Successful orders drop to zero for that payment method

If you see varied decline reasons (insufficient funds, expired card, incorrect CVC), that’s normal customer behaviour. If you see the same technical error over and over, it’s you.

The common causes
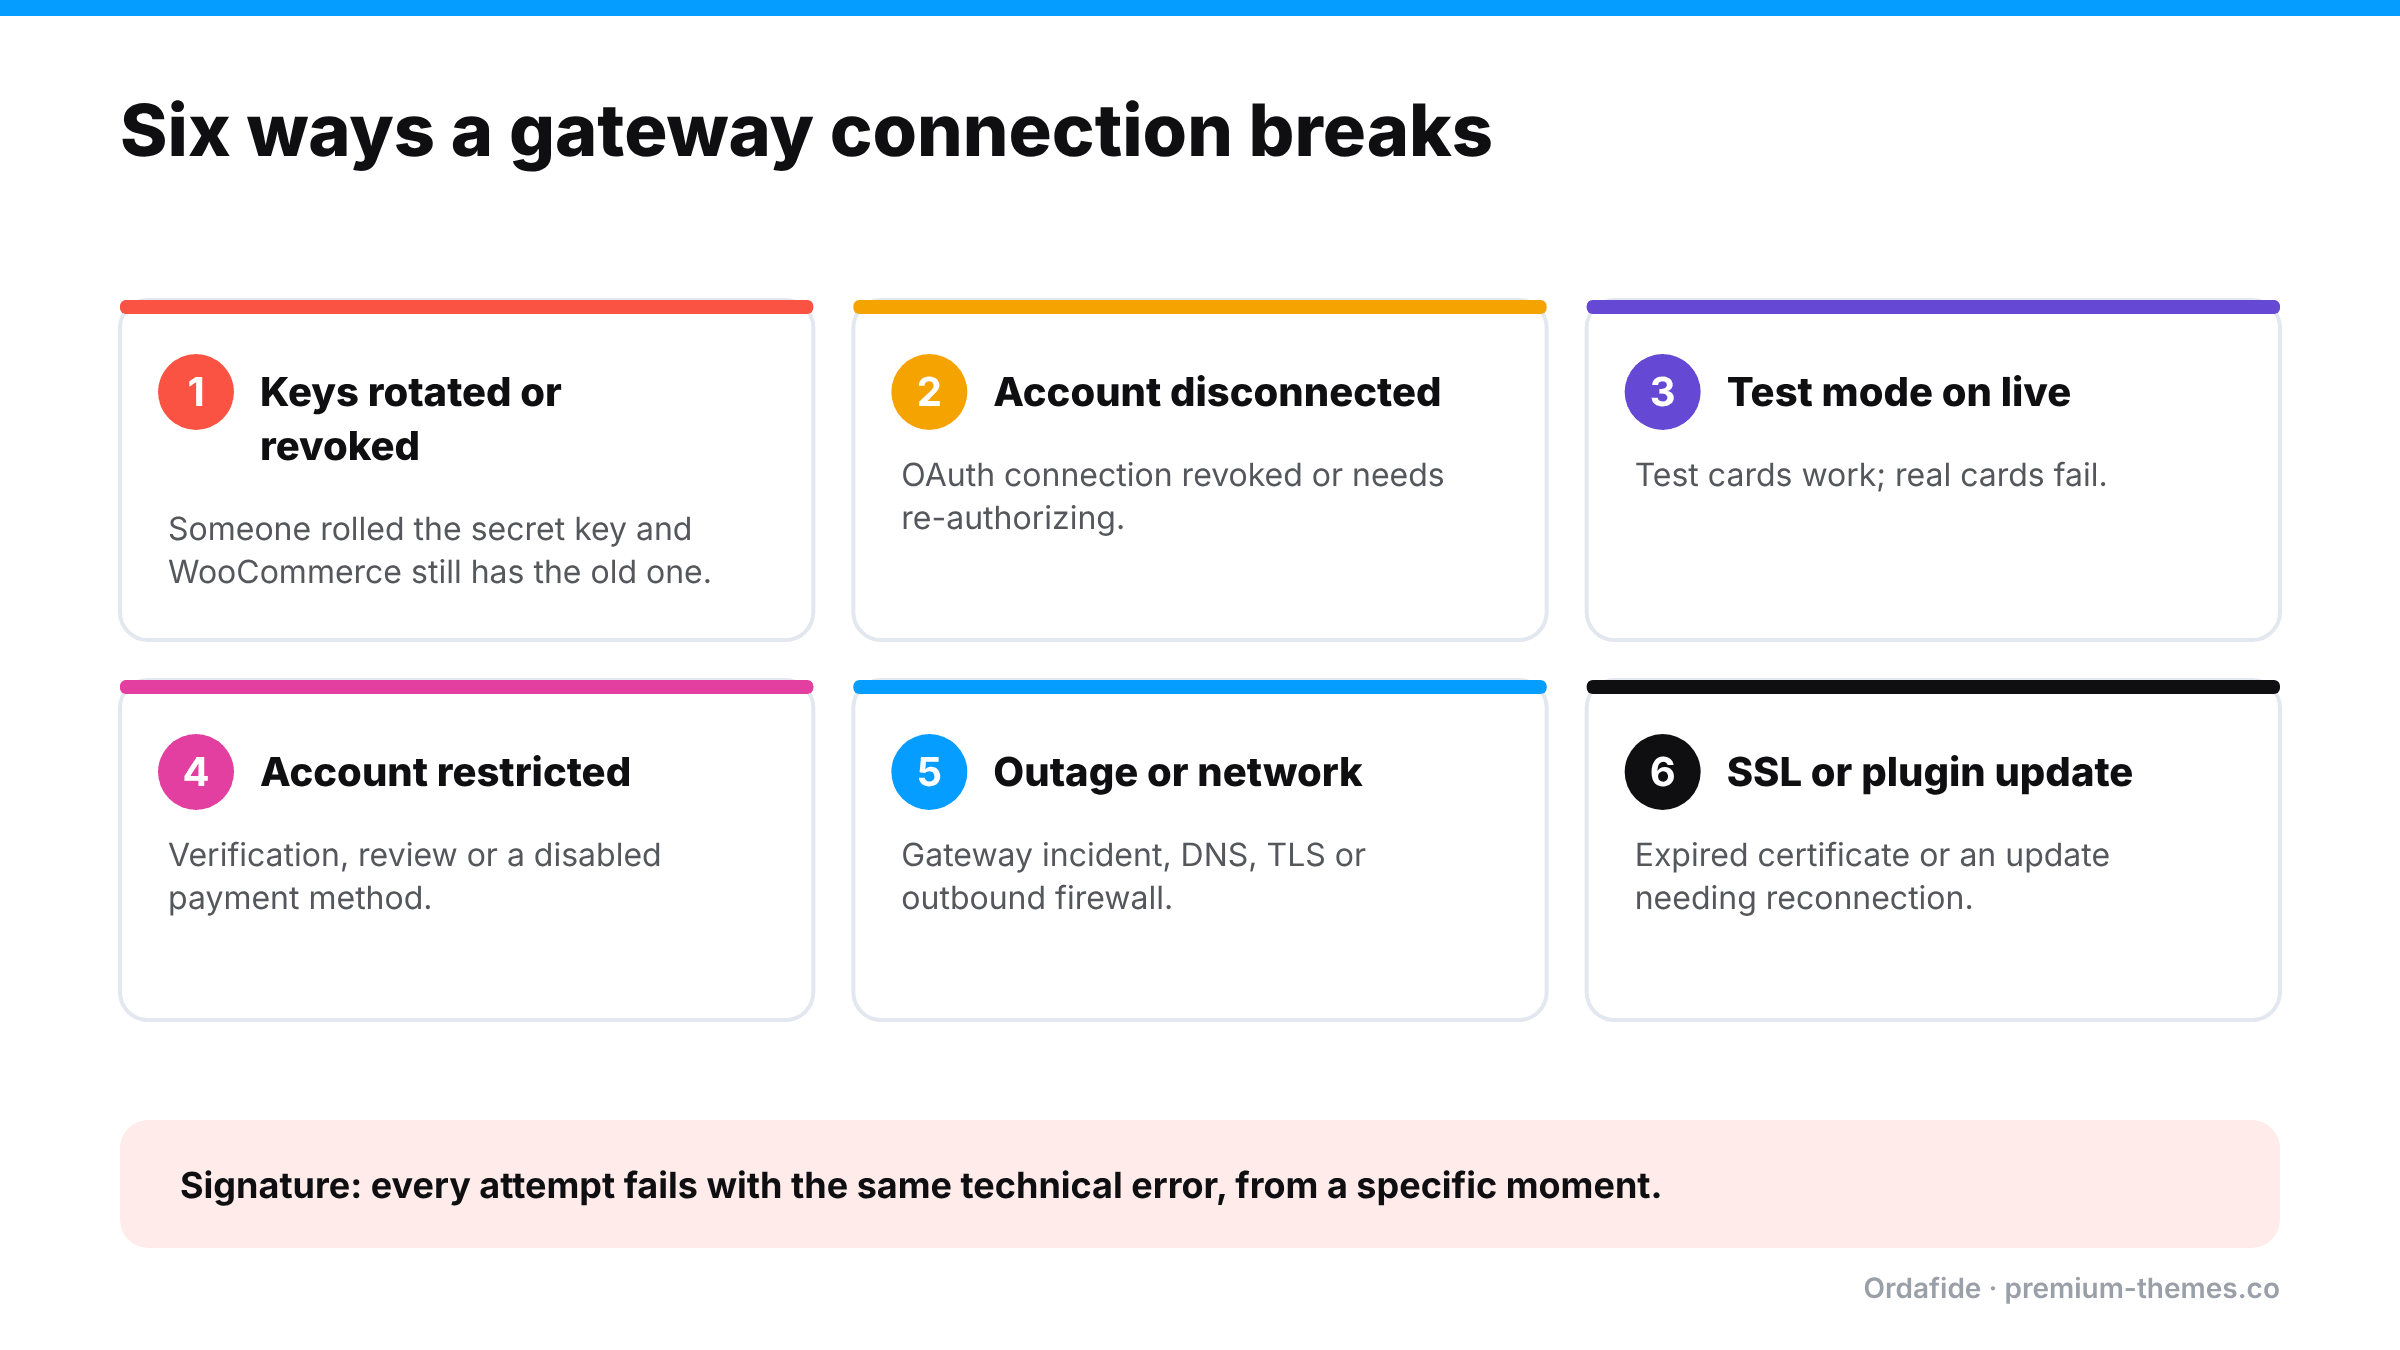
Six causes of a broken WooCommerce payment gateway: API keys rotated or revoked, account disconnected, test mode on the live site, account restricted, gateway outage or network problems, and SSL or plugin update issues. The signature is every attempt failing with the same technical error from a specific moment.

1. API keys rotated, revoked or expired

Someone regenerated the secret key in the gateway dashboard (often for security reasons, after a staff change or a suspected leak) and didn’t update WooCommerce. Or a restricted key was edited and lost a permission the plugin needs. The gateway now rejects every request.

2. The account was disconnected or needs re-authorization

Many gateway plugins now connect via OAuth (a “Connect with…” button) rather than pasted keys. Connections can be revoked, expire, or need re-authorizing when the plugin or gateway changes its integration method. Store owners discover this when payments stop.

3. Test mode on the live site (or live keys on staging)

  • Test mode left on after testing: checkout appears to work for you with a test card, but real customers’ real cards are rejected (or, worse, accepted as test transactions that never charge).
  • Live keys on a staging copy: real charges taken on a site you never check. (Payment received, no order)

4. The gateway account itself has a problem

Account under review, verification documents required, payouts paused, a payment method disabled, or the account closed for policy reasons. The gateway emails the account owner, and that email may be sitting in an inbox nobody reads.

5. A gateway or network outage

Gateways are very reliable, but not perfect. Regional outages, DNS problems, or your host’s network having trouble reaching the gateway’s API produce connection errors and timeouts.

6. SSL or server problems

  • An expired SSL certificate: browsers warn shoppers away, and gateways’ scripts may refuse to load.
  • An outdated TLS/cURL setup on the server that can’t connect to the gateway’s API.
  • A firewall blocking outgoing connections from your server to the gateway.

7. Plugin update or incompatibility

A gateway plugin update that needs new settings, requires reconnection, or conflicts with your theme or checkout type. (Update broke checkout · Block checkout errors)

The 10-minute recovery
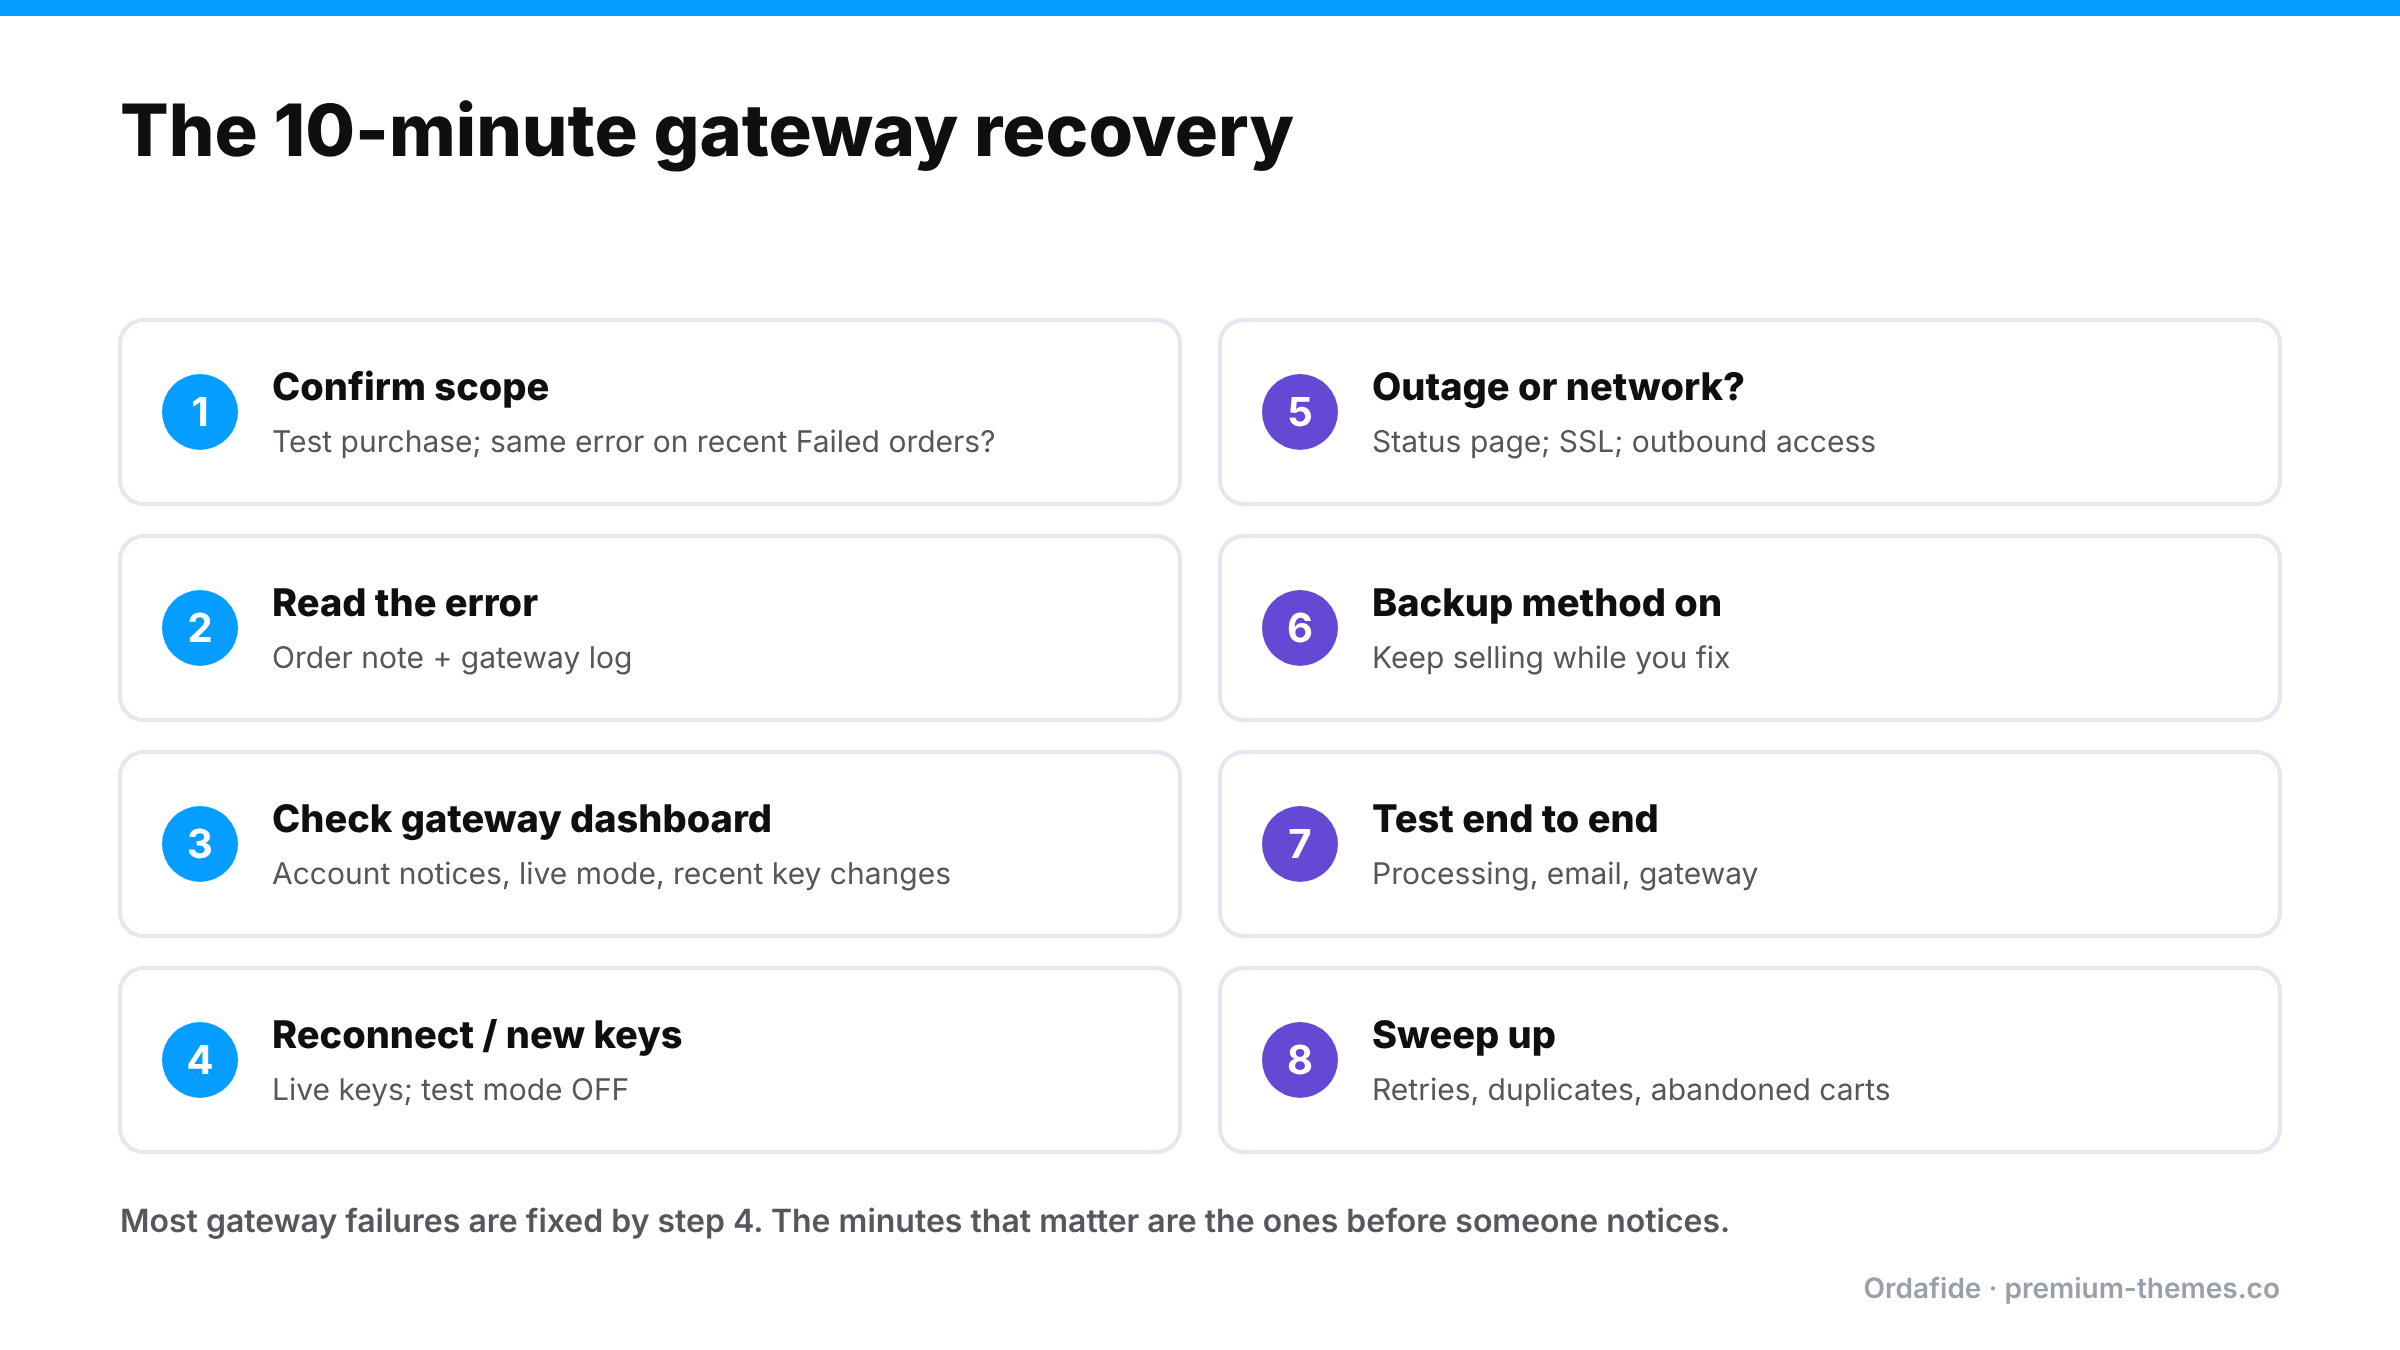
Eight recovery steps when a payment gateway stops working: confirm scope, read the error, check the gateway dashboard, reconnect or enter new live keys with test mode off, check for an outage or network issue, enable a backup method, test end to end, then sweep up retries, duplicates and abandoned carts.

1. Confirm the scope. Place a real test purchase in a private window. Check the last few Failed orders’ notes. Same error every time?

2. Read the error. The order note or the gateway plugin’s log (WooCommerce → Status → Logs, filtered by the gateway) usually names the problem: invalid key, authentication, connection, account restricted.

3. Check the gateway dashboard. Any banners about account status, verification, disabled methods? Are you looking at live mode? Were keys regenerated recently?

4. Reconnect or re-enter keys. Use the plugin’s connect flow, or paste fresh live keys. Confirm test mode is off.

5. Check the gateway’s status page for an incident if errors are connection timeouts.

6. Check SSL and outbound connectivity if the error is about connecting rather than authenticating. Ask your host to confirm the server can reach the gateway’s API.

7. Enable a backup method if needed. If the primary gateway is down and you have a second (PayPal alongside Stripe, for example), make sure it’s enabled while you fix the first.

8. Test again end to end: order arrives in Processing, email sent, payment visible in the gateway.

9. Sweep up. Find customers who failed during the outage. Abandoned-cart emails or a personal note (“we had a payment problem, it’s fixed now”) recovers a surprising share. Check for duplicates from customers who retried.

10. Write down the cause and who to call next time.

A worked example: the key rotation

On a Friday afternoon, a store’s developer follows good security practice: a former contractor had dashboard access, so they roll the Stripe secret key. Stripe gives the option to expire the old key immediately. They choose it.

They forget that the key is pasted into the WooCommerce Stripe settings.

  • From 16:40 Friday, every checkout fails with an authentication error. Customers see “There was an error processing your payment”.
  • Failed orders pile up with identical notes. Cards aren’t declined; the request never got that far.
  • The owner checks on Saturday evening, sees a quiet day, and assumes it’s the weekend.
  • Monday 09:00: a customer phones. Reconnecting takes three minutes.

Roughly 64 hours of a store with no working payments, caused by a good security decision missing one step. With order volume monitoring, the drop would have been flagged by 18:00 on Friday.

Know your gateway’s warning signs

Message or symptom Likely cause
“Invalid API key” / “authentication” Keys rotated, revoked or wrong mode
“No such customer” / “no such payment method” on renewals Switched accounts or test/live mix
“Your account cannot currently make live charges” Account verification or restriction
Connection timeout / cURL error Network, firewall, TLS or gateway outage
Payment field doesn’t appear Script blocked, SSL problem, plugin incompatibility
Test card works, real cards don’t Test mode on the live site

Prevention

  • Treat API keys like passwords with an owner. Whoever rotates keys updates WooCommerce in the same sitting. Keep a short note of where every key is used.
  • Make sure gateway account emails reach someone who reads them: verification requests, payout holds, disabled methods.
  • Never leave test mode on. After testing, place one real low-value order to confirm live mode.
  • Keep staging on test keys, always.
  • Watch the SSL expiry date (or use auto-renewing certificates).
  • Keep a second payment method available for outages.
  • Monitor checkout and order volume automatically. A gateway failure is an absence of successful orders, and absences are exactly what people miss.

How Ordafide helps

A gateway failure doesn’t create stuck or mismatched orders so much as an absence of good ones. That’s why the most useful protection here is Pro’s monitoring.

Ordafide Pro:

  • Synthetic checkout monitoring every 15 minutes: shop, product, cart, checkout and the Store API, with response times. It catches checkout pages that break or slow down, including when an expired SSL certificate or broken page stops shoppers reaching payment. It never places orders, and it waits for two consecutive failures before raising a finding.
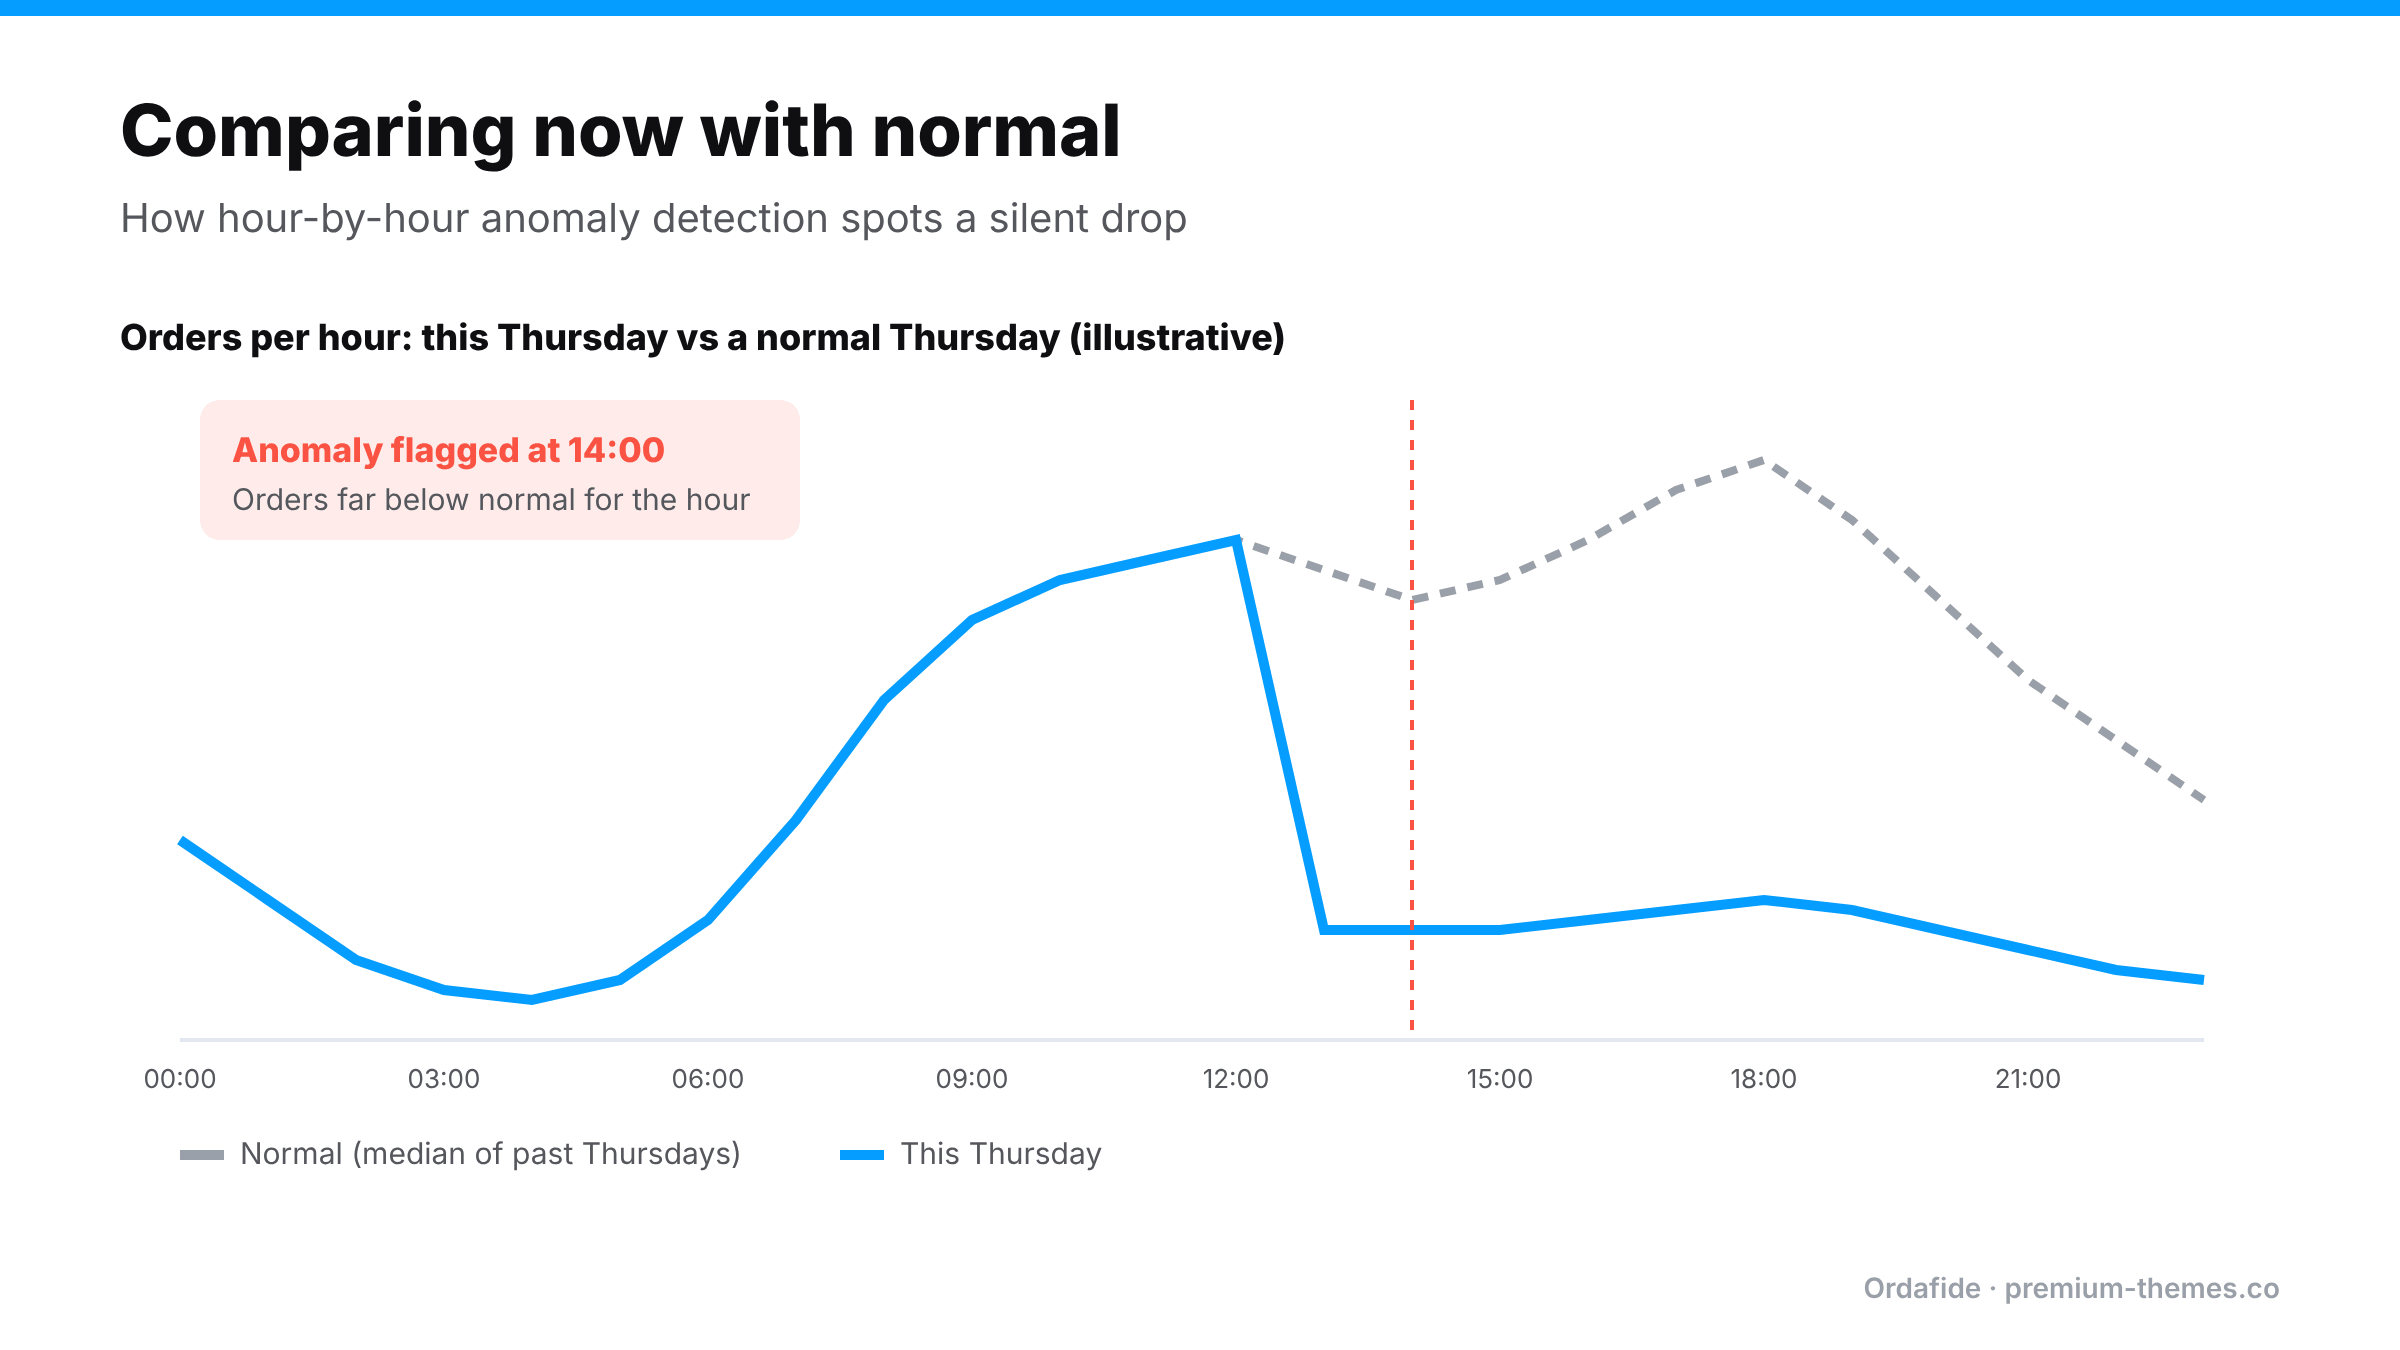
  • Order volume anomaly detection flags drops compared with comparable past hours. When a gateway connection breaks, successful orders fall away, and that’s the signal.
  • Read-only gateway reconciliation (Stripe, PayPal, Square, Mollie, Razorpay) compares what the gateway collected with WooCommerce, which helps spot payments landing somewhere unexpected, such as live charges taken by a staging copy.
  • Alerts to Slack, SMS, email or signed webhook, with severity routing, so a gateway failure on a Saturday night reaches your phone.

The free Ordafide plugin handles the clean-up. After an outage, customers retry, give up, and retry again. Ordafide’s duplicate charge, stuck payment and paid but cancelled checks find the orders caught mid-failure, and the Customer never emailed check finds paid customers who never got a confirmation.

Ordafide doesn’t hold or manage your gateway credentials for payments. Pro’s reconciliation uses read-only keys and can’t capture, refund or void anything.

Building a simple gateway runbook

Write one page, store it somewhere everyone can find it, and include:

  • Which gateways you use, which payment methods each provides, and which is the backup.
  • Who owns each gateway account and who can log in.
  • Where the keys are used (WooCommerce, other plugins, other systems) and the steps to rotate them safely.
  • The gateway’s status page and support contact.
  • The first five checks from the recovery section above.
  • Who to tell when payments fail: team, customers, ads.

When payments stop at 11 p.m. on a Saturday, a runbook turns panic into a ten-minute fix.

After an outage: the clean-up checklist

  • Failed orders during the outage reviewed. Any actually paid?
  • Duplicate orders from customers who retried, refunded from the duplicate order
  • Abandoned carts from the outage period contacted
  • Paid orders without confirmation emails found and resent
  • Gateway dashboard checked for charges with no matching order
  • Ads reviewed: spend during the outage, and whether to adjust budgets
  • Cause documented and the runbook updated
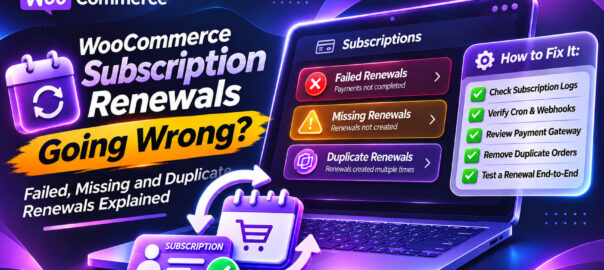
WooCommerce Subscription Renewals Going Wrong? Failed, Missing and Duplicate Renewals Explained

Subscriptions are the best revenue a store can have: predictable, recurring, and earned once. They’re also unforgiving when something goes wrong, because a renewal happens without the customer at the keyboard. Nobody sees an error message. Nobody clicks “try again”. If the renewal fails silently, you lose a month’s revenue. If it runs twice, a loyal customer finds two charges on their statement.

The forums show both sides. Threads on WordPress.org and elsewhere describe duplicate payments for subscription renewals, double charging on renewal, multiple payment intents on renewal even after payment succeeded, and renewals that simply never happened after an update or a change of payment plugin. WooCommerce maintains a whole troubleshooting page for common renewal issues.

This guide explains how renewals actually work, the three ways they go wrong, how to diagnose each, and how to catch them before your subscribers do.

This guide is about renewals in the official WooCommerce Subscriptions extension and similar plugins. Details vary by plugin and gateway, so check your plugin’s documentation for specifics.

How a renewal actually happens

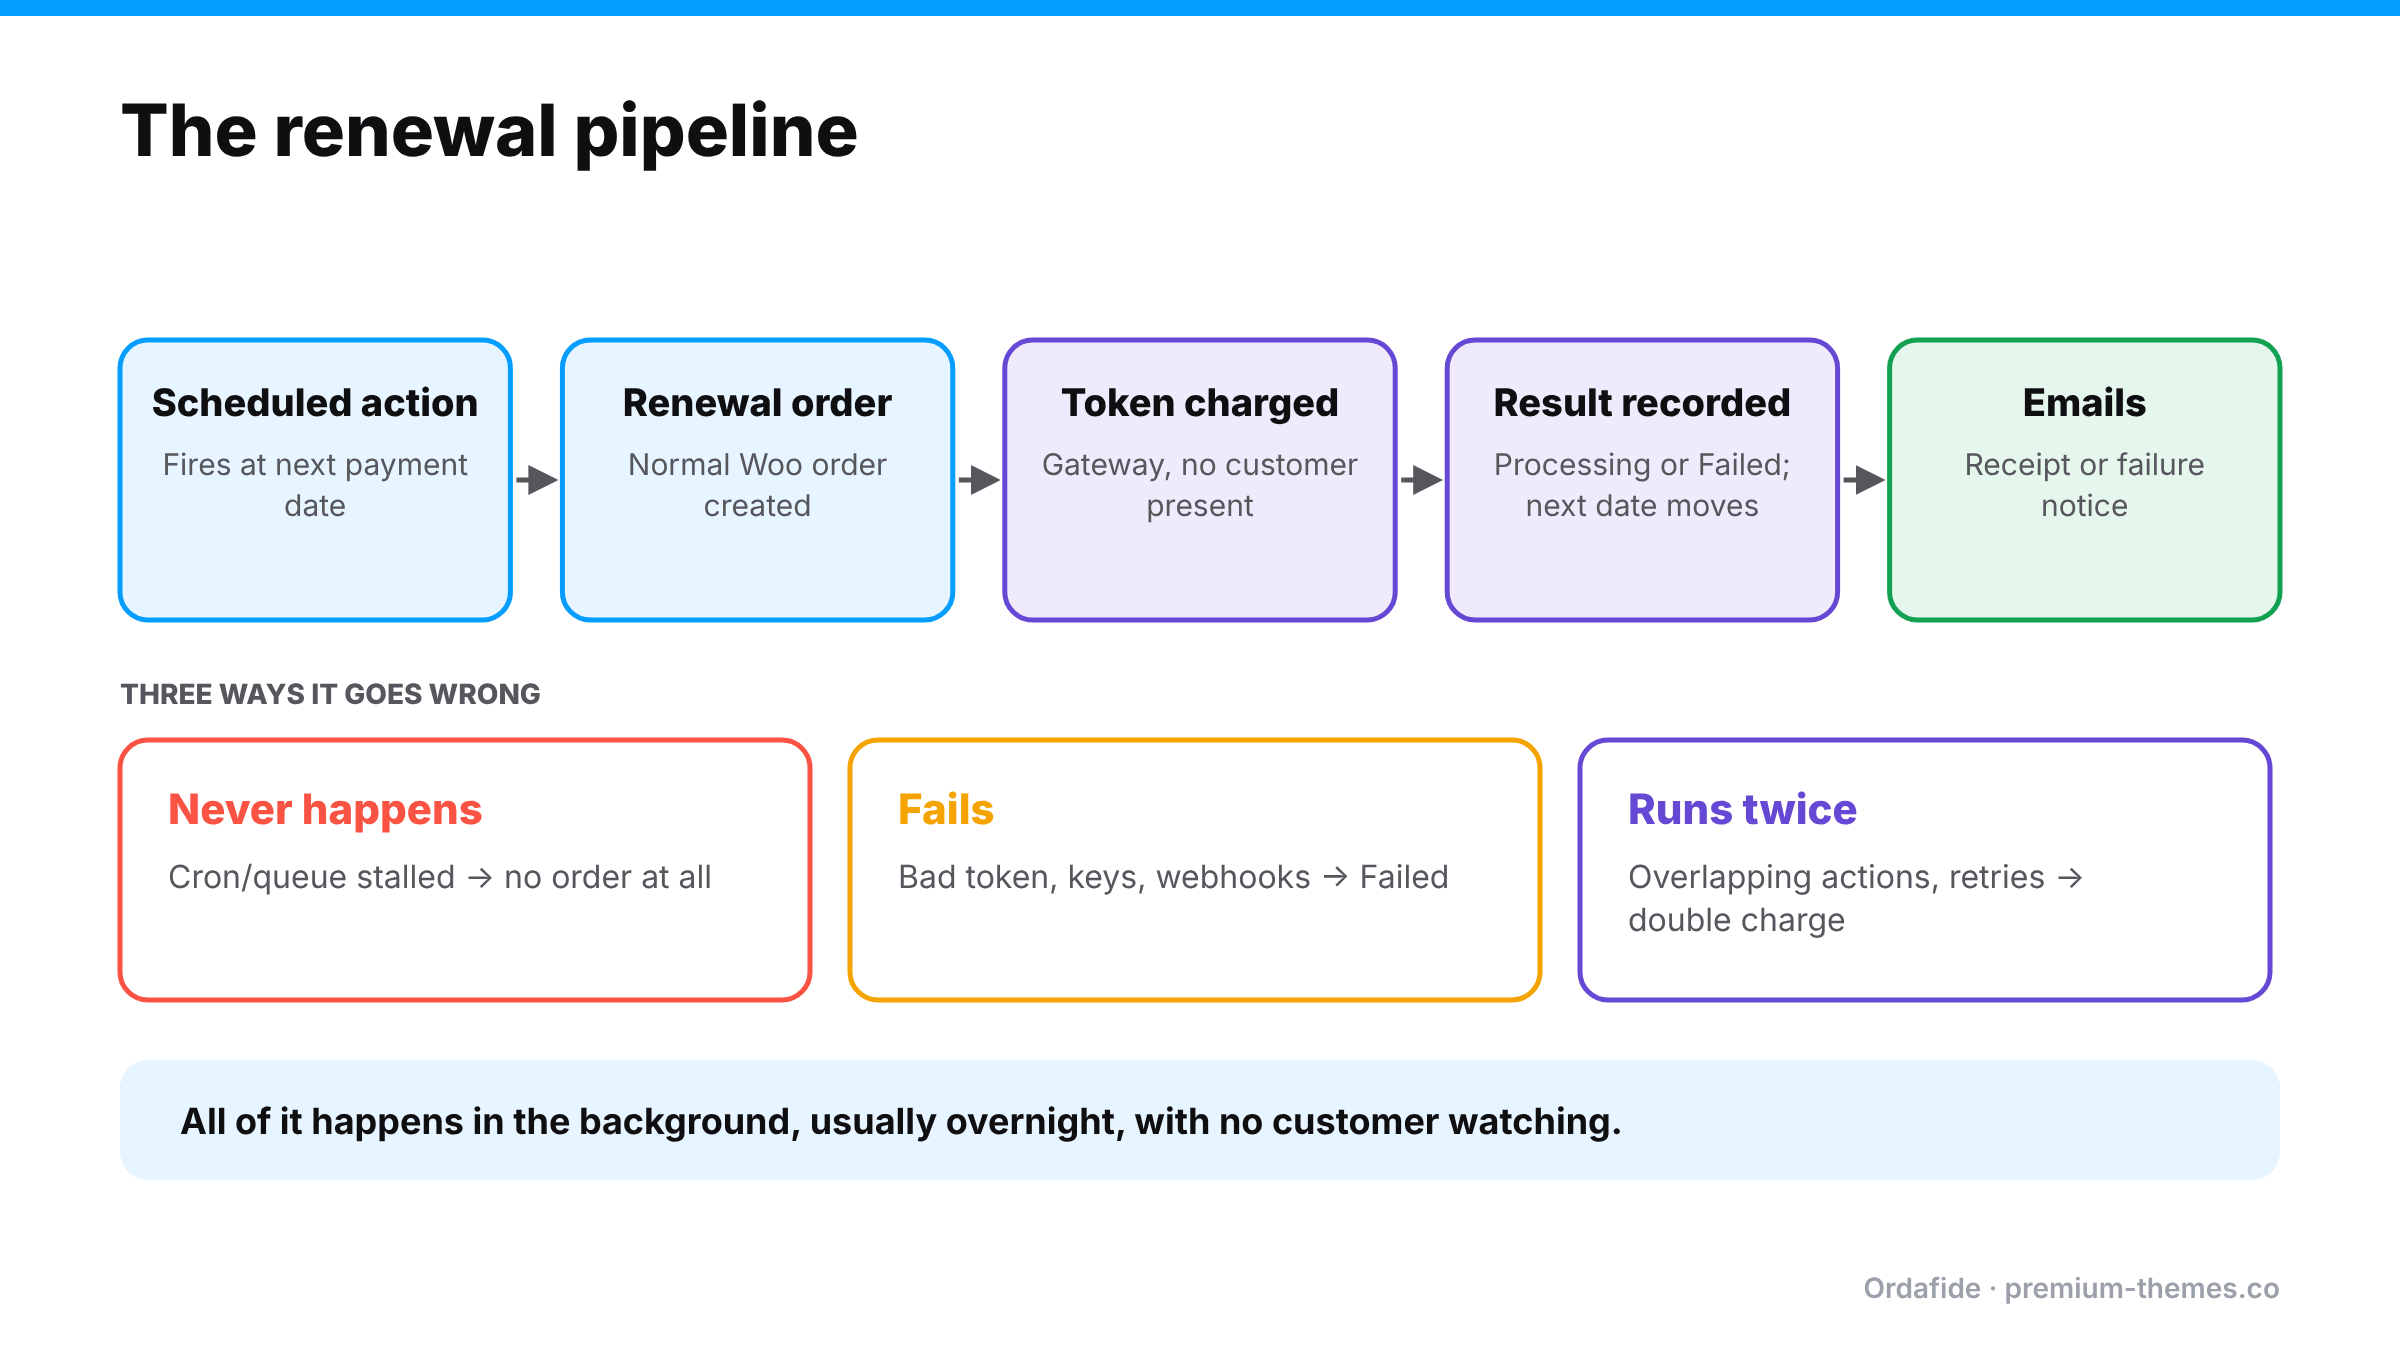
Subscription renewal pipeline: a scheduled action fires, a renewal order is created, the saved token is charged, the result is recorded and emails are sent. Three ways it fails: it never happens because cron or the queue stalled, it fails because of tokens, keys or webhooks, or it runs twice because of overlapping actions or retries.

A renewal is a chain of background events:

  1. A scheduled action fires at the next payment date. WooCommerce Subscriptions uses Action Scheduler for this (look for actions like woocommerce_scheduled_subscription_payment in WooCommerce → Status → Scheduled Actions).
  2. A renewal order is created, a normal WooCommerce order linked to the subscription.
  3. The gateway charges the saved payment method (a stored token) without the customer present.
  4. The result is recorded. The renewal order moves to Processing or Completed on success, or Failed on failure, and the subscription’s next payment date moves forward.
  5. Emails go out, and on failure, any retry rules are scheduled.

Every link in that chain can break, and because it all happens in the background, nothing alerts you by default.

Problem 1: Renewals that don’t happen at all

Symptoms: subscriptions show a next payment date in the past; no renewal order was created; revenue quietly drops; subscribers don’t notice (until they do).

Why: WooCommerce’s documentation is direct about it: renewals depend on scheduled actions, and if cron jobs aren’t running or the Action Scheduler queue fails, renewals aren’t created when expected. Common culprits:

  • WP-Cron disabled without a server cron, or loopback requests failing (guide)
  • A huge past-due backlog in Action Scheduler
  • PHP memory or time limits killing the renewal action
  • A site running in a staging / duplicate site mode, where renewal payments are deliberately not processed automatically

Diagnose: in Scheduled Actions, search for the subscription ID. Is the payment action pending and past due? Failed? Open it and read the log.

Fix: fix the scheduler, then let past-due renewals run. For individual subscriptions, WooCommerce documents creating a pending renewal order manually and processing it as a stopgap.

Problem 2: Renewals that fail

Symptoms: renewal orders in Failed status; subscriptions moved to On hold.

Why: most are ordinary: expired or declined cards, insufficient funds. But some are store-side:

  • Missing or invalid payment tokens, for example after switching payment plugins, migrating gateways, or when a staging site processed renewals against the same customer records
  • Gateway authentication errors: expired API keys, a disconnected account (guide)
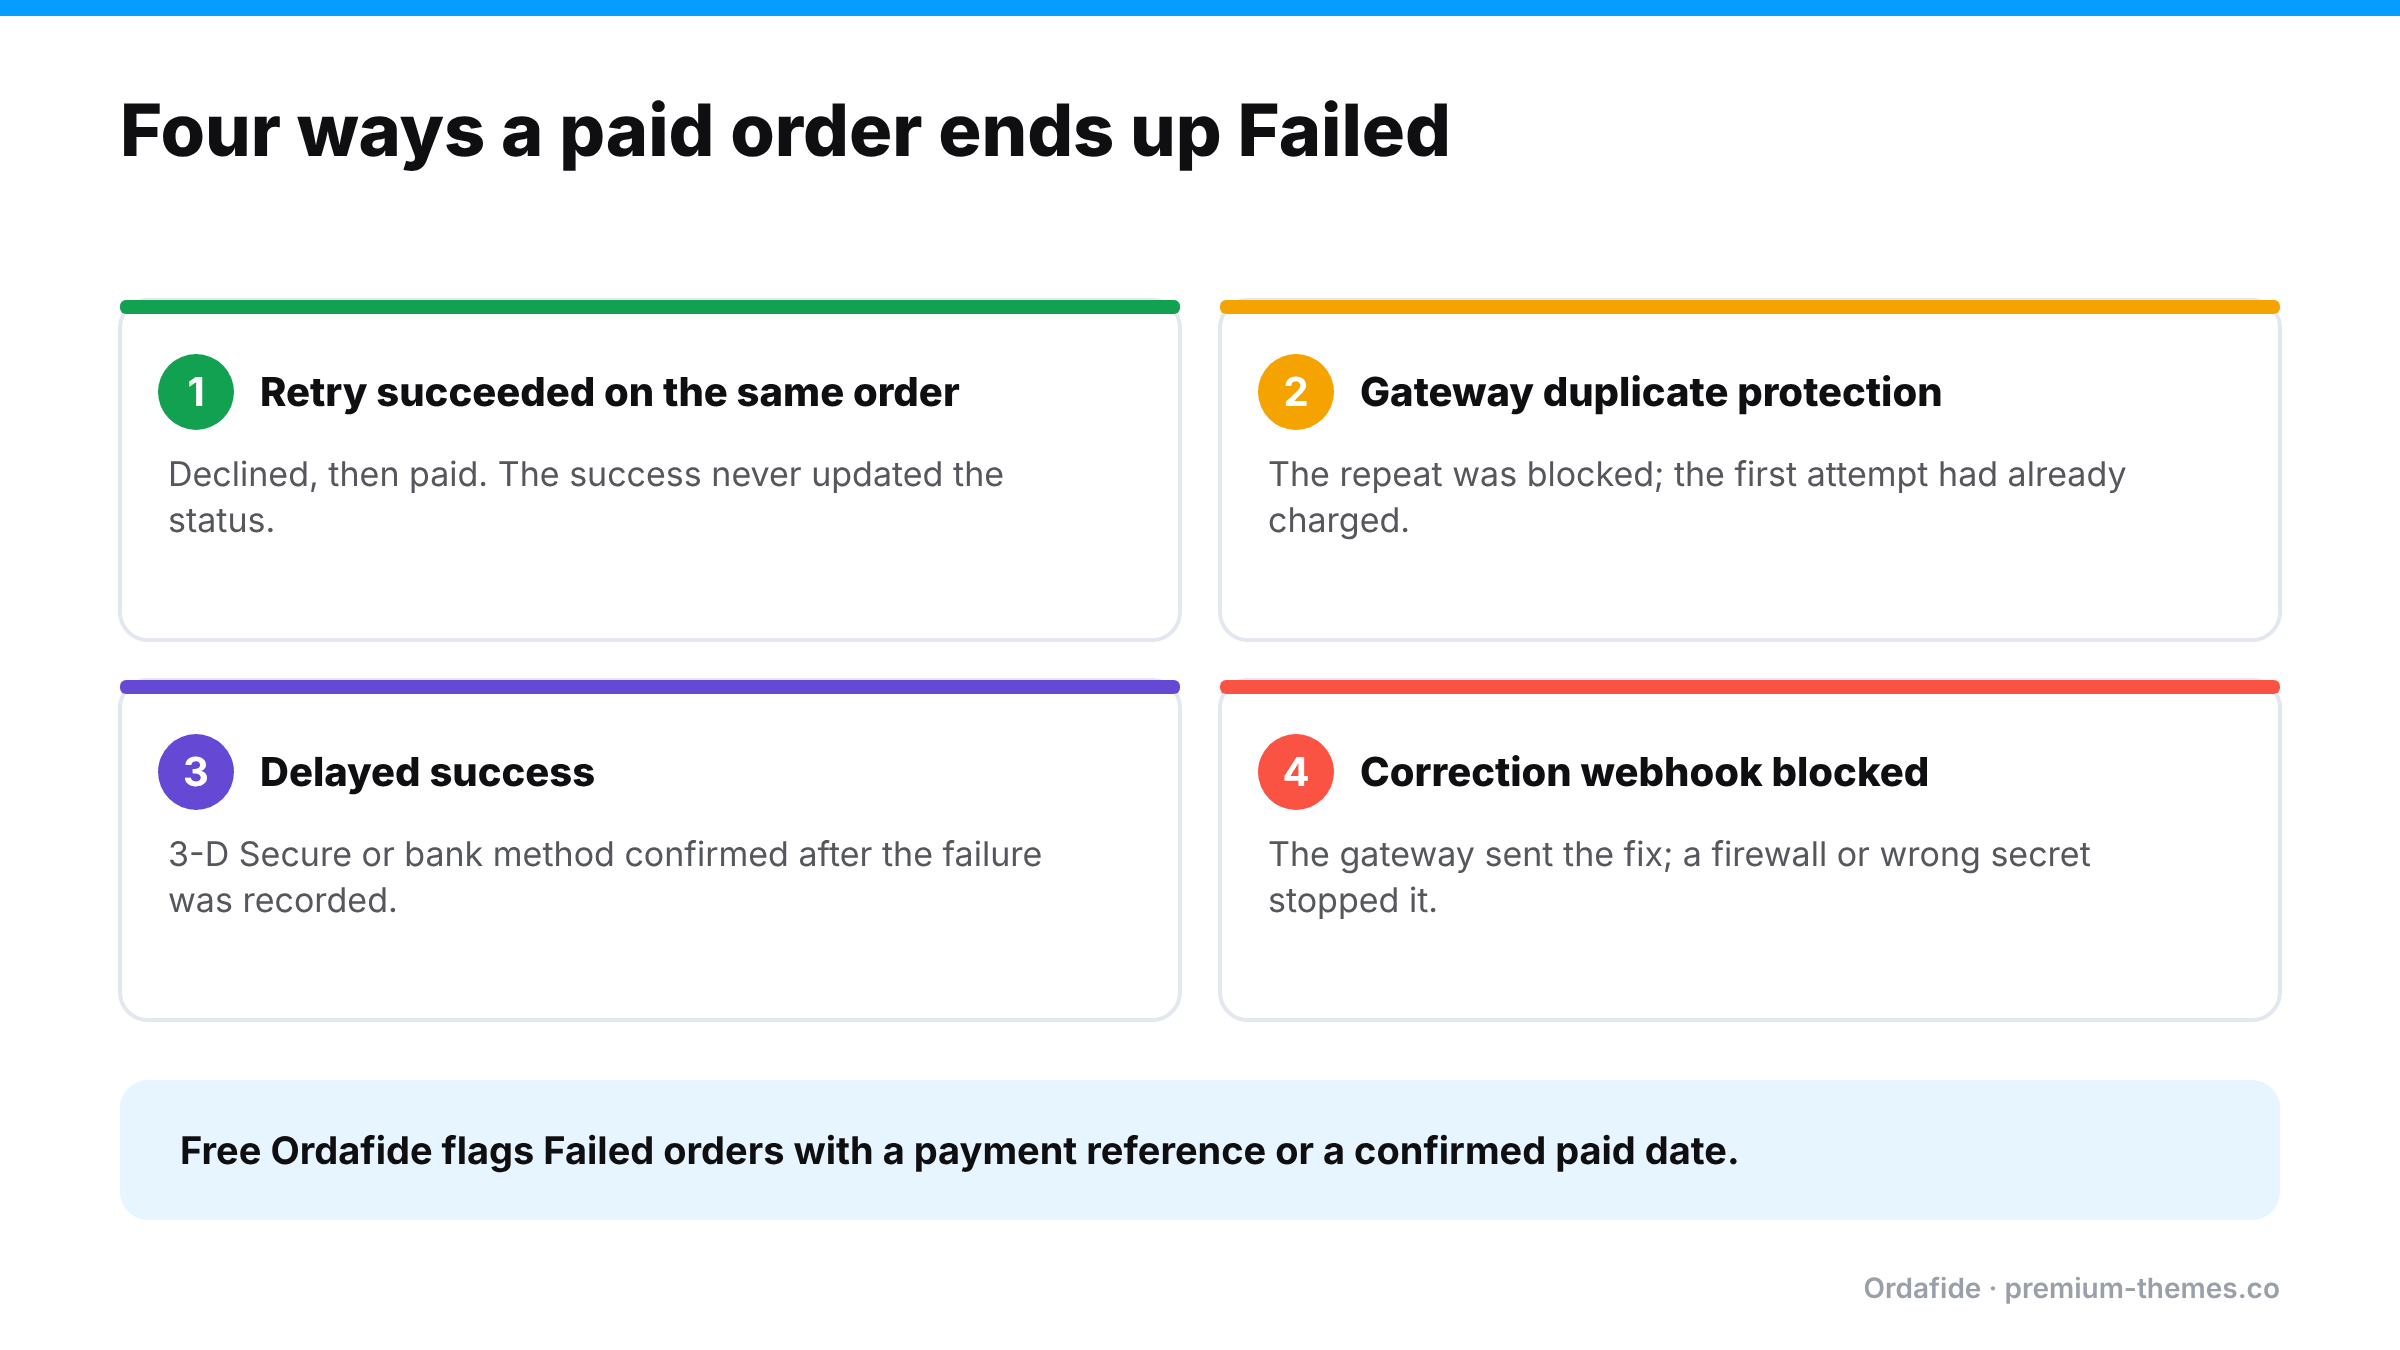
  • Webhook problems leaving a successful charge recorded as failed (Failed orders guide)

Diagnose: read the renewal order’s notes and the gateway logs. Does the subscription have a saved payment token? Did the gateway actually decline, or did the store fail to ask?

Fix: genuine declines → customer updates their payment method, and a retry system recovers many. Store-side failures → fix the token, keys or webhook, then process the renewal again. Before retrying, check the gateway to make sure the “failed” renewal didn’t actually succeed. Otherwise you create the next problem.

Problem 3: Duplicate renewals (charged twice)

Symptoms: two renewal orders for the same subscription and period; two charges on the customer’s card; angry email or a “duplicate processing” chargeback.

Why: WooCommerce’s troubleshooting guide lists the usual causes:

  • Overlapping scheduled actions: more than one payment action for the same subscription and timestamp
  • Manual actions (clicking Process renewal or Create pending renewal order) on a renewal that was already in progress
  • Conflicting plugins or custom code triggering renewals
  • Retrying a “failed” renewal that had actually succeeded at the gateway
  • Gateway retries after timeouts where the first attempt went through

Diagnose: in Scheduled Actions, look for multiple payment actions with the same subscription ID and timestamp. In the gateway, count the charges for that customer and period.

Fix: refund the duplicate from the duplicate renewal order (so WooCommerce and the gateway agree), cancel duplicate actions, check the subscription’s next payment date, and remove the cause.

A worked example: the overnight double renewal

A store with 600 monthly subscribers moves to a new host. During the migration, the old and new servers both run for a few hours, and both have WP-Cron active, pointing at the same database.

  • At 02:00, the old server’s scheduler picks up 40 due renewals and starts charging them.
  • At 02:01, the new server’s scheduler picks up the same actions before they’re marked complete.
  • 31 subscribers are charged twice. The second set of renewal orders sit next to the first, with different transaction IDs and identical totals, a minute apart.
  • The first complaint arrives at 08:30. By 10:00 there are nine, and one chargeback.

The fix: refund every duplicate from the duplicate renewal order, check each subscription’s next payment date, and switch off the scheduler on the old server. The lesson is never run two copies of a store against the same database with background processing switched on, and for subscription stores, put staging and migration copies into a mode that doesn’t process renewals.

Preparing before a change that could affect renewals

Before you migrate hosts, change payment plugins, update the subscriptions extension or edit renewal-related code:

  1. Note when renewals usually run and how many are due in the next few days.
  2. Pause or schedule the change away from big renewal batches.
  3. Make sure only one environment can process renewals.
  4. Afterwards, check Scheduled Actions for past-due and duplicate payment actions.
  5. Compare the next day’s renewal orders and gateway charges.

Why renewal problems hide so well

  • They happen in the background, often overnight.
  • They’re spread out: a few subscriptions a day, not a dramatic outage.
  • Failed renewals look normal, because cards do expire.
  • Missing renewals leave no order at all. There’s nothing to look at.
  • Duplicates are noticed by customers first, on their statement.

So the realistic goal is: notice within a day that the renewal machinery has stalled, that a renewal was charged twice, or that a “failed” renewal was actually paid.

How Ordafide helps with renewals

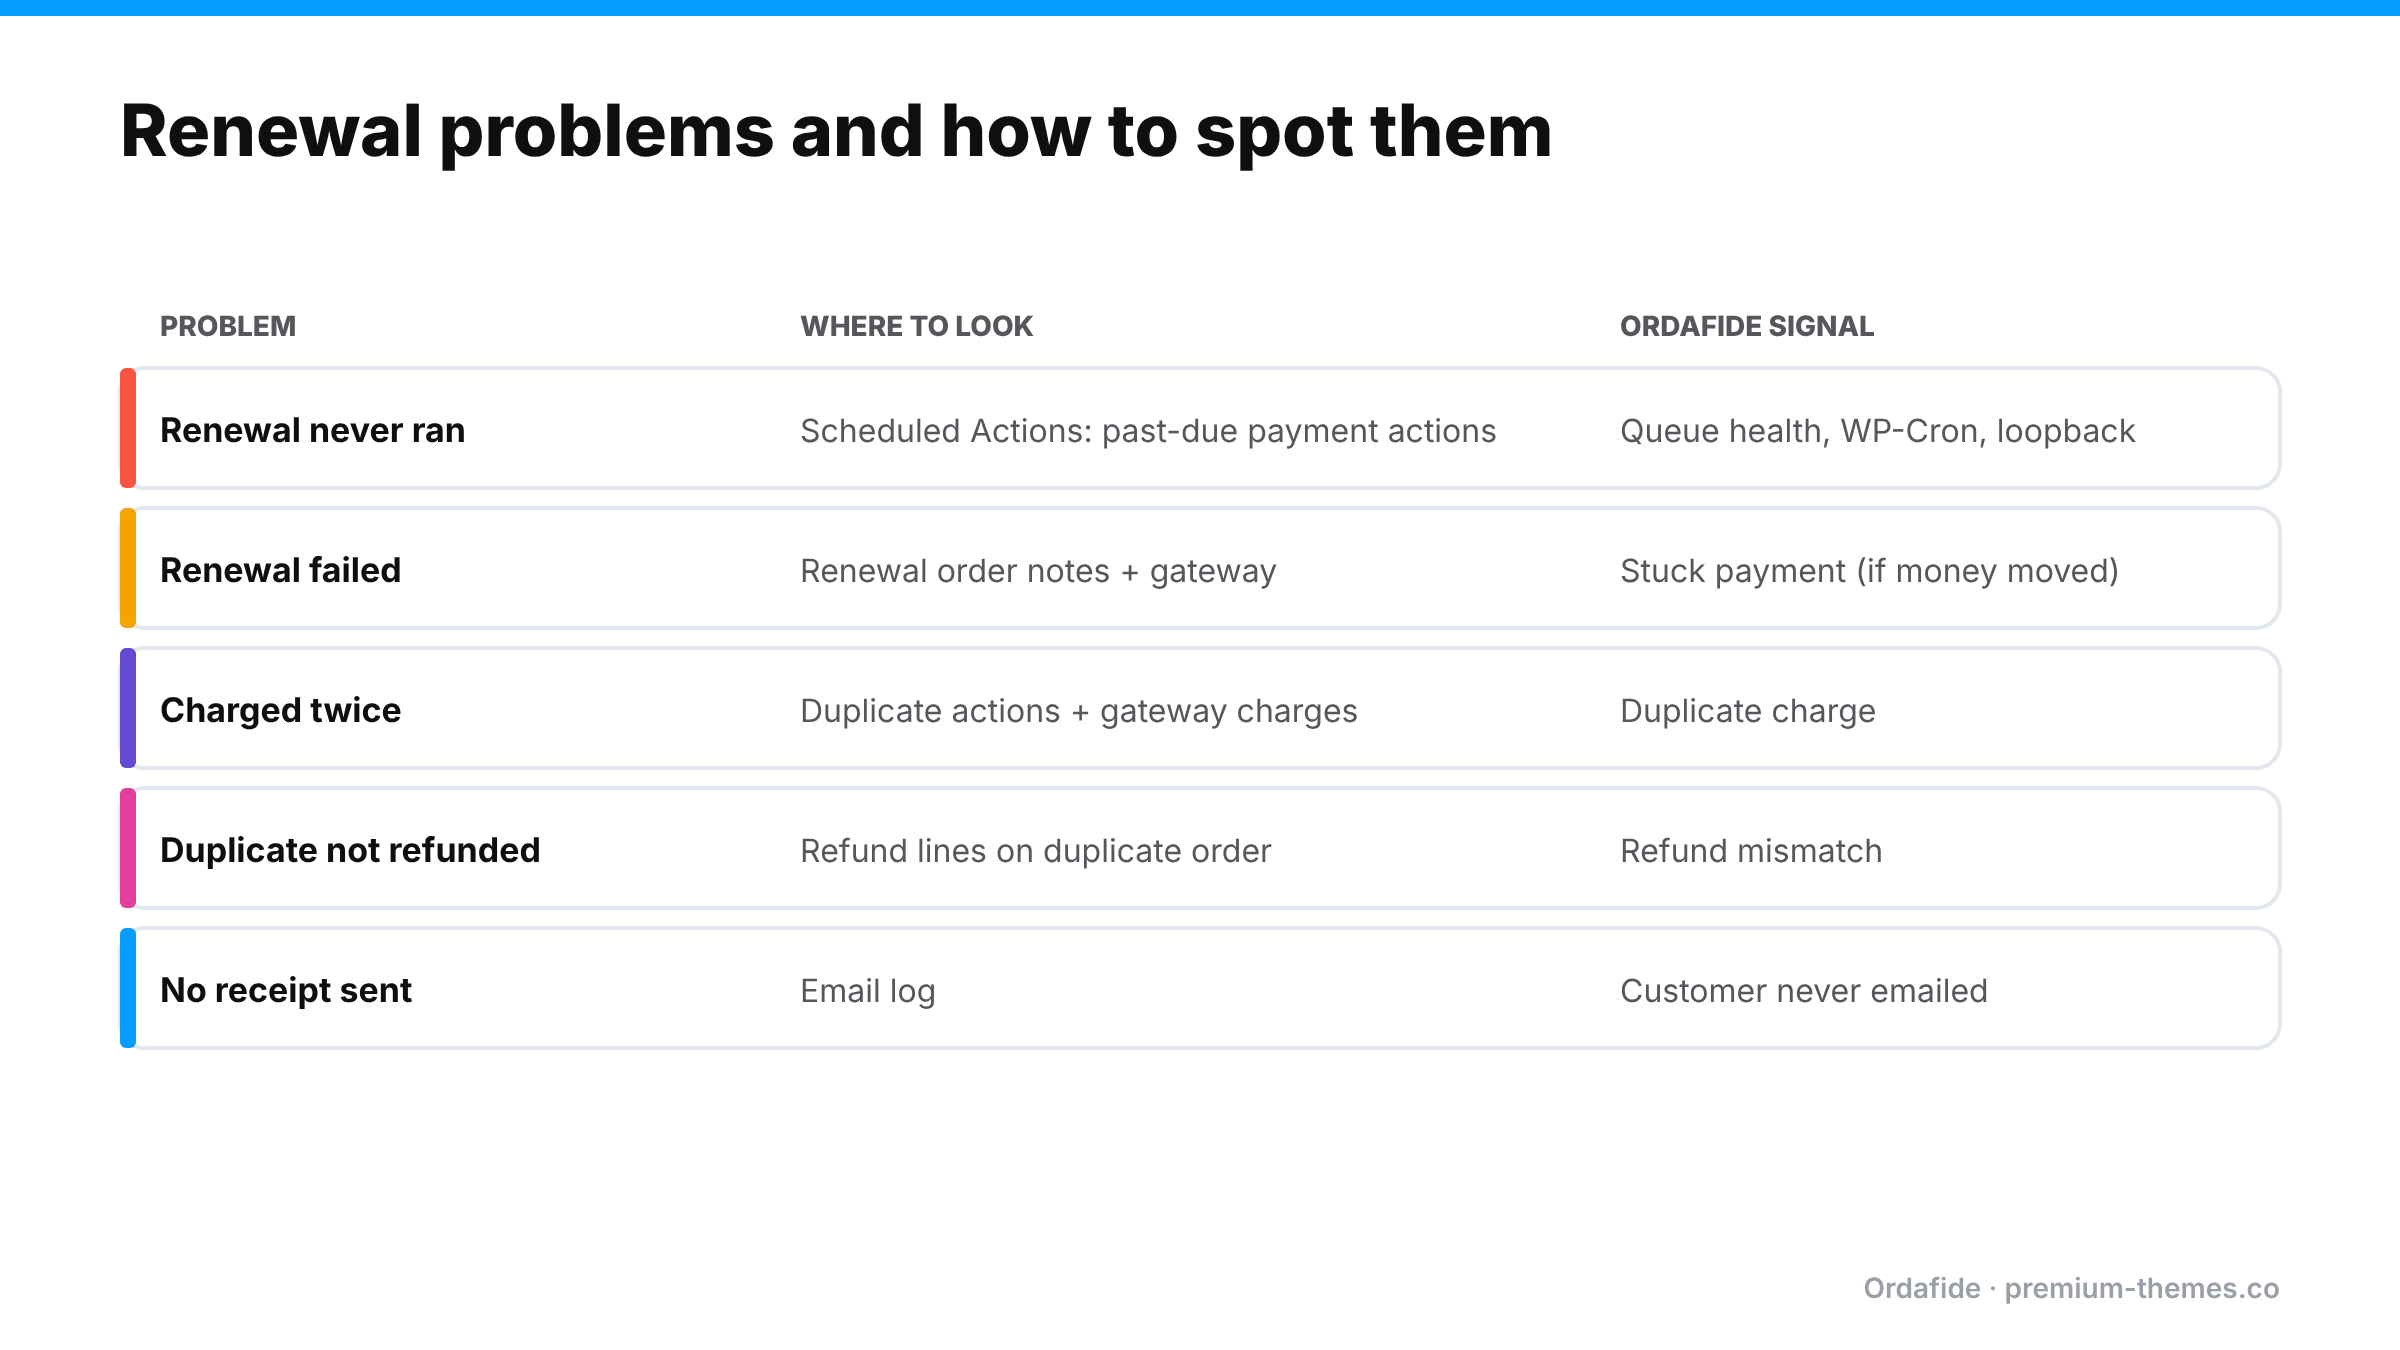
Table of renewal problems: renewal never ran (check past-due actions; Ordafide queue health), renewal failed (order notes and gateway; stuck payment check), charged twice (duplicate actions; duplicate charge check), duplicate not refunded (refund mismatch check), no receipt (email log; customer never emailed check).

Renewal orders are ordinary WooCommerce orders, so Ordafide’s checks apply to them like any other order, and its store health checks watch the scheduler that renewals depend on.

Ordafide Order Integrity for WooCommerce (free):

  • Background job queue health: how far behind Action Scheduler is, how many jobs have failed, and the most likely cause in plain language, plus WP-Cron status and a loopback test. When this goes red, renewals are at risk.
  • Duplicate charge: one gateway payment reference on two orders, or the same customer charged twice for an identical basket within minutes. That covers the classic double renewal from overlapping actions, which usually fire close together. The duplicate window is configurable if your duplicates arrive further apart.
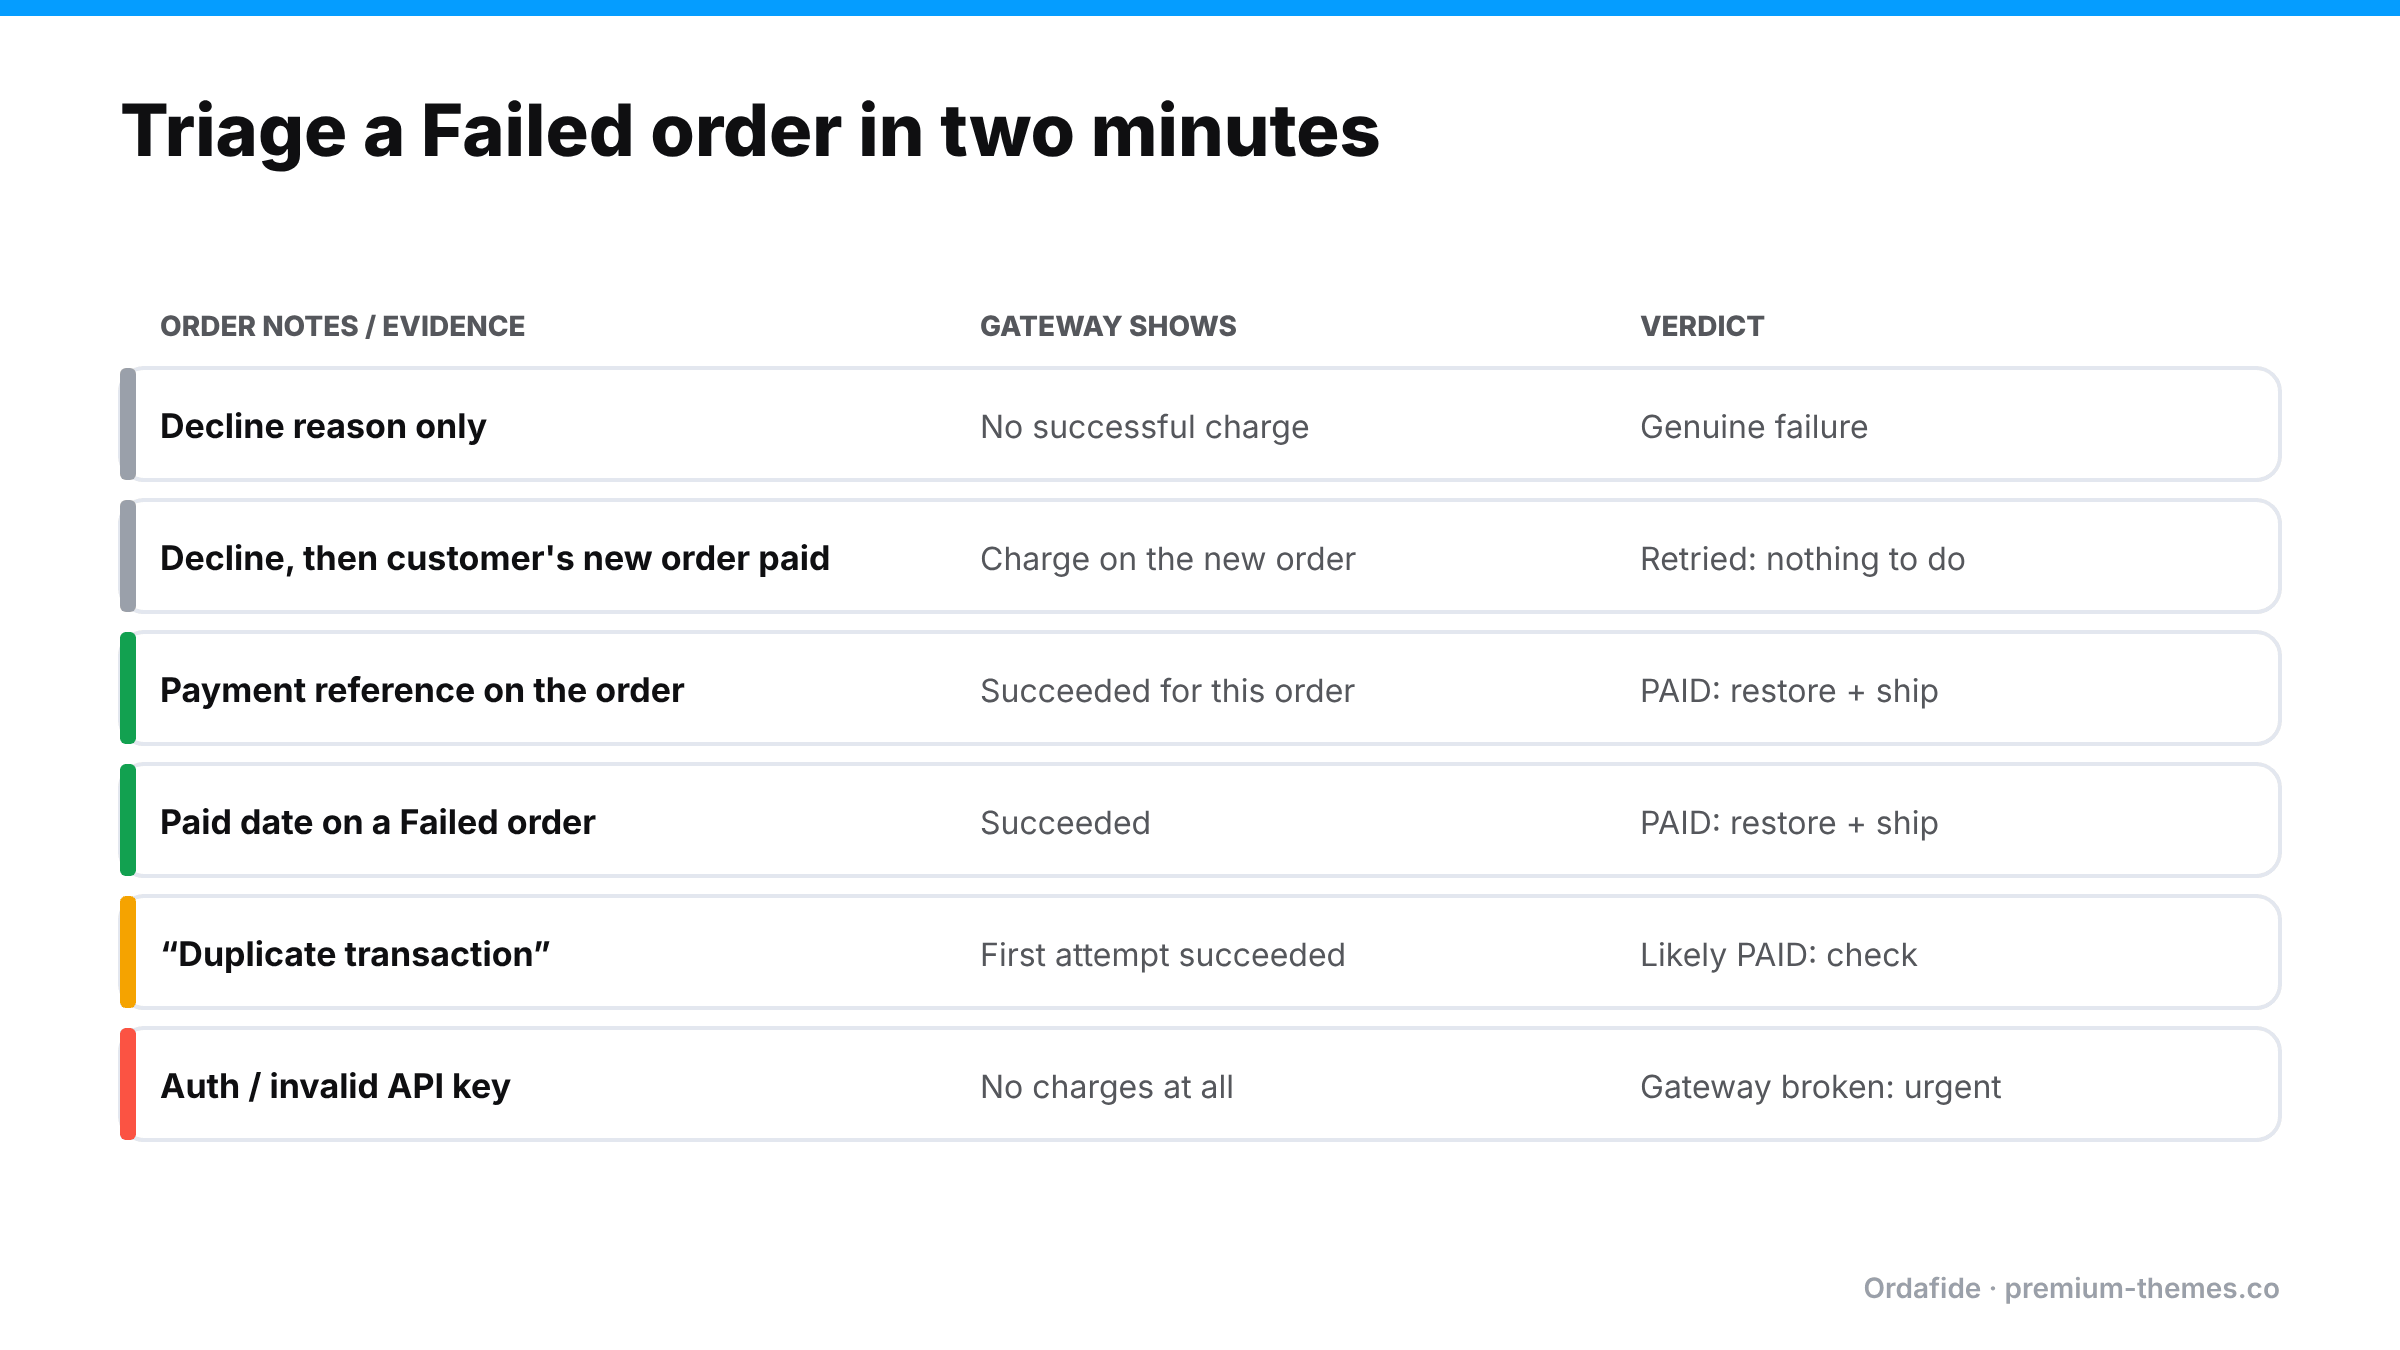
  • Stuck payment and paid but cancelled: renewal orders left Pending or Failed even though a payment reference or confirmed payment date shows money moved.
  • Refund mismatch: for the clean-up afterwards, to make sure duplicate renewals were actually refunded and recorded.
  • Customer never emailed: paid renewals where the receipt never went out.

Ordafide Pro adds:

  • Gateway reconciliation (Stripe, PayPal, Square, Mollie, Razorpay; read-only): catches renewal charges with no matching order, orders marked paid with no payment, and amount disagreements.
  • Order volume anomaly detection: a sudden drop in orders at the hour renewals usually run is a signal that the scheduler has stalled.
  • Alerts to Slack, SMS, email or webhook, so a queue backlog or a run of duplicates reaches you the same day.

Ordafide doesn’t manage subscriptions, retry payments or change renewal dates. Those stay with your subscriptions plugin. It tells you when the orders and the money stop agreeing, and when the machinery behind renewals has stopped.

Renewal health checklist

  • Real server cron running WP-Cron; loopback test passing
  • No large past-due backlog in Scheduled Actions
  • No duplicate payment actions for the same subscription and date
  • Staging sites never process live renewals (test keys, staging mode)
  • Gateway API keys valid; webhooks delivering
  • Failed renewals checked against the gateway before retrying
  • Duplicate renewals refunded from the duplicate order
  • Monitoring and alerts on queue health and duplicate charges

Communicating with affected subscribers

Subscribers are your most loyal customers, so renewal problems deserve a personal touch:

  • Charged twice: refund immediately, email before they notice if you can, and say clearly that it was your error and the duplicate has been refunded.
  • Renewal missed: decide whether to charge now (and tell them first) or skip the period. Surprising someone with a late charge invites disputes.
  • Renewal failed because of your setup (not their card): don’t send them a “please update your card” email. Fix your side, retry, and only contact them if needed.

A weekly renewal check (10 minutes)

  1. Scheduled Actions: search for pending subscription payment actions that are past due. Any?
  2. Failed tab: any failed renewal actions this week? Read the error.
  3. Renewal orders: filter recent orders to renewals. Any Failed? Any duplicates for the same subscription and date?
  4. Gateway: do renewal charges in the gateway match renewal orders?
  5. Subscriptions: any active subscriptions with a next payment date in the past?
  6. Integrity scan: check Ordafide’s findings for duplicate charges and stuck payments.

Most weeks it’s empty. The week it isn’t, you’ll catch the problem days before subscribers do.

Switching to HPOS? A WooCommerce Order Integrity Checklist for Before and After Migration

High-Performance Order Storage (HPOS) is the biggest change to how WooCommerce stores orders in the platform’s history. Instead of keeping orders in the WordPress posts and postmeta tables, where they shared space with blog posts and pages, HPOS stores them in dedicated order tables designed for the job. New stores use it by default, and WooCommerce has been encouraging established stores to switch.

For most stores the switch is smooth. But the WordPress.org forums have a steady trickle of threads that show what can go wrong: “HPOS doesn’t complete order sync”, “HPOS sync is not working”, “Reports not working when HPOS enabled”, “HPOS disabled after sync”. Integrations that stop receiving orders after an update are another common complaint, usually from a plugin that reads orders the old way.

Your orders are your business records. This checklist is about making sure the move doesn’t quietly damage them: what to check before, how to migrate with a safety net, and how to verify afterwards that every order still adds up.

What actually changes

Legacy (posts) storage HPOS
Where orders live wp_posts + wp_postmeta Dedicated wc_orders tables (plus related tables)
How plugins should read orders WooCommerce CRUD functions (or directly from posts, which many old plugins did) Only through WooCommerce CRUD functions
Performance Slows as order and post volume grow Designed to scale
Admin order screen Posts list screen WooCommerce’s own orders screen

The key risk is in the second row. Plugins that read or write order data directly from the posts tables, instead of through WooCommerce’s order functions, won’t see orders stored in HPOS tables, or will write data WooCommerce no longer reads. That’s how integrations “stop syncing” and reports go blank.

Phase 1: Before you switch

1. Audit plugin compatibility

WooCommerce shows a compatibility notice on WooCommerce → Settings → Advanced → Features listing extensions that haven’t declared HPOS compatibility. WooCommerce’s guidance is to enable HPOS only once all the extensions you use are compatible.

Pay special attention to plugins that touch orders:

  • payment gateways
  • shipping, fulfilment and label plugins
  • accounting, ERP, CRM and marketplace integrations
  • invoicing and PDF plugins
  • subscription, booking and membership plugins
  • custom code in your theme or a site plugin (search it for direct queries on shop_order posts)

2. Take a baseline snapshot

Before changing anything, record numbers you can compare afterwards:

  • Order count by status (Processing, Completed, On hold, Refunded, Failed, Cancelled, Pending)
  • Total revenue and refunds for the last full month, from WooCommerce Analytics and your gateway
  • A handful of specific orders you know well (a complex one with coupons, a partial refund, a subscription renewal, a multi-currency order): note their totals, items, notes and statuses

3. Back up

Full database backup, tested restore. Non-negotiable.

4. Clean up first

Fix existing order problems before migration, so you don’t carry them across and then blame HPOS. Stuck payments, refund mismatches and totals that don’t add up are easier to explain before the switch than after. (The free Ordafide scan is a quick way to establish this baseline.)

5. Rehearse on staging

Run the full migration on a staging copy first, with test payment keys. Test the order flows your store actually uses.

Phase 2: Migrating with a safety net

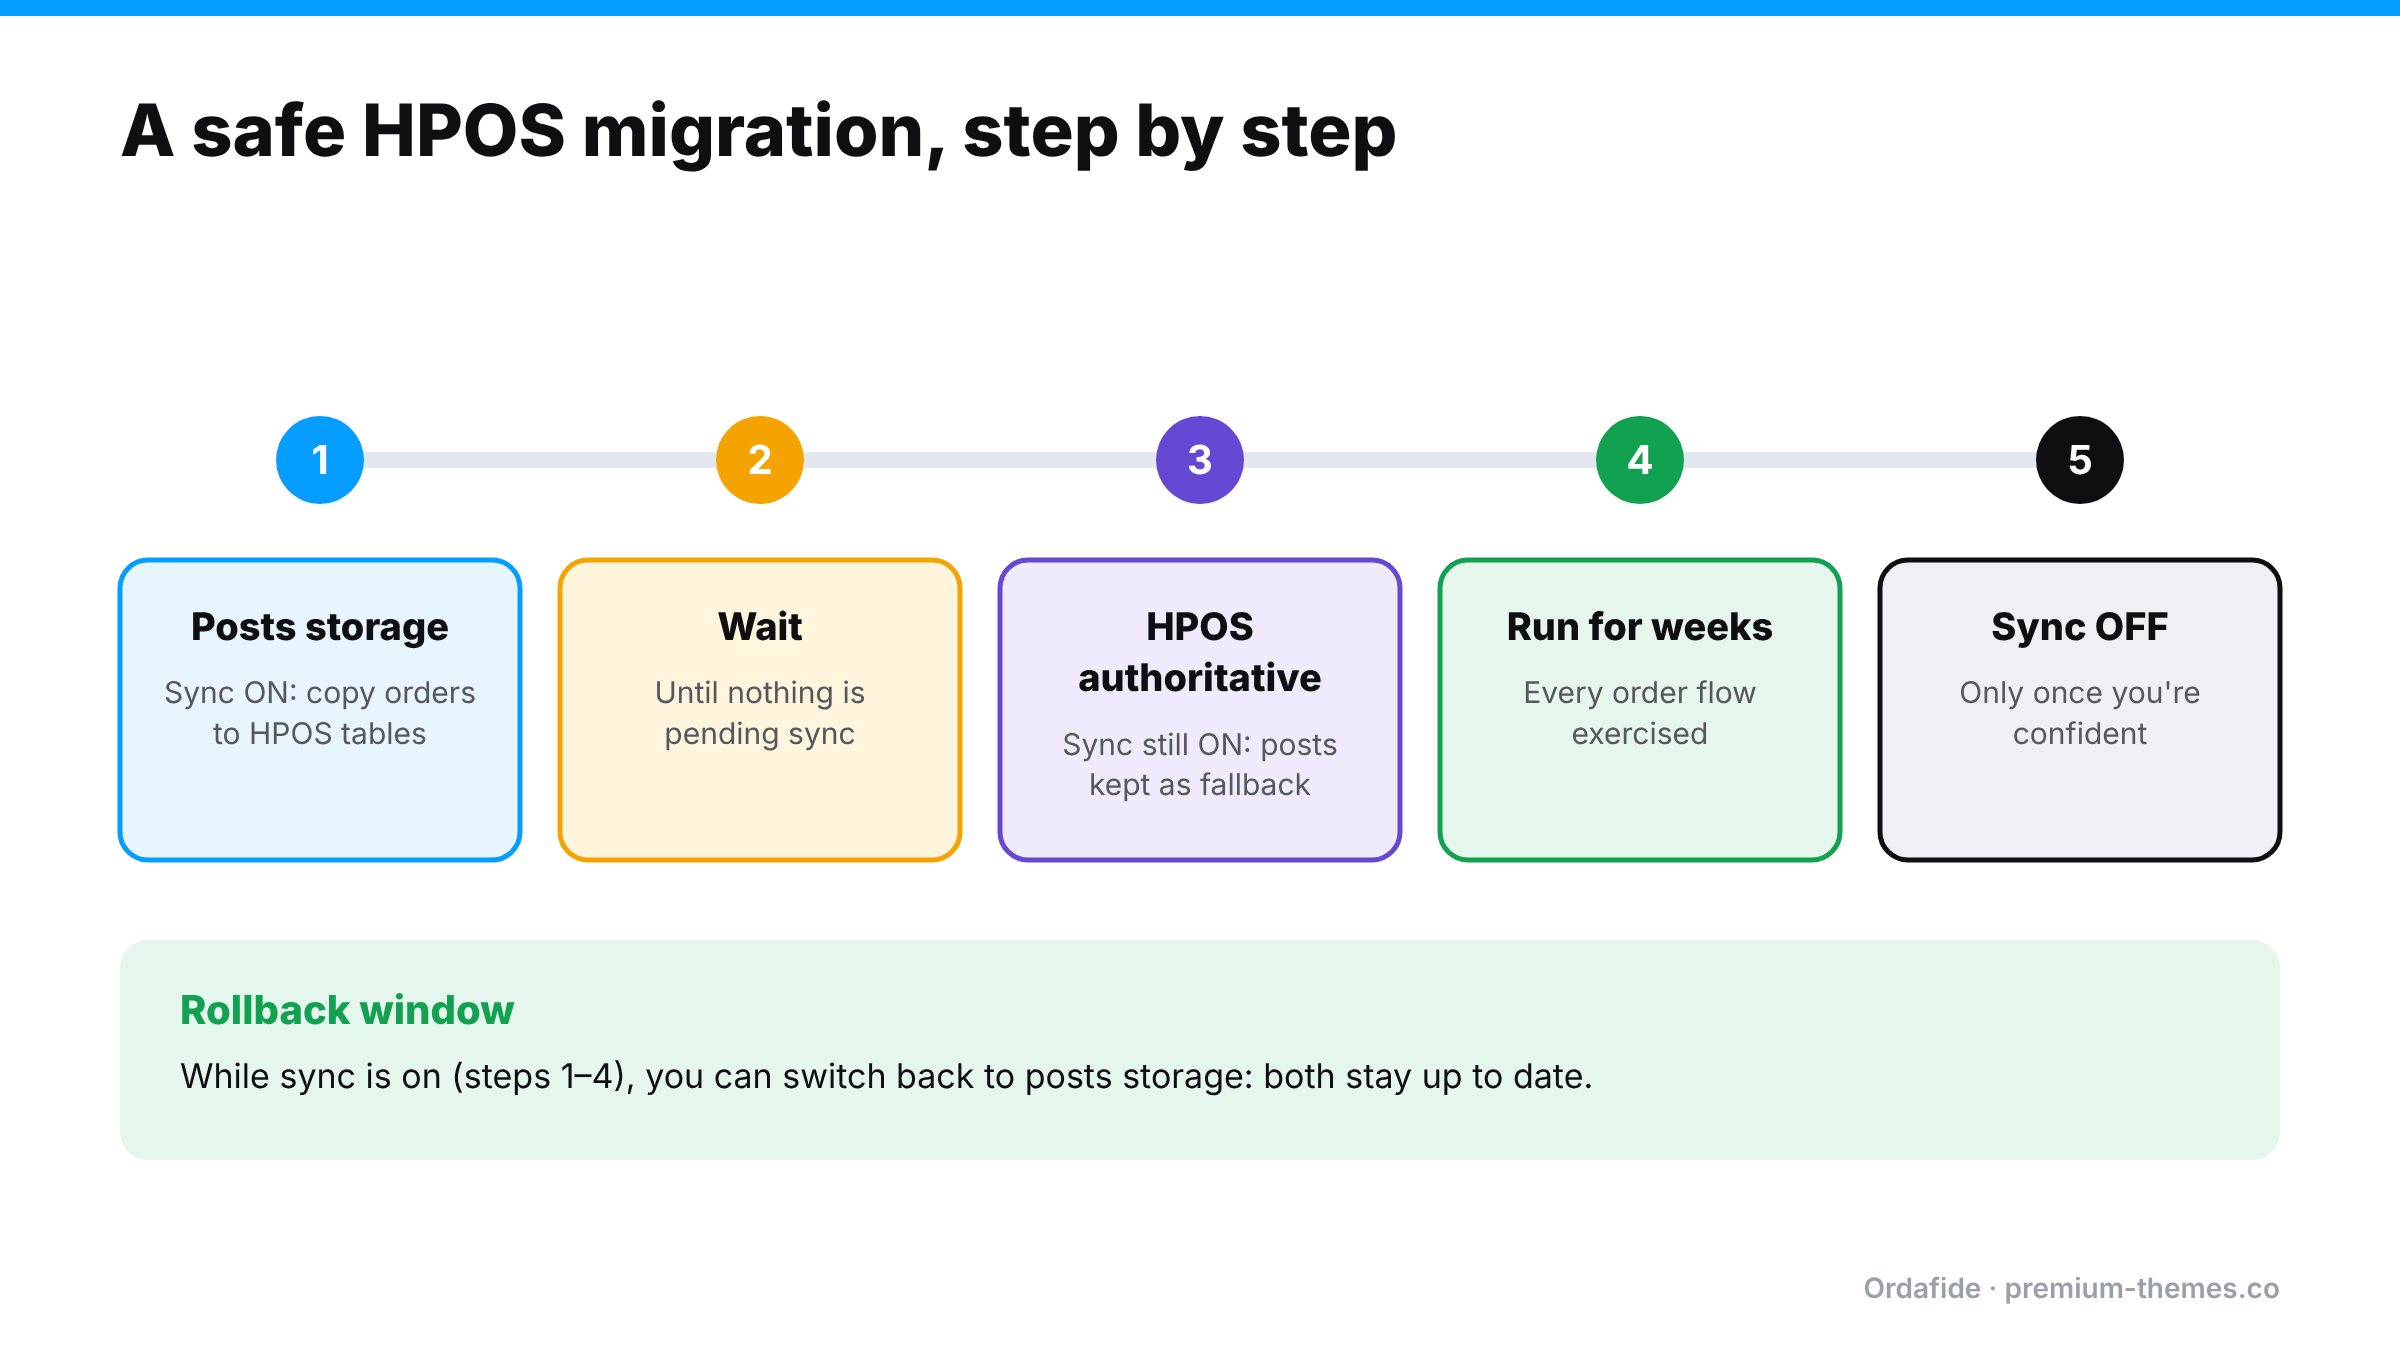
Five-step HPOS migration: enable sync while on posts storage, wait until sync completes, switch to HPOS as authoritative with sync still on, run for weeks exercising every order flow, then turn sync off once confident. While sync is on you can roll back to posts storage.

WooCommerce’s migration uses synchronization as its safety net. Under WooCommerce → Settings → Advanced → Features (custom data stores in some versions), you can keep the posts table and the new order tables in sync. WooCommerce’s developers describe sync as a temporary failsafe.

A cautious sequence:

  1. Enable sync while still using posts storage. WooCommerce copies existing orders into the HPOS tables in the background. On large stores this takes time and relies on background processing, so make sure your Action Scheduler and WP-Cron are healthy first. (Loopback / WP-Cron guide)
  2. Wait until sync is complete. The settings page tells you when orders are pending sync. Don’t switch until it’s done.
  3. Switch authoritative storage to HPOS, keeping sync on. Now HPOS is the source of truth, and the posts table is still updated as a fallback.
  4. Run for a while with sync on, long enough for every order flow to happen at least a few times: new orders, refunds, renewals, cancellations.
  5. Only then consider turning sync off, which removes the overhead of writing to both places.

If something breaks while sync is on, you can switch back to posts storage, because the data is still being written there. WooCommerce’s FAQ describes rollback in exactly these terms.

Sync isn’t free: writing every change to two places adds overhead. That’s the trade-off for safety during the transition.

Phase 3: Verifying afterwards

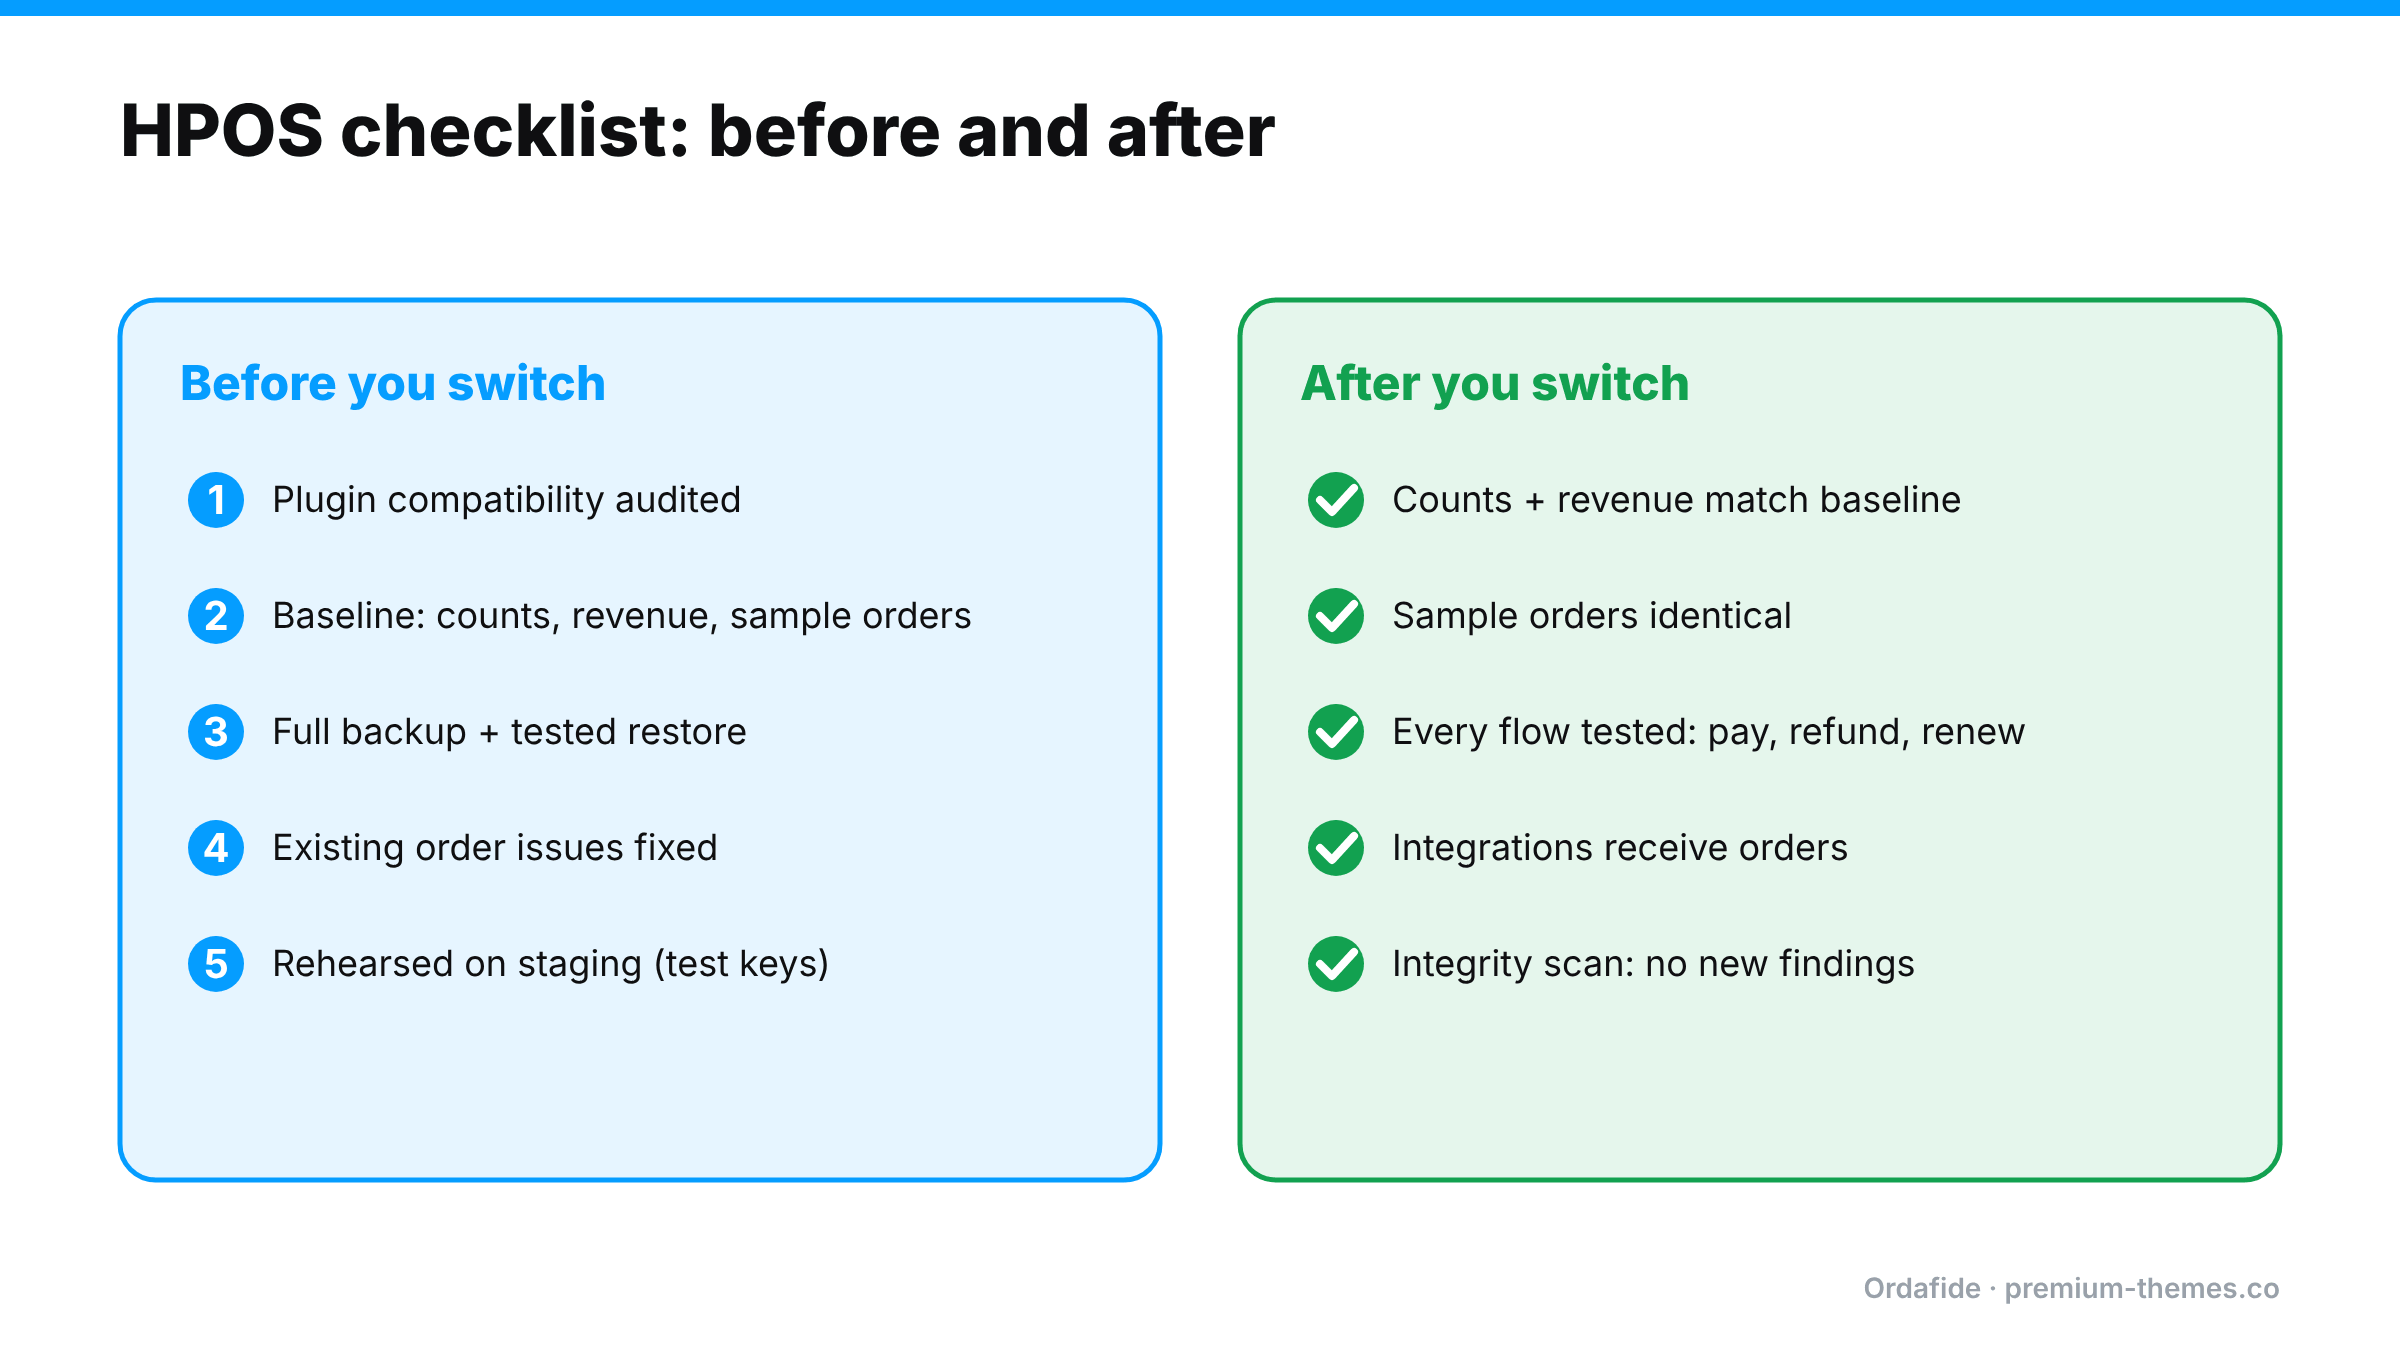
Two-column HPOS checklist. Before: audit plugin compatibility, record a baseline of counts, revenue and sample orders, back up, fix existing order issues, rehearse on staging. After: counts and revenue match, sample orders identical, every order flow tested, integrations receiving orders, and an integrity scan with no new findings.

This is the step most stores skip. “The orders page loads” is not verification.

Compare with your baseline

  • Order counts by status match
  • Revenue and refunds for the baseline month match in Analytics and the gateway
  • Your sample orders show identical totals, items, notes, customer details and statuses

Exercise every order flow

  • New order through every payment method → Processing, email sent
  • Partial and full refund from the order screen
  • Cancellation and failed payment
  • Subscription renewal (if used)
  • Order notes, custom fields and meta used by your plugins
  • Integrations: ERP, fulfilment, accounting, CRM all receive the new orders

Check order integrity across the store

  • No new stuck payments or paid-but-cancelled orders
  • No duplicate charges from integrations retrying
  • No refund mismatches
  • Order totals still add up (items + shipping + fees + tax = total)
  • Customers are still getting their emails
  • Reports: Analytics rebuilt and current

A worked example: the invoicing plugin

A store enables HPOS after its compatibility screen shows only one warning, for an older PDF invoice plugin the owner thinks is “just for printing”.

  • New orders work. Payments work. Emails work.
  • The invoice plugin, which reads order data directly from the posts table, starts producing invoices with missing line items for new orders, because the data isn’t in posts any more.
  • The plugin also writes the invoice number to post meta, so WooCommerce’s order screen no longer shows invoice numbers.
  • Three weeks later, the accountant notices invoice numbering gaps and invoices that don’t match order totals.

Because the store migrated with sync on, the fix was simple: switch authoritative storage back to posts, replace the invoice plugin with an HPOS-compatible one, then switch to HPOS again. Without sync, the store would have been untangling three weeks of mixed data.

The lesson: an “incompatible” warning on anything that touches orders deserves a fix before migration, not after.

Large stores: timing and load

  • Background sync on a store with hundreds of thousands of orders can take hours or days. Plan for it.
  • Sync relies on Action Scheduler. A healthy queue and a real server cron make it predictable.
  • Run the migration in a quiet period, not before a sale.
  • WooCommerce publishes a dedicated guide for enabling HPOS on large stores. It’s worth reading in full before you start.

How Ordafide fits an HPOS migration

Ordafide Order Integrity for WooCommerce is HPOS native. It declares HPOS compatibility and reads orders through the WooCommerce CRUD layer, so it behaves identically whether your store uses the new order tables or the legacy posts storage. That makes it useful on both sides of the switch:

  • Before: run a scan to establish a clean baseline: stuck payments, paid-but-cancelled orders, duplicate charges, refund mismatches, totals that don’t add up, customers never emailed. Fix what it finds.
  • After: run the same scan again. New findings point to something the migration or an incompatible plugin changed.
  • Scale: scans run in batches of 100 orders through Action Scheduler, with bounded queries, so even very large stores don’t time out.
  • Store health: Ordafide shows Action Scheduler backlog and failures and WP-Cron status, which is exactly what the background sync depends on.

To be clear about scope: Ordafide doesn’t compare the posts and HPOS tables row by row or perform the migration. WooCommerce’s sync does that. Ordafide checks that the orders themselves still make sense after the move.

Ordafide Pro adds gateway reconciliation (read-only, for Stripe, PayPal, Square, Mollie and Razorpay), a strong post-migration check because it compares orders against what the gateway actually collected, independently of how WooCommerce stores them. Its CSV/JSON audit export gives you a before-and-after record for your accountant.

The day-after-migration routine

For the first two weeks after switching, spend ten minutes a day on this:

  1. Check the Scheduled Actions queue for backlogs or failures.
  2. Open two or three new orders and confirm items, totals, notes and status look right.
  3. Check that integrations received yesterday’s orders.
  4. Run an integrity scan and compare with your baseline.
  5. Glance at Analytics and compare with the gateway.

If everything is quiet for two weeks, you can relax the routine, and consider whether it’s time to turn sync off.

What to tell your team

Before migrating, tell everyone who works with orders:

  • The orders screen will look different. HPOS uses WooCommerce’s own orders page rather than the posts list. Saved bookmarks and some admin URLs change.
  • Report anything odd immediately: missing fields, wrong totals, notes that don’t appear, an integration that goes quiet.
  • Don’t run bulk edits or imports during the sync window.
  • Who to contact if something looks wrong, and that you can roll back while sync is on.

Most post-migration problems are spotted first by the people who work in the orders screen every day.

Customer Says They Never Got the Order Email? How to Check, Prove and Resend in WooCommerce

“I placed an order three days ago and never got a confirmation. Did it go through?”

Every store gets this email. Usually the answer is simple: check the spam folder. But sometimes the email really never left your site, and sometimes it’s been failing for every customer for a week.

The trouble is that WooCommerce, out of the box, doesn’t give you an easy way to answer the question “was this specific email actually sent?” You can see the order. You can resend the email. But you can’t easily see whether the original made it to the mail server, or what happened to it there.

This guide walks through how to work out where an order email went missing, how to tell a one-customer problem from a store-wide one, and how to have the evidence ready next time.

The journey of an order email

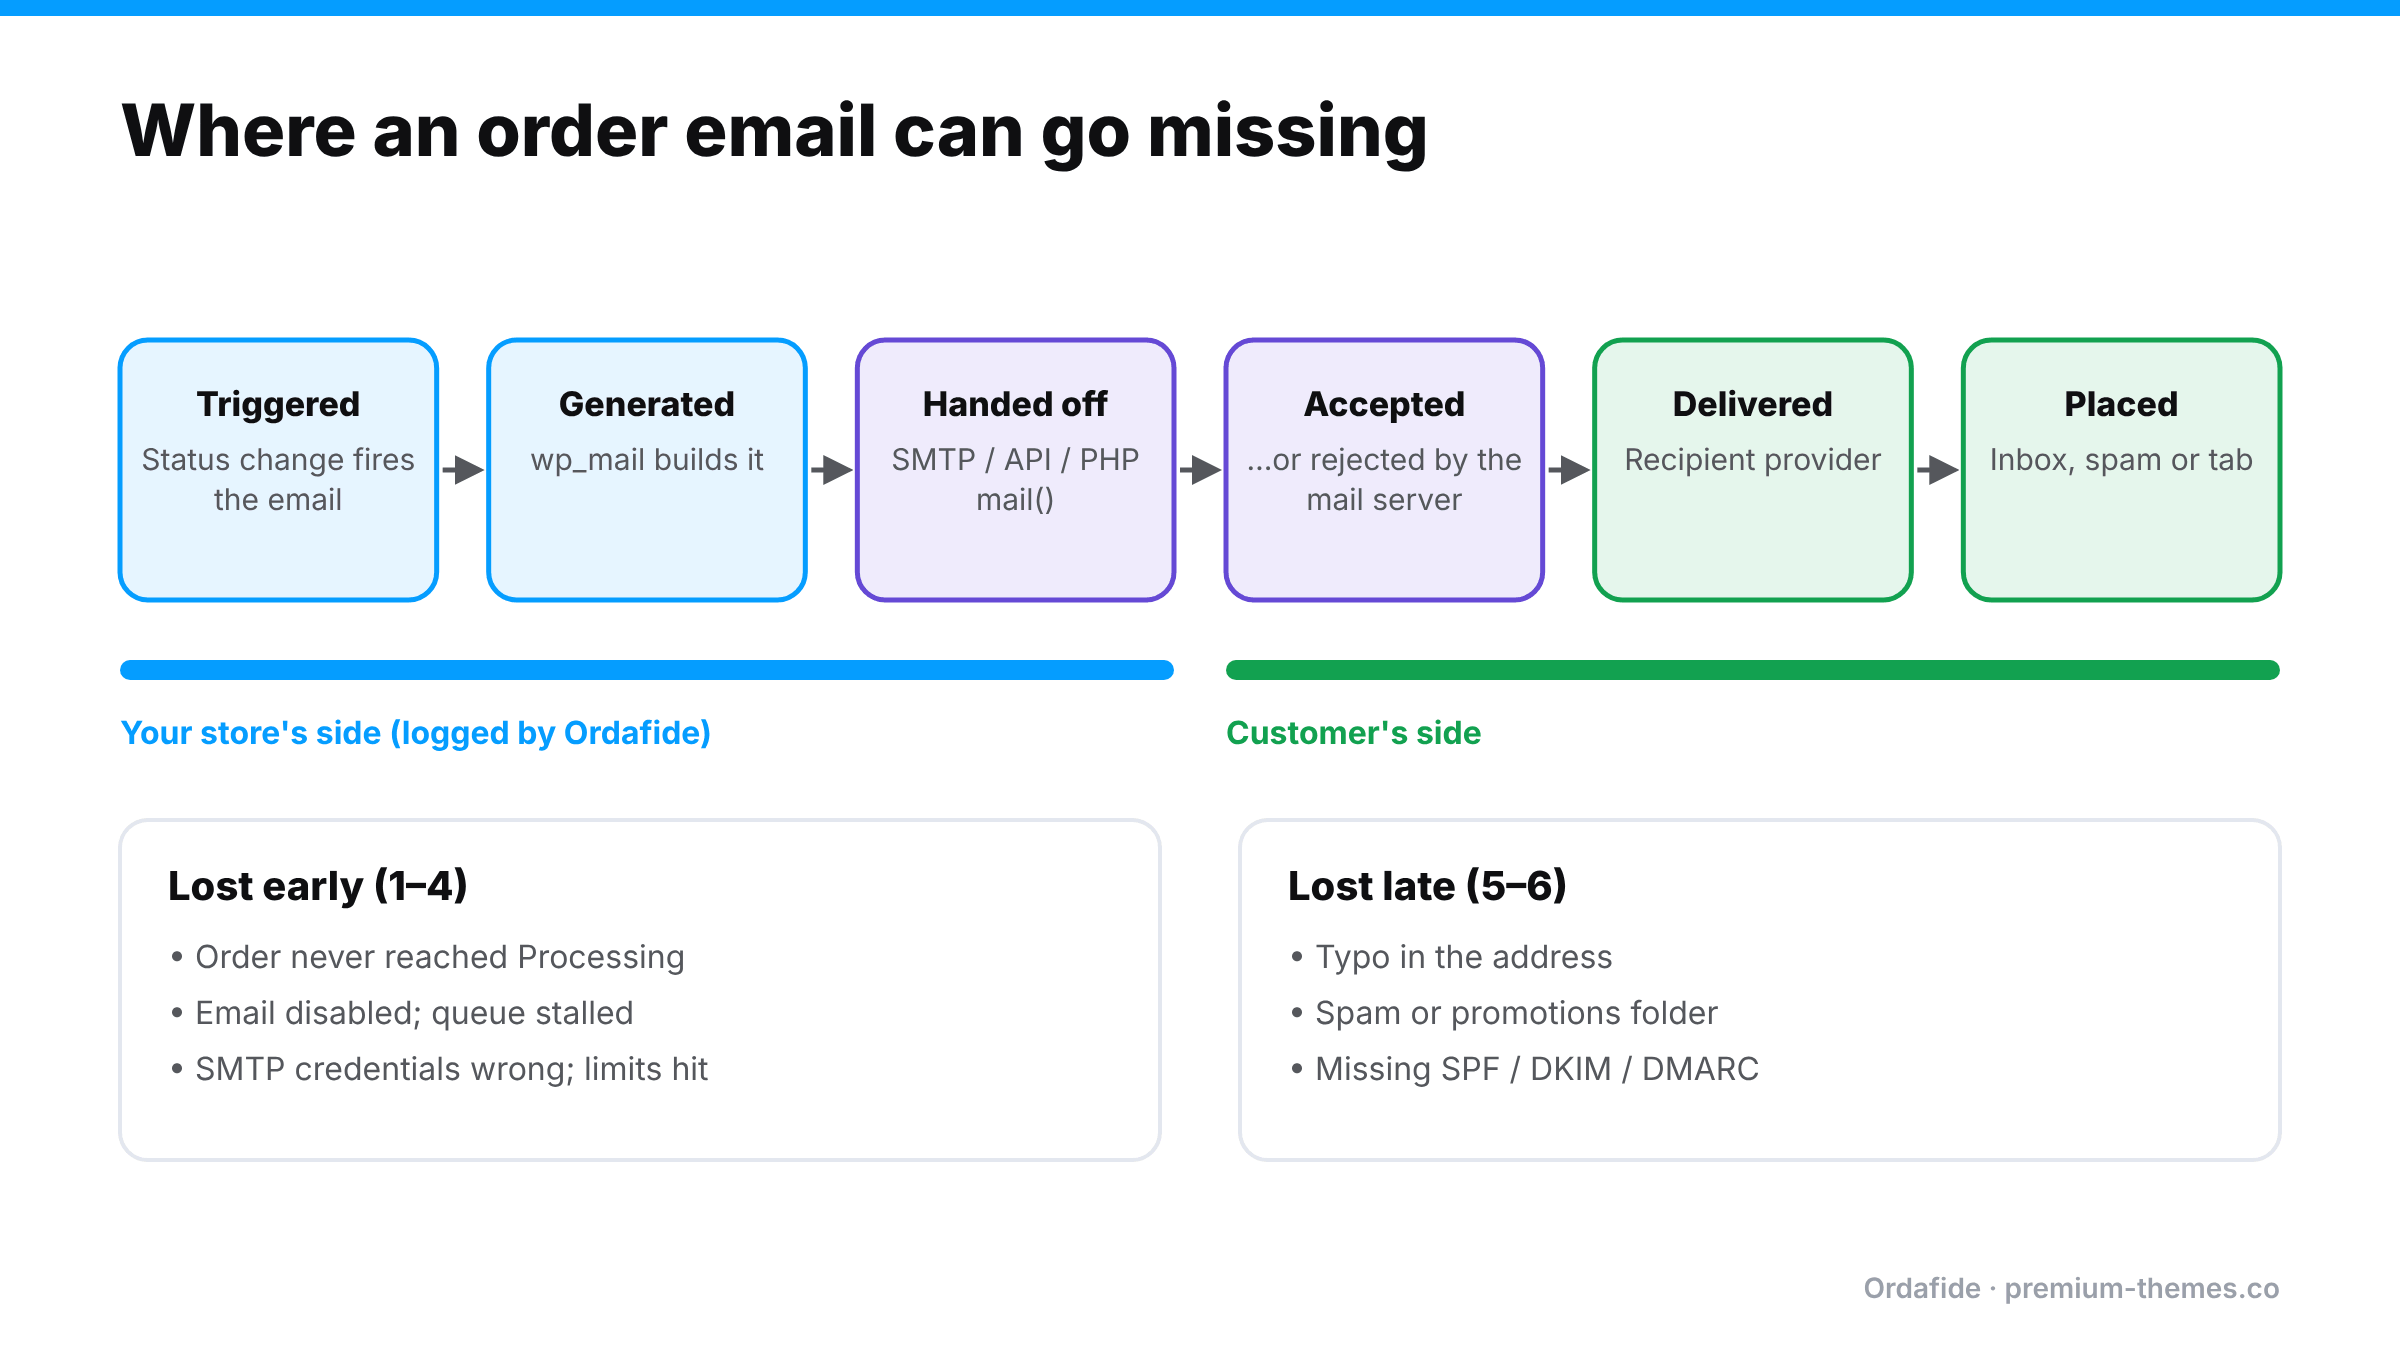
The six stages of an order email: triggered, generated, handed off, accepted or rejected, delivered, and placed in inbox or spam. The first four are on the store's side and can be logged; the last two are on the customer's side. Early losses include stuck orders, disabled emails, stalled queues and SMTP problems; late losses include typos, spam filtering and missing domain authentication.

An order confirmation passes through several stages, and it can be lost at any of them:

  1. Triggered. WooCommerce decides to send it when the order status changes (for example, to Processing).
  2. Generated. WordPress builds the email and hands it to its mailer (wp_mail).
  3. Handed off. The mailer passes it to a mail server: your host’s PHP mail(), or an SMTP or email API service.
  4. Accepted. The mail server accepts it for delivery, or rejects it (bad address, authentication failure, sending limits).
  5. Delivered. The recipient’s provider accepts it.
  6. Placed. It lands in the inbox, the spam folder, or a promotions tab.

WooCommerce’s job ends around stage 2. Everything after that is your mail setup and the customer’s provider.

Step 1: Was the email ever triggered?

  • Check the order status. Confirmation emails are tied to status changes. If the order is stuck on Pending payment or On hold, the “processing” confirmation was never triggered. That’s a payment problem, not an email problem. (Stuck pending orders)
  • Check the email is enabled. WooCommerce → Settings → Emails. Is Processing order enabled for customers?
  • Check the order notes. Some setups and plugins add notes when emails are sent.
  • Check the background queue. If emails depend on queued work and the queue is stalled, they’re waiting, not sent. (Loopback / WP-Cron)

Step 2: Was it handed to a mail server, and accepted?

This is where most stores have no evidence. Options:

  • An email log. Many SMTP plugins can log outgoing emails. A dedicated log shows the time, recipient, subject and whether sending succeeded.
  • Your email provider’s dashboard. If you send through an SMTP or API service, its activity log shows accepted, delivered, bounced and blocked messages, often searchable by recipient.
  • Your host’s mail logs. If you use PHP mail(), ask your host. Often there’s little to see, which is itself a reason to switch to a proper provider.

What you’re looking for:

  • No record at all: the email was never handed off (step 1 problem, or the mailer failed silently).
  • Rejected / failed: the mail server refused it. Look at the error (authentication, sending limit, invalid recipient).
  • Accepted / delivered: it left your systems successfully. The issue is on the recipient’s side.

Step 3: Was it delivered but filtered?

If your provider shows the email as delivered:

  • Ask the customer to check spam, promotions and any filters, and to search for your store name or order number.
  • Check the email address on the order for typos (gmial.com, missing letters). This is surprisingly common.
  • Check your domain authentication: SPF, DKIM and DMARC records for your sending domain. Missing or broken authentication sends order emails to spam.
  • Check the “From” address. It should be on a domain you’ve authenticated with your mail provider.

Step 4: Resend, and tell the customer what you found

From the order screen, use Order actions → Email invoice / order details to customer to resend. If the address was wrong, correct it on the order first. Then reply to the customer with what you found. “Our email was caught by your spam filter” or “we had a sending problem on our side, now fixed” is reassuring either way.

One customer or everyone?

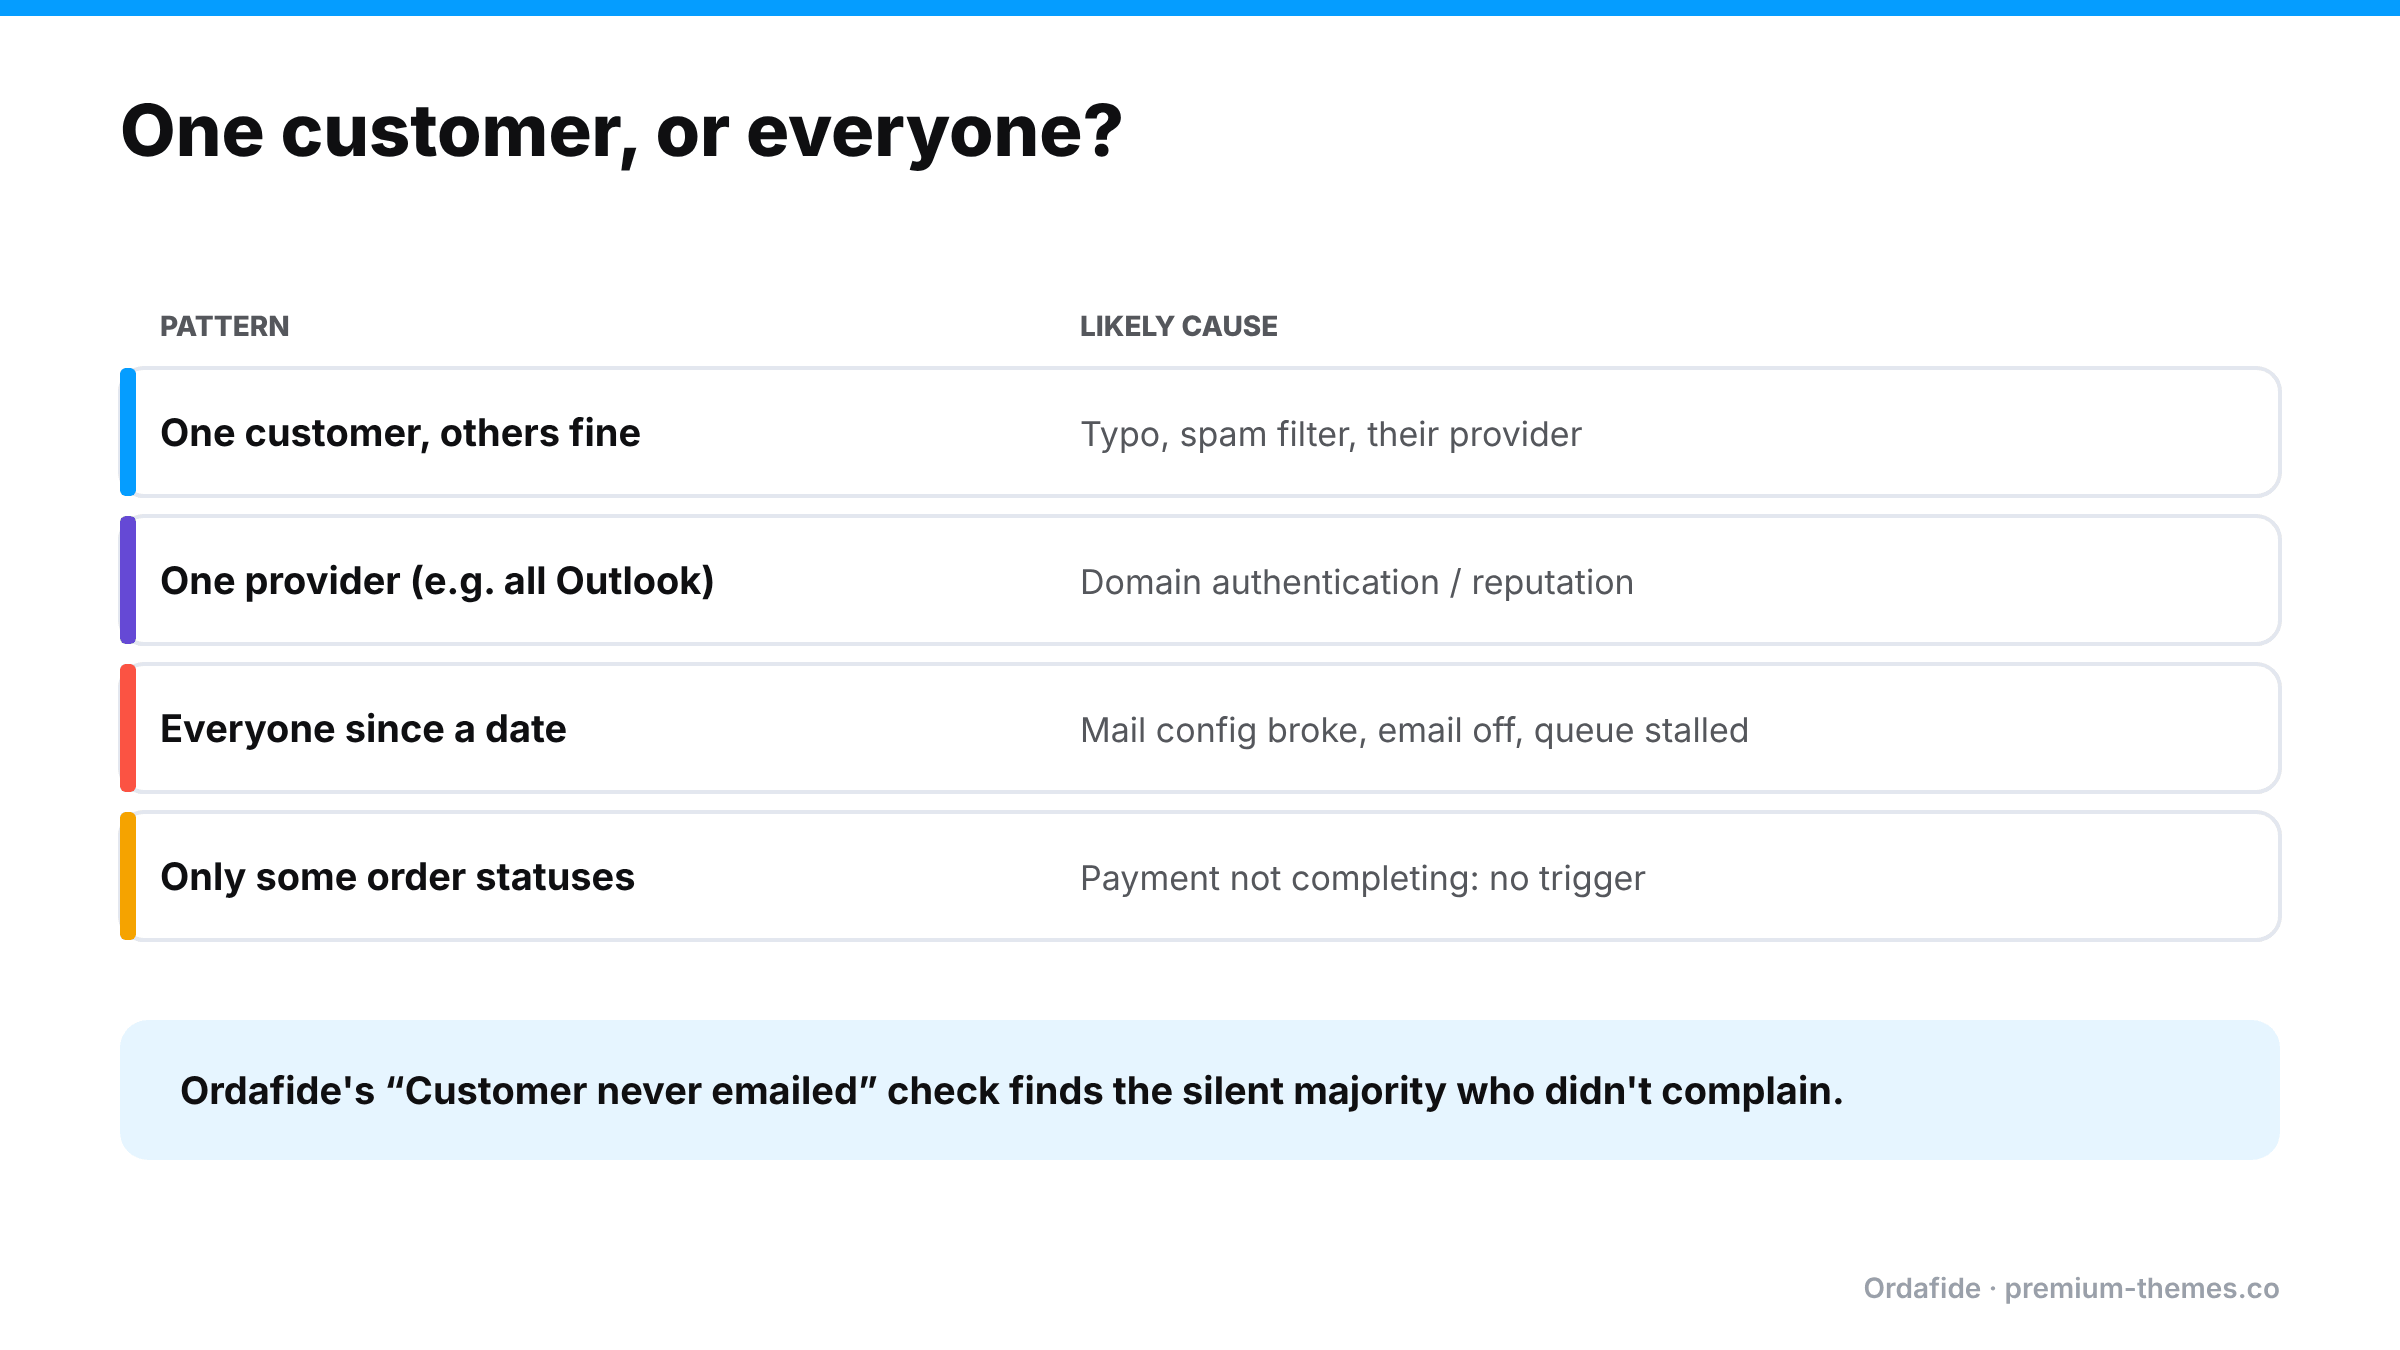
Table of email failure patterns: one customer means a typo or spam filter; one provider means domain authentication or reputation; everyone since a date means mail configuration broke, email was disabled or the queue stalled; only some statuses means payment isn't completing so the email is never triggered.

This is the most important question, and the one most stores never ask.

Pattern Likely cause
One customer, others fine Typo, spam filtering, their provider
One provider (e.g. all Outlook addresses) Domain authentication or reputation with that provider
Everyone since a date Mail configuration broke (migration, expired SMTP credentials, plan limit), email disabled, or queue stalled
Orders in certain statuses only Payment not completing, so the confirmation is never triggered

If it’s everyone, every customer since that date is a potential “did my order go through?” email, and some are potential chargebacks. (Self-inflicted chargebacks)

A worked example: the expired SMTP password

A store sends email through an SMTP service. In October, the store owner changes the password on that email account for security, but doesn’t update the SMTP plugin.

  • From that moment, every WooCommerce email fails authentication. The SMTP plugin falls back to PHP mail() on some setups, or simply fails on others.
  • The storefront, checkout and payments all work. Orders arrive. Nothing visibly errors.
  • Over the next nine days, about 120 customers don’t receive confirmations. A dozen email to ask “did my order go through?” Two open disputes for “unrecognized charge”.
  • The owner finally notices because their own admin new-order emails stopped too.

With a per-order email log, the first failed order would have shown “rejected: authentication failed” on day one, and a check for paid orders with no successful email would have flagged it by the next morning.

Good practice for order email deliverability

  • Send through a proper provider (SMTP or an email API), not PHP mail().
  • Authenticate your domain with SPF, DKIM and DMARC.
  • Use a From address on that domain, and a monitored Reply-To.
  • Keep transactional and marketing email separate where you can, so a marketing complaint doesn’t hurt order confirmations.
  • Check your provider’s sending limits before peak season.
  • Test after any change to passwords, DNS, plugins or hosting.

Having the evidence before you need it

The real problem is that you only go looking for email evidence after a customer complains, and by then you need to know about the other customers who didn’t complain.

What you want is:

  • a record of every order email, attached to its order,
  • the result the mail server returned,
  • a way to see paid orders that never got a confirmation,
  • and a one-click resend.

How Ordafide handles order email delivery

Ordafide Order Integrity for WooCommerce (free) includes an order email delivery log: every WooCommerce email is recorded against its order, together with the result your mail server returned. When a customer asks “did you send it?”, the answer is on the order.

On top of the log, the Customer never emailed check flags paid orders where no customer email reached your mail server, or where every attempt was rejected. That’s the store-wide problem surfaced before customers start writing in. From the finding, you can resend the email in one click. Resends are written to Ordafide’s activity log. (An email can’t be unsent, so that action can’t be undone.)

Ordafide also reports background queue and WordPress scheduler health, because a stalled queue is one of the most common reasons confirmations stop. An optional weekly summary email tells you when there’s something to look at.

A few honest limits:

  • The email log starts when you activate the plugin. Earlier orders can’t be judged and are skipped.
  • Ordafide records what your mail server said. It can’t see inside the customer’s inbox, so an email accepted by your server but filtered to spam later will look delivered.
  • It doesn’t replace a proper mail setup. You still need SMTP or an email API and SPF/DKIM/DMARC.

Ordafide Pro adds alerts (Slack, SMS, email, signed webhook), so a sudden run of un-emailed paid orders reaches you the same day, and CSV/JSON audit export if you need records for a dispute.

Quick checklist for “I never got my email”

  1. Is the order actually paid and in Processing?
  2. Is the customer email enabled in WooCommerce → Settings → Emails?
  3. Is the email address on the order correct?
  4. Does your email log or provider show it sent and accepted?
  5. If accepted: spam, promotions, filters, SPF/DKIM/DMARC.
  6. If not: mail configuration, credentials, limits, background queue.
  7. Resend, reply to the customer, and check whether other customers are affected.

Replying to the customer

Whatever you find, the customer mostly wants reassurance. A good reply:

“Thanks for checking. Your order #4102 is confirmed and paid, and it’s being packed now. It looks like our confirmation email [was caught by your spam filter / didn’t send because of a problem on our side, which we’ve fixed]. I’ve resent it just now. You’ll get tracking by email when it ships.”

Confirm the order, explain briefly, resend, and set the next expectation. If the problem was on your side, check whether other customers were affected before closing the ticket.

Common mistakes when investigating

  • Trusting a single test. Your test email arriving doesn’t prove customer emails arrive. Different providers filter differently.
  • Only checking admin emails. Admin new-order emails and customer confirmations are separate settings and can fail separately.
  • Resending without fixing. If the mail setup is broken, the resend fails too.
  • Forgetting the silent majority. For every customer who asks, several didn’t. Find them before they become disputes.
  • Ignoring order status. No confirmation for an order stuck on Pending is a payment problem, not an email one.

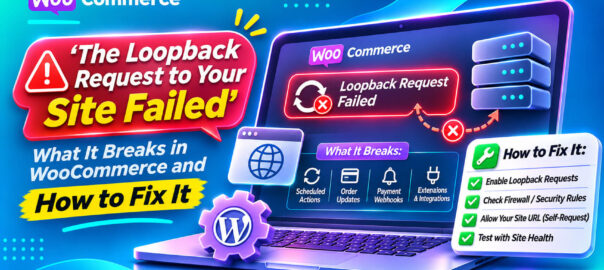
‘The Loopback Request to Your Site Failed’: What It Breaks in WooCommerce and How to Fix It

Open Tools → Site Health on many WordPress sites and you’ll find one of these:

  • “The loopback request to your site failed, this means features relying on them are not currently working as expected.”
  • “A scheduled event has failed” or “A scheduled event is late”
  • “The REST API encountered an error”

Most site owners shrug and move on, because the site looks fine.

On a WooCommerce store, that’s a mistake. Loopback requests and scheduled events are how WordPress and WooCommerce run background work: order emails, subscription renewals, stock updates, analytics imports, webhook deliveries, cleanup jobs. When loopbacks fail, that work can silently stop. Your storefront keeps working while the machinery behind it stalls.

This guide explains what a loopback request is, what fails in WooCommerce when it doesn’t work, the common causes, and how to fix it properly.

What a “loopback request” is

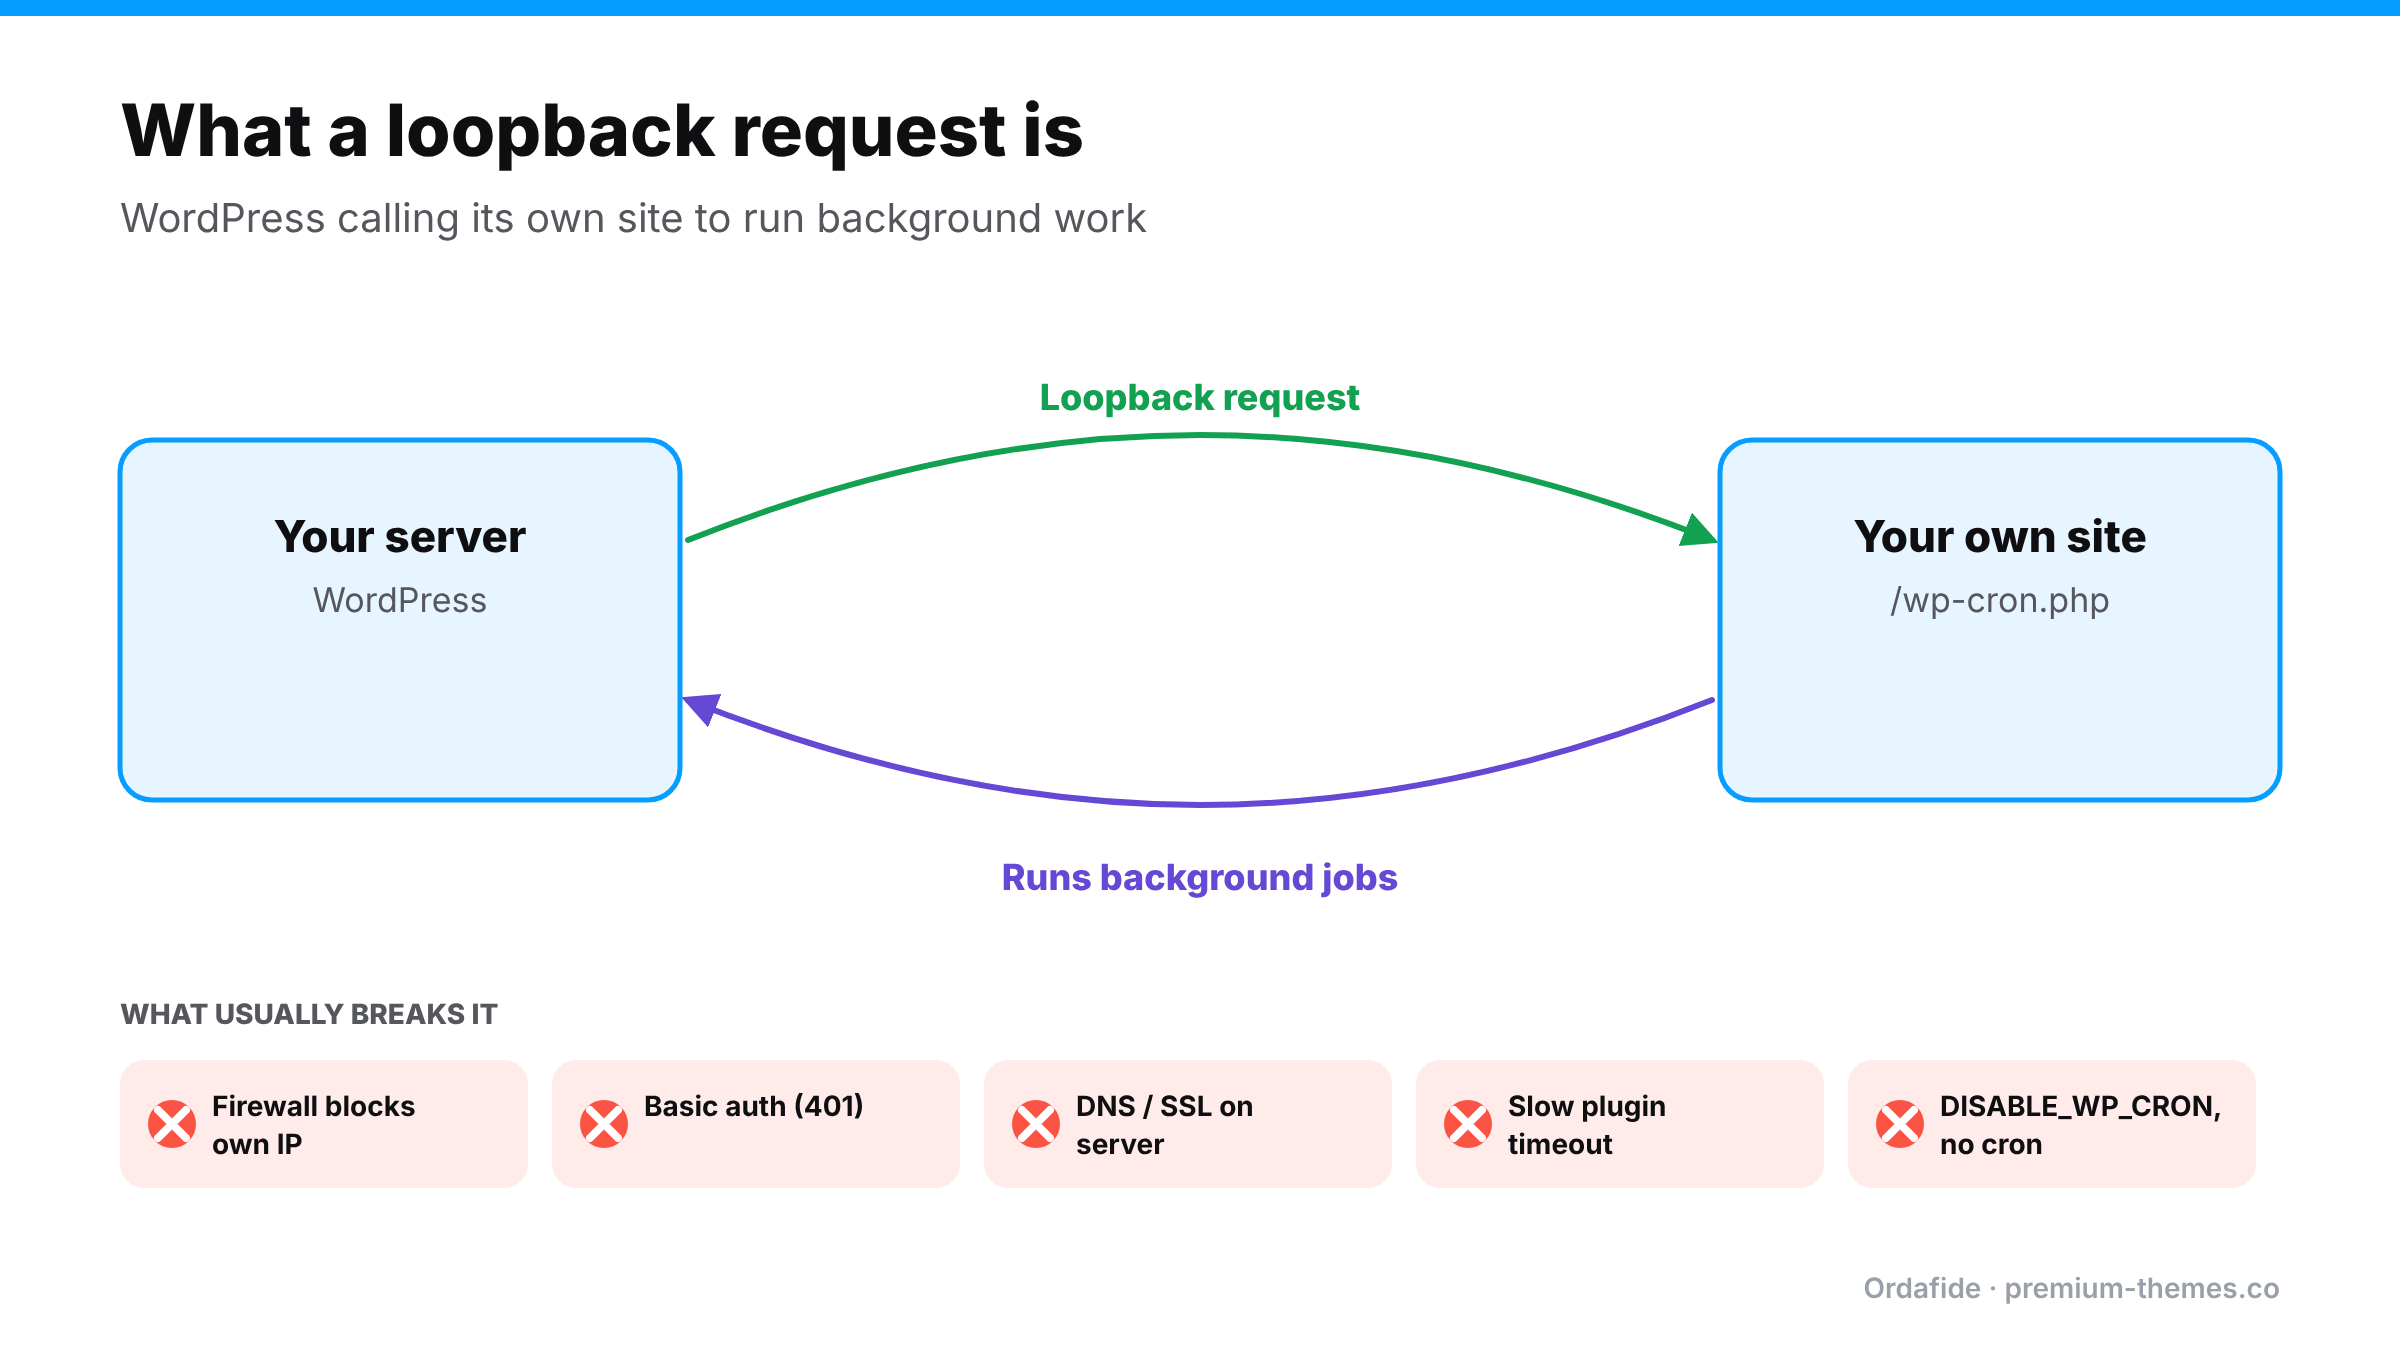
Diagram: the server running WordPress sends a loopback request to its own site's wp-cron.php, which runs background jobs. Common blockers: a firewall blocking the server's own IP, basic auth, DNS or SSL problems on the server, a slow plugin causing timeouts, and DISABLE_WP_CRON without a server cron.

A loopback request is your website making an HTTP request to itself: WordPress on your server calling https://yourstore.com/wp-cron.php (or another URL on your own site) over the network.

WordPress uses this to run tasks in the background, without making a visitor wait. When a page loads, WordPress checks whether any scheduled tasks are due. If they are, it fires a quick loopback request to wp-cron.php, which runs those tasks in a separate process.

WooCommerce builds on this with Action Scheduler, a queue for background jobs. Action Scheduler is triggered by WP-Cron and also uses asynchronous requests to keep the queue moving.

So if your site can’t reach itself, or WP-Cron is switched off without a replacement, background work doesn’t run.

What breaks in WooCommerce when loopbacks fail

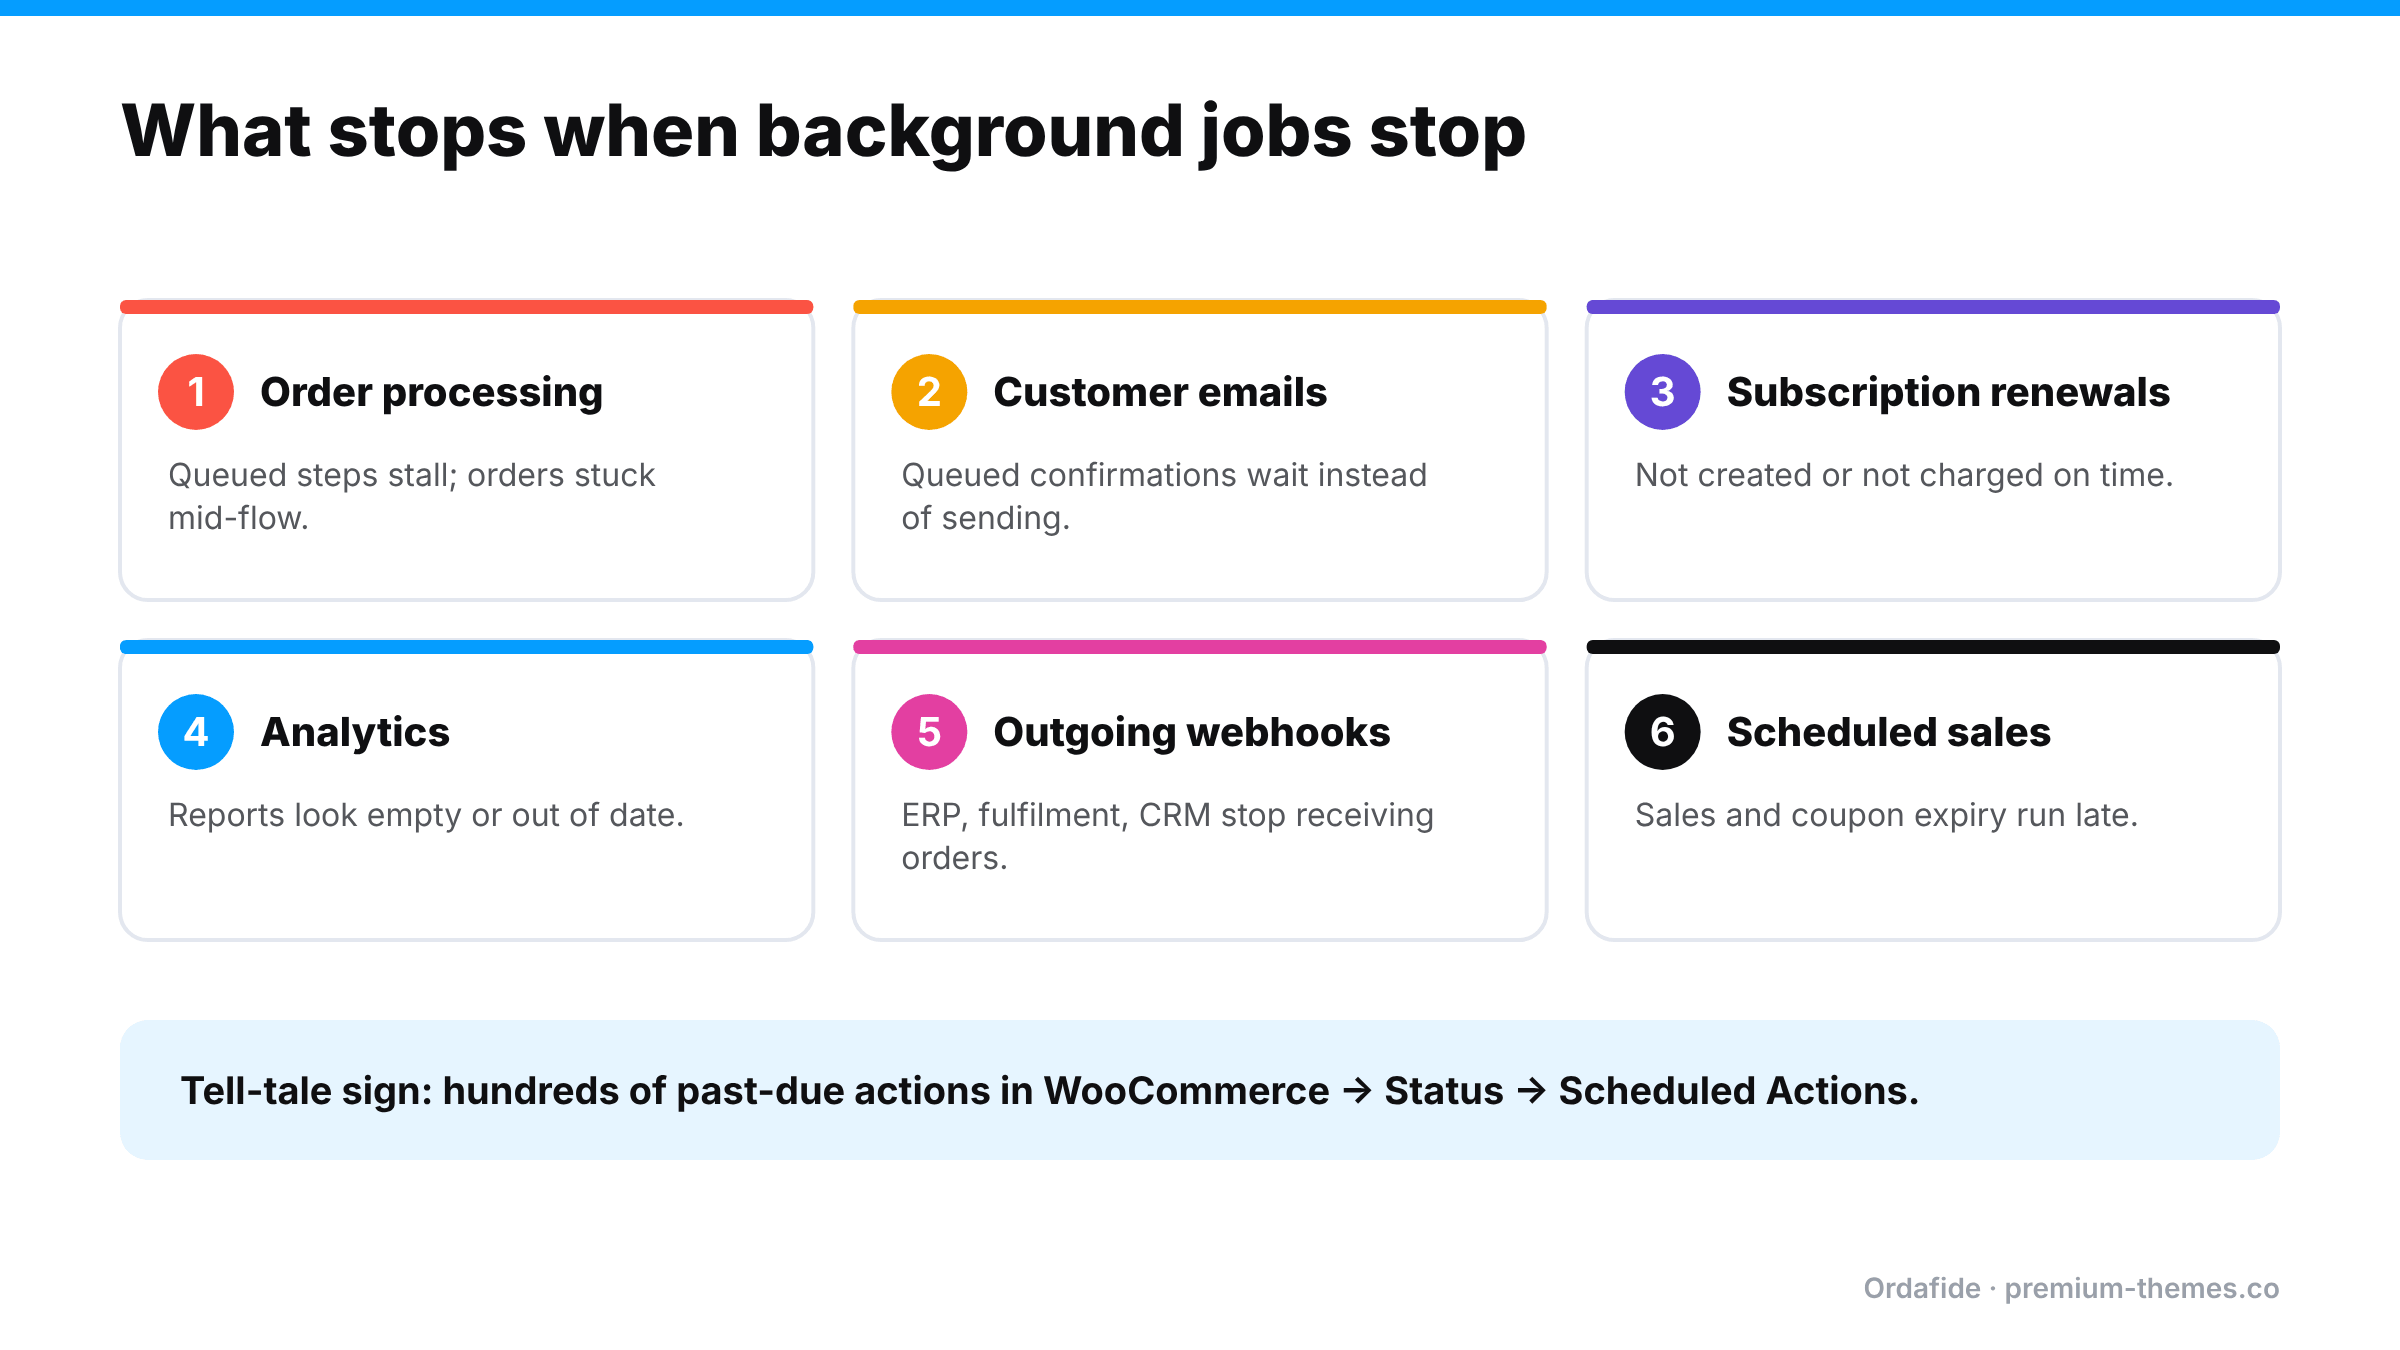
Six WooCommerce features that rely on background jobs: order processing, customer emails, subscription renewals, analytics, outgoing webhooks to other systems, and scheduled sales. The tell-tale sign of a problem is hundreds of past-due scheduled actions.

Background job What you notice
Deferred or queued order processing Orders stuck mid-flow; some payment confirmations processed late
Transactional emails that depend on queued work Customers don’t get confirmations promptly (guide)
Subscription renewals Renewals not created or not charged on time (guide)
Analytics imports WooCommerce Analytics looks empty or out of date
Outgoing webhooks to other systems ERP, fulfilment or CRM integrations stop receiving orders
Scheduled sales and coupon expiry Sales don’t start or end on time
Unpaid order cancellation and cleanup Timers don’t run on schedule

In WooCommerce → Status → Scheduled Actions, the tell-tale sign is a Pending tab full of actions whose scheduled time has already passed: hundreds of past-due actions.

The common causes

1. Firewalls and security plugins blocking your own server

Your server calling itself can look like an attack: a request from a data-centre IP (your own) with no browser. Host firewalls, security plugins and CDN bot protection sometimes block it. Ironically, the same rules often block payment webhooks too. (Firewall blocking webhooks)

2. Password protection or basic auth

Staging sites are often protected with HTTP basic authentication. If that protection is left on a live site, or the site was pushed live from staging with it, every loopback request gets a 401.

3. DNS and SSL problems on the server

The server must resolve your domain and complete an HTTPS connection to itself. A mis-set hosts file, a domain pointing elsewhere (behind a CDN or during a migration), or an SSL certificate the server doesn’t trust produces timeouts or “cURL error 28” messages.

4. A plugin slowing every request

Site Health gives loopback requests around 10 seconds. A plugin that makes every request slow (heavy session handling, external API calls on every page) can make loopbacks time out. A WordPress.org thread traced loopback and REST API timeouts on a WooCommerce site to one plugin’s session handling. Changing its settings resolved it.

5. DISABLE_WP_CRON without a replacement

Many hosts and performance guides set define( 'DISABLE_WP_CRON', true ); in wp-config.php to stop WP-Cron running on page loads. That’s good practice, as long as a real server cron job runs WP-Cron instead. If nobody set up that server cron (common after a migration), scheduled work simply never runs, and no error appears anywhere.

6. Very low traffic

WP-Cron triggers on visits. On a quiet store, hours can pass with no visitors, so nothing runs. Not a failure as such, but it makes background work slow and unpredictable.

How to diagnose

  1. Site Health: Tools → Site Health → Status. Note any loopback, REST API or scheduled event errors and the exact message (401, 403, timeout, cURL error).
  2. Scheduled Actions: WooCommerce → Status → Scheduled Actions → Pending. How many are past due? Check the Failed tab too, and open one to see the error.
  3. wp-config.php: is DISABLE_WP_CRON set to true? If so, ask your host whether a server cron job runs wp-cron.php.
  4. WP-CLI (if available): wp cron test checks whether WP-Cron can spawn; wp cron event list shows overdue events.
  5. Security logs: check your security plugin, CDN and host firewall for blocked requests from your own server’s IP to wp-cron.php.

How to fix it

Set up a real server cron (recommended for every store). In your hosting control panel, add a cron job that runs every few minutes:

*/5 * * * * wget -q -O - "https://yourstore.com/wp-cron.php?doing_wp_cron" >/dev/null 2>&1

or, with WP-CLI:

*/5 * * * * cd /path/to/site && wp cron event run --due-now >/dev/null 2>&1

Then set DISABLE_WP_CRON to true so visitors don’t also trigger it.

Allow your server to reach itself. Allowlist your own server IP in your security plugin and host firewall, and exempt wp-cron.php and admin-ajax.php from bot challenges.

Remove basic auth from production, or exempt your server’s own requests from it.

Fix DNS/SSL on the server with your host: the server should resolve your domain to itself and trust the certificate.

Find slow plugins with a conflict test on staging if loopbacks time out.

Let the backlog drain. Don’t delete past-due actions. They can include real customer emails and renewals. Once the cause is fixed, they’ll run. On very large backlogs, ask your host for help, or run wp action-scheduler run in batches.

Then sweep up. Check whether any customers missed confirmation emails or renewals during the stall.

A worked example: the migration nobody finished

A store moves to a faster host. The migration service copies wp-config.php, including define( 'DISABLE_WP_CRON', true );, which the old host required because it ran a server cron job. Nobody sets up a cron job on the new host.

  • Day 1: everything looks great. The site is faster.
  • Day 2: WooCommerce Analytics stops showing new orders. “Probably a caching thing.”
  • Day 4: a subscriber emails to say their renewal didn’t charge (they’re pleased, the owner isn’t).
  • Day 6: the fulfilment integration hasn’t received orders since day 1. The warehouse has been working from the admin screen.
  • Day 7: someone opens Scheduled Actions: 4,800 past-due actions.

Site Health had been showing “A scheduled event is late” since day 1. Nobody looked.

The fix was a single cron job in the hosting panel. The cleanup took two days: replaying renewals carefully, checking which customers missed emails, and reconciling the fulfilment system.

Hosting-specific notes

  • Managed WordPress hosts often disable WP-Cron and run their own cron. Confirm it’s running for your site, and how often.
  • Shared hosting may limit cron frequency (for example, no more than every 15 minutes). That’s usually fine for WP-Cron, but tell your host if you have heavy subscription or email volume.
  • Behind a CDN or proxy, your server may need to reach itself directly rather than through the CDN. Ask your host to make sure loopback requests don’t leave the server.
  • Staging sites cloned from production may run scheduled tasks (emails, renewals) against real customers. Disable outgoing email and payment processing on staging.

Watching it with Ordafide

The worst thing about loopback failures is that they’re silent and slow-burning. Site Health shows a warning once, and nobody looks at Site Health. The backlog grows by the hour.

Ordafide Order Integrity for WooCommerce (free) puts this front and centre on its Store health screen:

  • Background job queue health: how far behind Action Scheduler is, how many jobs failed, and the most likely cause in plain language rather than queue jargon.
  • WordPress scheduler status, including whether DISABLE_WP_CRON is set.
  • A loopback test you can run with one click. It asks your site to call its own wp-cron.php, contacts no other service, and runs only when you press the button.
  • An order email delivery log, so you can see exactly which customers missed their emails during a stall, with one-click resend.
  • The Customer never emailed check, which flags paid orders with no confirmation sent.

An optional weekly summary email tells you when there’s something to fix. For agencies, wp ordafide health reports the same from the command line.

Ordafide Pro adds real-time alerts (Slack, SMS, email, signed webhook) so a stalled queue reaches you within the hour, and a signed heartbeat endpoint an external monitor can poll to confirm the store’s own checks are still running, which matters when the scheduler itself is the thing that broke.

How often should WP-Cron run?

For most stores, every 5 minutes is a sensible default. Busier stores, or those with lots of subscriptions and integrations, often run it every minute. Very quiet stores can get away with 15 minutes, but emails and renewals will be less punctual. Whatever you choose, make sure it’s one cron job, not several competing ones, and that visitor-triggered WP-Cron is disabled so the two don’t overlap.

What not to do

  • Don’t install a “WP-Cron fixer” plugin on top of a broken setup without understanding the cause. Several overlapping cron triggers can run jobs twice, and for subscriptions that means double charges.
  • Don’t delete Action Scheduler tables to “clean up”. They hold real pending work.
  • Don’t ignore Site Health warnings because the site “looks fine”. On a store, background work is where the problems hide.
  • Don’t disable the firewall to get loopbacks working. Make a narrow exception for your own server.

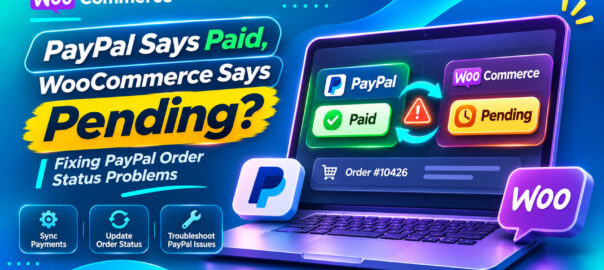
PayPal Says Paid, WooCommerce Says Pending: Fixing PayPal Order Status Problems

PayPal is one of the most popular ways to pay on WooCommerce stores, and one of the most common sources of “it says pending but I paid” support tickets.

Search the WordPress.org forums and the titles tell the story: “Payments succeed in PayPal but WooCommerce doesn’t update status”, “PayPal payments stay on pending”, “PayPal IPN notifications do not arrive”, “Webhook resubscription fails”, “PayPal: order paid but on failed status”. Some of these threads are a decade old. Others are from this year. The integration has changed several times, but the shape of the problem hasn’t.

This guide explains how PayPal tells WooCommerce about a payment, why that message gets lost, how to diagnose which part failed, and how to stop paid PayPal orders from being missed.

How PayPal confirms a payment to WooCommerce

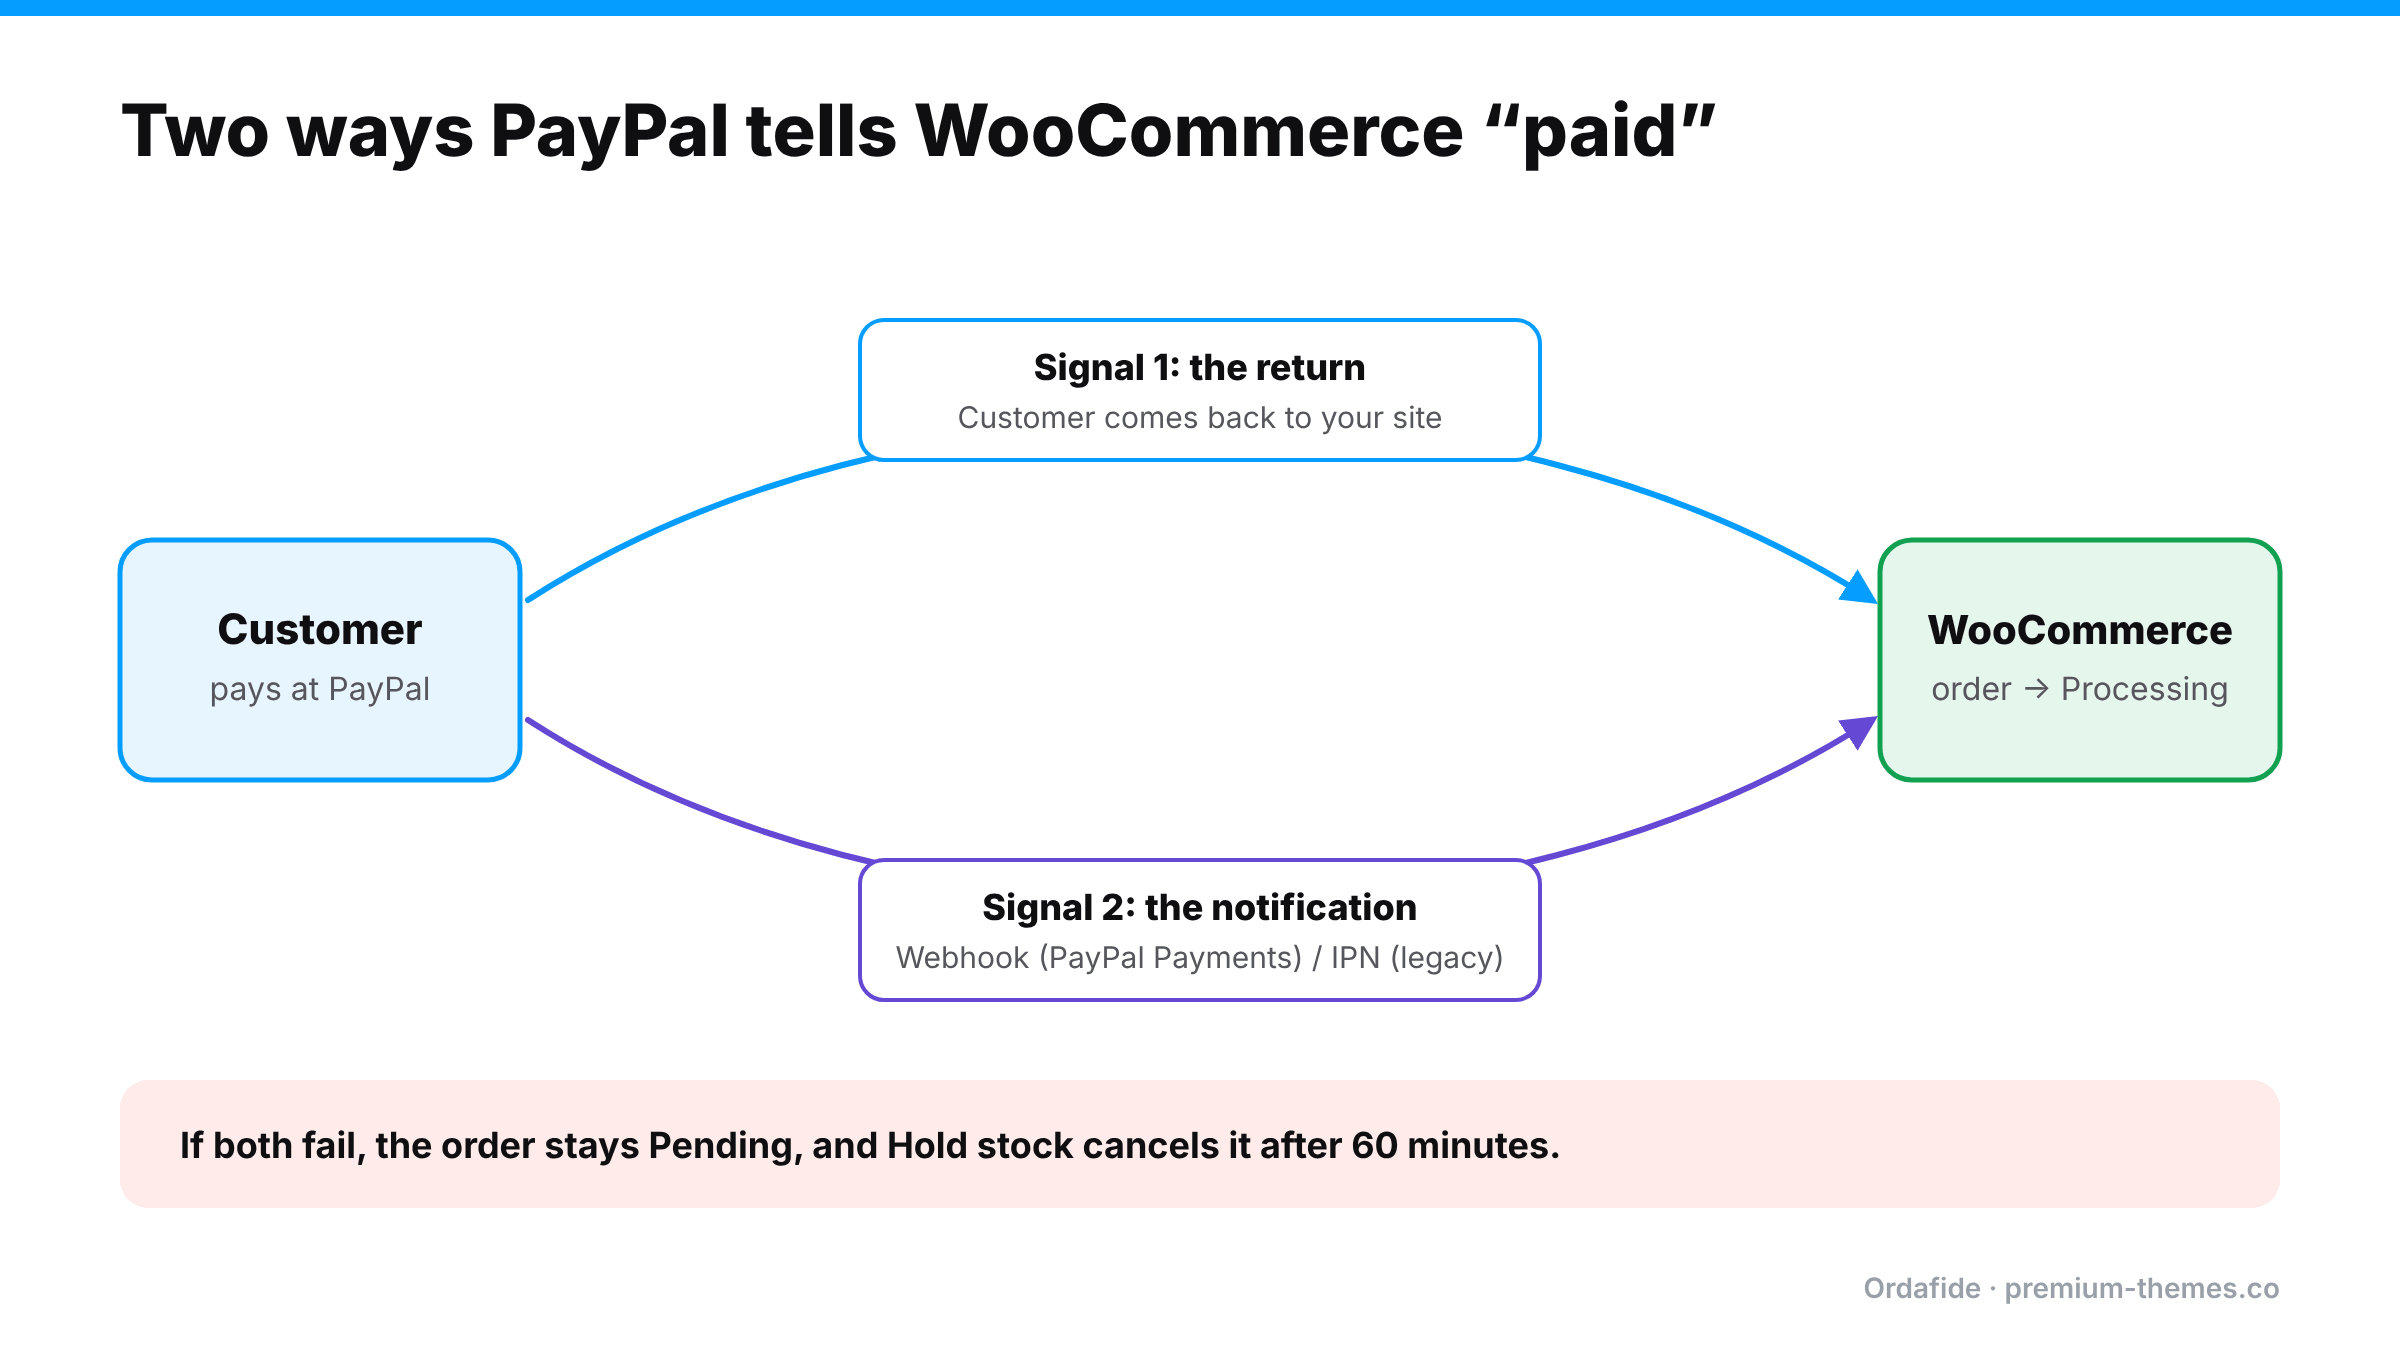
Diagram: after a customer pays at PayPal, WooCommerce learns about it either when the customer returns to the site, or through a server notification (webhooks for PayPal Payments, IPN for legacy PayPal Standard). If both fail, the order stays Pending and the Hold stock timer cancels it after 60 minutes.

PayPal checkout involves the customer leaving your page (or a PayPal popup appearing over it), so WooCommerce relies on two signals:

  1. The return. After paying, the customer is sent back to your site. The plugin can confirm the payment at that moment.
  2. The notification. PayPal’s servers send a message directly to your site: webhooks for the current WooCommerce PayPal Payments plugin, and IPN (Instant Payment Notification) for the legacy PayPal Standard.

If both signals fail, the order never moves. The customer closed the popup or tab before returning, and the notification was blocked or rejected. If the order also uses the Hold stock timer, WooCommerce auto-cancels it an hour later.

Which PayPal integration are you using?

This matters because the fixes differ.

Integration How notifications work Status
WooCommerce PayPal Payments Webhooks registered automatically with your PayPal account Current, recommended
PayPal Standard (built into older WooCommerce) IPN to a notify URL Legacy. WooCommerce has deprecated it
Third-party PayPal plugins Varies Check the plugin’s documentation

If you’re still on PayPal Standard, migrating to PayPal Payments is worth doing for many reasons, and this is one of them.

Why PayPal orders get stuck

1. Webhooks not registered, or registered to the wrong URL

PayPal Payments subscribes to webhooks for your site’s URL when you connect your account. If you changed domain, moved from staging to live, switched HTTP to HTTPS, or restored a backup, the webhook may point to the wrong place. The plugin’s settings include an option to resubscribe webhooks. Forum threads show this fixing many cases, and occasionally failing because something else (usually a firewall) blocks the subscription check.

2. A firewall or security plugin is blocking PayPal

Exactly like Stripe webhooks, PayPal’s notifications are automated POST requests that bot protection, WAFs and security plugins love to block. (Firewall blocking webhooks)

3. Sandbox and live mixed up

Connecting a live store to a sandbox account (or the reverse), or switching modes without reconnecting, leaves notifications going to the wrong environment.

4. The customer didn’t return to your site

Closing the PayPal window, a lost connection, or an in-app browser that doesn’t hand control back. That’s normal and expected, which is why notifications exist. It becomes a problem only when notifications fail too.

5. eChecks and payment review

Some PayPal payments are genuinely pending at PayPal: eChecks that take days to clear, payments held for review, unverified addresses, currency conversion acceptance. Those orders should wait. The fix is patience, not intervention. Always check PayPal’s actual status before acting.

6. Authorize instead of capture

If the plugin is set to authorize rather than capture, orders may sit On hold until you capture. (Authorized vs captured)

7. Background processing stalled

Parts of order processing can depend on WordPress’s background queue. If WP-Cron or Action Scheduler isn’t running, follow-on work stalls. (Loopback request failed)

Diagnosing a stuck PayPal order

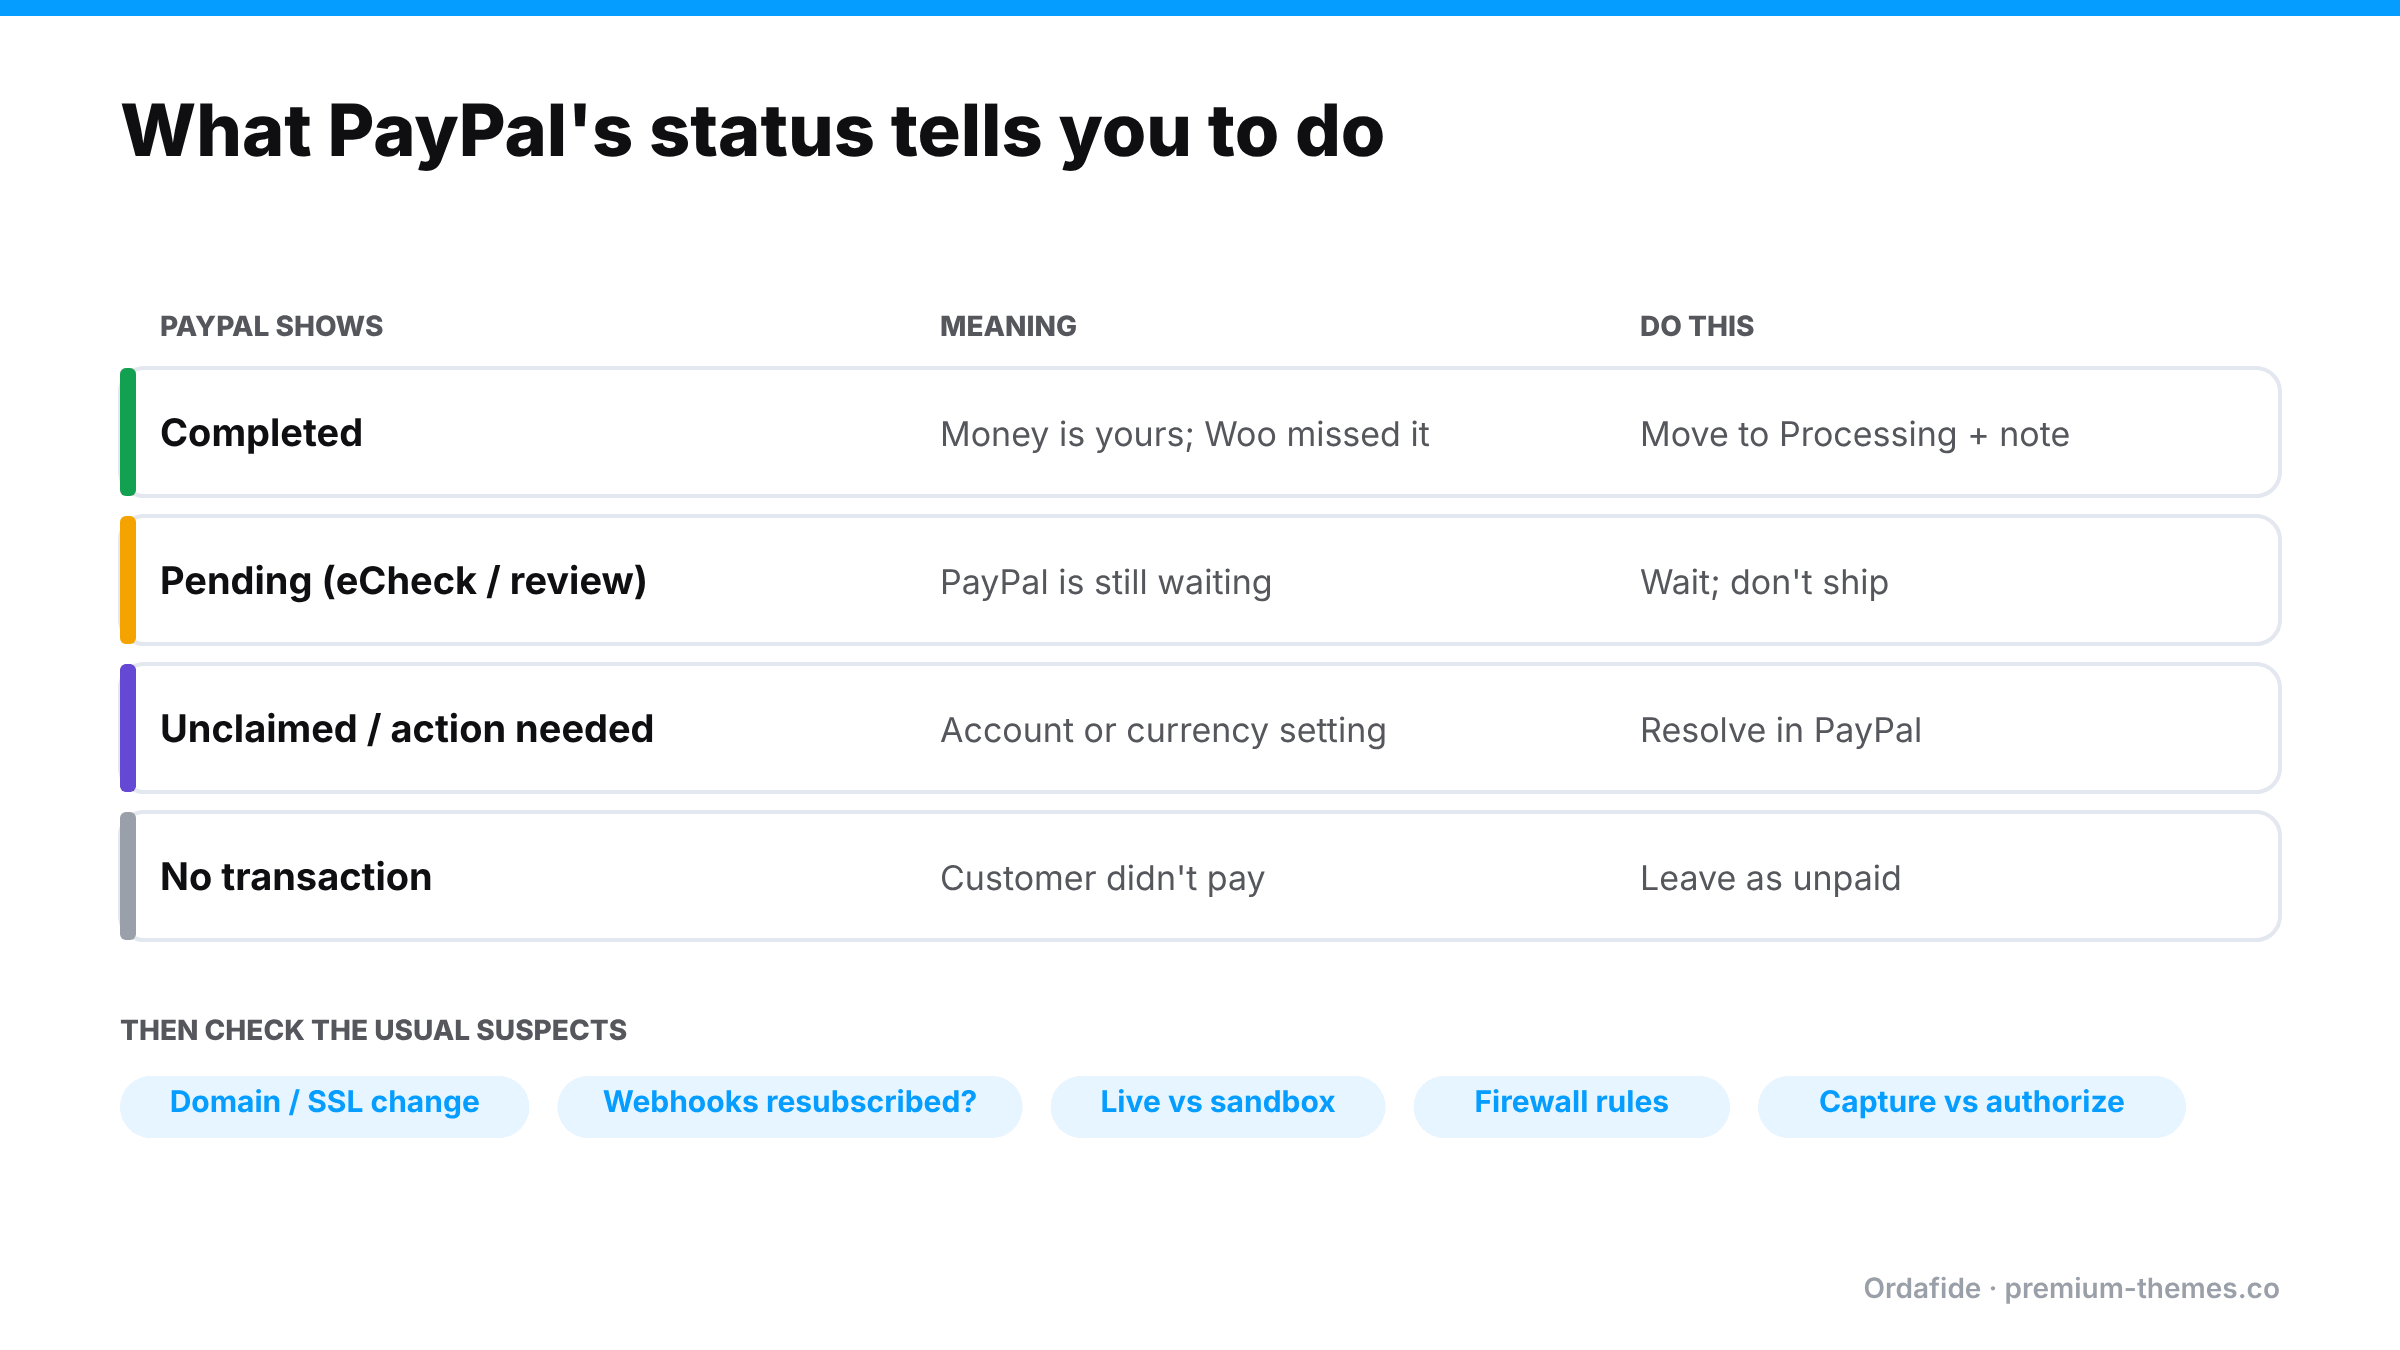
PayPal Completed means move the order to Processing; Pending for eCheck or review means wait; Unclaimed means resolve in PayPal; no transaction means the customer didn't pay. Then check domain or SSL changes, webhook subscription, live versus sandbox, firewall rules, and capture versus authorize.

1. Find the transaction. Open the order notes for a PayPal order or transaction ID. Search it in your PayPal account’s activity.

2. Read PayPal’s status.

  • Completed: the money is yours. WooCommerce missed the message.
  • Pending (with a reason): PayPal is waiting (eCheck, review, unclaimed). Don’t ship yet.
  • Unclaimed / requires action on your side: often currency or account settings. Resolve it in PayPal.
  • No transaction found: the customer didn’t pay; the order is genuinely unpaid.

3. Check the plugin’s connection and webhook status in WooCommerce → Settings → Payments → PayPal. Is it connected to the right environment (live vs sandbox)? Are webhooks subscribed? Try resubscribing.

4. Enable logging in the plugin’s settings, place a small test payment, and read the log for errors on the notification.

5. Check security layers (CDN, security plugin, host WAF) for blocked requests from PayPal around the payment time.

A worked example: the domain change

A store moves from shop.example.com to example.com and sets up a redirect. Everything looks fine: the site loads on the new domain, PayPal checkout works, customers return to the new domain after paying.

But PayPal Payments’ webhooks are still subscribed to the old domain. Notifications go to shop.example.com, hit a 301 redirect, and webhooks don’t follow redirects. Every notification fails.

  • Customers who return to the site after paying are fine, because the return confirms the payment.
  • Customers who close the PayPal window early, or whose phone drops the connection, are left on Pending payment. After an hour, the Hold stock timer cancels their orders.

Roughly one PayPal order in eight ends up cancelled despite being paid. Nobody connects it to the domain change made two weeks earlier.

Fix: resubscribe webhooks in the PayPal Payments settings so they point at the new domain, then reconcile the cancelled orders against PayPal.

Questions to ask whenever PayPal orders misbehave

  1. Has the domain, SSL or hosting changed recently?
  2. Is the plugin connected to live or sandbox?
  3. When were webhooks last resubscribed?
  4. Has anything changed in the CDN, firewall or security plugin?
  5. Is the plugin set to capture or authorize?
  6. Does PayPal itself show the payment as Completed, or Pending with a reason?

Most cases are solved by question 1, 3 or 4.

Fixing the orders you already have

For each order PayPal shows as Completed:

  1. Move the WooCommerce order to Processing.
  2. Add a note: PayPal transaction ID, amount, “verified in PayPal on [date]”.
  3. If it was auto-cancelled, check stock.
  4. Send the confirmation email and a short apology.

For orders PayPal shows as Pending, leave them and set a reminder. For no transaction, the order is genuinely unpaid.

Preventing it

  • Use WooCommerce PayPal Payments, kept up to date.
  • Resubscribe webhooks after any domain, SSL, migration or staging change.
  • Keep sandbox and live strictly separate, and make sure staging sites never connect to your live PayPal account.
  • Allow PayPal’s notifications through your CDN, security plugin and host firewall.
  • Use capture, not authorize, unless you have a reason.
  • Keep background processing healthy.
  • Watch for paid orders that don’t move, automatically.

Why PayPal problems come in clusters

Stripe problems often affect one order at a time. PayPal problems tend to affect all PayPal orders from a certain moment, because the most common causes are configuration changes: a domain change, a webhook subscription that lapsed, a new firewall rule, a sandbox/live mix-up. That has two consequences:

  1. The damage grows fast. Every PayPal order after the change is at risk, not just one.
  2. The fix is usually one setting, applied once, followed by reconciling the affected orders.

So the most valuable thing is noticing the first stuck PayPal order quickly. Once you see one paid PayPal order sitting on Pending, check the others from the same period, then check what changed around that time.

Testing PayPal properly after changes

After any change to domain, hosting, security or the PayPal plugin, do a real end-to-end test:

  1. Pay with PayPal and close the PayPal window immediately after approving, without returning to the store.
  2. Wait a few minutes and check whether the order moves to Processing anyway.

If it does, notifications are working. If it only updates when you return to the site, the notification path is broken and customers who don’t return will be left on Pending.

How Ordafide catches stuck PayPal orders

Because PayPal involves a redirect or popup and a notification, it’s one of the most failure-prone payment flows. Stuck PayPal orders tend to come in clusters, when something changes and every notification starts failing.

Ordafide Order Integrity for WooCommerce (free) flags:

  • Stuck payment: orders on Pending payment or Failed that carry a gateway payment reference
  • Paid but cancelled: orders with a confirmed payment date sitting in Cancelled or Failed with nothing refunded
  • Customer never emailed: paid orders that never got a confirmation
  • Background queue health, with a loopback test

Each finding explains what to check in PayPal before you change anything. If WooCommerce itself recorded a confirmed payment date, Ordafide can restore the order to Processing with one logged, reversible click.

Ordafide Pro connects to PayPal (as well as Stripe, Square, Mollie and Razorpay) with read-only credentials and reconciles what PayPal actually collected against WooCommerce. That catches the cases the free plugin can’t see, where no payment reference ever reached the order, or no order exists at all. It flags money with no order, paid orders with no payment, amount disagreements and refunds made in PayPal but missing in WooCommerce, with alerts to Slack, SMS, email or webhook. Because the credentials are read-only, Ordafide can’t capture, refund or move money.

A note on PayPal and refunds

The same notification problems that leave payments stuck can also leave refunds unrecorded. If you refund a PayPal payment from the PayPal dashboard and the notification doesn’t arrive, WooCommerce still shows the order as paid, stock isn’t restored and your revenue is overstated. Refund from the WooCommerce order screen wherever possible, so the plugin records the refund itself. (Refund status mismatches)

Is Your Firewall Blocking Payments? Cloudflare, Wordfence and WooCommerce Payment Webhooks

Security tools are supposed to keep bad traffic out. The trouble is that, to a security tool, a payment gateway’s webhook looks a lot like bad traffic: an automated server, with no browser, no cookies and no human, sending a POST request to your site at odd hours.

So security tools block it. And when a payment webhook is blocked, the gateway knows the customer paid, but WooCommerce never finds out. The order sits on Pending payment, the Hold stock timer cancels it, and a paying customer receives nothing.

This is one of the most common root causes behind stuck orders, and one of the least obvious, because the security tool is doing exactly what it was configured to do. This guide shows how each layer of security can block webhooks, how to prove it, and how to let payment confirmations through without weakening your protection.

Why webhooks are so easy to block

Payment gateways use webhooks to tell your store what happened: payment succeeded, payment failed, refund issued, dispute opened. A webhook is:

  • an automated POST request from the gateway’s servers,
  • to a specific URL on your site (for the WooCommerce Stripe plugin, typically https://yourstore.com/?wc-api=wc_stripe),
  • with no browser, so it can’t solve a JavaScript challenge or CAPTCHA,
  • often from data-centre IP addresses,
  • signed with a secret so your store can verify it’s genuine.

Bot protection, WAF rules, rate limits and “block suspicious POST requests” settings are designed to stop exactly this shape of traffic.

The security layers that commonly block webhooks

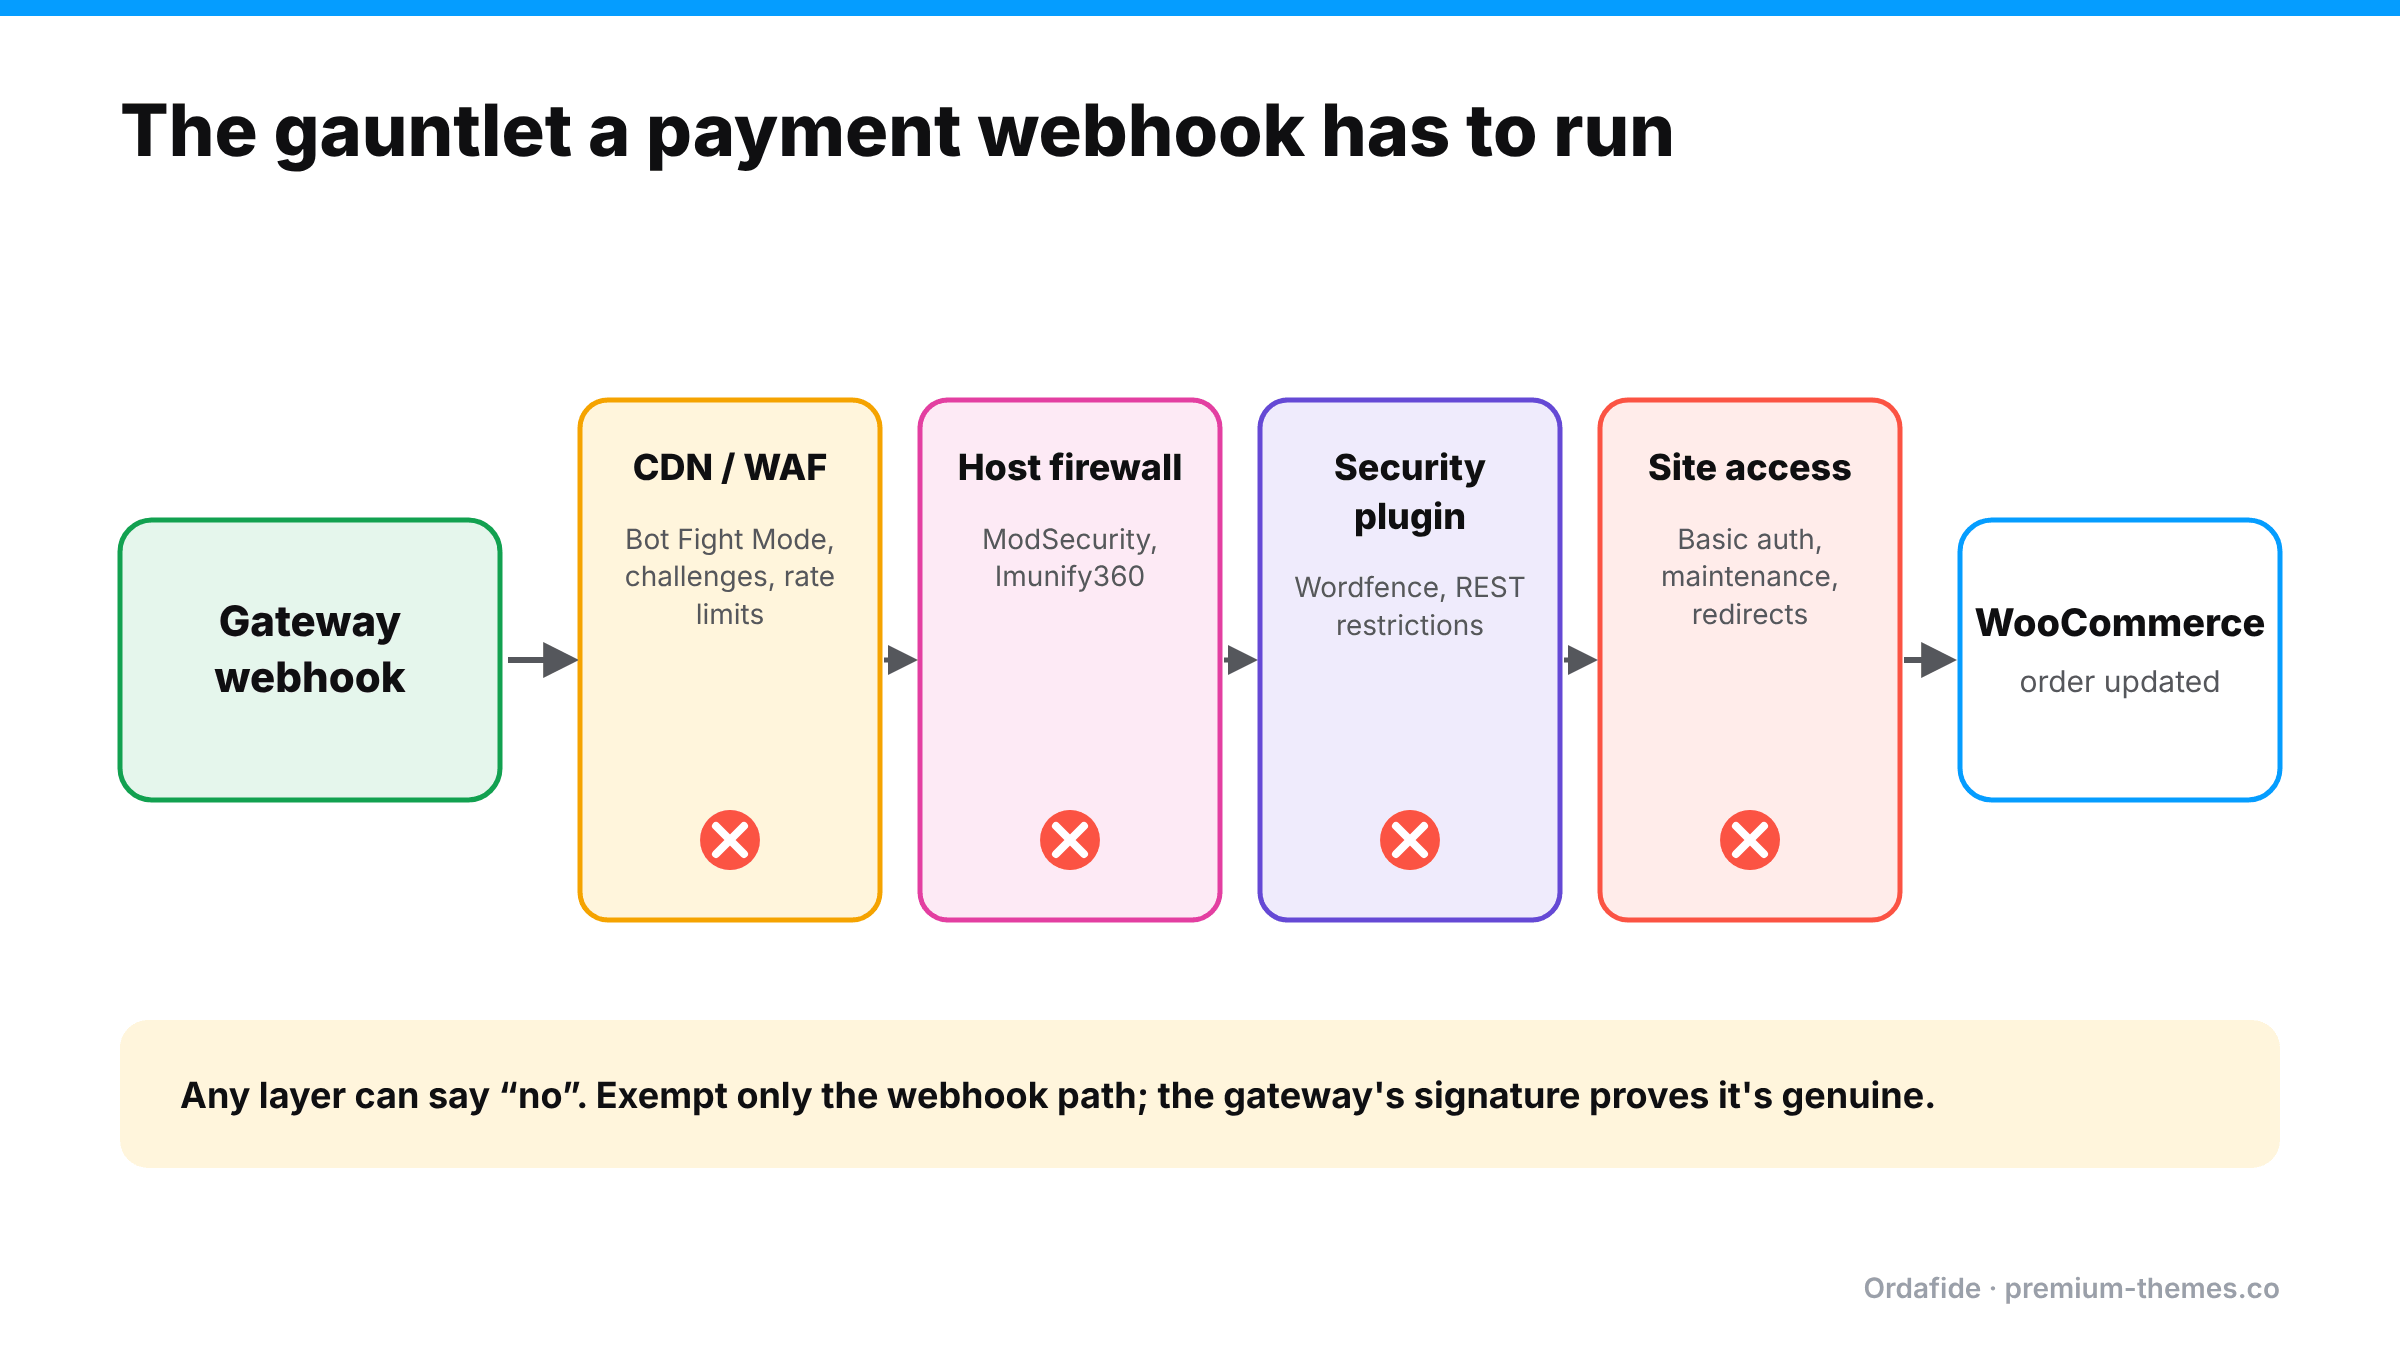
A payment webhook passes four security layers before reaching WooCommerce: CDN or WAF (bot protection, challenges, rate limits), host firewall, security plugin (Wordfence, REST restrictions), and site access controls (basic auth, maintenance, redirects). Any layer can block it. Exempt only the webhook path.

Layer 1: Cloudflare (or another CDN/WAF)

  • Bot Fight Mode. On Cloudflare’s free plan, Bot Fight Mode is a single zone-wide setting that challenges or drops automated-looking requests, with no per-path exemptions. Large senders like Stripe are usually on Cloudflare’s verified bots list and pass, but smaller gateways, regional payment providers and monitoring services are often blocked. On Pro and Business plans, Super Bot Fight Mode can be skipped for specific paths with a WAF custom rule.
  • Managed challenges and “Under Attack” mode. A webhook sender can’t solve a JavaScript challenge. If you switch on a challenge for all traffic during an attack (or for Black Friday), webhooks fail until you switch it off.
  • WAF custom rules that block by country, user agent or request method.
  • Rate limiting that catches bursts of webhook deliveries during busy periods.

Layer 2: Security plugins (Wordfence and others)

Security plugins inspect requests inside WordPress. A WordPress.org thread shows Wordfence returning 403 with “A potentially unsafe operation has been detected in your request to this site” for incoming webhooks. Wordfence support’s answer was to allowlist the exact URL or parameters under the firewall’s Allowlisted URLs setting rather than switching the firewall to Learning Mode, which carries its own risks.

Other common plugin-level blocks:

  • “Disable REST API” or “restrict REST API to logged-in users” settings (several gateways and the Store API use REST routes)
  • Country blocking that blocks the gateway’s server location
  • Brute-force or rate-limit rules applied to all POST requests

Layer 3: Host firewalls (ModSecurity, Imunify360 and similar)

Hosts run their own web application firewalls. Rules can flag webhook payloads (which contain JSON with fields that look like code or SQL to a crude rule) and return 403 or 406 without anything appearing in WordPress at all.

Layer 4: Site-level access controls

  • Password protection or HTTP basic auth (common on staging copies that were pushed live)
  • Maintenance mode (returns 503)
  • Redirects on the webhook URL (HTTP→HTTPS, www→non-www, trailing slashes), since webhooks generally don’t follow them

The signs you’re being blocked

  • Orders paid at the gateway are stuck on Pending payment or auto-cancelled an hour later
  • Your gateway emails you that webhook deliveries are failing (Stripe sends these warnings, and can eventually disable a failing endpoint)
  • Problems started after enabling a security feature, changing CDN settings, or moving host
  • It affects some orders (for example, only during busy periods when rate limits trigger)

One WordPress.org thread describes Stripe repeatedly warning a store that its webhook endpoint was failing with 403 errors. The owner recreated the endpoint and worked with their host, yet failures kept returning, and Stripe disabled the endpoint at one point. A 403 is almost always something on your side saying “no”.

How to prove where the block is

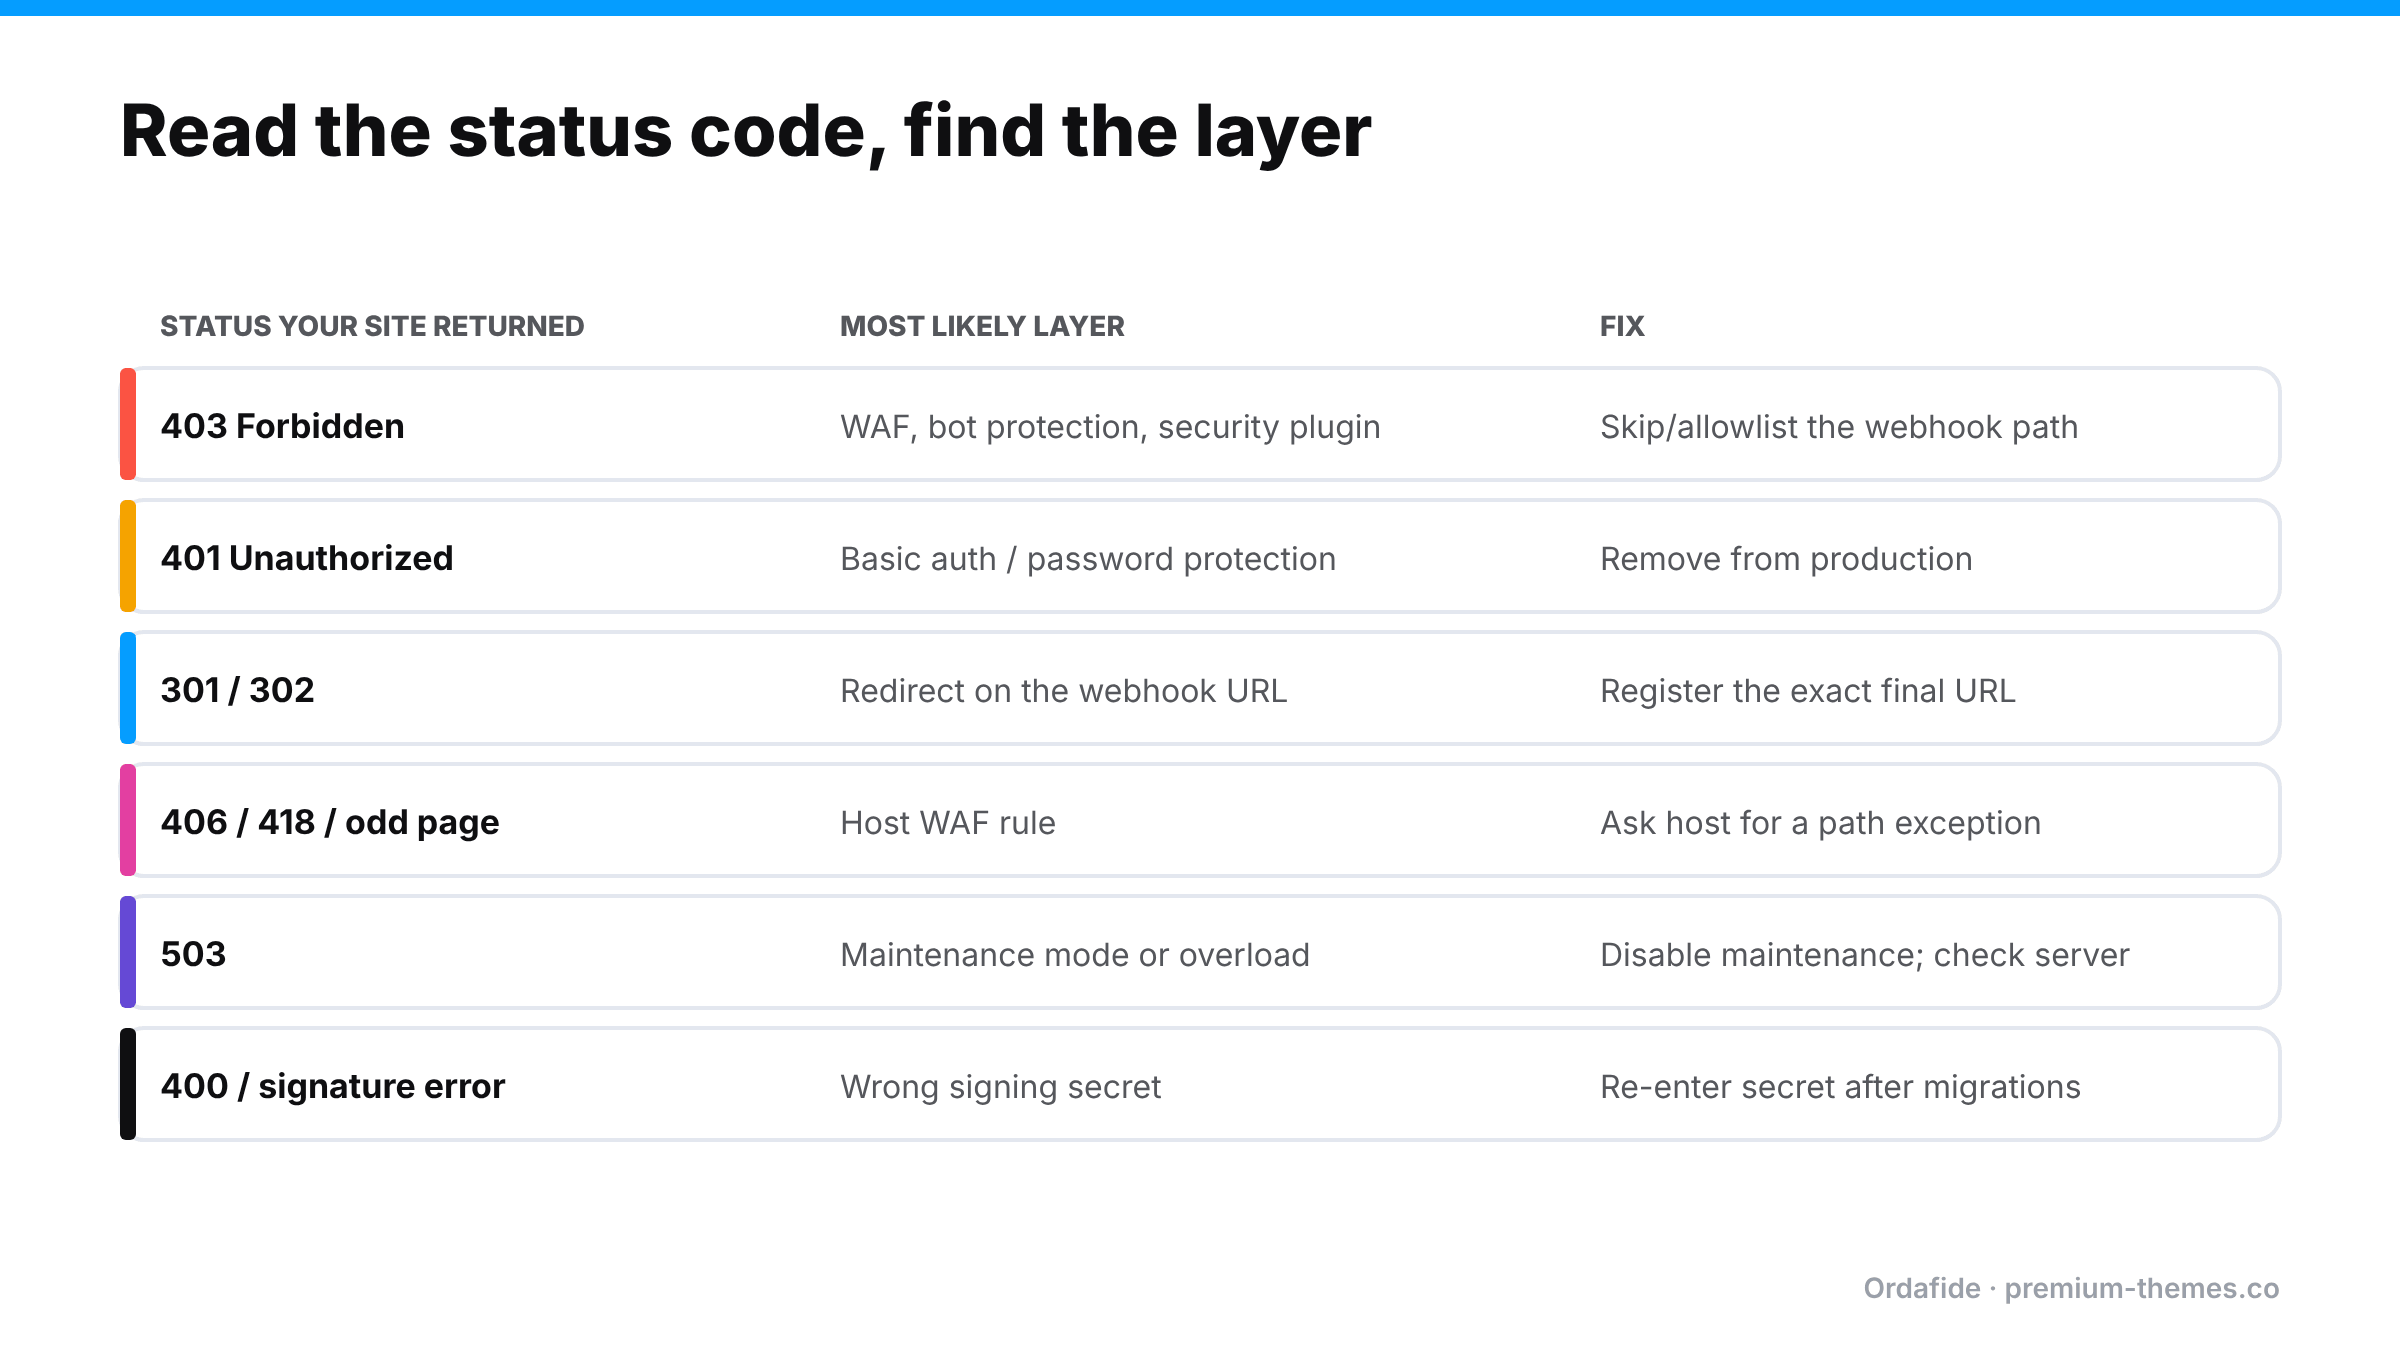
Table mapping webhook delivery status codes to causes and fixes: 403 means a firewall, bot protection or security plugin; 401 means basic auth; 301 or 302 means a redirect; 406 or unusual pages mean a host firewall rule; 503 means maintenance or overload; 400 or signature errors mean a wrong signing secret.

1. Read the gateway’s delivery log. In Stripe, open the webhook endpoint in the Dashboard (Developers / Workbench → Webhooks) and look at recent deliveries. The HTTP status your site returned tells you which layer to check. PayPal and other gateways have similar logs or notification histories.

2. Look at the response body. A Cloudflare block page, a Wordfence message, a host’s “Not Acceptable” page or a login prompt each identify themselves.

3. Check each layer’s logs:

  • Cloudflare: Security → Events, filtered by the webhook path. The Service column tells you whether Bot Fight Mode, a WAF rule or rate limiting acted.
  • Wordfence: Live Traffic and the firewall’s blocked requests.
  • Host: ask support to check WAF logs for the webhook URL and time.

4. Send a test event from the gateway and watch it arrive (or not) in each log.

Fixing it without weakening security

The principle: don’t turn protection off for the whole site. Make a narrow, specific exception for the webhook path, and rely on the gateway’s signature verification to prove requests are genuine.

  • Cloudflare (Pro/Business): allow verified bots, and add a WAF custom rule that skips Super Bot Fight Mode (and any challenge rules) for the webhook path. Optionally restrict it further to the gateway’s published IP ranges.
  • Cloudflare (Free): Bot Fight Mode can’t be exempted per path. Either turn it off and replace it with rate limiting and targeted custom rules, or serve the webhook endpoint from a hostname that bypasses the proxy and restrict it to the gateway’s IP ranges with signature verification.
  • Never put a managed challenge on machine-to-machine endpoints. Use allow, skip or block, not challenge.
  • Wordfence: allowlist the exact webhook URL/parameters in the firewall’s allowlisted URLs.
  • Other security plugins: allow REST and webhook routes for unauthenticated requests where the gateway needs them.
  • Host WAF: ask your host to add a rule exception for the webhook path.
  • Redirects: register the exact final URL (correct protocol and domain) with the gateway.
  • Re-check after every security change, including temporary “under attack” settings.

Then resend failed events from the gateway, or reconcile the stuck orders by hand. (Stuck pending orders)

A worked example: the Black Friday hardening

A week before Black Friday, a store owner reads about bot attacks on checkout and tightens security: Cloudflare’s security level goes up, a managed challenge is added for “suspicious” traffic to /?wc-api=* and /wp-json/*, and the security plugin’s rate limit is lowered.

  • Card testing attempts drop, which is good.
  • Stripe webhooks start receiving challenge pages. Stripe retries, and keeps failing.
  • Paid orders sit on Pending payment. The 60-minute Hold stock timer cancels them.
  • On Black Friday morning, 37 paid orders are in Cancelled. Stripe has emailed a warning about the failing endpoint to an address nobody checks during the sale.

Nothing was “broken” in the usual sense. Every tool did what it was told. The managed challenge was the right idea for checkout pages and exactly the wrong idea for a machine-to-machine webhook path.

The fix took five minutes: a skip rule for the webhook path, then resend failed events from Stripe and restore the cancelled orders. Detection took most of a day.

Different gateways, same problem

Gateway How it notifies Where to see failed deliveries
Stripe Webhooks, signed Dashboard → Webhooks → endpoint → deliveries
PayPal Payments Webhooks PayPal developer dashboard / plugin settings and logs
PayPal Standard (legacy) IPN PayPal IPN history
Square, Mollie, Razorpay and others Webhooks or callbacks Each gateway’s developer dashboard / plugin logs

Whatever the gateway, the principle is the same: find the delivery log, read the status code, then check the layer that returned it.

The bigger lesson: you need a detector downstream

Security settings change for good reasons: an attack, a new plugin, a host’s new rule set, a Black Friday hardening pass. Every one of those changes can break webhooks, and nothing in WooCommerce raises an error when they do. The gateway emails someone, eventually. Meanwhile paid orders pile up on Pending.

What you need isn’t a promise never to touch security settings. It’s a check that notices paid orders not progressing, whatever the cause.

How Ordafide catches the effect of a blocked webhook

Ordafide isn’t a firewall and doesn’t change your security settings. It watches for the consequences of a blocked webhook, which look the same whichever layer did the blocking.

Ordafide Order Integrity for WooCommerce (free) scans recent orders and flags:

  • Stuck payment: orders on Pending payment or Failed that carry a gateway payment reference, the classic fingerprint of a webhook that never landed.
  • Paid but cancelled: orders with a confirmed payment date that ended up Cancelled or Failed, with nothing refunded.
  • Customer never emailed: paid orders where no confirmation reached your mail server.

It also checks the background job queue and offers a loopback test (your site calling itself), useful when the same firewall rules that block webhooks also block your own site’s background processing. (Loopback request failed)

Ordafide Pro adds read-only gateway reconciliation (Stripe, PayPal, Square, Mollie, Razorpay), which shows payments the gateway collected that WooCommerce never recorded properly. It also sends real-time alerts to Slack, SMS, email or a signed webhook. Pro’s signed heartbeat endpoint lets an external uptime monitor confirm that Ordafide’s own checks are still running.

Webhook safety checklist

  • Webhook URL registered exactly (protocol, domain, no redirects)
  • Signing secret correct after every migration or clone
  • CDN bot protection allows or skips the webhook path
  • No managed challenge on webhook paths, including in “under attack” mode
  • Security plugin allowlists the webhook URL
  • Host WAF has an exception for the webhook path
  • Test event sent and confirmed after every security change
  • Automated detection of paid orders that don’t progress

Talking to your host or security provider

When you contact your host or security vendor, give them what they need to find the block quickly:

  • the exact webhook URL (for example https://yourstore.com/?wc-api=wc_stripe)
  • the time of a failed delivery and the status code your site returned
  • the gateway’s published IP ranges if available
  • a clear request: “Please make sure requests to this path from these sources aren’t challenged or blocked. The payment plugin verifies signatures.”

Ask them to tell you if their rule sets change in future. Host-level WAF updates are a common, invisible cause of new webhook failures.

WooCommerce Sales Suddenly Dropped? A 30-Minute Diagnosis Checklist

It usually starts as a feeling. Tuesday was quiet. Wednesday was quieter. By Thursday you’re refreshing the orders screen and wondering whether something is wrong with the store or with the world.

Store owners post this question constantly. A WordPress.org thread titled “Not getting any new orders, way to check for errors?” describes a merchant whose orders stopped while ad clicks kept coming in. They had recently hired someone to speed up the site, test purchases worked fine, and they spent days chasing caching, mixed content and mobile behaviour before finding a lead. Shopify’s community has the same threads: “I went from getting tons of sales to none”.

The frustrating part is that a sales drop can come from four very different places, and each needs a completely different fix:

  1. The store can’t take orders: checkout or payments are broken
  2. The store takes orders but records them wrong: orders exist but are stuck, failed or cancelled
  3. The numbers are wrong: sales are fine, but reporting or tracking broke
  4. Demand really dropped: traffic, ads, search ranking or season

This checklist gets you from “something’s wrong” to “it’s this” in about 30 minutes, in the order that finds the expensive problems first.

Minute 0–5: Is it real?

Before diagnosing anything, confirm there’s a drop.

  • Open WooCommerce → Orders and count orders per day for the last 14 days, including all statuses, not just Processing and Completed.
  • Compare with the same weekdays in previous weeks. Mondays aren’t Saturdays.
  • Account for the obvious: a sale that ended, a holiday, a marketing email that didn’t go out.

If total orders (all statuses) are normal but paid orders dropped, skip to Minute 15. That’s a payment recording problem, not a demand problem.

Minute 5–15: Can a customer actually buy?

This is the most common cause and the most expensive, so check it first.

Do a real test purchase, the way a customer would:

  • In a private window, logged out, on a phone as well as a desktop.
  • Add a product, go to cart, go to checkout, pay with a real card (refund it afterwards).
  • Watch for anything odd: slow spinners, missing payment fields, error messages, a Place order button that does nothing.

Check the browser console (developer tools) on the checkout page for red errors naming a plugin.

Check what changed around the day the drop began:

  • Plugin, theme or WooCommerce updates (including auto-updates)
  • New caching, optimization or security settings
  • Hosting changes: migrations, PHP version upgrades, firewall rules
  • Payment gateway changes: new keys, reconnects, account notices

The WordPress.org thread above is typical: the drop started right after “speed optimization” work. Caching and script-optimization plugins are among the most frequent causes of a checkout that loads but doesn’t work. (Update broke checkout playbook)

Remember the partial breaks. Checkout might fail only on iPhones, only for one payment method, only for logged-in customers, only in one language, or only on block checkout. Your own quick test passing doesn’t clear the store. Test the paths your customers actually use. (Block checkout errors)

Minute 15–20: Are orders arriving but getting stuck?

If checkout works, look at what happens after payment.

  • Filter orders by Pending payment, Failed, On hold and Cancelled for the drop period. Are there more than usual?
  • Open a few. Is there a gateway payment reference or a paid date on orders that aren’t Processing?
  • Check your gateway dashboard: are payments arriving that don’t match WooCommerce orders?

If paid orders are being stuck or auto-cancelled, the cause is almost always payment confirmations not reaching WooCommerce: a blocked webhook, a wrong secret, or a stalled background queue. (Stuck pending orders · Failed orders · Firewall blocking webhooks)

Minute 20–25: Is it the numbers, not the sales?

Sometimes nothing is wrong with sales at all.

  • Analytics vs orders: WooCommerce Analytics relies on background processing to import orders. If the background queue stalls, reports can lag or look empty while real orders keep arriving. Check WooCommerce → Status → Scheduled Actions for a large past-due backlog.
  • Ads and analytics tracking: a broken purchase event in Google Analytics or an ad platform can make conversions “disappear” while WooCommerce has the orders.
  • Email notifications: if you judge sales by new-order emails and those stopped, it may be email that’s broken, not sales. (Emails not sending)

Always trust the orders list and your gateway over dashboards and notifications.

Minute 25–30: Is it demand?

Only once the store is cleared should you look outward:

  • Traffic: did sessions fall at the same time as orders? If traffic is steady and orders fell, it’s almost certainly a store problem, not demand.
  • Sources: did one channel collapse? Paused ads, a disapproved product feed, an email that didn’t send, a search ranking drop.
  • Prices and stock: did a best-seller go out of stock, or a price change go live?
  • Competition and season: a competitor’s sale, a seasonal dip.

A worked example: the “speed optimization” week

A store averages 25 orders a day. On Wednesday a freelancer installs a performance plugin and turns on “delay all JavaScript until user interaction”. Desktop checkout still works, because moving the mouse triggers the scripts. On many phones, the payment field never initializes before the shopper taps Place order.

  • Wednesday: 19 orders. “A bit slow.”
  • Thursday: 14 orders. Ads are running as normal.
  • Friday: 12 orders. The owner’s own test purchase, on a laptop, works.
  • Monday: a customer emails: “Your checkout doesn’t work on my phone.”

Running the checklist on Thursday morning would have found it in ten minutes. Minute 5–15 (test on a phone, check what changed) points straight at the new plugin. Instead it took five days and roughly 40 lost orders.

The lessons generalize: test on the devices your customers use, always ask “what changed?”, and don’t wait for a customer to tell you.

Keep a simple change log

Most sales-drop investigations stall on one question: what changed around that day? A one-line-per-change log answers it instantly:

Date Change By
4 Nov Performance plugin installed, JS delay on Freelancer
6 Nov Shipping rates updated Owner
9 Nov Stripe plugin auto-updated Auto

Include plugin installs and updates, settings changes, hosting changes, gateway changes, and marketing changes (ads paused, emails sent). It takes seconds to keep and saves hours when something goes wrong.

The quick decision tree

Decision tree for a WooCommerce sales drop: traffic normal but all orders down means checkout is broken; all orders normal but paid orders down means payments aren't being recorded; orders normal but reports down means reporting broke; traffic down with steady conversion means a demand or marketing problem. Check the store first.

  • Traffic normal, all-status orders down → checkout broken. Test every path.
  • Orders normal, paid orders down → payments not being recorded. Check stuck, failed and cancelled orders against the gateway.
  • Orders normal, reports down → reporting or tracking problem. Check Scheduled Actions and analytics tags.
  • Traffic down, conversion steady → demand or marketing problem. Check channels.

Partial drops are the hardest

A complete stop is obvious within a day. A partial drop, where orders fall by 30% because one payment method or one device type broke, can run for weeks. Daily sales vary anyway, and a 30% dip looks like a slow week.

Signs a “slow week” is actually a partial break:

  • One payment method’s share of orders falls sharply while others hold steady
  • Mobile orders fall while desktop orders don’t
  • New customer orders fall while repeat customers keep buying
  • One country or currency stops ordering

WooCommerce Analytics can break orders down by payment method and customer type, and your web analytics can split conversion by device. Those comparisons often reveal a partial break in minutes.

Why it takes days to notice

Here’s the uncomfortable pattern behind most of these stories: the drop started days before anyone looked. A sales drop is an absence. Nothing errors. Nothing emails you. Absences are hard for people to notice, especially on weekends, during holidays, or when sales naturally vary day to day.

The fix isn’t to stare at the dashboard more. It’s to have something compare “now” with “normal” for you, all the time.

Catching drops automatically with Ordafide

Illustrative line chart of orders per hour: this Thursday tracks a normal Thursday until 13:00, then falls far below. An anomaly is flagged at 14:00, hours before anyone would notice by looking at daily totals.

Ordafide Pro is built to turn an absence into an alert:

  • Order volume anomaly detection compares the current hour’s orders with comparable past hours (same time of day, same day of week) using median-based statistics, so normal ups and downs and one-off busy days don’t trigger false alarms. It flags drops (and spikes) and resolves itself when volume returns to normal.
  • Synthetic checkout monitoring checks shop, product, cart, checkout and the Store API every 15 minutes, with response times. An optional deep mode adds a product to a cart. It never places an order, and it raises a finding only after two consecutive failures.
  • Gateway reconciliation (Stripe, PayPal, Square, Mollie, Razorpay; read-only) shows payments that arrived without matching orders.
  • Alerts to Slack, SMS, email or a signed webhook, with severity routing and throttling.

The free Ordafide plugin covers steps 15–25 of this checklist automatically. It flags stuck payments, paid-but-cancelled orders, duplicate charges and paid customers who were never emailed, and reports Action Scheduler and WP-Cron health, which affects both order processing and reports. Its optional weekly summary email arrives only when there’s something to look at.

What Ordafide doesn’t do is analyse your marketing or traffic. If the store is healthy and demand fell, that’s a job for your analytics.

After you find the cause

  1. Fix it (roll back, reconfigure, unblock), then do a full test purchase.
  2. Sweep up: find orders caught during the outage that are stuck, duplicated or un-emailed, and fix them.
  3. Win back customers who tried and failed, via abandoned-cart emails or a short apology with a discount.
  4. Write down the cause and the date. Next time, it’s the first thing you check.
  5. Set up detection so the next drop is found in an hour, not a week.

What a sales drop costs while you investigate

Every hour of investigation is an hour of lost sales if the cause is a broken checkout. That’s why the checklist starts with the store, not the marketing: the store problems are the ones that cost you money by the hour, and the ones you can fix in minutes once found.

If you can’t find the cause quickly, limit the damage while you look:

  • Pause paid ads sending traffic to a checkout that may be broken.
  • Switch to a known-good setup: roll back the last change, or temporarily use classic checkout instead of the block.
  • Enable a second payment method if one gateway is suspect.
  • Put a short note on the site (“having trouble checking out? email us”) so motivated buyers can still reach you.

WooCommerce Failed Orders: What They Mean, When They’re Actually Paid, and What to Do

Every WooCommerce store has a few Failed orders. Most are harmless: a card declined, a customer gave up. So most store owners learn to ignore them.

That habit is expensive, because a small share of Failed orders aren’t failed at all. The customer was charged. The money is in your gateway. WooCommerce just recorded the wrong outcome. The WordPress.org support forums are full of threads titled things like “Customer payment says failed but it has been drawn from their bank account” and “Successful Stripe payments after failure, yet WooCommerce order failed”.

This guide explains what Failed means, how to tell a genuine decline from a paid order recorded as failed, and what to do with each.

What “Failed” means in WooCommerce

WooCommerce marks an order Failed when a payment attempt doesn’t go through. The order usually moves from Pending payment to Failed, and the gateway adds an order note explaining why.

Typical genuine causes, as WooCommerce’s own guide to failed orders lists them:

  • Declined card: insufficient funds, expired card, spending limits, wrong details
  • Authentication problems: wrong or expired API keys, a suspended gateway account
  • Duplicate-transaction protection: the gateway rejects what looks like a repeat submission
  • Site issues: outdated plugins, conflicts, server problems

By default, WooCommerce sends the admin a failed-order email but not the customer. Many customers who fail at checkout simply try again or leave.

The dangerous minority: “failed” orders that were paid

Four ways a paid WooCommerce order is recorded as Failed: a retry succeeded on the same order without updating status; gateway duplicate protection blocked a repeat after the first attempt charged; a delayed success arrived after the failure; or the correcting webhook was blocked. Ordafide flags Failed orders with a payment reference or paid date.

Here’s the problem. Failed is what WooCommerce believes happened. Sometimes the gateway disagrees.

Path 1: The customer retried and the second attempt succeeded on the same order

The first attempt is declined, so the order is marked Failed. The customer fixes their card details and pays successfully. If the success is recorded against the same order but the status update doesn’t complete (a webhook failure or plugin bug), the order stays Failed even though it now carries a successful payment.

Path 2: The gateway’s duplicate protection blocked a request that had already succeeded

A web agency documented a case where the gateway (NMI) rejected a second submission of a transaction as a duplicate. The first submission had actually succeeded. The customer saw an error, WooCommerce marked the order Failed, and the card was charged anyway. The gateway’s own log showed “Duplicate transaction”.

Path 3: A delayed success arrived after the failure

Some payment methods report a failure or timeout first and a success later (3-D Secure challenges that complete late, bank-based methods, wallets). If the later success never reaches WooCommerce, the order stays Failed.

Path 4: The webhook that would have corrected it was blocked

Even when the gateway does send the correction, a firewall, security plugin or wrong webhook secret can stop it from arriving. (See is your firewall blocking payments?.)

In every path, the customer has paid, and your store has no intention of shipping anything, because nobody works the Failed list.

How to triage a Failed order in two minutes

Triage table for WooCommerce Failed orders: a decline with no charge is a genuine failure; a decline followed by a paid new order needs nothing; a payment reference or paid date with a succeeded charge means the order was paid and should be restored; a duplicate transaction note likely means paid; an authentication or API key error means the gateway is broken.

Open the order and read it like evidence.

  1. Read the order notes from the bottom up. Gateways write what happened: “Card declined (insufficient funds)”, “3-D Secure authentication failed”, “Payment intent succeeded”. Pay attention to the last gateway note, not the first.
  2. Look for a transaction or payment reference. Many gateways write a reference (for example a Stripe Payment Intent ID) to the order. A reference on its own doesn’t prove payment, but it tells you exactly what to look up.
  3. Look for a paid date. If WooCommerce recorded a date paid on a Failed order, something is badly out of step: WooCommerce itself once believed the payment succeeded.
  4. Check the gateway. Search the reference or the customer’s email in your gateway dashboard. Is there a succeeded payment for this amount?
  5. Check for a second order. The customer may have given up and placed a new order that succeeded. Then the Failed order is just history, and nothing needs doing.
What you find What it means What to do
Decline note, no successful payment at the gateway Genuine failure Nothing, or a friendly “need help?” email
Decline note, but a later order from the same customer succeeded Customer retried on a new order Nothing
Gateway shows a succeeded payment for this order Paid but recorded as Failed Move to Processing, add a note, ship, apologize
Paid date recorded on a Failed order Paid but recorded as Failed Verify in gateway, then as above
“Duplicate transaction” note Gateway blocked a repeat. The first may have succeeded Check the gateway for the original charge
Authentication or API key error Your gateway connection is broken Fix now: every customer is failing (guide)

A worked example: five Failed orders on a Monday

Here’s what a typical weekend’s Failed list might contain, and how each one resolves.

#8812, $64, note: “Card declined (insufficient funds)”. No payment in the gateway. Ten minutes later the same customer placed #8815, which succeeded. Nothing to do. The customer retried on a new order.

#8820, $129, note: “3-D Secure authentication failed”, then nothing. The gateway shows a succeeded payment for the same Payment Intent four minutes later. The customer completed the bank challenge on a second attempt, but the success never reached the order. Paid but recorded as Failed. Move to Processing, ship, apologize.

#8827, $38, note: “Duplicate transaction”. The gateway shows one successful charge, from the first submission. The customer saw an error on the second. Paid. Restore and ship, and look at why checkout is slow enough for customers to resubmit.

#8831, $210, note: “Invalid API Key provided”. No charge at the gateway. Neither were there any successful orders after 02:10 on Sunday. Your gateway connection broke. This is the urgent one: every customer since 02:10 failed. (Gateway stopped working)

#8836, $19, random name, mismatched address, “card declined”. One of 40 similar orders between 03:00 and 04:00 for your cheapest product. Card testing. (Card testing guide)

Five Failed orders with five different explanations, two of which were paid. Without opening each one, all five look identical in the list.

Telling customers about genuine declines

For genuine declines, a short, friendly follow-up recovers real sales, especially for higher-value carts:

“Hi Sam, it looks like your payment for order #8812 didn’t go through. That’s usually a temporary card issue. If you’d still like your order, you can pay here: [link]. If you’ve already ordered again, please ignore this.”

Keep it helpful, not accusatory, and never send it before checking that the customer hasn’t already paid on another order.

When Failed orders spike

A handful of Failed orders a week is normal. A sudden change is a signal:

  • A spike of Failed orders on cheap products from random names: almost certainly card testing. (Card testing guide)
  • Every order failing with the same authentication error: your API keys expired, were rotated, or the account was disconnected.
  • Failed orders concentrated on one payment method or device: a compatibility problem after an update.
  • No Failed orders and no successful orders: not a payment problem at all. Checkout itself is broken. (Sales suddenly dropped?)

What happens to stock

Stock behaviour for Failed orders has changed across WooCommerce versions. WooCommerce’s troubleshooting documentation notes that from WooCommerce 11.0, moving an order to Failed returns stock only if stock had previously been reduced for that order, and an immediate decline leaves inventory unchanged. If you restore a Failed order to Processing because it was actually paid, check stock afterwards, especially on older versions or with inventory plugins.

Fixing a paid order that’s stuck on Failed

  1. Verify the payment in the gateway: status succeeded, amount and currency correct.
  2. Change the order to Processing and add a private note with the payment ID and how you verified it.
  3. Check stock for the items.
  4. Send the customer their confirmation (Order actions → Email invoice / order details to customer) and a short apology. They saw an error and were charged, so they’re worried.
  5. Look for a duplicate order in case the customer also paid a second time.
  6. Find the cause (webhook, duplicate protection, delayed method) so it doesn’t keep happening.

How Ordafide finds paid orders hiding in the Failed list

Nobody reads every Failed order, and that’s the point: the paid ones look exactly like the rest.

Ordafide Order Integrity for WooCommerce (free) scans your recent orders and flags the ones that don’t add up:

  • Stuck payment: orders on Pending payment or Failed that carry a gateway payment reference, the trace a gateway leaves when money moved.
  • Paid but cancelled: orders with a confirmed payment date sitting in Cancelled or Failed, with nothing refunded.
  • Duplicate charge: the same customer charged twice for an identical basket within minutes, common after a confusing failure.

Findings are sorted by money at risk, with the evidence laid out and what to check in your gateway before touching anything. When WooCommerce itself recorded a confirmed payment date, Ordafide can restore the order to Processing in one click. The change is logged and can be undone. Ordafide never captures, refunds or voids anything, and it sends nothing to a third party.

Ordafide Pro goes one step further with read-only gateway reconciliation (Stripe, PayPal, Square, Mollie, Razorpay). It compares what the gateway actually collected against your orders and flags money with no order, paid orders with no payment and amount disagreements, so a Failed order with a successful charge behind it can’t hide. Pro’s order volume anomaly detection also flags sudden spikes, the typical shape of a card testing attack, and its alerts reach Slack, SMS, email or a webhook.

A simple Failed-order routine

  • Daily: glance at the Failed count. Is it normal?
  • Weekly: review Ordafide’s findings (or the weekly summary email) for stuck and paid-but-failed orders.
  • On any spike: check for card testing, API key errors, or a broken payment method.
  • Optionally: email customers with genuine declines a short “having trouble paying?” note. It recovers real sales.

Reducing genuine failures

Not every Failed order is a hidden payment, and the genuine ones are worth reducing too:

  • Show clear error messages. A shopper who understands “your bank asked for extra verification” tries again. One who sees “error” leaves.
  • Offer more than one payment method. If a card fails, a wallet or PayPal often works.
  • Make checkout fast, so customers don’t resubmit and trigger duplicate protection.
  • Keep gateway and WooCommerce plugins updated. 3-D Secure and wallet handling improves over time.
  • Watch for patterns. Failures concentrated on one card brand, country or device usually have a fixable cause.

Should You Auto-Approve Returns? Building Return Approval Rules for WooCommerce

Every growing store hits the same fork in the road with returns.

Option A: approve everything by hand. Safe, but slow. Customers wait days to hear back, your team spends hours clicking “approve” on routine requests, and the queue balloons every January.

Option B: auto-approve everything. Fast and cheap, until you notice the same handful of customers buying, wearing and returning, or a high-value item approved and refunded before anyone looked at it.

A discussion on Reddit about automating ecommerce returns summed up where most experienced operators land: the best systems “automate the obvious cases and smoothly escalate everything else to humans”, with context attached. Commenters agreed on the tension: auto-approving without any checks invites fraud, but demanding photos for every return slows down simple cases that carry no fraud risk at all. One suggested routing by order value and customer history: auto-approve small returns from trusted customers, flag risky ones for review. Another pointed out the payoff depends on volume. At a low return rate manual handling may be fine; at high volumes automation becomes essential.

This guide turns that consensus into a practical framework: which returns to automate, which to review, how to write rules that don’t surprise you, and how to set them up in WooCommerce.

The automation spectrum

Spectrum from fully manual (more control, slower) through assisted manual and rules-based to fully automatic (faster, more abuse risk). Rules-based, where routine returns are decided automatically and the rest are held or flagged, is the target for most stores.

Level What happens Good for
Fully manual Every request reviewed by a person Very low volume; very high-value goods
Assisted manual Every request reviewed, but with filters, bulk actions, and history at hand Small stores growing quickly
Rules-based Routine requests decided automatically; the rest held or flagged for a person Most growing stores
Fully automatic Everything approved automatically Very low-value goods, very low abuse risk

For most WooCommerce stores, rules-based is the right target: speed for the 80–90% of routine returns, human judgment for the rest.

What can be safely automated

These returns are usually safe to approve without a human:

  • Exchanges for a different size or colour. You keep the revenue, and the risk is low.
  • Low-value items, where the cost of reviewing exceeds the cost of a mistake.
  • Inside the return window, for eligible products: the system has already checked the policy.
  • Common, low-risk reasons such as “too small”, “too large” or “changed my mind” on unworn items.
  • Trusted customers with a good history.
  • Clear store errors (wrong item sent), where you’d approve anyway and delay only annoys.

What should go to a human

  • High-value returns, above a threshold you set.
  • Damage and fault claims, especially without detail or photos.
  • Customers with several recent returns, or with past returns refused on inspection.
  • Categories prone to wardrobing: occasion wear, event equipment, cameras.
  • Unusual combinations: returning most of a large order, or the same item repeatedly.
  • Anything your rules don’t recognize. The default should be “hold”, not “approve”.

What can be automatically rejected

Automatic rejection should be reserved for clear-cut policy cases, and always with a specific reason sent to the customer:

  • Outside the return window (if not already blocked at submission)
  • Non-returnable products (if not already excluded)
  • Duplicate requests for units already returned

Be cautious: an automatic rejection the customer doesn’t understand quickly becomes a complaint or a chargeback. If in doubt, flag instead of reject.

Four actions, not two

Good rule systems offer more than approve/reject:

Action Meaning Use for
Approve Decision made; customer gets next steps Routine, low-risk returns
Reject with reason Decision made; customer told why Clear policy violations
Flag Proceed normally, but mark for attention Mild risk signals you want to watch
Hold Stop; wait for a person High value, high risk, missing evidence

Flag is underrated. It lets you approve quickly while keeping an eye on patterns, for example customers whose returns you want to inspect carefully on arrival.

Signals worth building rules on

Whatever tool you use, rules are only as good as the signals they can see. The most useful ones, roughly in order of value:

  • Return value: the single strongest predictor of how much a wrong decision costs.
  • Return type: exchange, store credit or refund. Exchanges keep revenue and carry less risk.
  • Reason: sizing reasons are low risk; damage and “not as described” deserve evidence.
  • Whether an explanation or photos were provided for reasons that need them.
  • Product or category: occasion wear and high-value electronics behave differently from basics.
  • Customer history: number of recent returns, past refusals on inspection, lifetime spend.
  • Order age: requests near the end of the window are slightly more likely to be wardrobing.
  • Order size: returning most of a large order is worth a look.

You don’t need all of them. Value, type and reason alone cover most of the benefit for most stores.

How to write rules that don’t surprise you

Use “first match wins” ordering

Ordered rule list checked top to bottom: hold returns over $300, hold damage claims with no explanation, flag customers with many recent returns, approve exchanges, approve returns under $50, hold everything else. A $400 exchange is held by rule 1 even though exchanges are usually approved.

When rules are checked in order and the first one that matches decides, you can reason about them like a checklist:

  1. Hold if the return value is over $300
  2. Hold if the reason is “Damaged” or “Faulty” and no explanation was given
  3. Flag if the customer has had several returns recently
  4. Approve if it’s an exchange
  5. Approve if the return value is under $50
  6. Hold everything else

Put the most cautious rules first. A $400 exchange should be held (rule 1) even though exchanges are normally approved (rule 4).

Always have a default

The last rule should catch everything not matched above. Hold is the safe default while you’re learning; switch it to approve once you trust your rules.

Record which rule decided

When a customer asks “why was my return approved instantly but my friend’s wasn’t?”, or when you’re auditing a bad decision, you need to know which rule made the call. Without that, rules become a black box nobody trusts.

Start strict, then loosen

Begin with a narrow set of auto-approvals (exchanges, low-value items) and a default of hold. Review a month of held returns: if you approved 95% of them anyway, add a rule to approve that type automatically. Loosen with evidence, not hope.

Review monthly

Look at:

  • What share of returns were decided automatically
  • Average time to decision for automated vs held returns
  • How many auto-approved returns turned out to be problems on inspection
  • How many held returns you approved without changes (candidates for new auto-approve rules)

Telling customers about automated decisions

Customers don’t need to know a rule decided their return, but they do need the decision to feel fair and fast:

  • Instant approvals should read like any approval: clear next steps, the label, the deadline.
  • Held returns deserve a short, honest message: “Thanks, we’ve received your request. Because of the item’s value, a member of our team will review it personally within one working day.” That turns a delay into a sign of care rather than suspicion.
  • Automatic rejections must give the specific reason and a way to reply. If a customer can’t understand why a machine said no, they’ll ask their bank instead.
  • Flags are internal only. The customer’s experience shouldn’t change.

When a customer queries a decision, the activity log’s record of which rule decided makes the answer quick and consistent.

A worked example

A clothing store processing 400 returns a month starts fully manual. Two people spend about 15 hours a month approving requests, and customers wait an average of two days for a decision.

They introduce rules:

  • Hold anything over $200
  • Hold “Damaged” claims without photos
  • Flag customers with 4+ returns in 90 days
  • Approve all exchanges
  • Approve “Too small”/”Too large” under $200
  • Hold everything else

After a month, about 70% of returns are approved automatically within seconds, most of them exchanges and sizing returns. The remaining 30% are held or flagged, and the team reviews them properly instead of rushing. Average decision time drops from two days to a few hours, and the team spends a fraction of the time on approvals. Because flagged customers’ returns are inspected carefully on arrival, two cases of repeated wardrobing are spotted in the first month.

(Illustrative example; your mix of returns will differ.)

Common rule-writing mistakes

  • Approve-all default. If your last rule approves everything, any gap in your rules becomes an automatic approval. Default to hold until you trust the set.
  • Too many rules. Twenty overlapping rules are impossible to reason about. Most stores need five to eight.
  • Rules nobody owns. Someone should be responsible for reviewing and changing them, or they drift out of date as products and prices change.
  • Thresholds that never move. A $50 auto-approve limit set three years ago may no longer fit your average order value.
  • Silent rejections. Automatic rejections without a reason the customer can understand generate complaints and disputes.
  • Forgetting seasonality. A rule set tuned for July may hold far too much in January. Review before holiday returns season.

Approval is only one step

Automating approval speeds up the front of the process. Make sure the rest keeps up:

  • Labels generated on approval, so an instant approval comes with an instant label.
  • Restocking on arrival, after inspection, not on approval, so automated approvals don’t put unchecked items back on sale.
  • Refund after arrival for anything held or flagged.
  • Clear emails at each step, so customers know what happens next. ([Templates](/blog/woocommerce-return-email-templates/))

Setting it up with Recirco

Recirco – Returns & Exchanges for WooCommerce (free) handles the policy layer and the assisted-manual level:

  • Return window, eligible statuses and excluded products/categories are enforced at submission, so ineligible requests never reach the queue.
  • Per-unit eligibility blocks duplicate requests for the same units.
  • Reasons with optional required explanations, so the information needed to decide arrives with the request.
  • An admin queue with search, filters, status counts, a pending badge and bulk approve, reject, mark received and delete, for fast manual review.
  • An activity log on every return.

Recirco Pro adds conditional approval rules, the rules-based level described above:

  • Seven conditions and four actions: approve, reject with reason, flag, and hold
  • First match wins, so rules behave like the ordered checklist above
  • The activity log names the deciding rule on every return, so automated decisions are explainable to your team and your customers
  • Which signals you can use depends on the seven conditions Recirco Pro supports. Check the Recirco documentation for the current list and map the example rules in this article to them. Anything the conditions can’t express can still go to the hold default for a person to decide.
  • Works alongside Pro’s exchanges, store credit, Shippo labels generated on approval, photo uploads for claims, and analytics (including average days to resolve) to measure the effect of your rules

WooCommerce Return Email Templates: 6 Messages Customers Actually Read (Copy and Paste)

Return emails are some of the most-read messages your store sends. A customer waiting for a refund opens every one, often more than once. Yet most stores either send nothing between “I’d like to return this” and the refund, or send generic messages that leave the customer with more questions than answers.

Good return emails do three jobs:

  1. Tell the customer exactly where things stand, so they don’t email to ask.
  2. Tell them exactly what to do next, so the return arrives correctly and quickly.
  3. Protect the relationship, so a return becomes a reason to buy again, not a reason to leave.

The stakes are real: the NRF found 71% of shoppers are less likely to shop with a retailer again after a poor returns experience (NRF, October 2025).

Below are six templates covering the full return lifecycle, with subject lines, the reasoning behind each, and the mistakes to avoid. Copy them, adjust the tone to your brand, and replace the bracketed placeholders.

The six emails a return needs

Six return emails: request received (confirm and set timing), admin alert (team acts), approved (how to send it), rejected (why and options), completed (amount, date and timing), and customer note (explain anything unusual). All six are built into free Recirco.

# Email Sent when Main job
1 Request received Customer submits a return Confirm, set expectations
2 Admin alert Customer submits a return Get your team to act
3 Approved You approve Explain how to send it back
4 Rejected You decline Explain why, kindly, with options
5 Completed / refunded Refund or exchange is done Confirm the money, close the loop
6 Customer note Anything unusual Explain in plain words

Some stores add a “received” email when the parcel arrives. If your process has a gap of more than a day or two between arrival and refund, add one. It’s the best single defence against “did you get my parcel?” emails. ([More on that](/blog/where-is-my-refund-tickets/))

Principles for every return email

Annotated example refund email: the return number is in the subject line, the status comes first, the exact amount, payment method and date are listed, and it ends with honest bank timing and an invitation to reply.

  • Put the return number in the subject line. Customers search their inbox for it.
  • Lead with the status. “Your return is approved”, not “Thank you for contacting us regarding…”
  • One clear next step, in bold or as a button.
  • Specific over vague. “Within one working day”, not “soon”. “$24.30 to your Visa”, not “your refund”.
  • Plain text-friendly. Many people read on phones; keep layout simple.
  • Human tone. Returns aren’t a failure on the customer’s part. Never make them feel judged.
  • Same voice as your marketing. A playful brand shouldn’t suddenly sound like a bank.

Template 1: Request received

Subject: We’ve got your return request: [RETURN NUMBER]

Hi [First name],

Thanks, we’ve received your return request for order #[Order number].

Return number: [RETURN NUMBER]
Items: [Item list with quantities]

We’ll review it within one working day and email you with next steps. You can check the status any time in My Account → Returns.

Changed your mind? You can cancel the request from the same page.

[Store name]

Why it works: instant reassurance that the request went through, a reference number, a time commitment, and a place to look. It prevents the “did my request work?” email entirely.

Avoid: “Your request is being processed.” It says nothing.

Template 2: Admin alert (internal)

Subject: New return request [RETURN NUMBER]: [Customer name], [value]

A new return request needs review.

Customer: [Name], [email]
Order: #[Order number], placed [date]
Items: [Item list]
Reason(s): [Reasons + customer explanation]
Return value: [Amount]

[Review in admin →]

Why it works: your team can triage from the email: reason, value, customer. The faster this is acted on, the faster email 3 goes out.

Tip: send it to a shared inbox or channel, not one person, so holidays don’t stall returns.

Template 3: Return approved

Subject: Your return [RETURN NUMBER] is approved. Here’s how to send it

Hi [First name],

Good news: your return for order #[Order number] is approved.

What to do next

  1. Pack the item(s) securely, ideally in the original packaging, with tags attached.
  2. Write your return number [RETURN NUMBER] on a note inside the parcel.
  3. Send it to:
    [Return address]
    [Or: Your prepaid label is attached. Print it and drop the parcel at any [carrier] location.]
  4. Please send it within 14 days.

Once it’s on its way, add your tracking number in My Account → Returns so we can watch for it.

What happens next: when your return arrives we’ll check it within [2] working days and then [refund you / send your replacement].

[Store name]

Why it works: numbered steps, the address or label right there, a deadline, and a preview of what happens next. It answers “where do I send it?”, “how?”, “by when?” and “then what?” in one go.

For exchanges: replace the last paragraph with “Your replacement [item/size] will ship [as soon as your return arrives / today].”

Avoid: burying the address in a footer, or attaching a label without saying which carrier accepts it.

Template 4: Return rejected

This is the hardest email to write well, and the one most likely to become a complaint or chargeback if written badly.

Subject: About your return request [RETURN NUMBER]

Hi [First name],

Thanks for your return request for order #[Order number]. Unfortunately we can’t accept this return because [specific reason, e.g. “the order was delivered on 2 October, outside our 30-day return window” / “personalized items can’t be returned”].

We know that’s not the answer you were hoping for. Here’s what we can do:

  • [If faulty: “If the item is faulty or damaged, please submit a new request choosing ‘Faulty’ and we’ll look at it under your warranty rights.”]
  • [Optional goodwill: “As a thank-you for being a customer, here’s 10% off your next order: [CODE].”]

If you think we’ve got something wrong, just reply to this email. A real person will read it.

[Store name]

Why it works: a specific reason the customer can understand and check, an acknowledgement that it’s disappointing, an alternative path (especially for faults, which may have legal protection beyond your return window), and a human route to appeal.

Avoid: “Your return does not meet our policy.” No reason, no options, no human: that’s a template for a chargeback.

Template 5: Return completed / refunded

Subject: Your refund of [amount] is on its way: [RETURN NUMBER]

Hi [First name],

Your return [RETURN NUMBER] is complete.

Refund: [$24.30]
Refunded to: [Visa ending 4242 / PayPal / store credit]
Date issued: [14 January]

Most banks show refunds within 5–10 working days. If you can’t see it after that, reply to this email and we’ll send you the refund reference to give your bank.

[If partial: “This covers [items]. [Short explanation of any difference].”]

Thanks for shopping with us. We hope to see you again soon.

[Store name]

For exchanges:

Subject: Your replacement is on its way: [RETURN NUMBER]

Your exchange is complete and your [new item, size] has shipped. Tracking: [link]. There’s nothing to pay.

For store credit:

We’ve added [$27.50] store credit to your account (including a [10]% bonus). It’s ready to use at checkout. See your balance in My Account → Store credit.

Why it works: the amount, method and date answer “where’s my money?” before it’s asked, and an honest bank timeframe stops the day-three panic.

Template 6: Customer note (anything unusual)

Use this whenever something needs explaining: a partial refund, a condition issue, a delay, a question.

Subject: A quick update on your return [RETURN NUMBER]

Hi [First name],

[Plain explanation, e.g. “Your parcel arrived today, thank you. One of the two shirts was missing its tags, so under our returns policy we’ve refunded the other shirt ($22.50) and will send the untagged one back to you at no cost.”]

[What happens next / what they can do.]

Any questions, just reply.

[Store name]

Why it works: customers accept almost any outcome if it’s explained before they discover it on a statement.

Adapting the tone to your brand

The templates above use a neutral, friendly tone. Adjust it to match how the rest of your store sounds:

  • Playful brands can lighten the approved email (“It’s not you, it’s the size. Let’s fix that.”) but should keep the steps and numbers plain.
  • Premium brands can be warmer and more personal (“A member of our team will personally inspect your item”), and may offer a callback for high-value returns.
  • Technical or B2B stores can be more concise and include order and SKU references in a short table.

Whatever the tone, keep three things constant: the return number, the next step, and the specific amounts and dates. Personality goes around the facts, never in place of them.

If you sell in several countries, translate return emails rather than relying on English everywhere. A customer anxious about their money will read every word, and it helps if they’re in their own language.

Mistakes that create complaints

  • No return number in the subject: customers can’t find the thread.
  • Different numbers in different places (order number in one email, RMA in another, with no link between them).
  • Vague timing (“soon”, “shortly”) that invites “how soon?” emails.
  • Rejections without reasons.
  • Refund emails without the amount.
  • Marketing-heavy footers on a rejection email. Not the moment for “You might also like…”.
  • Sending from no-reply addresses while telling people to reply.

Setting these up in WooCommerce

WooCommerce sends a refund email, but has no return request, approval, rejection or note emails, because it has no concept of a return.

Recirco – Returns & Exchanges for WooCommerce (free) adds all six:

  • Request received, admin alert, approved, rejected, completed and customer note
  • Each editable, in HTML and plain text, so you can paste in the wording above and match your brand
  • Sent automatically as the return moves through its statuses, so nobody has to remember
  • Customer notes written on the return can be emailed directly, covering Template 6
  • Each return has an RMA number with your own prefix, so subject lines and references are consistent

Recirco also gives customers a live status page in My Account with the return address, labels when available, the tracking number they added, and the current status, so the emails and the page always tell the same story.

Recirco Pro adds what the exchange and credit versions of Template 5 rely on: exchanges that create a zero-total replacement order, store credit with a bonus percentage and a balance page in My Account, plus carrier labels via Shippo generated on approval, so the “your prepaid label is attached” line in Template 3 becomes automatic.

Stop the ‘Where’s My Refund?’ Emails: How to Keep WooCommerce Customers Informed During Returns

Look through any store’s support inbox in January and you’ll find the same handful of messages over and over:

  • “I sent my return last week. Did you get it?”
  • “Where’s my refund?”
  • “Is my return approved? Where do I send it?”
  • “I’ve heard nothing since I asked to return this.”
  • “My bank says nothing has come in.”

In retail support these are often called WISMR tickets (“where is my refund?”), a cousin of the “where is my order?” tickets that flood inboxes before delivery. They’re frustrating for everyone: the customer feels ignored, and your team spends hours answering questions a status update could have answered automatically.

And they matter beyond support cost. The NRF found 71% of consumers are less likely to shop with a retailer again after a poor returns experience, and four in five would share a bad returns experience with friends and family ([NRF, October 2025](https://nrf.com/media-center/press-releases/consumers-expected-to-return-nearly-850-billion-in-merchandise-in-2025)). A customer who’s anxious about their money is one quiet week away from calling their bank.

This guide identifies the moments where customers go looking for information, what to tell them at each, and how to automate it in WooCommerce so the questions stop arriving.

Why WISMR tickets happen

Every one of these emails has the same root cause: the customer doesn’t know what’s happening, and has nowhere to look.

With email-based returns, the process is invisible to the customer. They send a request into the void, ship a parcel into the void, and wait for money to appear. Every gap in communication becomes a ticket.

WooCommerce alone makes this harder:

  • There’s no return record for the customer to look at. Only the original order.
  • There’s no “return received” or “return approved” email. WooCommerce has a refund email, but nothing before it.
  • Partial refunds don’t change the order status, so even the order page gives no clue anything happened.

The five moments that create tickets

Timeline of five moments that create support tickets: request sent (did it go through?), approved (where do I send it?), shipped (did you get it?), refunded (where's my money?), and anything unusual (why is it less?). Answer each with an email and a status page.

Map your return process and you’ll find customers need information at five points. Miss any one, and tickets follow.

Moment 1: “Did my request go through?”

When: immediately after they ask to return something.
What they need: confirmation it was received, a return number, and when they’ll hear back.
Ticket if missing: “I filled in your form, did it work?”

Moment 2: “Is it approved? What do I do now?”

When: when you approve (or reject) the return.
What they need: the decision, where to send the item, the return number to include, how to package it, the label if you provide one, and any deadline.
Ticket if missing: “Where do I send it?” / “Is it approved yet?”

Moment 3: “Did you get my parcel?”

When: after they’ve shipped it.
What they need: reassurance that you know it’s on the way, and confirmation when it arrives.
Ticket if missing: “I posted it a week ago, has it arrived?”

Moment 4: “Where’s my money?”

When: after the item arrives and is inspected.
What they need: confirmation of the refund amount, the method, the date it was issued, and how long their bank typically takes to show it.
Ticket if missing: “Where’s my refund?” This is the big one, and the one most likely to turn into a dispute.

Moment 5: “Anything else I need to know?”

When: whenever something unusual happens: a partial refund, a deduction, a delay, a question about condition.
What they need: a clear, human explanation, before they notice something unexpected on their statement.
Ticket if missing: “Why was I refunded less than I paid?”

Templates for each moment

Adapt these for your emails and status page.

Moment 1: Request received

We’ve got your return request for order #6120 (return number RET-1043). We’ll review it within one working day and email you with next steps. You can check its status any time in My Account → Returns.

Moment 2: Approved

Good news: your return RET-1043 is approved. Please send the item(s) to [address] within 14 days, with your return number inside the parcel. [Your prepaid label is attached.] When you’ve sent it, add your tracking number in My Account → Returns so we can watch for it.

Moment 3: Received

Your return RET-1043 has arrived. We’ll check it within [2] working days and then process your refund.

Moment 4: Refunded / completed

We’ve refunded $24.30 to your original payment method today. Most banks show refunds within 5–10 working days. Your return RET-1043 is now complete. Thanks for shopping with us.

Moment 5: Something unusual

We’ve received your return RET-1043. One of the two items was returned without its tags, so under our returns policy we’ve refunded $22.50 for the other item. If you have any questions, just reply to this email.

Two ways to answer: push and pull

Customers get information in two ways:

  • Push: emails sent at each moment. Proactive, but easy to miss or land in spam.
  • Pull: a status page they can check whenever they want. Always there, always current.

You need both. Emails tell people something changed; the status page answers the question at 11 p.m. on a Sunday when they wonder, again, whether you’ve received the parcel.

What a good return status page shows

Mock-up of a return status page in My Account showing the return number, an Approved status badge, the order and item, return address, prepaid label, a field for the customer's tracking number, refund details, a team note and a cancel button, with a checklist of what a good status page includes.

  • Return number and the order it belongs to
  • Items being returned, with quantities and reasons
  • Current status in plain words (“Approved: please send your item”, “Received: being checked”, “Refunded on 14 Jan”)
  • Next step for the customer, if any
  • Return address and any label
  • Tracking number they’ve added (and a way to add one)
  • Refund amount and date once issued
  • Notes from your team, where relevant
  • A way to cancel the request if they change their mind

Writing refund timing honestly

The most common WISMR trigger is the gap between “we refunded you” and “the money appears”. Card refunds commonly take several working days to show on a statement, depending on the bank. Say so explicitly in the refund email:

“We’ve refunded $54.20 to your Visa ending 4242 today, 14 January. Most banks show refunds within 5–10 working days. If you can’t see it after that, reply to this email and we’ll send you the refund reference to give your bank.”

Specific amount, specific method, specific date, an honest timeframe, and a clear next step. That one paragraph prevents more tickets than anything else in this guide.

Before and after: a week of return tickets

Before: a store processing about 60 returns a week by email receives roughly 45 return-related emails on top of the requests themselves: “did you get my request?” (10), “where do I send it?” (8), “did my parcel arrive?” (12), “where’s my refund?” (13), “why is my refund less?” (2). At around five minutes each to find the order and reply, that’s nearly four hours a week of answering questions about things that already happened.

After: requests are made in a portal that confirms them instantly; approval emails include the address and label; customers add tracking numbers and see “Received” on their status page; the refund email states the amount, date and expected bank timing. Most of those 45 emails never get written. The ones that remain are genuine exceptions that deserve a human.

The difference isn’t working harder. It’s that every question now has an answer waiting before it’s asked.

Internal service levels that prevent tickets

Customer-facing updates only help if the steps behind them happen on time. Agree internal targets:

  • Approve or reject within one working day of the request.
  • Mark received the same day the parcel arrives.
  • Refund within two working days of arrival (or on arrival for low-risk returns).
  • Reply to customer notes within one working day.

Track them. When a step slips, the “where’s my refund?” emails come back.

Setting it up with Recirco

Recirco – Returns & Exchanges for WooCommerce is free, and is built to cover all five moments without extra tools.

Pull: a status page in My Account

  • A Returns tab in My Account listing each return with its RMA number.
  • Live status for every return, enforced by a seven-status workflow, so what the customer sees always reflects where the return really is.
  • Your return address and policy text on the page; labels displayed when available.
  • Customers can submit a tracking number themselves and cancel their own request.
  • Customer-visible notes from your team appear alongside the return.

Push: six editable emails

  • Request received (moment 1)
  • Approved and Rejected (moment 2)
  • Completed (moment 4)
  • Customer note (moment 5): send a message to the customer straight from the return
  • Admin alert, so your team knows a request is waiting

All six are editable in HTML and plain text, so you can add the refund-timing wording above. Your team gets an admin queue with a pending badge, status counts, filters and bulk actions, so requests are approved quickly and moment 2 isn’t delayed.

Refunds are created from the return as real WooCommerce refunds, so the refund in the customer’s account, the refund at the gateway and the return’s status all agree. There’s no “the system says refunded but the money hasn’t moved” confusion.

Recirco Pro reduces ticket volume further:

  • Carrier labels via Shippo, generated on approval, so customers get a tracked label instead of asking how to send it.
  • Conditional approval rules for instant decisions on routine returns: moment 2 happens in seconds.
  • Exchanges and store credit with a balance page in My Account, so credit customers can check their balance themselves.
  • Analytics including average days to resolve, the number that predicts WISMR volume.

Don’t forget the team side

Customers aren’t the only ones who need visibility. Your team needs to see, at a glance, which returns are waiting on them: requests to approve, parcels arrived but not checked, refunds not yet issued. A queue with status counts and a pending badge does this. Without it, steps slip quietly, and the customer-facing updates stall with them.

When several people handle returns, a shared view also stops two people answering the same customer, or one promising something the other contradicts. Internal notes on each return keep the story consistent: whoever picks it up next can see exactly what was said and done.

Measuring success

Track these monthly:

  • Return-related tickets per 100 returns. The headline number. It should fall sharply once status pages and emails are in place.
  • Average days to resolve. Faster returns mean fewer “where’s my refund?” messages.
  • Time from arrival to refund. The gap most likely to cause anxiety.
  • Disputes on returned orders. Should approach zero.