Tag Archives: RMA

WooCommerce RMA Workflow: Process Returns Without Duplicate Refunds or Wrong Stock

WooCommerce RMA Workflow: Process Returns Without Duplicate Refunds or Wrong Stock

A return touches four different things at once:

1. The order in WooCommerce
2. The payment in your gateway (Stripe, PayPal, etc.)
3. The stock in your inventory
4. The customer, via email

When returns are handled by email and memory, those four drift apart. The refund goes through twice. The item comes back but nobody restocks it. The order says one thing, the gateway says another, and the customer has heard nothing for a week.

This guide sets out a clean RMA (Return Merchandise Authorization) workflow for WooCommerce, the mistakes it prevents, and how to make the store enforce it.

The five most common return-processing mistakes
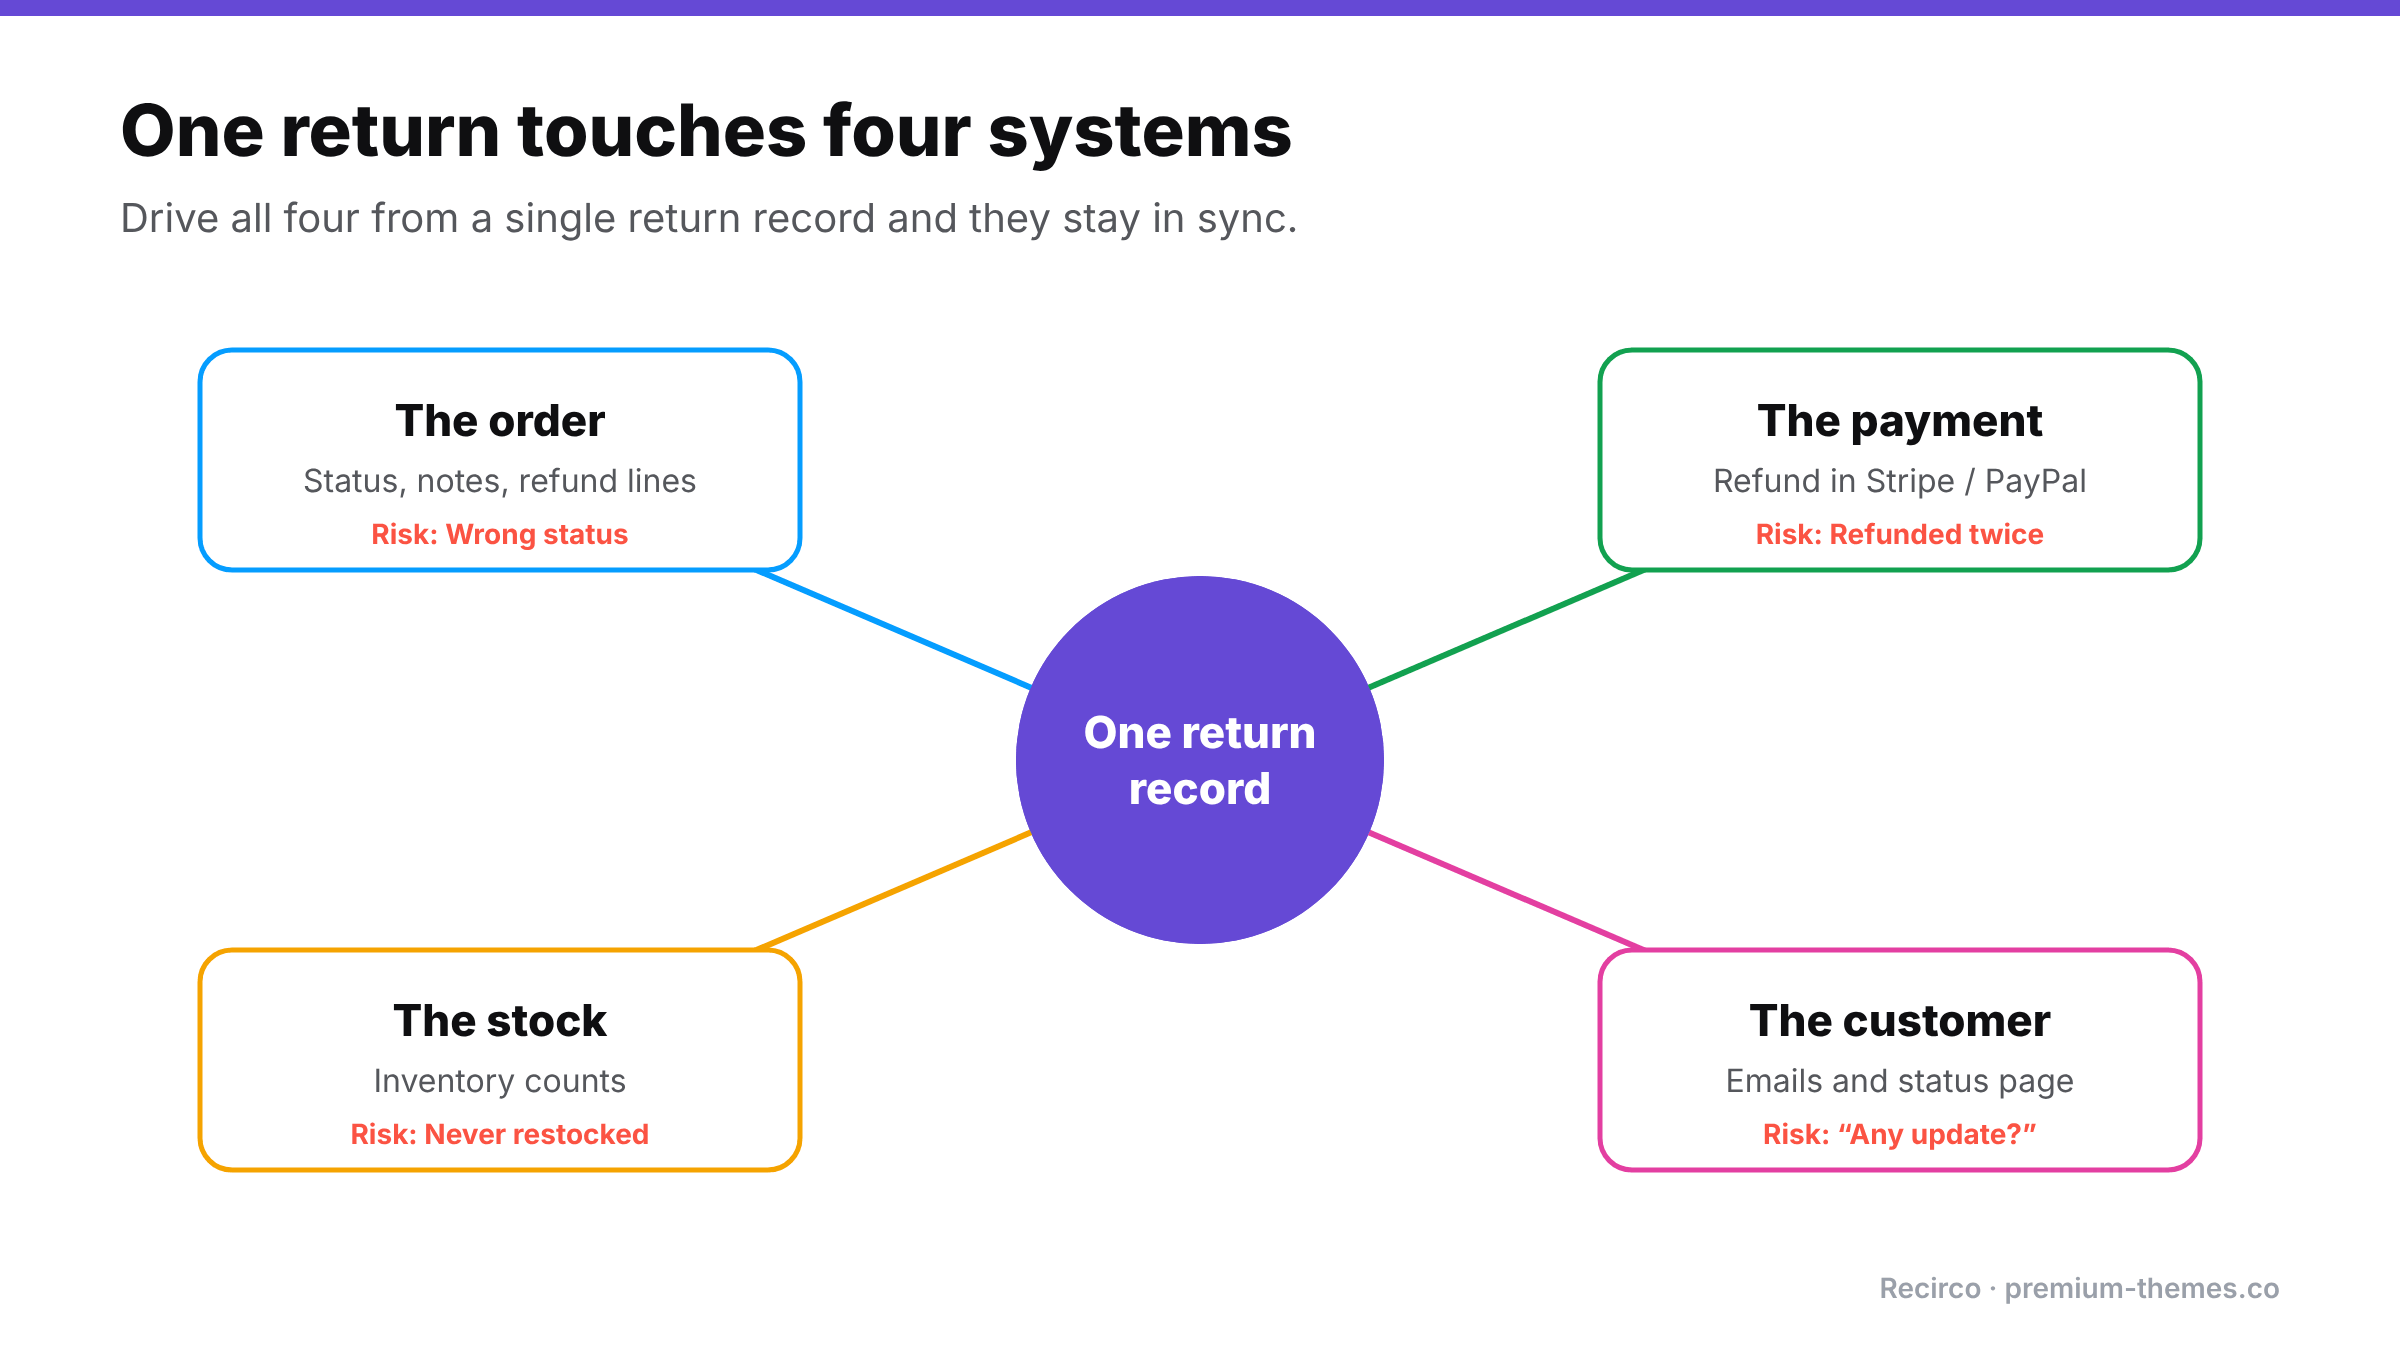
Hub diagram: one return record connected to the order (risk: wrong status), the payment (risk: refunded twice), the stock (risk: never restocked) and the customer (risk: chasing updates).

1. Inventory drift

A returned item comes back, gets put on a shelf, and is never added back to stock in WooCommerce. Over time your counts drift: products show out of stock when you have them, and your reorder decisions are based on wrong numbers.

The opposite happens too: stock is restocked when the return is requested, and the item never actually comes back.

2. Duplicate refunds

There are three places to issue a refund: the gateway dashboard, the WooCommerce order, and (if you use a returns tool) the return itself. When two people use two different places, the customer gets refunded twice. Refunds made only in the gateway may also never reach WooCommerce, so your records still show the order as paid.

3. Unenforced return windows

Without a system checking dates, late returns get approved to avoid arguments.

4. No data on why items come back

Without a recorded reason on every return, you can’t see that one product’s sizing is wrong or one supplier’s quality has dropped.

5. Fragmented records

The return conversation is in email, the refund in Stripe, the stock change in a spreadsheet, and the order in WooCommerce. Answering “what happened with this return?” means checking four places.

A clean WooCommerce RMA workflow

Here’s a workflow that avoids all five. The key idea: one record per return, moving through fixed statuses, with refunds and stock changes triggered from that record.

1. Request

(Setting this up from scratch? Follow our step-by-step returns portal guide.)

The customer requests a return from My Account, choosing the order, items, quantities and a reason. The system checks eligibility: inside the window, not already refunded, not an excluded product. An RMA number is issued.

2. Review and approve (or reject)

Your team reviews the request in a queue, sees the order history and reason, and approves or rejects with a note. The customer is emailed either way. If approved, they get the return address.

3. In transit

The customer ships the item and adds a tracking number.

4. Received

The item arrives and is inspected. This is usually the right moment to restock, because you only add back stock you physically have, in sellable condition.

5. Refund (or exchange, or credit)

The refund is created from the return record, as a proper WooCommerce refund that is optionally sent to the gateway in the same step. Because it’s linked to the return, the system can prevent a second refund for the same items.

6. Completed

The return is closed, the customer is notified, and the full history stays in an activity log.

When should you restock?
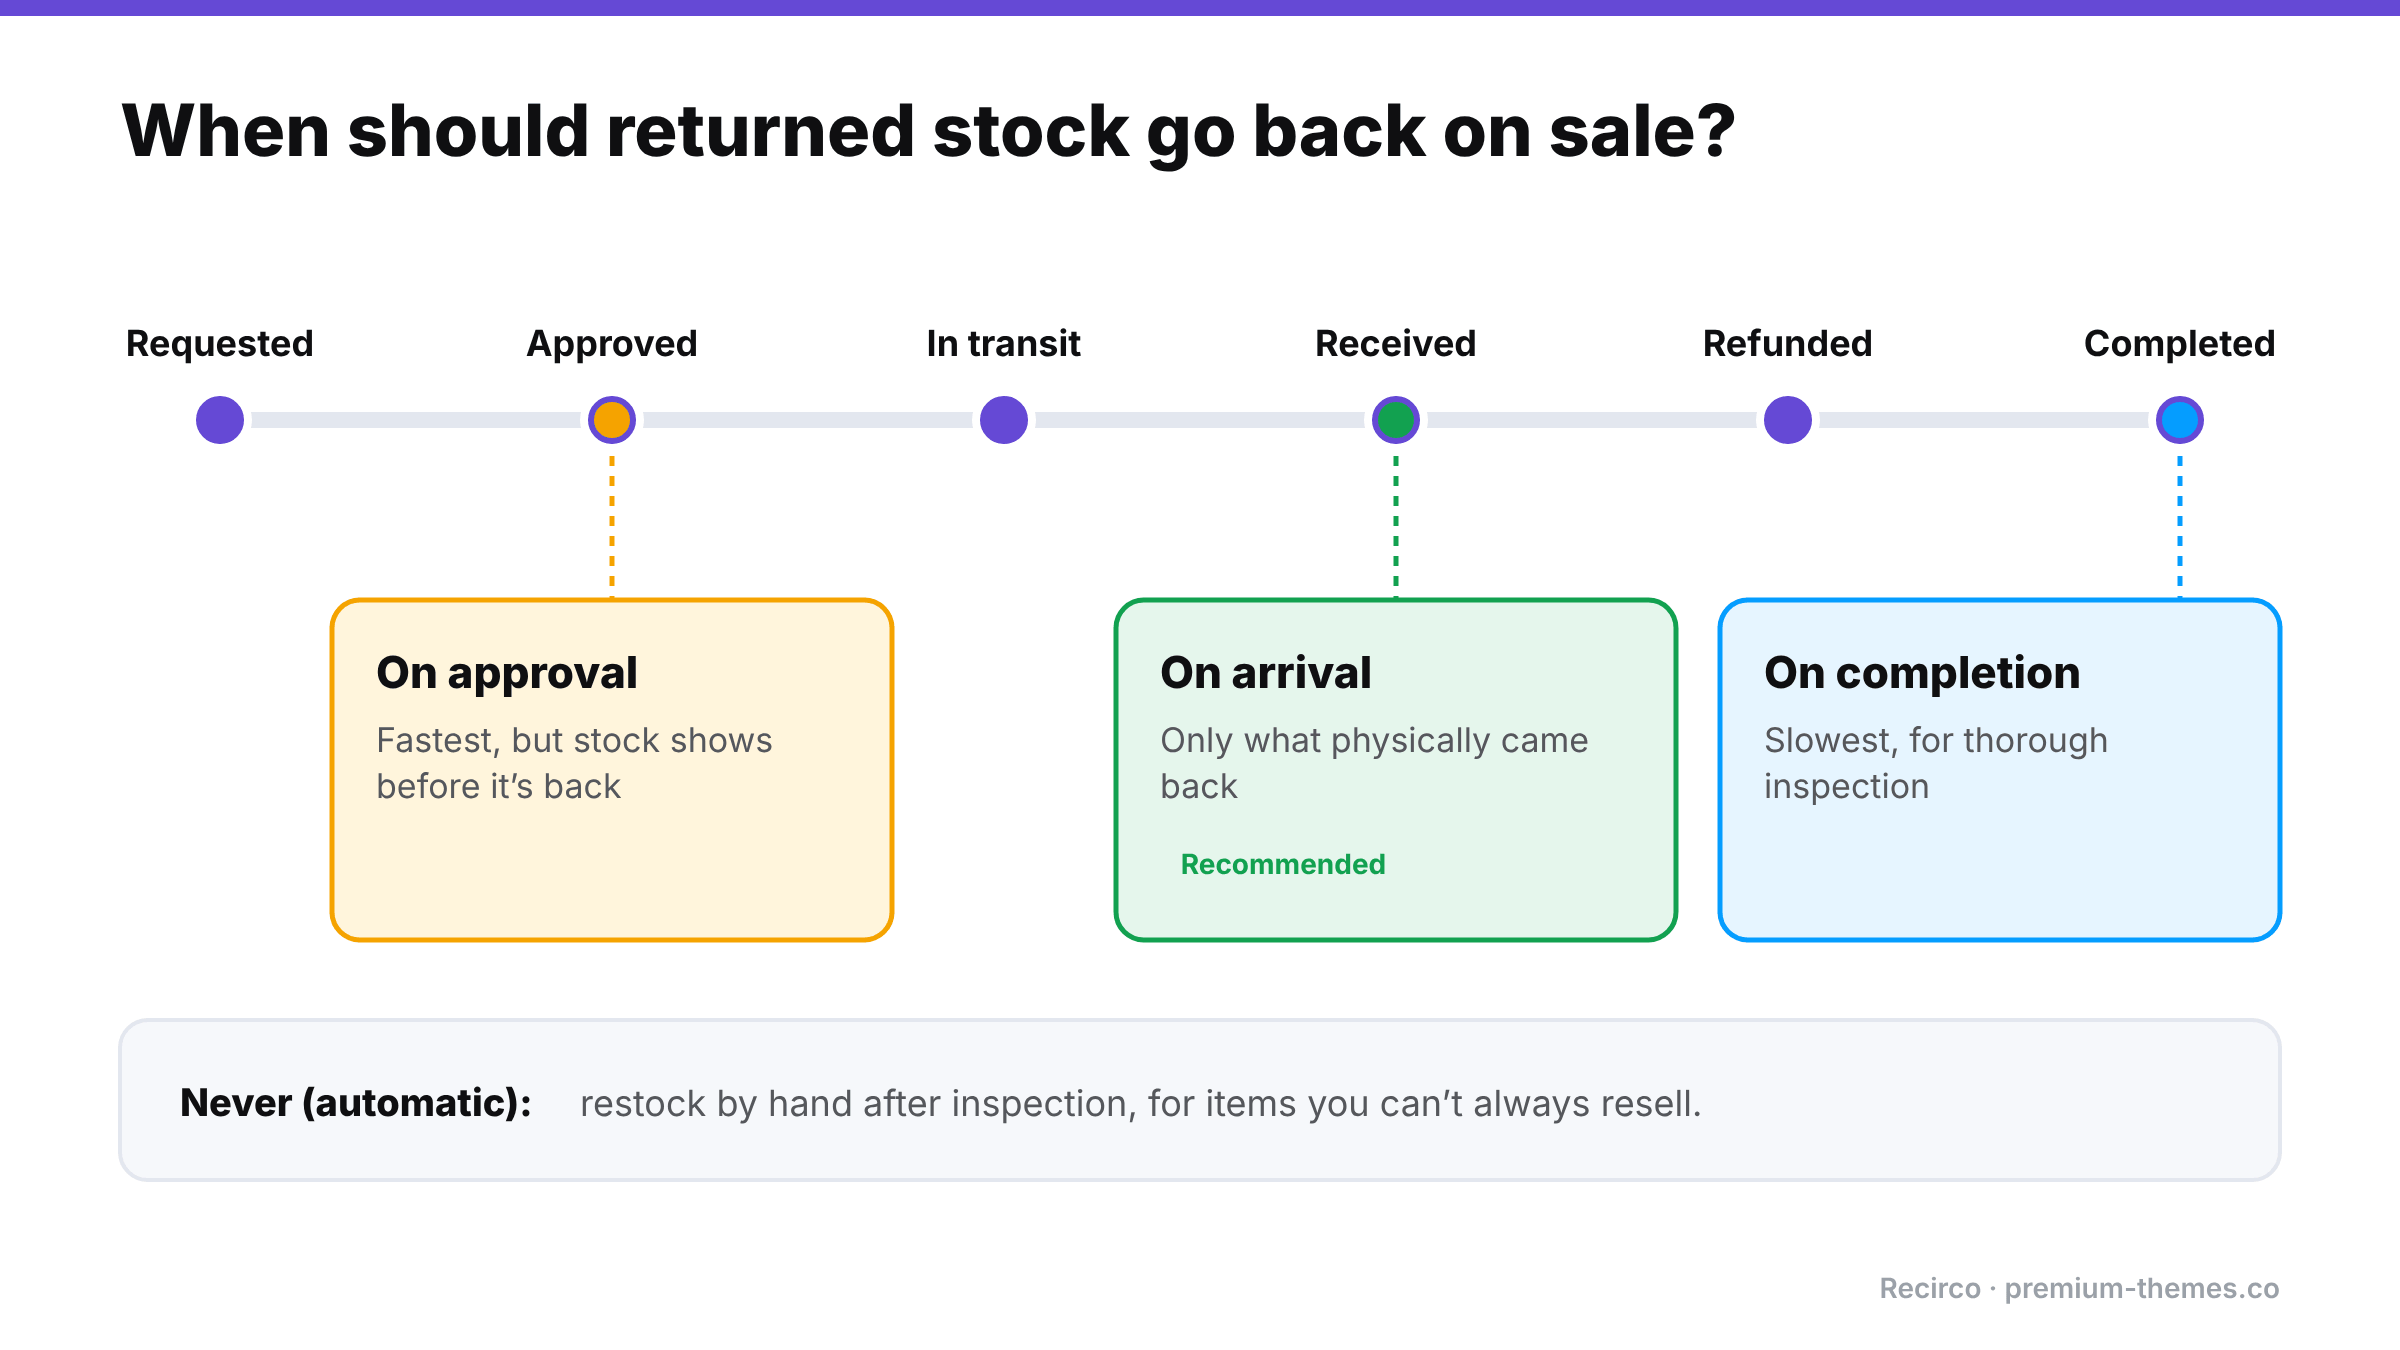
Return status timeline from requested to approved, in transit, received, refunded and completed, with four restock options: never (restock by hand), on approval (fastest but stock shows before it's back), on arrival (recommended), and on completion (slowest).

If you’re not sure, use on arrival.

Getting refunds right in WooCommerce

A few things worth knowing about how WooCommerce refunds work:

  • Refund from the order, not the gateway. On the order screen, Refund via [gateway] sends the money and records the refund in WooCommerce. A refund made only in the gateway dashboard may never be recorded in WooCommerce.
  • “Refund manually” records a refund in WooCommerce without sending money. Use it when the money was already returned another way (for example, already refunded in the gateway).
  • Partial refunds need the tax split. If you refund one line item, the refund should include the correct share of that line’s net amount and tax. Getting this wrong makes your tax reports inaccurate.
  • “Restock refunded items” on the WooCommerce refund screen adjusts stock at the moment of refund. If your returns tool already restocked on arrival, don’t restock again.
  • Fully refunded orders should move to Refunded. A fully refunded order still sitting in Processing can get shipped by mistake.

Making WooCommerce enforce the workflow

The free Recirco – Returns & Exchanges for WooCommerce plugin is built around exactly this workflow:

  • Seven statuses enforced by a guarded state machine. A return can only move to a valid next status, so steps can’t be skipped or reversed by accident.
  • Restock timing you choose: never, on approval, on arrival, or on completion.
  • Refunds from the return: creates a real WooCommerce refund, optionally sent to the gateway, with net and tax split from the original line. Auto-refund on completion is optional and off by default, and the plugin is designed to prevent duplicate refunds for the same return.
  • Admin queue with search, filters, status counts, a pending badge and bulk approve, reject, mark received and delete.
  • Activity log on every return and a panel on the order edit screen, so the order and its return are in one place.
  • Internal notes or notes emailed to the customer.
  • Six editable emails covering every step.
  • Return windows, eligible statuses, excluded products/categories and reasons.
  • HPOS compatible, data in three dedicated custom tables, and no outbound calls.
  • 26 documented actions and 29 filters for developers who want to connect returns to an ERP, warehouse or helpdesk.

It writes to your orders only when you tell it to.

Recirco Pro adds automation on top: conditional approval rules, carrier return labels via Shippo generated on approval (cheapest rate by default, with manual label upload as a fallback), exchanges, store credit, analytics, and warranty claims with serial numbers and photos.

Is your current process leaking? A quick audit

  • [ ] Can you list every open return and its status in under a minute?
  • [ ] Is there exactly one place your team issues return refunds?
  • [ ] Are returned items restocked at a consistent, defined moment?
  • [ ] Does every return have a recorded reason?
  • [ ] Can a customer see their return’s status without emailing you?
  • [ ] Are late returns rejected by the system, not by a person?

If you answered “no” to two or more, a structured RMA workflow will save you time and money.

Restock timing Good for Risk
Never (automatic) Items that can’t be resold; manual inspection You must remember to restock by hand
On approval Very fast-moving stock, trusted customers Stock shows available before it’s back
On arrival Most stores Small delay before stock is available
On completion Stores that inspect thoroughly before closing Longest delay
How to Add a Self-Service Returns Portal to WooCommerce (Free, Step by Step)

How to Add a Self-Service Returns Portal to WooCommerce (Free, Step by Step)

WooCommerce can issue refunds. What it can’t do out of the box is handle returns.

There’s no way for a customer to request a return from their account, no approval step, no RMA number, no return reasons, no return window. So most stores end up running returns through email: “Hi, I’d like to return my order…” followed by a back-and-forth to find the order number, which item, why, whether it’s still in the return window, and where to send it.

That works at five returns a month. At fifty, it becomes a part-time job and a source of mistakes: forgotten restocks, refunds issued twice, late returns approved because nobody checked the date.

This guide shows how to replace that email thread with a proper self-service returns portal, for free.

Why it’s worth doing

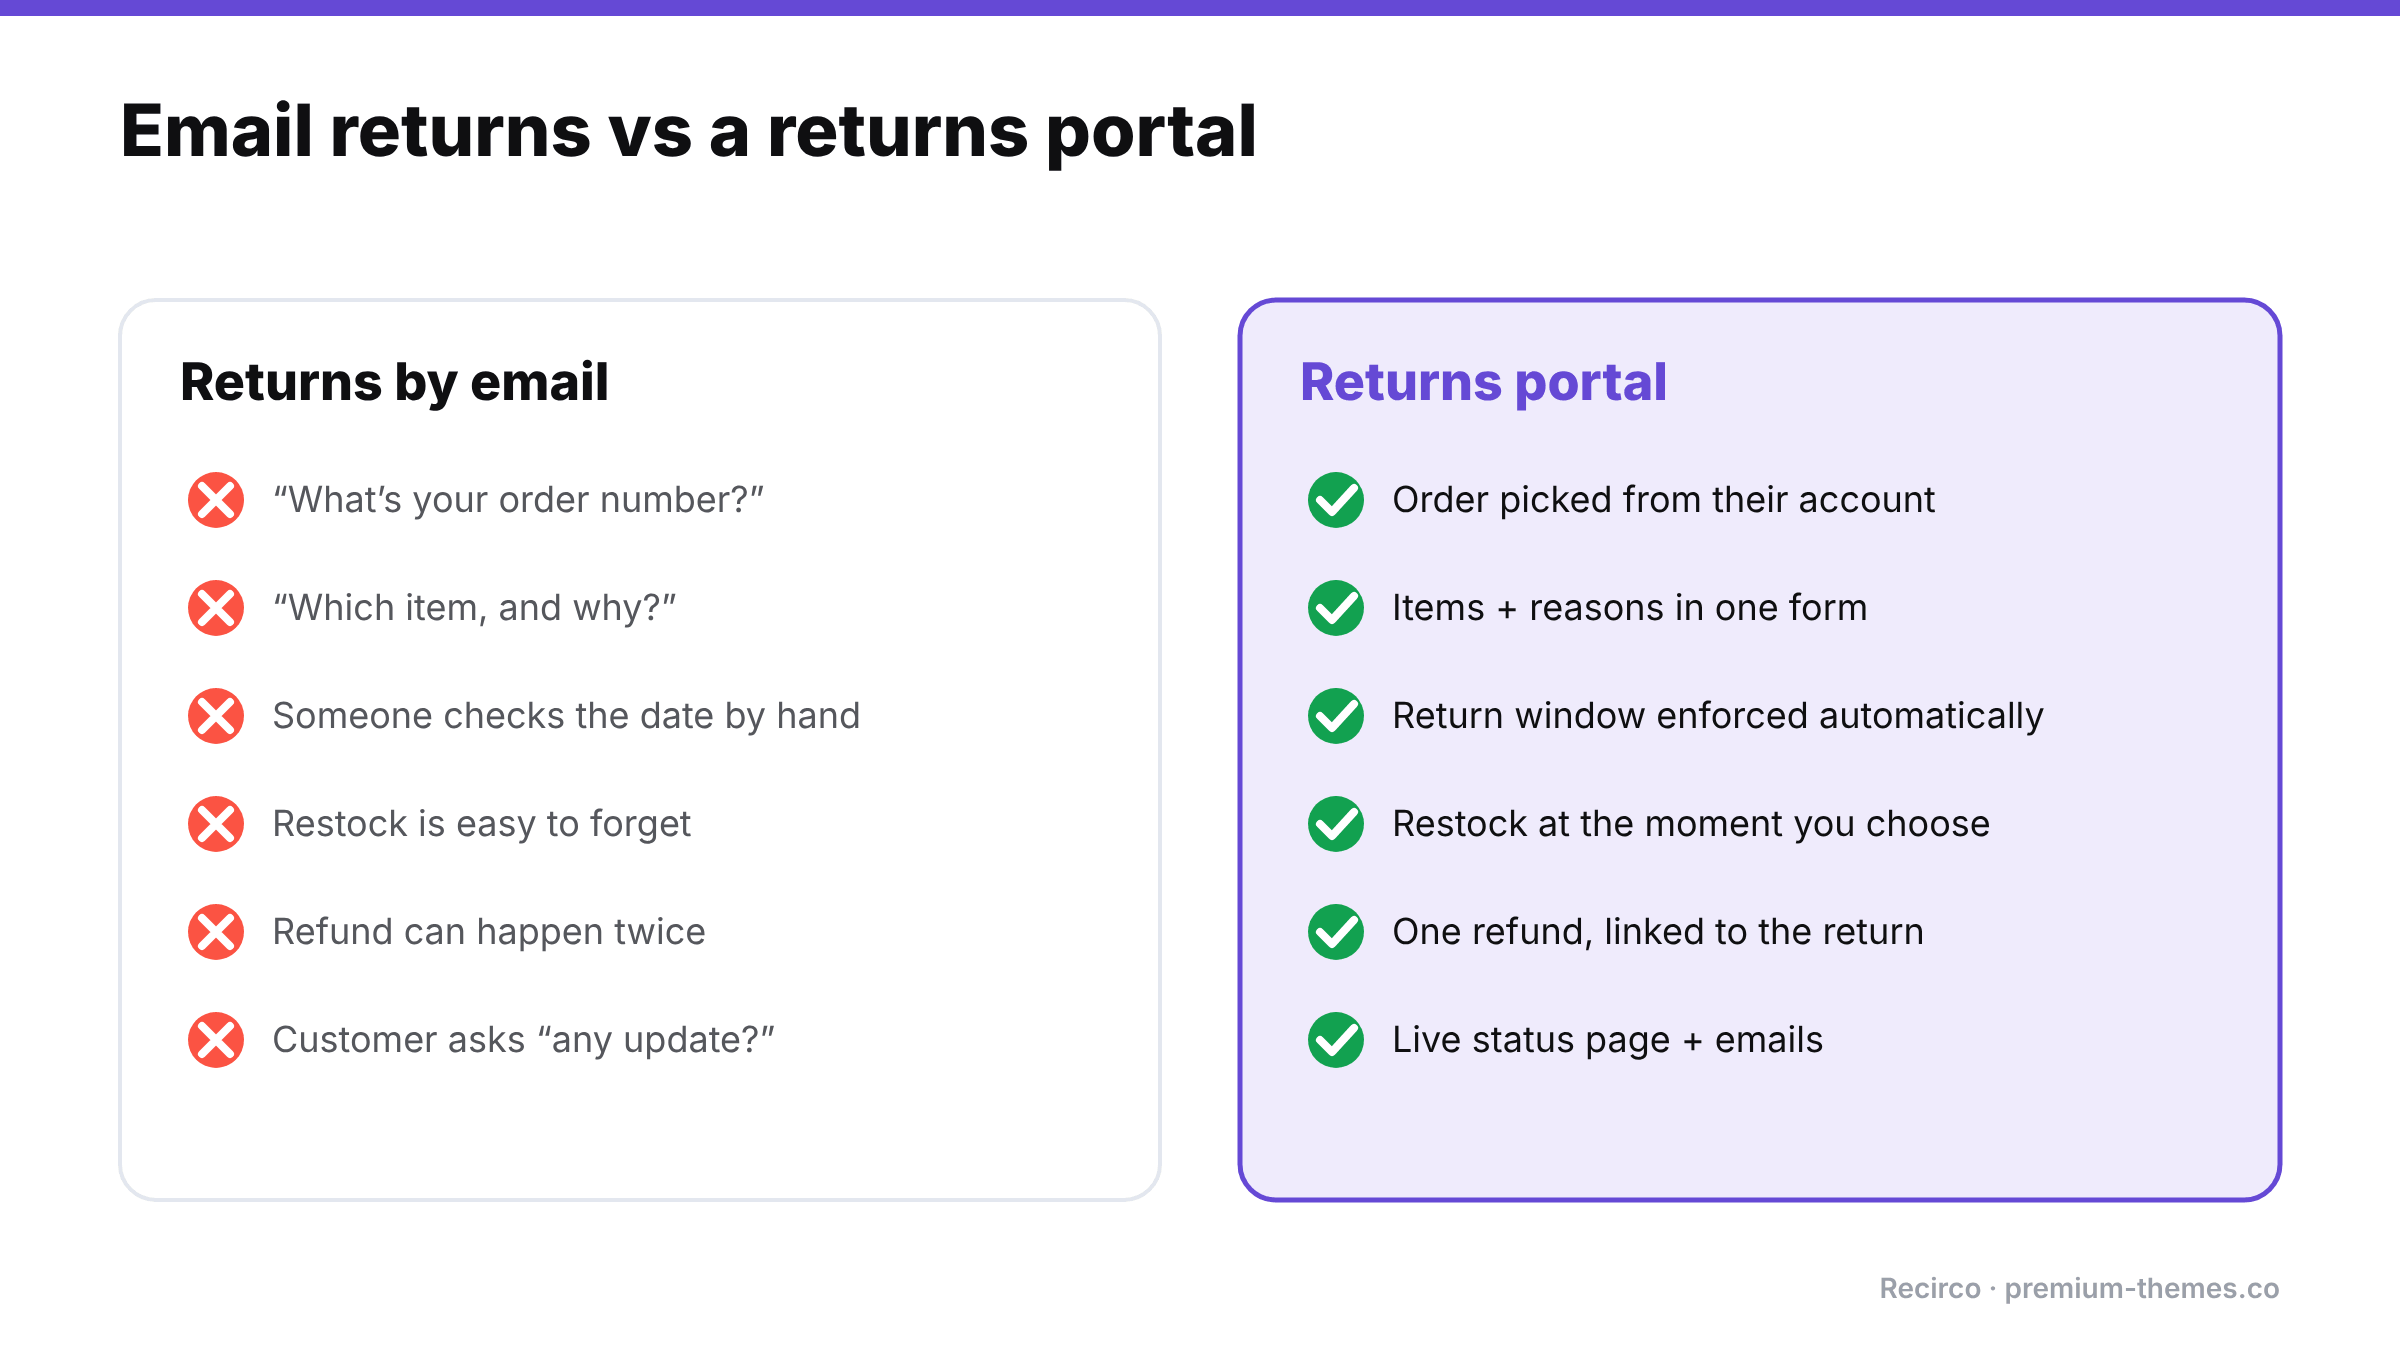
Comparison. Returns by email: asking for the order number, item and reason, checking dates by hand, forgotten restocks, double refunds, and customers chasing updates. Returns portal: order picked from the account, items and reasons in one form, window enforced automatically, restock at a chosen moment, one linked refund, and a live status page.

Returns aren’t an edge case. The National Retail Federation estimated that 19.3% of online sales would be returned in 2025, and that 76% of consumers are more likely to choose a retailer offering an instant refund or exchange. 71% said they’re less likely to shop with a retailer again after a poor returns experience (NRF, October 2025).

A clear, self-service returns process does three things:

  1. It cuts support time. Customers submit everything you need in one go.
  2. It enforces your policy consistently. The system checks the return window, not a tired staff member.
  3. It builds buying confidence. Shoppers check returns policies before they buy. An easy process removes a reason to hesitate.

What a good WooCommerce returns portal needs

For customers:

  • A Returns area inside My Account, not a separate form they have to find
  • Only eligible orders and items offered (inside the return window, not already refunded, not excluded)
  • Per-item quantities and a reason for each
  • A status page showing what happens next, where to send the item, and an RMA number
  • The ability to add a tracking number and cancel their own request

For your team:

  • A single approval queue with search, filters and bulk actions
  • A clear status workflow that can’t be skipped or reversed by accident
  • Restocking at the right moment
  • Refunds created from the return, with no double-refunding
  • Notes (internal and customer-facing) and an activity log
  • Emails at each step

Step-by-step: setting up a free returns portal with Recirco

We’ll use Recirco – Returns & Exchanges for WooCommerce, a free plugin on WordPress.org. It requires WordPress 6.2+, PHP 7.4+ and WooCommerce 7.0+, supports HPOS and block checkout, and makes no outbound calls. Your returns data stays in your own database.

Step 1: Install and activate

Go to Plugins → Add New, search for Recirco, install and activate. WooCommerce must already be active.

Step 2: Set your return window

Go to WooCommerce → Returns settings and set:

  • Return window (days). How long customers have to request a return.
  • What the window counts from: the order’s completed, paid or created date. “Completed” is usually fairest if you mark orders complete when they ship or are delivered.
  • Eligible order statuses. Typically Completed (and Processing if you allow returns before shipping is marked complete).

Selling to EU customers? EU consumers have a legal right to withdraw from most online purchases within at least 14 days of receiving the goods. Set your window to at least that. More on this in our WooCommerce return policy guide.

Step 3: Exclude what can’t be returned

Exclude specific products or categories such as final-sale items, personalized products, underwear or perishables. Excluded items simply won’t appear as returnable in the portal.

Step 4: Set up return reasons

Recirco comes with six common reasons pre-loaded. You can edit them and choose which ones require an explanation. For example, “Damaged or defective” might require details, while “Changed my mind” doesn’t. Good reason data is how you’ll later reduce your return rate.

Step 5: Add your return address and policy text

Add the address customers should send items to and a short policy summary. Customers see these on their return status page along with the RMA number. You can set your own RMA prefix (e.g. ‘RMA-‘ or ‘RET-‘), customize the portal’s URL slug, and adjust the policy text.

Step 6: Choose when stock goes back

Pick when returned items are added back into inventory: never, on approval, on arrival, or on completion. For most stores, on arrival is safest. You only restock what physically came back.

Step 7: Review the emails

Recirco sends six editable emails (HTML and plain text): request received, admin alert, approved, rejected, completed, and customer note. Adjust the wording to match your brand voice.

Step 8: Test it as a customer

Log in as a test customer with a completed order, open My Account → Returns, and submit a request. If the Returns page shows a 404, go to Settings → Permalinks and click Save once to refresh WordPress’s URL rules.

What processing a return looks like

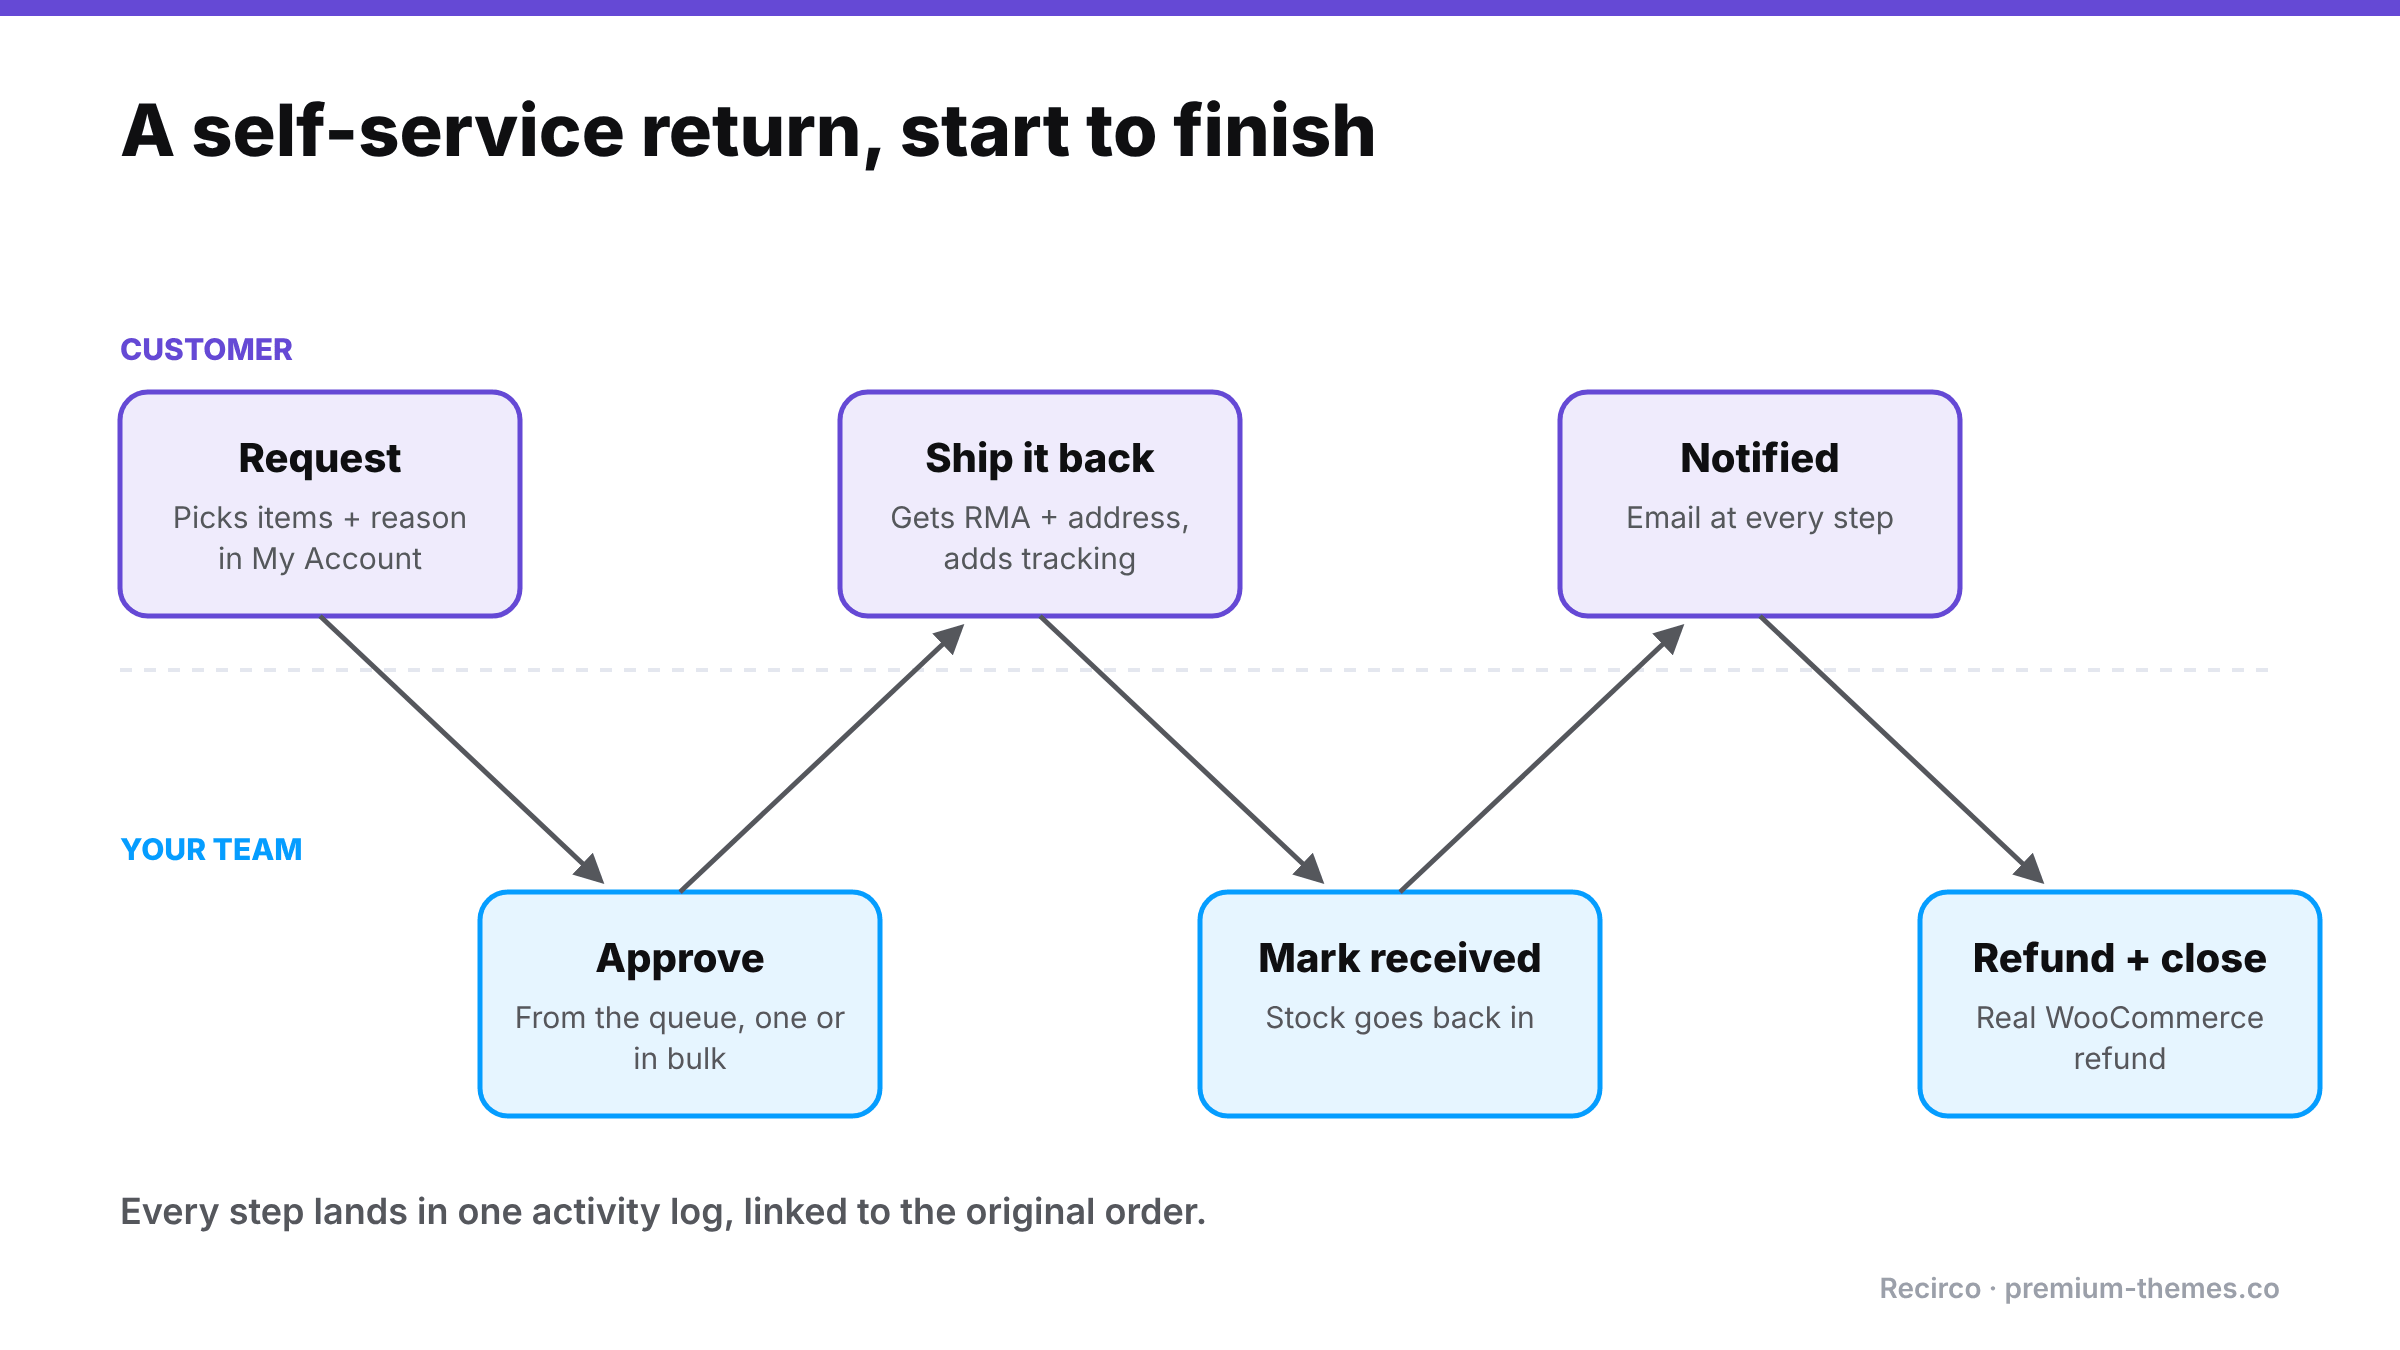
Return lifecycle alternating between customer and store: customer requests a return in My Account, team approves it, customer ships it back with the RMA number and tracking, team marks it received and restocks, customer is notified, team issues a WooCommerce refund and closes it. Every step is in one activity log.

(For the reasoning behind each step, see our WooCommerce RMA workflow guide.)

  1. The customer submits a request. You get an admin alert and see it in the queue with a pending badge.
  2. You (or a teammate) open it, review the items, reasons and order, and approve or reject. Several at once with bulk actions if you like.
  3. The customer gets the approval email with the RMA number and return address, ships the item, and adds a tracking number.
  4. When the parcel arrives, you mark it received. Stock is restocked if you chose on arrival.
  5. You create the refund from the return. Recirco creates a proper WooCommerce refund, optionally sent through your payment gateway, with net and tax split from the original line. Auto-refund on completion is available but off by default.
  6. The return is completed and the customer is notified. Every step is in the activity log, and a panel on the order edit screen shows the return.

Going further: exchanges, store credit and labels

The free plugin is a complete returns system. If you want to keep more revenue from returns and automate the busywork, Recirco Pro adds:

  • Exchanges and variant swaps. Customers pick a replacement size or colour, and a zero-total replacement order is created on completion.
  • Store credit with an optional bonus percentage and expiry, applied at checkout.
  • Conditional approval rules to auto-approve, reject, flag or hold requests.
  • Carrier return labels via Shippo, generated on approval.
  • Returns analytics: reasons, most-returned products, value returned and time to resolve.
  • Warranty claims with serial numbers and photo uploads.

We go deeper on why exchanges matter in Exchanges vs refunds.